Welcome to my blog!

Thanks for visiting my blog. As the title suggests, I love to scrapbook, stamp, and sing! I will share cards and scrapbook pages I create, as well as information about my music - Barbershop harmony.

Saturday, August 31, 2024

Final Day for the August 2024 Die Cut Divas Challenge!

Hey everyone - I'm part of the end of month post at Die Cut Divas today. We're sharing last minute inspiration for our August Challenge with the theme of embossing & sponsored by SheepSki Designs.. It ends tonight at 9pm Pacific time. 

I shared card one below but also have two bonus cards only here:


Supplies: Paper - My Favorite Things black;
Copic & printer friendly white; scrap of pink
Digi - SheepSki Designs Floral Heart
Dies - Hero Arts Thinking of You Stamp & Cut;
Lawn Fawn Platform Pop-Up (bow)
Lifestyle Crafts Nesting Lace Circles
Other - Copic Markers; Versamark ink; 
Ranger clear embossing powder


For my first card, I used the same heart image as a previous card but minus the butterfly. Once again sister Diva Arlene (A Bit of This and That) printed off some images and she made this one larger than the other. Too large for an A2 card so I decided to make it a circle card. I found an old QuicKutz scalloped circle die set - the largest one was a perfect fit! I die cut two from black cardstock and scored the back before adhering together & adding the heart circle (colored with Copics). I'd planned to wet emboss a sentiment this time & did. Just not the usual stamp & emboss. Instead, I applied Versamark ink to a black die cut and clear embossed it - such amazing shine!

After assembly, I noticed a black Copic stain on my circle - darn it! I had used a Copic 100 marker to color the edges of the scallops & my fingers were a bit stained. It was a small spot but I couldn't cover it up with a white gel pen. So I die cut a LF bow and added to the card to cover the spot. The tail piece of the bow is horizontal when die cut but I snipped it in half and glued the tails hanging down. Good save, eh?

Ready for a couple bonuses? First a daffodil card:


Supplies: Paper - Copic/printer friendly cardstock;
Paper Studio A2 card
Stamps - unk for sentiment
Dies - Elizabeth Craft Stitched Rectangles (retired)
Other - Copic Markers; Hero Arts Pitch Black ink;
Versamark ink; Ranger clear embossing powder

I colored the daffodils three different ways based on photos I found on google. On the SheepSki site for this image, the inspiration photo has some hand drawn lines on the glass vase so I tried to replicate that. Thought it added some shape to it. This time I stamped and clear embossed the sentiment. Put the stamp set I used in a safe place, then couldn't find it to note the brand - oh well...

For my final bonus, I got another Christmas card made!! Arlene sent me this sweet birdie image and I had fun coloring it with Copics. Added some sparkle to the snow and matted it in black. Embossed a 4.25x5.5 piece of Bermuda cardstock using a new Honey Bee embossing folder. Since the folder is newly used, I'll send this card to Darnell's August NBUS Challenge #65.


Supplies: Paper - Copic/printer friendly cardstock;
Hero Arts Bermuda; MFT black; Paper Studio Glitter
Digi - SheepSki Designs Winter Robin
Dies - Elizabeth Craft Stitched Rectangles (retired);
Recollections Handwritten Works (retired)
Embossing Folder - Honey Bee Snowflakes 3D
Other - Copic Markers; Hero Arts Sparkle lacquer

The JOY came out of the bits box where it had languished forever! I had to search my blog to find what brand it was (Michael's) - LOL. Anyway, it was cut with a bright pink glitter paper but my berries were red and I wanted red. So I colored it with increasingly darker red Copics - still retained some pink so I added some dark pinkish Copic to my berries - good enough!

That's it, friends - hope to see your last minute creations in the August Diva Gallery using embossing. If it's wet embossing, be sure to include a die cut in your design!

Thanks for visiting & happy crafting!!


Friday, August 30, 2024

Craft Roulette 230

Hello everyone - Happy Friday night!! I typically don't post twice in one day but I watched Craft Roulette Episode #230 live tonight & yes, I made my card during the show. Decided to just go ahead and post since I have a busy day tomorrow...


Supplies: Paper - Neenah Solar White; 
Hero Arts Layering Paper (retired);
My Favorite Things plaid
Stamps - Hero Arts Four Hearts (c2012 retired)
Other - Hero Arts & Memento inks;
Park Lane gems; printed sentiment

Mary Gunn FUNN had Lea Lawson (@LeaLawsonCreates) as her guest. Lea is a crafter plus the Marketing Manager at PinkFresh Studio. Here's what the wheel spun for us:


  • Project - Shaped Card: I made a postage stamp shaped card.
  • Colors - Peacock: I used blue/green/purple.
  • Element - Tall: I made a tall mini-slim card.
  • Random - XOXO: The heart I stamped is printed with XOXOs.

I die cut two mini slim sized postage stamps, scored the back one and adhered the front one. Added a mat layer die cut with the next smaller postage stamp. Stamped and white embossed the heart, then inked with green/blue/purple. Fussy cut it & added to the card with foam tape, then glued a stripe sentiment across it. Three gems completed the card.

That's it for tonight! Please stop back tomorrow for our last of the month Die Cut Diva post & thanks for visiting!

Inspired by Bobby at Just Us Girls!

TGIF everyone! Just a quick post this morning with a card I finished for the current Just Us Girls Challenge #742 to CASE one of the design team members. Here's my card inspired by Bobby's beautiful card!


Supplies: Paper - Tim Holtz watercolor; Poptone Black;
Spellbinders A2 card & Betterpress porcelain
Stamps - Hero Arts Elegant Weeds (c2011 retired)
Press plate w/dies - Spellbinders You Are Everything Sentiments
Other - Faded Jeans & Blueprint Sketch Distress Stains; 
Betterpress Costal Ink; foam tape; 
Ranger Seafoam white ep; Versamark ink

I was drawn to the white embossed weeds and deep blues on Bobby's card. I stamped and white embossed using a retired Hero Arts weeds set onto watercolor paper. My weeds didn't emboss as crisply as I would've liked, oh well.

Next I swiped Distress Stains over the paper - loved this look! Spritzed it a bit for some water droplets, dried it & then die cut with a stitched rectangle. Adhered to an A2 card & finished it off with a Betterpressed sentiment from the bits box. Quick & easy!

That's it for today. I'll be back tomorrow with the last-of-the-month post for Die Cut Divas. We have embossing for our August Challenge & would love to see you there!

Thanks for stopping by & happy crafting!!

Wednesday, August 28, 2024

Floral Celebration Threefer

Hey everyone - hope all is well with you! I'm back with my second entry of three allowed at Just Us Girls Challenge #741 (Anything Goes Stencil Week) and third of three at Color Hues #93 (Orange and Yellow), plus I have a couple bonus cards.


Supplies: Paper - Recollections yellow glitter;
Paper Studio pastel A2 card; scraps;
Spellbinders Betterpress Porcelain
Press Plate with Stencils - Spellbinders Floral Celebration and Stencil Bundle 
Press Plate with Dies - Spellbinders A Little Message Sentiments 
Dies - Hero Arts Tag Frames Infinity Dies;
Other - Park Lane gems; various inks; foam tape

I pressed the new-to-me Floral Celebration plate using Bark ink & colored in orange/yellow/brown (neutrals allowed) using the coordinating stencils. It's a 6 step process and I have a photo of step 6 along with the inks I used (lower right ink is a Hero Arts gold):


There was room at the top of my 5x7" panel to press a couple of sentiments which I did using Saffron ink. I die cut both plus some shadow layers. I die cut the floral panel with three different stitched rectangles from the same AJVD set so I had two extras for bonus cards:


Additional supplies: Scrappy Tails dies from Bloom Trio Bundle;
My Favorite Things plaid paper & scraps


Additional supplies: Elizabeth Craft Designs retired stencil

That's it for today! I'll also send card one to Darnell's August NBUS Challenge #65 since my press plate bundle is newly used here.

Thanks for stopping by & happy crafting!!


Monday, August 26, 2024

An Anything Goes Monday!

Happy Monday friends! I'm playing today with Darnell's (djkardkreations) IDEAS program where on the 4th Monday of the month Anything Goes!! You can see her beautiful inspiration HERE. I'd been working on another card using some PFS washi so decided to finish it this morning:


Supplies: Paper - Recollections A2 card; scraps;
Neenah Solar White; Spellbinders Betterpress Porcelain;
Washi - Pinkfresh Studio English Garden
Dies - Pinkfresh Studio English Garden &
Folk Edge Rectangles 
Press Plate w/Die - Spellbinders You are Everything Sentiments
Embossing Folder - Tim Holtz Cobblestone 3D

I mentioned back in July that I'd found the PFS English Garden still available at my local store and finally dove in (see a card with the stamps & stencils HERE). It's retired at PFS but I see Frantic Stamper still has the stamps & dies HERE

I'd added the washi to a piece of Neenah & cut a bunch of pieces & made a birthday card which I'll share next. The floral clusters above were leftovers. If desired, you can see a card HERE made with some English Garden washi pieces that Lisa (My Paper Tales) sent me last year; she enabled me!

The washi pieces were sitting atop a piece of cardstock I'd embossed with the TH Cobblestone folder. I wanted to cut it down with the Folk Edge die which flattened the 3D texture but I didn't really care. I could've re-embossed it but I was too lazy! You can see the 3D texture on the next card.


This card went to my sister Tami who has a bday this week. The die cut birthday and the printed HAPPY were in my sentiments box - brand unknown.

I'm entering card one in the August Pinkfresh Studio Challenge to use washi. You don't have to use the colors in their photo; that's one option.

That's it for today - thanks for visiting!! Hope you have a crafty Monday & if interested, check out our Die Cut Diva August Challenge where our theme is embossing!


Saturday, August 24, 2024

A Faux Envelope Card for Craft Roulette 229

Welcome everyone - yay, it's the weekend!! I spent an enjoyable Friday night watching Craft Roulette Episode #229 live on my laptop while checking the Twins game on Apple TV - gotta love multiple devices! Sadly, the Twins lost to the Cardinals but we have another opportunity to best them tonight... Since I was multitasking, I didn't finish my card until after the live show ended.

Here's my card for CR#229:


Supplies: Paper - Neenah Solar White; 
scraps; an old envelope
Stamps with dies - Sunny Studio Heart Bouquet (dies HERE)
Dies - Spellbinders Layered Mix & Match Sentiments (DOM-Sep21);
My Favorite Things Blueprints 26 (bow)
Other - Copic Markers

Mary Gunn FUNN had Karen Burniston (@KarenBurniston) as her guest. Karen is well known in the crafting world for her pop-up dies & she used some during the show. The wheel spun some interesting parameters this week - can you guess just from looking at my card? Here they are:


  • Project - Faux Envelope: I made an envelope into an A2 card.
  • Colors - Berries: I used blues, reds & purples from various berries.
  • Element - Strings: Image has strings; also strings on inside.
  • Random - Overlap: Envelope flap overlaps onto the card base.

To make the envelope card, I trimmed the sides and bottom of a real envelope to the size of an A2 card. Setting the envelope back's bottom piece aside, I glued a piece of patterned cardstock on the inside part of the envelope front. Next I glued the back's bottom over the patterned paper, just along the sides and bottom, leaving an opening. 

Next I die cut a tag and stamped the sentiment, added some string & popped it into the envelope. Then I worked on my balloons. The balloon die doesn't include the strings so I stamped the balloon image (that includes the strings) and added the string tails, then fussy cut it. Stamped the balloon again, used the die & colored with Copics. Glued the die cut over the fussy cut balloons with the strings. Added them to the flap with the strings dangling as the overlap. Decided to do a layered birthday sentiment so die cut the words and outline, assembled & added to the card. 

Here's a view of the envelope card open with the tag pulled up. The tag fits inside perfectly to close the envelope and, since it's A2 sized, it'll fit into an A2 envelope! This is my first time using the balloon set - got it when Sunny Studio last sponsored Die Cut Divas - so cute, isn't it?!


Additional Supplies: Paper - scraps;
Doodlebug Design Sweet Things patterned
Dies - Sunny Studio Mini Mat & Tag 3
Stamps - Sunny Studio Inside Greetings Birthday

Since my balloons got first play today, I'll add my card to Darnell's August NBUS Challenge #65. I'll also play at Seize the Birthday #290 using the Anything Goes option.

That's it for today, friends. Thanks for stopping by and have a great weekend!!


Thursday, August 22, 2024

Holiday Elements - Washi and Stenciled

Hi everyone - I hope your week is going well. I was inspired by friend Greta's beautiful card to plan something for the August Pinkfresh Studio Challenge. It's been a few years since I played over there - how time flies!!

I don't have a huge collection of PFS in my stash but had picked up the English Garden washi/stamp/stencil/die collection locally. I haven't shared the washi version on my blog yet (stenciled one HERE) but I made it in July so didn't want to send it to the challenge. Decided instead to order something from PFS & found their Holiday Elements collection on sale - yay! They didn't have the die in stock but I found one at Frantic Stamper. Just received my orders in the mail this week so gave Holiday Elements first play. Here's the washi version:


Supplies: Paper - Park Lane gold A2 card; Paper Studio Holiday;
Michael's pink; Neenah Solar White; Betterpress Porcelain
Dies - Pinkfresh Studio Holiday Elements 
(out of stock at PFS but found HERE at Frantic Stamper)
& Folk Edge Rectangles (retired)
Hot Foil Plate with Die - Spellbinders All You Need Sentiments

I rolled the washi out onto a piece of Neenah, then die cut. Also die cut the shapes from another piece and layered for stability & dimension. Next I die cut two layers of the folk art set and adhered to an A2 card. Arranged the elements and adhered. Could not for the life of me find my foiled PFS holiday sentiments so added a Betterpressed one (made with a hot foil plate). LOL - the only item from the die cut selection that I didn't use was the mistletoe sprig!

Here's the stenciled version which I decided to make since it's Stencil Week #741at Just Us Girls:


Additional supplies: PFS Holiday Elements Stamps & Coordinating Stencils

And here's a process photo with all inks - I'm on the 6th and final step here:


I didn't do any additional shading, just stamped and stenciled, then die cut. This time I just used one of the Folk Edge layer dies on a piece of canvas patterned paper. While I love the gold & shimmer of the washi, I really enjoy stenciling this set! Looking at it, it could use some shading so I may add some later... Since this set is new, I'll also add my card to Darnell's August NBUS Challenge #65.

That's it for today. Thanks for stopping by &, as usual, happy crafting!!


Wednesday, August 21, 2024

Floral Heart

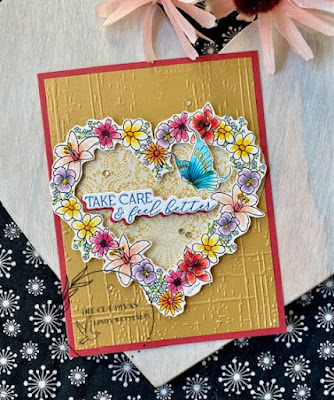
Hi everyone - It's my turn to post at Die Cut Divas today! I'm sharing the card below, plus I have a bonus card only here.


Supplies: Paper - Park Lane gold cardstock;
My Mind's Eye patterned; Paper Studio A2 card;
Betterpress Porcelain
Digi stamp - SheepSki Designs Floral Heart 
Embossing Folder - Taylored Expression Weathered (retired)
Press Plate with die - Spellbinders You Are Everything Sentiments
Other - Betterpress Hydrangea ink; Copic Markers;
Park Lane gems


We have SheepSki Designs as our sponsor this month and for the August Diva Challenge our theme is Embossing - either wet or dry, your choice! Plus you must use a die cut or an embossing folder on your project. For my card, I chose dry embossing & used a retired Taylored Expressions folder on gold cardstock. Trimmed the panel to layer onto an A2 card.

Thanks once again to Arlene (A Bit of This and That) who printed off some Sheepski images since my printer remains offline. I fussy cut the heart wreath and the butterfly, then colored with Copics. I backed the heart with some My Mind's Eye lacy paper & added to the card with foam tape. Added a pressed sentiment, the butterfly and some gems - done!

Ready for a bonus? This time I used an image featuring a trio of vases, colored with Copics, along with another embossed Weathered background.


Additional Supplies: Paper - Hero Arts Dove A2 card
Digi Stamp - SheepSki Designs Mini Vases

That's it for today, friends. We Divas hope to see your project in our August gallery sometime before 8/31/24 at 9p Pacific Time. A random draw from eligible August entries will determine who wins 3 images from SheepSki.

Thanks for stopping by & happy crafting!


Monday, August 19, 2024

More Orange and Yellow

Happy Monday everyone!! Since it's the third Monday of the month, Darnell (djkardkreations) and her IDEAS program participants are using E for embossing (wet or dry). I had the heat tool out for an upcoming Die Cut Diva post so went with wet embossing:


Supplies: Paper - Neenah White;
Paper Studio pastel A2 card; My Mind's Eye patterned
Stamps - Penny Black Soft Wings & Eloquence
Dies - Taylored Expressions Easy Strips 1/4 & Easy Strips 1/8
Other - Hero Arts Lemon Drop, Creamscicle & Pitch Black inks; 
Memento Tangelo ink; clear embossing powder;
Versamark ink

I decided to combine this theme with a couple of challenges & use up leftover Kaleidoscope strips from previous cards. Check out the current Group of Seven Cardmakers technique post to learn more. Since my strips were Orange & Yellow, I made another card for Color Hues #93. I chose a beautiful butterfly from Penny Black as my focal point so it work for the August Penny Black Saturday Challenge - Anything Goes (optional flowers).

I stamped and embossed the butterfly, then blended yellow & orange inks onto it. I've owned the stamp since 2012 & don't believe the coordinating die existed at that time. Didn't buy it later so I had to fussy cutting the image. Added it to a card onto which I'd arranged some patterned strips in the Kaleidoscope fashion. Stamped a sentiment from a PB clear set & left the rest plain. My card will go to a chorus friend who contracted Covid while on vacation - she's doing better after taking Paxlovid.

Speaking of plain, here's a bonus. I did a diagonal Kaleidoscope pattern on a second card and added a foiled sentiment (hard to photograph) from Memory Box (thanks Dave!). Simon Says Stamp has them - Happy Birthday Foil Greetings Black Circle Tabs. That uses up the strips I'd die cut.


That's it for today, friends. Chorus is singing at a senior's complex tonight so I'd better start organizing things. Thanks for stopping & happy crafting!!


Sunday, August 18, 2024

Friends are True Gifts

Hi everyone - I'm back with my third and final card for Christmas Kickstart #89 where it's time for Animal Antics. 


Supplies: Paper - Neenah Solar White;
Hero Arts Bermuda; scrap of kraft
Stamps - Penny Black Bright Spirits,
Dies - Spellbinders Dancin' Gnome (retired);
Other - Hero Arts Emerald Green ink & sparkle lacquer;
Copic Markers; foam tape

I enjoyed crafty shopping with my sister-in-law yesterday & purchased a couple new-to-me Penny Black 2020 stamps on clearance. I decided to create a winter scene that would fit at Kickstart. I'll also enter it in the Penny Black August Saturday Challenge - Anything Goes with option of Flowers (not used). I've not played there before but was inspired by Loll (Stamping with Loll) who's a guest designer this month.

I stamped the polar bear and hedgie decorating a Christmas tree from one PB set, plus a hedgie in stocking from the other set. Colored them with Copics & fussy cut. I have a box of fabulous PB stamps from my friend Jean (Right as Rain) where I found the perfect set with trees & a fabulous sentiment set. Thanks again, Jean!!

I stamped the trees across a rectangle and added it to an A2 card. Hand drew a snow line with a Copic, then added the bear/hedgie image. The image doesn't have the lower parts of the animal bodies - probably meant to be within a window. So I took a second rectangle & cut it down with a hill die then added to the scene to cover up that lower half. Stamped the sentiment in the bottom right corner. Die cut a stump and added to the card with foam tape and adhered the hedgie in stocking propped up on the stump.

So fun to put together and now I have another card for the Christmas stash - I'm up to about 40, I think. I also add my card to Darnell's August NBUS Challenge #65 since my hedgie stamps got first play here.

That's it for now. Thanks for stopping by & enjoy the rest of your weekend!


Saturday, August 17, 2024

Coffee Makes Everything Better

Hi there - hope you're enjoying the weekend! Last night I was multi-tasking again, watching the Twins play the Rangers and watching Craft Roulette Episode #228 live. Managed to finish my card after the show but waited to post until today. I prefer not to post twice in one day, unless absolutely necessary...

Supplies: Paper - Neenah Solar White; Hero Arts Eggplant;
Craft Consortium Retro Summer;
Lawn Fawn All the Dots & Summertime
Stamps - Hero Arts A Little, My Week, & 
Calendar Pieces (all retired); 
Inkadinkado Special Thoughts (retired)
Dies - Hero Arts Square Infinity Dies
Other - Copic Markers; foam tape

Last week people uploaded 426 projects to the challenge for a total of 40,328! The show has been going since 2020 after Covid hit but I just started participating earlier this year. This week host Mary Gunn FUNN had Irene Smith (@ArtemisMade1as her guest. The wheel wasn't too hard on us.


  • Project - Card with Squares: I made a 5" square card with a square patterned layer, plus an inchie.
  • Colors - Bee Garden: According to scientists, bees love purple, violet & blue.
  • Element - Monday: I stamped a little tab with the word Monday.
  • Random - Use a Marker(s): No brainer, I used Copics :)

What to do with Monday? I googled Monday quotes because people in the chat were talking "Manic Monday" & the like. I found one at Reader's Digest: 55 Monday Motivation Quotes (#18) that says - “May your coffee be strong and your Mondays be short.” —Unknown. That lead me to a coffee theme with an old Hero Arts label & a Java inchie. After stamping, I colored in the label and the inchie with various Copics; fussy cut the label & die cut the inchie.

Want to play along? It's open to the general public, just with a shorter window to submit. Go HERE for details.

That's it for today! I'm meeting my sister-in-law for crafty shopping at Anchor Paper, our favorite local store. This time I actually need supplies - I'm hoping they have long cutting plates for the Vagabond there. Pray that I don't buy too much else - I'm expecting a couple packages next week from online orders...

Thanks for visiting & happy crafting!!

Friday, August 16, 2024

Kaleidoscope birthday cards

Hi all - TGIF!! I've been meaning to play with along with the current Group of Seven Cardmakers technique - Kaleidoscope. All seven shared wonderful cards on their technique post & it looked like such fun! Loll's beautiful reminder card got me motivated to try the technique this morning. And after seeing Marcia's lovely card for Color Hues #93, I decided to use the Orange/Yellow combo.


Supplies: Paper - Hero Arts Dove A2 card
My Mind's Eye patterned; scraps of yellow
Stamps - My Favorite Things Itty Bitty Basics (retired)
Dies - Taylored Expressions Easy Strips 1/4 & Easy Strips 1/8
Other - Hero Arts Lemon Drop & Creamscicle inks; 
Memento Tangelo ink; enamel dots

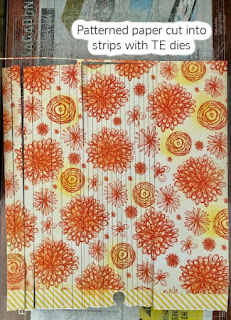
An MME paper pad (The Sweetest Thing - Tangerine) with orange & yellow patterns was sitting on the table from a Diva post coming up next week. I pulled out an orange floral print which had some soft yellow in the background. I brushed yellow ink on some of the flowers and orange on others for some interest. Die cut the 6x6 piece using two TE strip dies, then cut the balance in half. Here's a view of the paper on the Vagabond:

I arranged the strips towards the bottom as Loll did on her card but I left no spaces. Stamped the MFT sentiment in orange. Next I cut some daisies from a Poppystamps set & arranged on the card. Added some enamel dots to the flower centers - done!

Since I had so many strips left, I made another card - this time orienting my strips vertically & leaving some space between them:


Additional supplies: Paper Studio pastel orange A2 card;
Park Lane gem

That's it for today, friends! It's a gloomy day here so perfect for staying inside to craft. 

Thanks for visiting!