Welcome to my blog!

Thanks for visiting my blog. As the title suggests, I love to scrapbook, stamp, and sing! I will share cards and scrapbook pages I create, as well as information about my music - Barbershop harmony.
Showing posts with label Merry Monday Challenge. Show all posts

Monday, June 25, 2018

Merry Monday #296 - Rustic

Hi everyone - Nina hosts Challenge #296 to create a rustic Christmas card this week at Merry Monday. Watch for a big announcement at the end of this post!


I went with the "countryside" definition of rustic and created a snowy scene with some deer and trees atop a mat of what I consider a rustic patterned paper with lots of wood planks. Here's my card:

Supplies: Paper - Neenah Classic Crest Solar White
BoBunny Altitude and Merry & Bright 6x6 pads; 
DCWV A2 card; scrap of wood plank paper (for the star)
Dies - Tim Holtz Winter Wonderland
My Favorite Things Die-Namics Blueprints 20 
and some other set for the star button (both retired) 
Lawn Fawn Forest Border
Other - ultra thin foam squares); C03 Copic Marker; Icy Stickles
Memento Tuxedo Black ink; May Arts string twine

I covered an A2 card with a piece from the BoBunny Altitude paper. Next I die cut the deer trio from a piece of the Merry & Bright paper. The die set also includes the snowy sky so I cut it into a piece of white card which I then cut with a stitched rectangle. I cut another piece of white with the tree border and then cut it with the same rectangle die and layered. Shaded a bit with a Copic, then stamped the sentiment and adhered the deer (some ultra thin foam used). Stickles may not be rustic but I couldn't resist adding them to my row of trees. I die cut several of the star buttons (from a retired Blueprints set, not sure which one) from brown card, layered them and then topped with one cut from wood plank paper. Threaded with string twine & adhered with a glue dot - done!

Be sure to check out all the rustic goodness by the Design Team, plus challenge details HERE!

And now for the BIG Announcement: Originally, the Merry Makers were only taking a summer break for July and August. Lesley, the challenge creator, has decided to close the challenge as soon as this week's winners are announced. So, this is my LAST Merry Monday post. Boo Hoo!! Sad news and I will miss creating with the talented Design Team that has included me as a guest since the 9/4/17 post. Thanks to Lesley and Lori and all the rest for the opportunity!! Before being on the DT, I'd played at Merry Monday since January 2015 and have met so many wonderful crafters as a result. I'm sure I'll be checking in at their blogs as much as I can.

Thanks for stopping by and for your interest in Merry Monday! I'll be out there playing in other Christmas card challenges, such as CAS Christmas, since I can't seem to get my cards made without them! Hope to see you in Blogland - cheers!!

Monday, June 18, 2018

Merry Monday #295 - Inspiration Photo

Merry Monday everyone! This week Marcia hosts Challenge #295 with a yummy inspiration photo.


Supplies: Paper - Neenah Classic Crest Solar White; Poptone Black Licorice;
Michael's green; Studio Calico Magical; 
Teresa Collins Santa's List; My Mind's Eye On the Bright Side
Stamps - Art C Mason Jar Stamp and Die; Taylored Expressions Many Minis - Holiday
Dies - Hero Arts Nesting Circle Infinity Dies; Our Daily Bread Mini Tags
Impression Obsession Pine Branch
Other - Copic Markers; foam tape; May Arts ribbon and string twine

Went a bit too literal but definitely wanted to do a jar with peppermints. Then the wood plank background drew me although I went with a different type of wood. I have several jar stamps with dies but bought a new one on a BOGO sale at Michael's. This set has a cute label with an embossing layer but instead I went with a little tag for my sentiment. Couldn't cover up all my peppermints now, could I?! I included the piece of peppermint paper to show I die cut them right from the paper, using a slightly smaller circle to better fit in my jar. So fun and easy.

What draws you in the inspiration photo? Can't wait to see your creation! Please head over to Merry Monday to check all the challenge details and fabulous inspiration from the Design Team. Thanks for stopping by!

Monday, June 11, 2018

Merry Monday #294 - Barns

Hey all - we're heading to the countryside for Leanne's challenge at Merry Monday! For Challenge #294 she wants a barn on our Christmas card.


I had absolutely nothing in my stash with a barn, not even a scrap of patterned paper, nor Silhouette design. Great excuse to shop, right?! I started looking locally and found some kid style farm stickers which I bought - just in case... My Silhouette software needs updating & I can't get into the online store right now - no luck there. So off I went to shop online. Coincidentally, The Scrapping Cottage had a 50% off sale - oh my! I bought two different barn dies and a stamp & cut farm set - all adorable. Rather an unusual barn, but I started with the Reindeer Barn - Santa needs a grand residence for Rudolph, right? Just love this one!!

Supplies: Paper - Neenah Classic Crest Solar White; Bazzill brown; 
Lawn Fawn Let's Bokeh in the Snow
Dies - Lawn Fawn Stitched Hillside Borders
The Scrapping Cottage Reindeer Barn Cottage Cutz
Stamps - Hero Arts October 2017 My Monthly Hero (sentiment) & DI038 Christmas Tree Set (retired)
Impression Obsession Cover-a-Card Wooden Plank
Other - Joy Ultra-thin foam tape; Copic Markers; Paper Studio gemstones;
Tea Dye Distress Ink & Fired Brick Distress Oxide Ink; Distress Markers

This little scene was a lot of work but so much fun! I started by die cutting the entire barn set in white. Then I colored all the non-white pieces with Copic Markers and assembled the barn. I placed it in snowbank layers and added a stamped tree behind - I colored the stamp with Distress Markers to stamp it. Here's a side view:


Popped some elements with ultra-thin foam tape & maybe you can see the dimension a bit better in this view. I really love the thin foam but it can be very hard to handle since it's so teeny! Couldn't resist sharing a couple of photos taken during my process:


Please tell me I'm not the only one who crafts in every odd spot possible! In the top photo I'm on the kitchen counter with some of my pieces, the die, and the packaging - all atop a magazine and some outgoing mail. Then I'm on the stove top (no, it wasn't hot - LOL) coloring the pieces while sipping a coffee! The counter on the other side of the stove was piled with stamp sets I've recently used so I couldn't color there - sigh... We won't talk about the counters on the other side of the kitchen or the kitchen table, also full of stuff. Really should clean up so we can eat in there!

If you're still with me, I have a two-fer! I was talking to my friend Heather who called me all the way from Ireland yesterday! Just love chatting with her and 90 minutes went quickly - thanks for the call, Heather!! Afterward I had a small window before I went to sing (with a bunch from chorus) for one of our housebound members (it went great). Spotted a barn I had die cut from another Scrapping Cottage item I bought with the Reindeer Barn. I had an idea to cut out these cute little pigs from a piece of patterned paper but do you think I could find it?! Well, I spotted an extra Silhouette cut from THIS CARD and decided to use part of the cow. I also had a bit of snowflake paper left from last week's Merry Monday angel card. The card came together quickly!

Supplies: Paper - DCWV neutral A2 card; Poptone Black Licorice;
Neenah Classic Crest Solar White; BoBunny Snowfall
Silhouette digi cut - Design ID 207545 Welcome to the Farm
Dies - The Scrapping Cottage Barn Cottage Cutz;
My Favorite Things Blueprints 20 (retired)
Stamps - Hero Arts Holiday Sayings (retired) & Kelly's Outline Letters
Other - foam tape; Jolee's Santa Hat Repeats; Candied Apple Distress Marker

What do you think of the puny sentiment? I showed the photo to a chorus friend and she thought it said moody - oops, maybe I should have put a dash instead of the third O....  ha, ha. Anyway, I'll try to share some more barn cards now that I'm well supplied with barn stuff! Meanwhile, be sure to check out all the challenge details and amazing Design Team cards HERE. Thanks for stopping!!


Monday, June 4, 2018

Merry Monday #293 - Angels

Merry Monday to you and welcome to Challenge #293! Linda would like to see an angel on your Christmas card this week.


Supplies: Paper - Michael's snowflake printed A2 card; BoBunny Snowfall;
Carta Bella So This is Christmas; Tim Holtz Metallic kraft; Paper Studio brown
Die - My Favorite Things Die-Namics JOY
Other - Hero Arts sequins; Paper Studio Angel sticker; Tea Dye Distress Ink

I love angels but I don't have much angel stuff in my stash. This lead me to shopping at Hobby Lobby where I found some pretty angel stickers. The package has three different layered angel labels with loads of gold foil but not really Christmas-y. No worries - I chose one with blue to coordinate with some pretty BoBunny snowflake paper. The browns in the paper paired with a brown music paper looked so pretty with the angel. I cut a brown JOY to layer as a shadow behind a JOY cut from two layers of gold foil. The angel sticker came with several layers of foam tape - I carefully peeled off the back layer since I thought it was too thick. A few sequins and done!

I think my neighbor Brenda will end up with this card - she adores angels! Can't wait to see your angel creation!! Be sure to check out all the challenge details and link-up HERE, as well as amazing inspiration from the rest of the Design Team! Thanks for stopping!!

Monday, May 28, 2018

Merry Monday #292 - Penguins!!

Hey everyone - Happy Memorial Day! Hope you're having a great holiday if you're celebrating. This week we're playing with penguins over at Merry Monday's Challenge #292. Can the trio in the inspiration photo be any cuter?!!


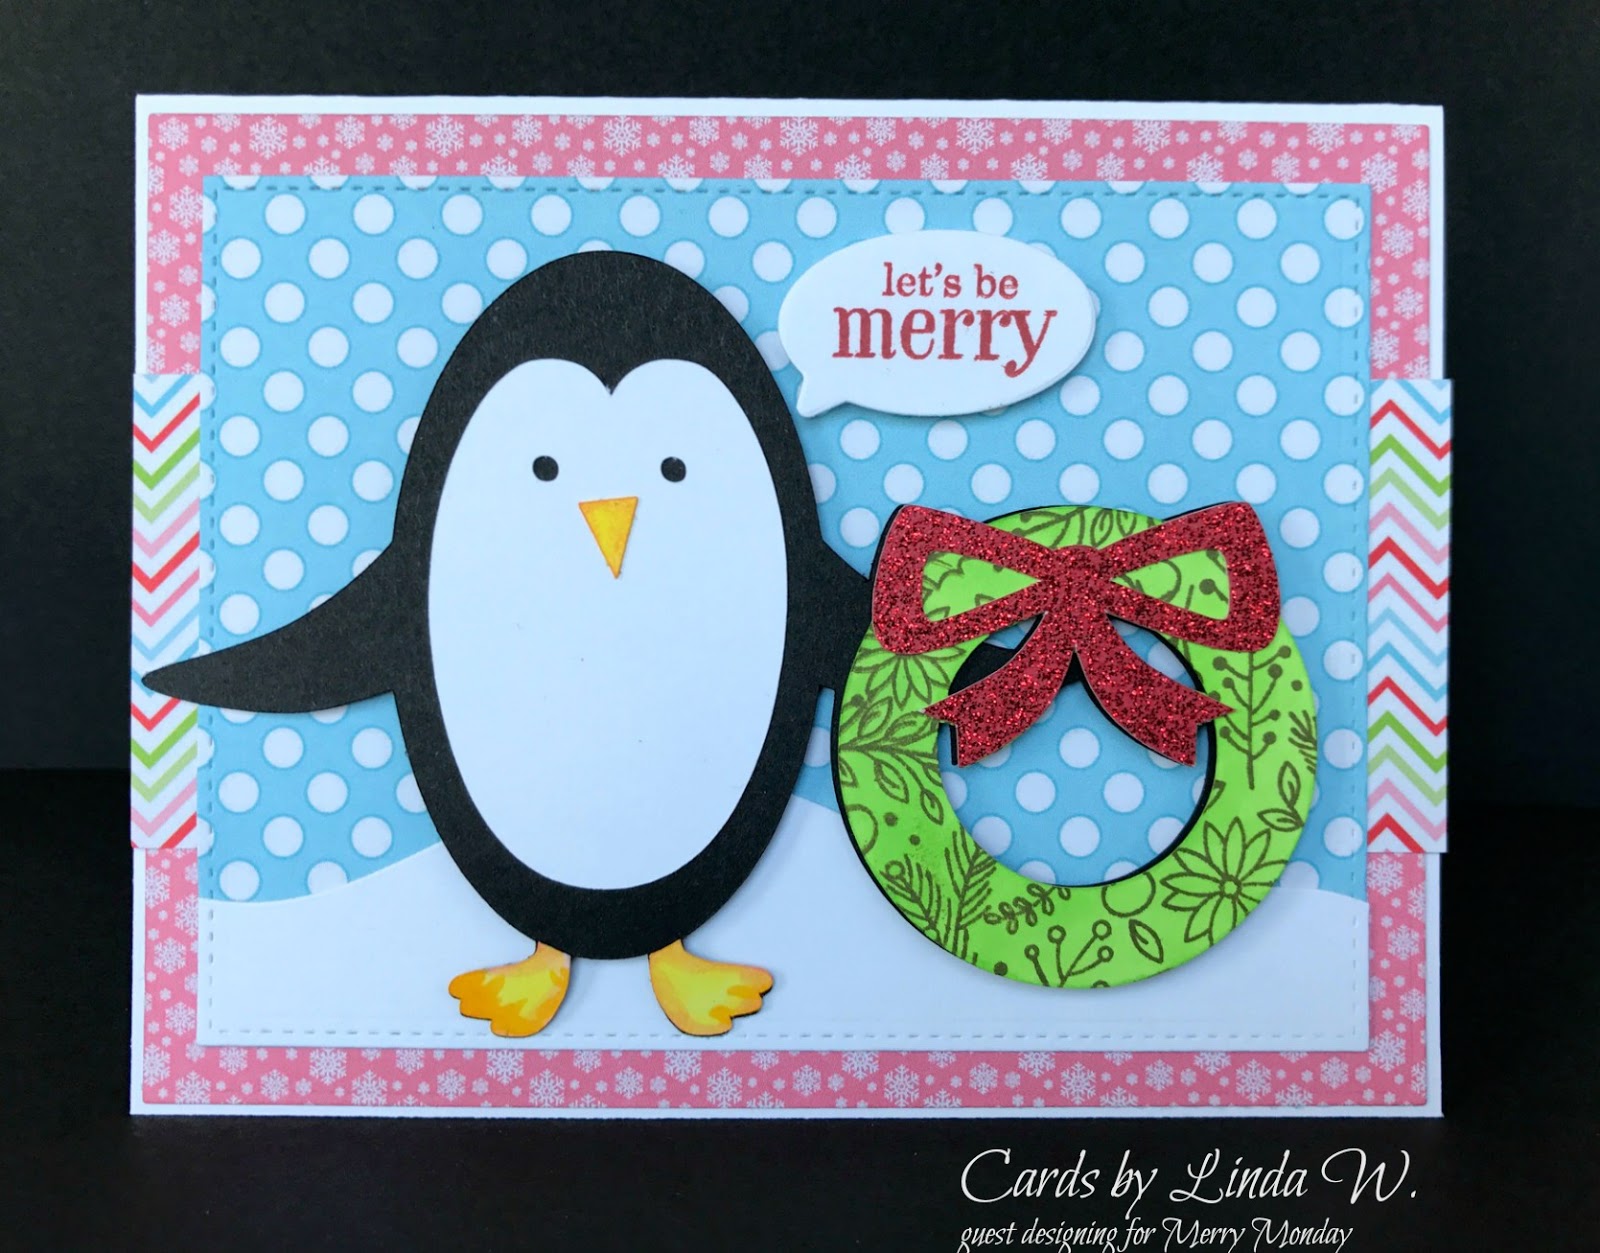
I seem to have accumulated quite a stock of penguin items over the years, but especially since I started playing at Merry Monday. Instead of going to my stash, though, I headed to the Silhouette and cut a penguin with wreath - so cute!

Supplies: Paper - Neenah Classic Crest Solar White; Poptone Black Licorice
Paper Studio glitter; Pink & Main Jolly
Silhouette image - Design ID #35189 Penguin with Wreath by Jennifer Wambach
Stamps - Hero Arts CM100 Christmas Messages and CG698 Holiday Florals Bold Prints
Dies - Hero Arts DI364 Thank You Messages Frame Cuts (speech bubble);
My Favorite Things Blueprints 20 (retired) Lawn Fawn Stitched Hillside Borders
Other - Copic Markers, Joy foam squares; Hero Arts green ink; Fired Brick Distress Oxide ink

I cut the penguin pieces from black and white cardstock, then colored the ones I wanted yellow. Cut the wreath from white too, colored with a green Copic and stamped with the Bold Print. Cut the bow from red glitter paper and layered up Mr. Penguin using some ultra thin foam squares. Die cut two stitched rectangles - one patterned and one white. Cut a hill into the white and layered. LOL - the side I liked was the one without the stitches on the hill - oops. Made a top fold horizontal A2 card and added a snowflake printed mat, a strip of chevron pattern and the rectangle. Popped my penguin atop and added the sentiment speech bubble. Done!

Check out the penguin goodness by the amazing Design Team and all the challenge details HERE. Thanks for visiting!!

Monday, May 21, 2018

Merry Monday #291 - Sweets!!

Hi all - back with another Merry Monday challenge! Kelly hosts Challenge #291 this week and she wants candy canes, cookies or sweets on our Christmas cards. Yum - I can do that!!


Supplies: Paper - Neenah Classic Crest Solar White
Paper Studio kraft and brown; Basic Grey Aspen Frost
Studio Calico Magical (candy cane); Tim Holtz metallic kraft
Stamps - Pink and Main Cocoa Kisses (plus matching dies)
Dies - My Favorite Things Die-Namics Blueprints 20 (retired) & Oval Shadows
Hero Arts Tag Infinity Dies
Other - foam tape, Stickles, white enamel accents, Copic markers,
Memento Rich Cocoa ink; Fired Brick Distress Oxide ink

Went shopping at Pink and Main to get one of their new stamp sets (Pocket of Sunshine) and spotted the darling Cocoa Kisses set with plenty of sweets. Into my cart it went - I figured it would be perfect for this challenge! I diecut the sweets and the sentiment label, then stamped and colored them. Thought it would be fun to put the sweets on a cookie plate so used the versatile Oval Shadows dies to cut a gold metallic plate.

I arranged the plate and sweets on my counter and decided they'd look good on a tag. To get a wide enough tag, I used the largest of Hero Arts Infinity Tags but cut it to a shorter length to fit my A2 card. The candy canes on the paper were actually printed on a diagonal but I arranged my tag die to line the canes up vertically before I cut it. I found a fun Basic Grey patterned paper to put behind the tag. I cut it with a stitched rectangle and gave it a narrow brown mat before adhering to a scalloped rectangle, then the card.

As always, check Merry Monday for all the challenge details and great inspiration from the Design Team. I hope you'll have a chance to play along with us this week! Thanks for stopping!!

Monday, May 14, 2018

Merry Monday #290 - Bells!

Welcome back for another Merry Monday challenge! This week, the delightful JoAnn would like us to use bells on a Christmas card for Challenge #290. What gorgeous gold bells in the inspiration photo!!


Supplies: Paper - Neenah Classic Crest Solar White; Paper Studio Red; Poptone Black Licorice
Stamps - Hero Arts Wreath with Bells (retired), Holiday Florals Bold Prints, &
 Merry & Bright Tag Set by Lia - sentiment (retired)
Dies - My Favorite Things Blueprints 21 (retired); Spellbinders Ribbon Banners
Other - Copic markers; Memento Tuxedo Black & Fired Brick Distress Oxide inks; 
Target Hot Spot gold sequins; foam tape; Faber Castell Metallic Gold PITT pen

I had to go with my favorite Hero Arts bell cling stamp. A stamping friend, Isha, sent it to me when she was my Secret Santa a few years ago. What a fun image to color and you can see two other examples of my cards using this stamp here and here. I was especially thrilled with the color of the bells this time! I used two new-to-me Copic colors Y26 Mustard & Y28 Lionet Gold. I colored the bell panel several weeks ago but finally had a chance to put a card together. By the time I did, I see that the wonderful Leanne also made a card with this bell stamp - oh well, great minds.... I just love her gorgeous blues!!

I started to make this a shaker card since I had a bag of yummy shaker mix. Alas - dismal failure - my acetate refused to cooperate (full of static & my anti-static activities failed to help...). So, I tossed my shaker panel and die cut a simple pierced rectangle panel with a circle opening. After gluing it over my bell panel, I decided to stamp on the window panel. Why do I do that?? Luckily I saved the die cut circle and popped it over my colored bells before stamping. Now I have a stamped circle for the future! After die cutting and embossing a banner, I decided to edge it with a metallic gold - so shimmery in real life. I popped the banner with foam tape, otherwise this would've been a nice flat card for mailing.

Thanks for visiting and I hope you can join us at Merry Monday! See all the challenge details and inspiration from the fabulous Design Team HERE. Have a great week!!


Monday, May 7, 2018

Merry Monday #289 - Stars!

Merry Monday everyone! Debbie hosts Challenge #289 this week to use stars on your Christmas card.


I decided to show some love to a star with swag die that I bought last year (I think). Another NBUS item which are legion at my house! I thought about using a star embossing folder behind the swag, then I remembered some yummy BoBunny paper with several star patterns - used two of them here. The wood plank paper is from that same collection.

Supplies: Paper - DCWV A2 kraft card; Paper Studio glitter & brown;
BoBunny Christmas Collage 6x6; Tim Holtz kraft metallic; Michael's green
Dies - My Favorite Things Die-Namics Joy, Rectangle Peek-a-Boo Window,
Blueprints 20 (retired) & 13
Ultimate Crafts When you Wish (retired)
Other - Stickles; Doodlebug enamel dot 

I cut the star swag set from different colors and layered. The pine cones cut only in outline but I backed them with a glittery paper so they'd stand out more. The bow and JOY were cut from glitter paper too but it looked very dull. Jazzed them up with some Stickles, including an enamel dot for the bow's center. I cut multiple joys from plain red cardstock and layered them for dimension with the glittery one on top.

Please check out the challenge details and all the wonderful inspiration from the Design Team HERE. Would love to see your creation linked up to the challenge! Thanks for stopping and have a wonderful week!!

Monday, April 30, 2018

Merry Monday #288 - No stamping!

Deanne has a great theme for Challenge #288 over at Merry Monday - no stamping!


When is the last time you created a card with absolutely no stamping?! I tend to stamp on most cards I make, especially the sentiments. Given all the dies I have, though, I can easily do bunches of cards without stamping - LOL!!

Supplies: Paper - Michael's Recollections holiday printed A2 card
American Crafts snowflake paper from Target's Hot Spot 
Neenah Classic Crest Solar White: Paper Studio glitter & red
Dies - Lawn Fawn Stitched Hillside Borders
My Favorite Things Die-Namics Blueprints 20 (retired)
Other - foam tape, Copic Markers

Just love Hero Arts Paper Layering dies - so fun! I bought the polar bear die when it was released last year and immediately cut one. I colored parts with Copics but actually paper-pieced all the glittery hearts in the scarf. They are very teeny and I had to recut some as the first ones disappeared on me! Also carefully removed the nose holes, colored them in black and inlaid back in. Poor bear was sitting around on my craft table waiting for a home - glad I found him one on this card!!

I also love the Hero Arts Christmas Trimmings Stamp & Cut! Not only does it have the Merry Christmas in both a stamp and a die, it has a bow, some holly and berries - perfect! I die cut the sentiment in red and glued the Merry directly to the bear and the Christmas to the snowbank. A bit of foam tape behind the bear added some dimension. Done!

Thanks to Deanne for a fun challenge - check it all out HERE, including fabulous cards by the Design Team. So glad you stopped by and I hope you have a crafty week!!

Monday, April 23, 2018

Merry Monday #287 - Inspiration Photo

Back for another Merry Monday post - I'm glad you stopped by! This week Colleen offers a fabulous inspiration photo for Challenge #287.


The fun mix of colors and all the snowflakes struck me right away. You might see buildings but I saw an array of gift tags. With that idea in mind I headed to my crafty stash to look for tag dies. Instead I found a grid die and my mind went bouncing off in another direction - does this happen to you?! Here's my card:

Supplies: Paper - Recollections printed card; Paper Studio holiday red;
Hero Arts Lawn; Poptone Bubblegum; Neenah Classic Crest Solar White;
Tim Holtz Metallic Kraft
Dies - My Favorite Things Die-Namics Sq Grid Cover-up (retired)
Lawn Fawn Mini Snowflakes
Stamps - Avocado Arts - poinsettia (retired); Inkadinkado Home for Christmas - present
Hero Arts Origami Happy Holidays - wreath; Paper Smooches Warm Hearts Icons - holly
Hero Arts Let the Angels Sing - dove (retired); Lawn Fawn Snow Day - heart
Lawn Fawn Let it Snow - bell, Ready Set Snow - snowman, & Peace Joy Love (retired) - tree
Hero Arts Color Layering Wreath - sentiment
Other - Hero Arts Red Royal & Black inks; Copic Markers; 
Xmas Red Stickles; Lucky Clover Distress Ink; May Arts string twine;
Silver & gold gel pens

I started with a prefab A2 card from Michaels in the light pool color from the inspiration photo. Hard to see in my photo but it's printed in little snowflakes. I diecut the grid in four colors, using the red outline (just love red with pool) and inlaying squares of the three other colors. I left three windows open to the pool card. Next I went through my Christmas stamps looking for images to fit my windows. I stamped the sentiment in one open pool window and added a gold and a silver diecut snowflake in the others. I stamped the chosen images and colored with Copics. Three of the images had no outlines so I carefully traced them with a black Copic marker - a bit wonky in spots, oh well....

This was a fun card to plan and assemble! Also a nice flat card for mailing. If I'd been smarter, I would've stamped a few more squares while I had the stamps set up in the MISTI. Surfing my stash for images to fit took the most time in the process - the rest went pretty quickly. Yay - another Christmas card for my growing set. Seventeen weeks into the year; how many cards do you have ready? The Merry Monday Christmas Challenge will help you reach your goal so you're not scrambling come December!!

Thanks for stopping by and be sure to check out the challenge details and all the awesome Design Team cards HERE. Hope you have a crafty week and I can't wait to see what you'll create!!

Monday, April 16, 2018

Merry Monday #286 - Favorite Christmas Verse

Hi all - over at Merry Monday this week, Sue hosts Challenge #286
She'd like to see your favorite Christmas verse on a card.


Wow - this was indeed a challenge for me! Do I even have a favorite Christmas verse?! Definitely couldn't find a good one among my crafty supplies. Luckily I found a clear stamp set at Michael's with a couple of sweet little poems I liked - on sale too - bonus! I decided to use the "From Home to Home" verse since I had a die with a house on it. From there, my design came together quickly.

Supplies: Paper - Neenah Classic Crest Solar White; BoBunny Altitude 6x6
Stamp on It cover weight shimmer vellum
Verse Stamp - Recollections Snow Inspiration
Dies - My Favorite Things Blueprints 20 (retired) & 13
Memory Box Countryside Circle; Lawn Fawn Mini Snowflakes
Other - Icy Stickles; Foam tape; Stormy Sky Distress Ink

So - funny story about the verse stamp. The quality isn't as good as the US made stamps I usually buy. When I got it out and stamped a test image, some of the lines didn't look even with the rest of them. The word Christmas especially looked wonky. This lead me to do surgery on the stamp, carefully trimming lines away and stamping them separately. Isn't perfect but better than it was as one image!! From a diecut panel I didn't like, I ended up cutting off a house to pop up with foam tape. The sentiment says "from home to home" after all, so I needed two houses :) Decided there was too much open blue space in the half circle so I added two sizes of the mini snowflakes. A sparkly roof on each house - done!!

Thanks for stopping and I hope you'll have a chance to play along with us this week. See all the fabulous creations of the Design Team, plus challenge details HERE. Enjoy!!

Monday, April 9, 2018

Merry Monday #285 - Add Ribbon!

Merry Monday everyone! Nina hosts Challenge #285 and would like to see ribbon on our Christmas cards.


What a pretty wrapped package in the inspiration photo! I always envy people who create such lovely gift wrap!! At least I can tie a halfway decent bow - if I do say so myself.....

Supplies: Paper - DCWV A2 dark brown card; BoBunny Merry & Bright 6x6 pad
Stamp - Hero Arts DI037 Christmas Ornaments Stamp & Cut (retired)
Dies - Lifestyle Crafts gingerbread people (retired); My Favorite Things Blueprints 13
Hero Arts DI199 Nesting Circle Infinity Dies
Other - Silhouette ID 245242 Love You Card; Hero Arts Red Royal ink
May Arts ribbon & twine; foam tape

I started out playing around with ribbon weaving but that idea didn't pan out. I had the gingham ribbon in the pile of ribbons I was trying to weave and decided to tie a bow on my card. I also had a pile of gingerbread people from some past cards. They ended up being dangled from twine along with a heart left over from Valentine's Day and an ornament attached with a regular staple. Sorta crazy but I like how it turned out. I had a grey ornament laying on the counter but it didn't look right so I went though my stash and found this ornament from 2012. The sentiment appears right in the ornament oval - perfect stamped in red to match the heart. Decided to put the entire ribbon dangle atop a banner over a stitched rectangle (both from MFT's Blueprints 13). I used the teeny circle die from the fabulous Hero Arts set to die cut the hole in my dangles.

Thanks for stopping and be sure to check out all the Design Team cards and challenge details HERE. Can't wait to see your Christmas card featuring ribbon!!

Monday, April 2, 2018

Merry Monday #284 - Colors Red & White

Merry Monday everyone! Marcia has a red and white color scheme for Challenge #284 this week.


Such a pretty color combo and I love her inspiration photo with all the red ornaments! I decided to go with white snowflakes though, using a fun frame die set for the first time.

Supplies: Paper - Neenah Classic Crest Solar White; Paper Studio red
Dies - Spellbinders Snowflake Snippets
Sentiment Stamp - Hero Arts CL454 Sending Holiday Cheer (retired)
Snowflake Embossing Folder by Darice
Other - Foam Tape, Darice sequins, 
DCWV clear gemstones, Hero Arts Red Royal ink

The sentiment looks washed out in the photo but it's really as deep a red as the backing to the snowflakes. The lower right snowflake panel is about the truest for the real life red - a rich cherry. The die cuts are a bit of a pain to glue - probably should've used Stick-it! And, of course, I got some glue on the red where I didn't want it - covered that boo-boo up with a sequin :) I arranged the pieces on a white panel embossed with snowflakes & adhered it to a top fold white A2 card. The die set contains 2 other squares - 1" & 2" with different snowflake designs. I'll have to try them next time!

Please click HERE to see all the wonderful inspiration from the Merry Monday Design Team & the challenge details, including the link-up for your creation. Can't wait to see your red and white card!

Thanks for stopping and have a crafty week!!

Monday, March 26, 2018

Merry Monday #283 - Puppy Time!

Whoo hoo - time for Leanne's Challenge #283 at Merry Monday. She would like to see a puppy on our Christmas cards this week. Isn't the little white pup in the inspiration photo the sweetest?!


I've put a dog image on various cards but never a puppy on a Christmas card. I found the perfect pup on a Stamp & Cut set by Hero Arts.

Supplies: Paper - BoBunny Merry & Bright 6x6, scrap of Authentique yellow
Neenah Classic Crest Solar White; Poptone Red Pepper & Green Apple
DCWV Ms Sparkle green card
Stamps - Hero Arts DC220 Fluffy Stockings Stamp & Cut
CL907 Color Layering Wreath (sentiment)
Dies - Hero Arts DI337 Nesting Infinity Oval Dies
My Favorite Thing Blueprints 13, 26 & 23 (retired)
Other - Copic Markers, foam tape, Hero Arts Red Royal ink; red nail head


I love Hero Arts Stamp & Cut sets - they're in the 200s of releases now. I don't have them all but I managed to pick up a few new Christmas sets from last year's catalog. The Fluffy Stockings set has both a puppy and a kitten in stockings - so adorable!! The puppy reminded me of the one in the inspiration photo. I colored him with Copics and decided to feature him on an oval,.rather than try to do a fireplace with mantle. The sentiment came from a Hero Arts set I used a couple weeks ago on this card which included my pup's daddy - LOL. What do you think of the yellow scalloped border? It matches the yellow snowflakes in the paper perfectly so I couldn't resist it.

Hope you have a chance to play along with us this week - can't wait to see your puppy creations! Check out all the sweet Design Team cards, along with challenge details HERE. Thanks for stopping!!

Monday, March 19, 2018

Merry Monday #282 - Inspiration Photo!

Merry Monday everyone! Linda offers a beautiful inspiration photo for Challenge #282. I just love all the rich reds with the pines, candles and pine cones!


Supplies: Paper - Poptone Black Licorice; Paper Studio Red
Neenah Classic Crest Solar White
Stamps - Deep Red Holiday Candles; Tim Holtz Stamptember 2017
Hero Arts CL241 Three Tree Christmas (retired - sentiment)
Dies - My Favorite Things Blueprints 21 (retired)
Other - Versamark ink; clear & gold embossing powder, foam tape; Copic markers

I was drawn to the diamond pattern in the rich red ribbon in the photo. I found a cling stamp with rows of diamonds in last year's Tim Holtz Stamptember cling set. It has an added star to it but I figured it would work. Stamped and gold embossed it on a red card, then diecut into a pierced rectangle. Added it to a top fold A2 black card. I stamped the sentiment in Versamark and considered gold embossing but loved the watermark look. Clear embossed it to make it pop even more. I stamped and colored the candles, fussy cut and adhered with foam tape. Keeping it simple, I added nothing else.

See Merry Monday for the challenge details and the beautiful Design Team cards. I hope you get a chance to play along this week! Thanks for stopping!!

Monday, March 12, 2018

Merry Monday #281 - Inspiration Photo!

Hi all - time for another inspiration photo at Merry Monday - challenge #281 hosted by Kim. Talk about making me thirsty - this photo does it!


Time to get out my Cottage Cutz Hot Cocoa Cafe die set and make a cup of cocoa for this week's card:

Supplies: Paper - Paper Studio red, brown & 
Christmas Classics 6x6 (candy cane patterned); 
Neenah Classic Crest Solar White; My Favorite Things watercolor 6x6
Dies - My Favorite Things Blueprints 20 (retired) & Oval Shadows
Hero Arts DI337 Nesting Oval Infinity Dies;
Cottage Cutz Hot Cocoa Cafe; Lawn Fawn Stitched Snowflakes
Stamp - Hero Arts CL909 Merry Cactus (retired - sentiment)
Other - foam tape, Copic markers, Hero Arts Red Royal ink; DCWV gem

I bought the cup die back in 2016 when I was vacationing in Arizona and made this card with it. Sorta weird patterned papers, now that I look back, but hey - that's what I had to work with in AZ. This time I went with solid papers for the cup and like it much better! I considered stamping a pattern on my cup but decided to add a little snowflake with a gem. I created the layered saucer using MFT oval shadow dies - who knew, when I got these free with an order, that they would be so handy?! I shaded all the cup pieces with Copic markers, even drizzling some brown for cocoa like the inspiration photo :)

I formed the nearly A2-sized card by cutting two MFT scalloped rectangles. I scored the back one at 1/2" and adhered to the front panel. I diecut the patterned paper with a stitched rectangle & added a red mat before adhering it to my scalloped card. The inspiration photo has a lot of white so I stuck to a white sentiment "table" to hold my cup. Because the background paper was so busy, I put a pale green oval behind the cup which I adhered with foam tape. Done!

Can't wait to see what you create this week! Be sure to check the challenge details & the fabulous Design Team cards at Merry Monday. Thanks for stopping!!

Monday, March 5, 2018

Merry Monday #280 - Inspiration Photo!

Welcome to another Merry Monday post! This week Kelly hosts challenge #280 with an amazing photo to inspire us. Such an elegant dinner setting!!


I took away the silver stars dangling from the chandelier and gold stars sprinkled around the centerpiece. A rich black night filters through the windows so I included black in my color scheme. Here's my card:

Supplies: Paper - Poptone Black Licorice; Tim Holtz Metallic Kraft; white by ?
Stamp - Hero Arts CG619 Chalkboard Messages (retired)
Dies - Hero Arts - DI331 Star Confetti Fancy Die
Other - foam tape; Tarnished Brass Distress Stain; Distress Embossing Ink; 
Ranger Superfine Black Embossing Powder; Wink of Stella; puffy sticker

Thanks to my dear friend Betty, I had some Hero Arts star panels in my stash. Betty cut them in white and all the bitty stars stayed stuck in the panel I picked - what a feat! I decided to pop some out in a few cascades and left the rest in. Then I painted the panel using brass stain. Once dry, I trimmed it to 4x5.25" and adhered to a silver mat. I didn't inlay the remaining stars, just let the silver show through. I adhered the layers to a black top-fold A2 card and added a black strip. I stamped the sentiment on a strip of silver, embossed in black, fussy cut it, and added to the black strip. The sentiment has an outline star but I put a glittery gel sticker right over it - perfect size - from the December 2017 My Monthly Hero kit!! Also added some clear Wink of Stella to the largest brass stars in the diecut panel. The photo doesn't do justice to all the shimmer.

How are you doing with your Christmas cards? It may be early March but time flies! Be sure to check out this week's Merry Monday for loads of inspiration from the Design Team and a spot to link your creation.

Thanks for stopping!!

Monday, February 26, 2018

Merry Monday #279 - Poinsettias!

Merry Monday everyone - time for challenge #279! JoAnn asks for a poinsettia on your Christmas card this week. Just love her inspiration photo with the white candle flanked by the beautiful bouquet of poinsettias and mistletoe!!


Decided to die cut a poinsettia using a set I bought last year. I added it to a candle along with some mistletoe. Here's my creation:

Supplies: Paper - Neenah Classic Crest Solar White, red and green; 
Basic Grey Juniper Berry; 
Heidi Swapp Christmas; Paper Studio cranberry
Dies - Spellbinders S5-055 Layered Poinsettia
My Favorite Things Blueprints 21 (retired);
Sizzix Tim Holtz 662425 Festive Greens
Other - foam tape, Copic Markers, 
Hero Arts PW121 White Puff Embossing Powder
Silhouette Design ID? - Candle

I die cut the poinsettia layers from a salmon red card, then embossed them using the die and a rubber mat. I cut the largest poinsettia layer again in green since the leaf from the die set seemed too big, as did the berries for the center. I cut the berries I used from a soft orange card using the smallest infinity circle die. I inked them all for some dimension. Stamped, die cut and colored the mistletoe, then put a couple pine sprig behind.

Next I cut a candle on the Silhouette in white card, plus a black offset mat - sorry I can't find the design #. I took the interior pieces out, stamped & embossed the candle piece, and colored the flame and outline with Copics. Put all the pieces back together, adhering to the black mat. Added Stickles to parts of the flame. Once dry, I tried the candle on different papers and colors of cardstock. Finally found a fun woodgrain piece from Heidi Swapp with some hanging light strings at the top. I die cut it with a pierce rectangle and added a strip at bottom as a "table" for my candle. Arranged the candle, poinsettia and mistletoe. Stamped the sentiment and adhered the panel to a cranberry colored card. Done!

Thought I'd show a side view so you can see the dimension:


This was definitely not a card for mass production - too many steps - but I had fun with it! Be sure to check out the fabulous creations of the Design Team, challenge details & the link-up for your creation - find it all HERE. Hope you have fun with the poinsettia theme and thanks for stopping!

Monday, February 19, 2018

Merry Monday #278 - Photo Inspiration

Debbie offers a gorgeous photo to inspire us for Challenge #278 at Merry Monday this week.


Don't know about you but the sweet dog with his red collar really caught my eye! He seems to be looking up the stairs - wonder what he spies? I'm guessing the family cat :) Another thing I spotted is the brick wall out the right windowpane. So I included both of those on my card.... along with a wreath.

Supplies: Paper - Paper Studio red; Poptone Black Licorce; 
Neenah Classic Crest Solar White; Basic Grey Juniper Berry 6x6 pad
Stamps - Hero Arts CM204 Santa's Door Accessories and 
SB120 Wreath Stamp & Die Combo
Inky Antics Punny Christmas Pups
Embossing Folder - Taylored Expressions Subway Tiles
Silhouette Design ID #28561 Speech Bubbles by Sarah Hurley
Other - Foam Tape; 3M washi tape; Copic Markers, Wink of Stella (clear)
Ink - Cracked Pistachio, Iced Spruce, Pine Needles Distress Ink; 
Hero Arts Red Royal & Black; Memento Tuxedo Black & Rich Cocoa

Well, I thought I had a brick embossing folder or stencil around here somewhere but couldn't find it. So I used the Taylored Expressions Subway Tiles which worked beautifully. I ran some black ink over top to emphasize the texture. Then I stamped, colored, and fussy cut the little dog. Used the Silhouette to cut a speech bubble and mat for the sentiment. Die cut the wreath then stamped the layers using my MISTI. Stamped and fussy cut the bow, then colored with Copics. It's hard to see but I added Wink of Stella to the dog's hat.

Can't wait to see what inspires you about Debbie's photo! See Merry Monday for all the challenge details, inspiration from the Design Team and the link-up to add your card. Thanks for stopping!!

Monday, February 12, 2018

Merry Monday #277 - Stencil it!

Merry Monday everyone! Deanne hosts Challenge #277 this week and she'd like us to use a stencil on a Christmas card.


I have a lovely pile of stencils, many of which have never been used! I decided to give a Tim Holtz layering stencil its first play along with some embossing paste - it really gave some nice texture. Here's my card:

Supplies: Paper - DCWV green A2 card; Neenah Classic Crest Solar White
Stencil - Tim Holtz THS071 Woodland Layering
Die - Lawn Fawn Stitched Hillside Borders; My Favortie Things Blueprints 13
Sentiment stamp - Hero Arts CM122 Mini Christmas
Inks - Tim Holtz Lucky Clover, Pine Needles, Tumbled Glass, and Vintage Photo Distress Inks
Other - Tim Holtz Distress Grit Paste; Marvy White Gel Pen

And here's a close-up of the texture:


After applying ink to the trees, I let them dry thoroughly. Then I put the paste smoothly over the top layer of the stencil one tree at a time, letting it dry in between trees. On the middle tree, I finally got the paste thick enough with some globs so it has a more realistic look of snow. Added Stickles over top for some shimmer and shaded the sky with a bit of Tumbled Glass. I stamped the sentiment, added a couple of white snowbanks and a green mat. Decided to leave it simple and not add any embellishments but I used a white gel pen to add a few snow dots you can barely see in the close-up.

Remember to check Merry Monday for inspiration by the Design Team members, challenge details & the link-up to add your card this week. Can't wait to see what you create!! Thanks for stopping!