Welcome to my blog!

Thanks for visiting my blog. As the title suggests, I love to scrapbook, stamp, and sing! I will share cards and scrapbook pages I create, as well as information about my music - Barbershop harmony.
Showing posts with label Challenge from Heather. Show all posts

Friday, September 2, 2016

Recap of Heather's Challenges to me

Hi all - I thought it would be fun to recap this summer's Christmas card challenges from my friend, Heather. Here are her challenges to me (the hyperlinks are to her posts, when she was able to do one):
  1. Christmas Quilt 
  2. CAS (clean and simple)
  3. Non-Christmas Image
  4. Critter Christmas (use an animal)
  5. Blog Title
  6. Christmas Shaker
  7. Inked Embossing Folder
  8. Needles
  9. Hearts
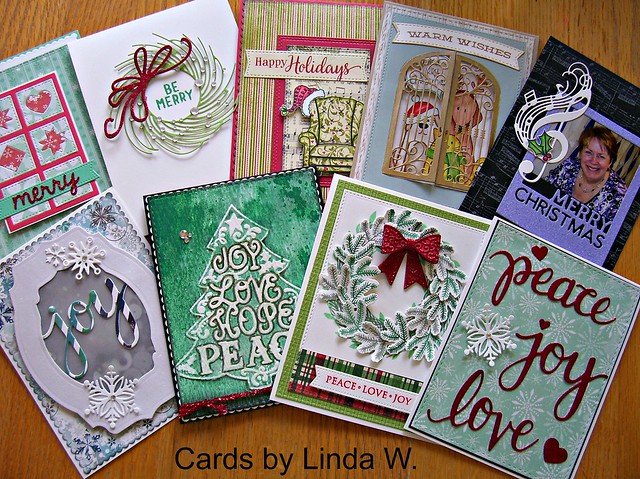
Here's a photo of all the initial cards I made for Heather's nine challenges:

Summer challenges from Heather

I put them in challenge order starting at top left and continuing in 2nd row starting at left. To see each card individually with supply lists, here are the hyperlinks to my posts:
  1. Christmas Quilt 
  2. CAS
  3. Non-Christmas Image
  4. Critter Christmas
  5. Blog Title
  6. Christmas Shaker
  7. Inked Embossing Folder
  8. Needles
  9. Hearts
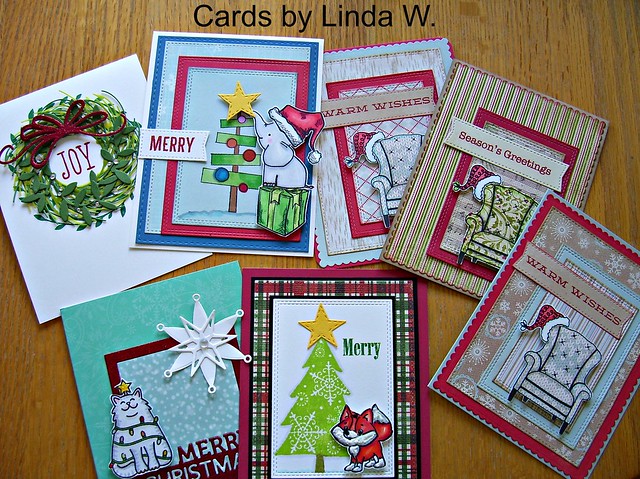
Sometimes, I was able to do more than one card. Here's a quick photo of the extra cards:

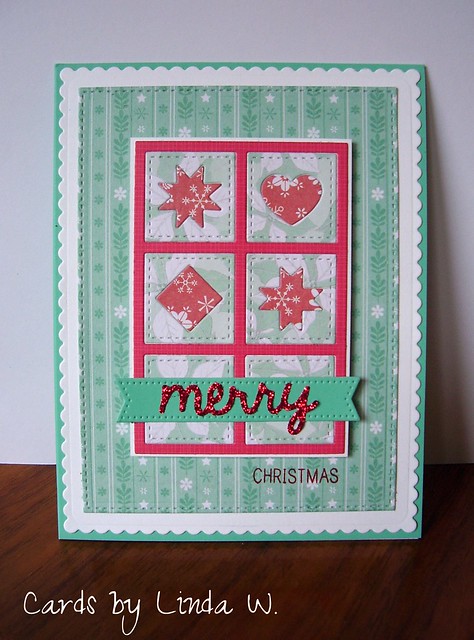
More challenge cards

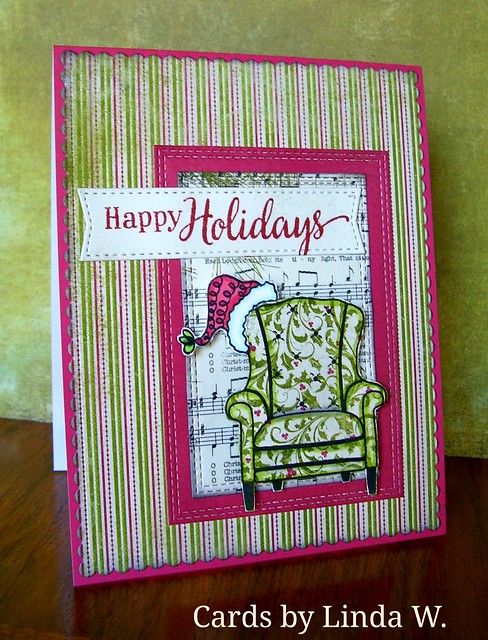
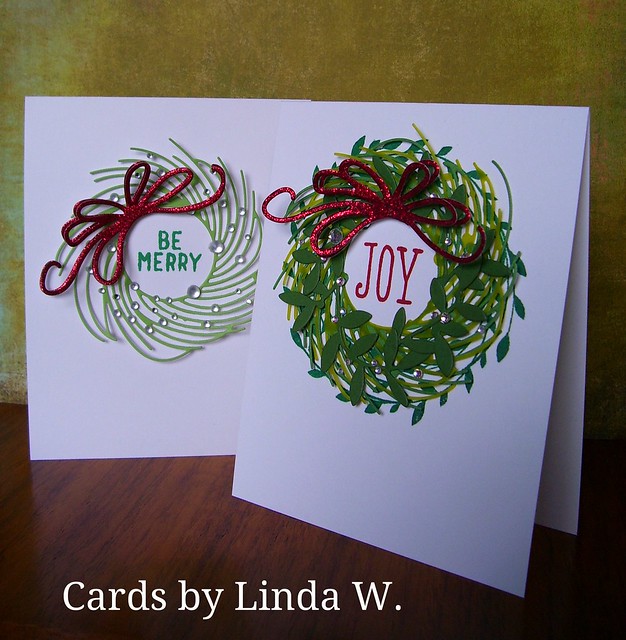
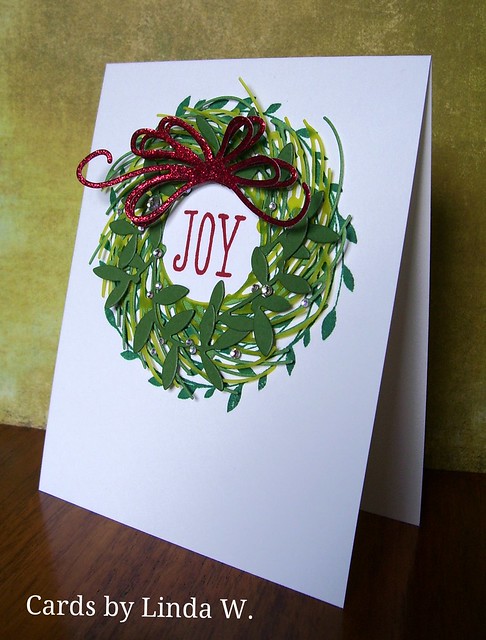
Links to posts for these card: Wreath, Ellie and chairs, Critters

Wow - I made a total of 16 cards for Heather's challenges!! Thanks to Heather for challenging me to keep the Christmas card production going!! I also made 9 cards to challenge her resulting in a total of 27 Christmas cards during the nine weeks of challenges. Heather hasn't finished my challenges yet so I'll save that recap for the future... :)

How's your Christmas card production going? I'm up to 59 cards at this point so I should be done well in time this year - yay!! I'd love to hear your totals so far - remember, only 16 weeks until Christmas and this time will fly! If you need inspiration to get going, head over to Merry Monday where new challenges start next week.

Thanks for stopping by and thanks for the lovely comments!!

Tuesday, August 30, 2016

Hearts for Christmas

Hi all - it's the last week of summer challenges between my friend Heather and me. Still having computer issues with her photo software, she emailed me this week's challenge:

 Include a heart on a Christmas card

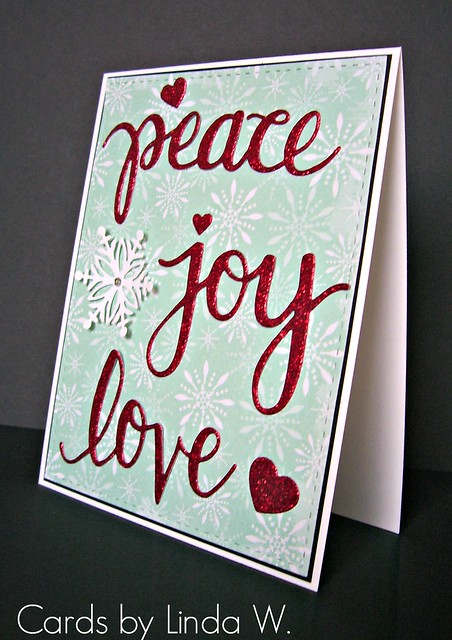
How fun is that?! Heather knows that I love all things heart related so this one would be a no-brainer. The darling Lawn Fawn petite paper from the Peace Joy Love 6x6 pad (retired) immediately popped into my mind. It has the words printed throughout along with tiny stars and hearts - perfect! I die cut a stitched rectangle with that paper and then thought of the new Hero Arts Peace Stamp & Cut set. And oh - I also have their Joy and Love sets - woo hoo! Decided to use all three words, just like the paper. Merry Monday had this as challenge (I was the guest designer) back on June 20th so I can link it to Lori's Summer Link-up. Note - the last chance for the link-up is 8/31/16, then the Merry Makers will be back in September with new challenges - Yay!

After die-cutting the 3 words from red glitter paper and arranging them on the Peace Joy Love paper, I thought the paper seemed too busy. I loved its pool color, though, and found a light pool with snowflakes in the Penny Black Holiday Trimmings pad. Here's my card:

peace joy love with hearts

Supplies: Paper - Neenah Solar White, Anchor Paper Black, Paper Studio glitter paper, Penny Black Holiday Trimmings 6x6
Dies - Hero Arts DC187 Peace, DC175 Love and DC169 Stamp & Cut; snowflake from stash, 
Hearts from Sizzix Tim Holtz Crazy Things & My Favorite Things Die-namics Blueprints 20 (from the quilt die); 
Simon Says Stamp Bundle of Stitched Shapes (stitched rectangle)

Many thanks to Heather for all the fun challenges this summer! You can find my challenge to her for this week here. I'll look for her cards once she gets her software issue sorted - definitely won't be this week. Thanks for stopping by and have a crafty day!!
Tuesday, August 23, 2016

Needles and more needles!

Happy Tuesday everyone! I'm back with a card I made for Heather's challenge to me this week. She's having computer issues so sent me an email with the challenge details; here's what she wrote:

"Your challenge for this week - "Needles". - You can interpret this any way you want e.g. pine needles, using needles to do sewing, piercing etc."

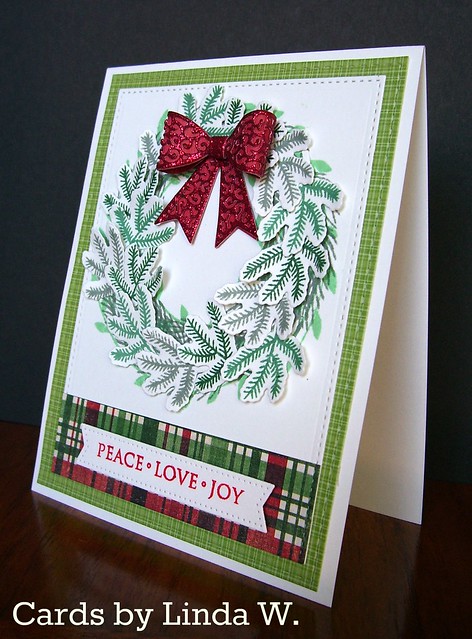
What a great theme and I have a lot of pine branches from which to choose!! Here's my card:

Peace Love Joy Wreath
Supplies: Paper - Neenah Solar White, the Paper Studio Old World Winter (plaid) and Christmas glitter, Lawn Fawn Peace Joy Love (green plaid), Basic Grey Juniper Berry (red base for the bow's glittery filigree)
Stamps - Hero Arts CL889 Holiday Pine Branches (two styles of branches), CL343 Holiday Sayings (sentiment), 
CL474 Special Wishes (stamped background wreath)
Ink - Tim Holtz Distress Inks (Candied Apple, Cracked Pistachio, Iced Spruce, Evergreen Bough, Pine Needles)
Dies - Hero Arts DI147 Pine Branch Frame Cuts, Simon Says Stamp Bundle of Stitched Shapes (large stitched rectangle), My Favorite Things Blueprints 20 (smaller stitched rectangle) & 21 (banner), 
Creative Expressions craft dies CED1408 Classic  and CED 1211 Filigree 3D Itty Bitty Bows

I started out stamping a base wreath with Cracked Pistachio; this wreath is more leafy than piney but I added stamped pines all the way around using one of the small branches from the Holiday Pine Branches clear set. I used Iced Spruce ink for this step. I then die cut the panel into a stitched rectangle. A blob of misplaced ink toward the bottom made me die cut a partial stitched rectangle in the red/green plaid to cover it! Then I stamped and die cut fifteen of the four-pronged branch using Pine Needles, Evergreen Bough and Iced Spruce ink (5 of each). I curled them a bit before popping them onto the base wreath using glue dots. I die cut a classic bow with red paper and a filigree bow with red glitter paper. The filigree by itself looks beautiful but I didn't want to see through any gaps here. Assembled the bow and popped it with a glue dot onto the wreath. Layered the panel onto a larger stitched rectangle and adhered to a top fold A2 card. I die cut a pierced (is that bonus points, Heather?) banner and stamped with the sentiment. Added it to the card with foam tape. Done - another challenge met! Thanks to Heather for throwing it down this week, despite all her computer issues. 

Since this one has peace/joy/love on it (a past Merry Monday challenge), I'm adding it to Lori's Summer Link-up. Won't be long before Merry Monday will be back with new challenges - until then, I hope you've drawn inspiration from ones Heather and I have posted.

Thanks for stopping!

Tuesday, August 16, 2016

Inked Embossing Folder

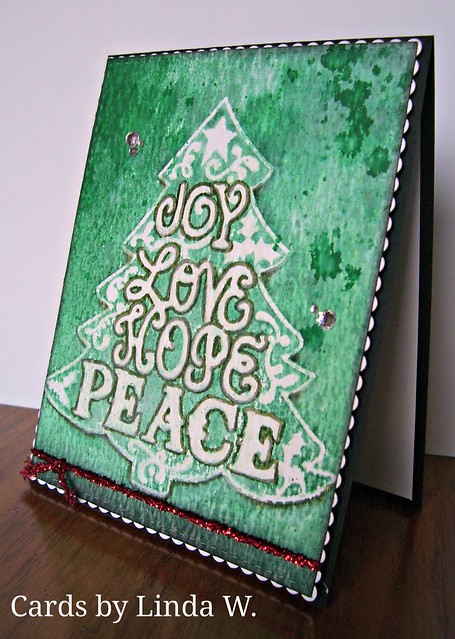
Hi everyone - I'm back with a card made for Heather's challenge to me this week. She asked for a card using an inked embossing folder. I like this technique and how she spritzed it for her sample card. Here's what I created:

Joy Love Hope Peace tree
Supplies: Paper - Tim Holtz watercolor paper, Neenah Solar White, Anchor Paper black
Distress Inks - Cracked Pistachio, Evergreen Bough, Black Soot; Distress Marker - Frayed Burlap
Other - Lucky Clover Distress Stain; tinsel twine, Michael's Reflections gems, foam tape
Dies - Simon Says Stamp Bundle of Stitched shapes (stitched rectangle), My Favorite Things Die-namics Blueprints 20 (scalloped rectangle); Sizzix embossing folder - name unknown

I copied Heather's technique of inking and spritzing my embossing folder. Since I was using the heavily textured side of the watercolor paper, it didn't soak in completely. So I moved the ink around with a water brush, adding where necessary. Then I masked off the tree to spray some Distress Stain which I also spritzed and dried with a heat tool. Yes, I finally got a heat tool - no more hair dryer for my Chemistry 103 homework - LOL. To emphasized the text, I outlined it with a Frayed Burlap marker; I also added some around parts of the tree with a water brush. I die cut the dried panel with a stitched rectangle and adhered it to a scalloped mat, then added the tinsel twine. I popped the panel onto a top fold A2 card with foam tape. If I remember correctly, the tinsel twine was wrapping on a Christmas gift from Heather...thanks again, Heather!

Fun challenge and I like how my card turned out. Thanks for stopping and have a crafty day!!
Tuesday, August 9, 2016

Christmas Shaker Card

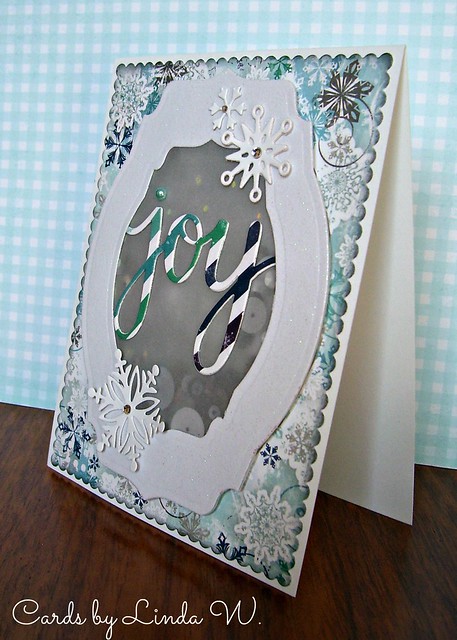
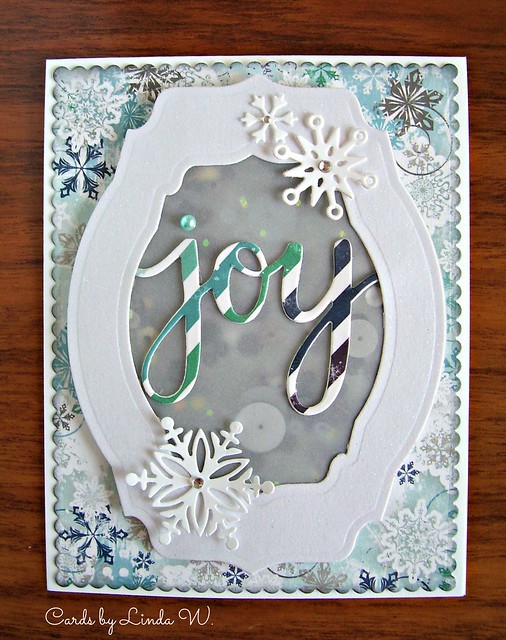
Happy Tuesday everyone! Busy day for me yesterday with an early (and long, but fun) chorus rehearsal but I spotted Heather's challenge this morning and off I went to create a shaker card. I haven't made many shaker cards but they are such fun!! I liked Heather's inspiration card using a floating word and a snowflake so I decided to incorporate those elements. Here's my card:

Joy shaker standing view
Supplies: Paper - BoBunny Altitude Collection, Neenah Solar White, the Paper Studio Christmas Glitter
Dies - Spellbinders Nestabilities Labels 36, Hero Arts DC169 Joy Stamp&Cut, 
various snowflakes, My Favorite Things Die-Namics Blueprints 20
Other - Vellum (from a Hero Arts My Monthly Hero kit), foam tape, Michael's Reflections gems, Hero Arts pearl,
shaker mix from Heather plus Michael's Reflections chunky glitter "Glitz" 

First I made a window/frame using two of the Spellbinder nestie dies and some white glitter cardstock. Then I cut a piece of black & grey bokeh paper from the BoBunny pack and the vellum using the larger die. I glued the vellum behind the frame and added foam tape around the opening on the back side. Then I added my shaker mix. Thanks to Heather for the gorgeous mix of black/grey shaker elements - perfect for the background paper! Thought for sure I had some snowflake sequins around here someplace but couldn't find them... so I added some white glitter to the mix. Popped my bokeh panel on - done with the shaker! I love BoBunny papers and this 6x6 pad has so many yummy patterns!! I finally settled on a snowflake pattern, which I cut using the MFT scalloped rectangle, to layer onto my card base. Added the shaker to the layered card base. The JOY die from Hero Arts fit perfectly across my shaker window, then I added on a trio of snowflakes from my stash and some gems/pearl. The bottom snowflake came from Heather - thanks again!

Here's a view of the card laying flat on the table:

Joy shaker

Thanks to Heather for another fun challenge! See my challenge to her HERE and thanks for stopping!

Tuesday, August 2, 2016

Use Blog title to create a Christmas card

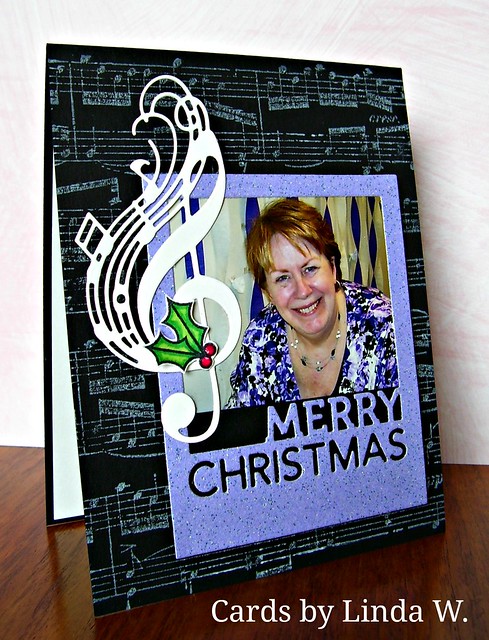
Happy Tuesday everyone! That Heather - she dreams up the craziest challenges!! This week I'm to create a Christmas card that somehow incorporates my Blog title - Scrappin', Stampin' & Singin'. I didn't have to think for long :) and off I went. Here's the card:

Merry Christmas Polaroid
Supplies: Paper - Anchor Paper black, the Paper Studio glitter paper, Neenah Solar White
Stamps - Hero Arts CG222 Music Background, Paper Smooches Warm Hearts (holly)
Dies - Simon Says Stamp Holiday Frames, Cheery Lynn Whistle a Happy Tune
Ink - Hero Arts Unicorn White; Other - Copic Markers, foam tape, Glossy Accents

I don't do much scrapbooking anymore and rarely blog about it. To incorporate that element in my card, I decided it had to have a photo! The Polaroid die from Simon Says Stamp called to me to pop in a photo from my retirement party. I thought a sparkly lavender frame would pull the color from my sweater in the photo. There's also black in the sweater so I decided to stamp a music pattern in white on a black card. I added a musical clef die cut. Sad, but true, I had to pilfer the die cut off a leftover gift bag I made for the chorus boutique - I couldn't find my clef die!! To finish with another stamped element, I used a sweet holly image that I colored with Copic markers and fussy cut. I added Glossy Accents to the berries. Done!

Fun challenge and I loved Heather's sample card incorporating the stitching in her Blog title; she does it so well! If you missed my challenge to her, see it here. Happy crafting and thanks for stopping by!!

Wednesday, July 27, 2016

More Christmas Critters

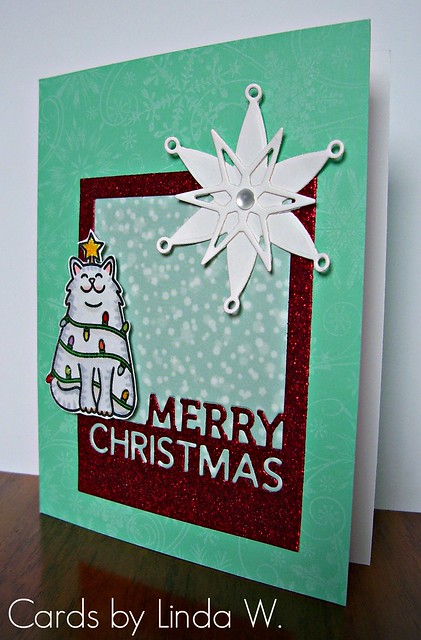
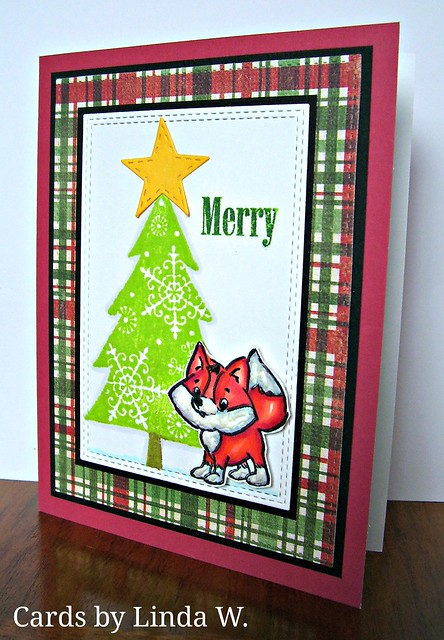
Hi all - I'm back with a couple more cards for Heather's challenge to have an animal on your Christmas card. I'm supposed to be making non-holiday cards today but I couldn't resist making a few more critter cards. On card 1, I used a darling kitty from a Sunny Studios set; on card 2, I used a sweet fox from Art Impressions I got for free at a stamp expo last year. Here are the cards:

Merry Christmas cat

Supplies: Paper - Hero Arts pool card; Neenah Solar White; Lawn Fawn "Let's Bokeh in the Snow" 6x6 pad
Dies - Simon Says Stamp Holiday Frames; Spellbinders Holiday Greetings (2 medium snowflakes, layered)
Stamps - Sunny Studio "Santa's Helpers"; My Daily Bread Snowflake Background
Other - Copic Markers; Glossy Accents; Lemon Stickles; Michael's Reflections gem; Hero Arts Unicorn White Ink; foam tape

Merry Christmas fox
Supplies: Paper - Hero Arts grenadine card; Neenah Solar White; Michaels Yellow & Black; Paper Studio Old World Winter
Stamps - Hero Arts CL465 Tree-mendous; CL343 Holiday Sayings; Art Impressions Unmounted Freebie Fox CHA2015
Dies - Simon Says Stamp Bundle of Stitched Shapes (star); My Favorite Things Blueprints 20 (stitched rectangle) & Double Stitched Rectangles
Ink - Distress Inks Twisted Citron and Pine Needles; Other - Copic Markers; Memento Tuxedo Black ink; Liquid Applique; foam tape

Hope you're having a crafty day! See this week's challenge to Heather here. I'm off to make the card I need to mail today. Thanks for stopping!!

Tuesday, July 26, 2016

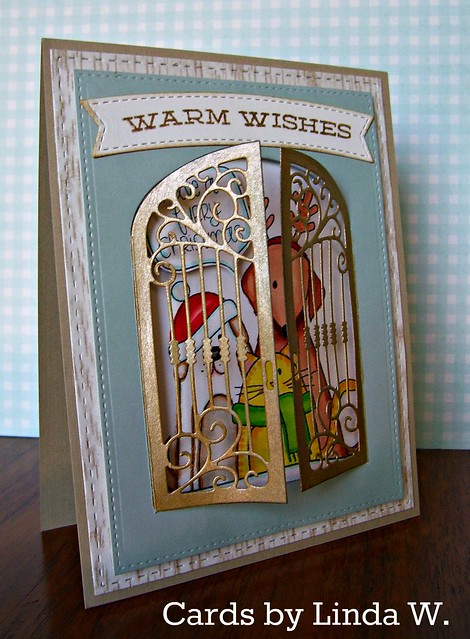
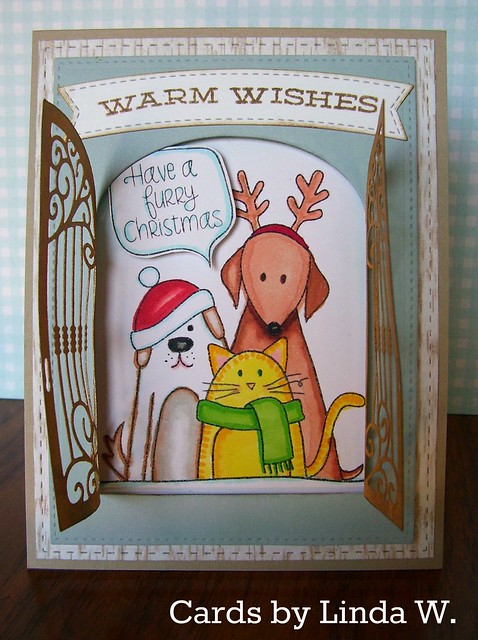
A Furry Christmas

Hi all - my friend Heather has challenged me to make an animal Christmas card this week! How fun is that?! I'm an animal lover and have had many pets over the years, mainly cats. So, I knew my card had to have a cat on it! I picked this darling furry trio image that Heather sent me - thanks, Heather! Here's my card:

Warm Wishes Furry Christmas gate closed
Supplies: Stamps - Simon Says Stamp "Furry Christmas"; Hero Arts with Studio Calico 331232 "Spread Joy"
Dies - My Favorite Things Die-Namics Blueprints 20 (stitched rectangle) & 28 (banner); Penny Black gothic gate 51-146; 
Simon Says Stamp Bundle of Stitched Shapes (largest stitched rectangle)
Paper - Authentique "Cozy"; kraft and blue cardstock from stash by unknown
Distress Stains - Tarnished Brass; Distress inks Frayed Burlap & Black Soot

Here's a view with the gate folded open:
Warm Wishes gate open

I die cut the blue stitched rectangle and then die cut the gate into it. I masked off all but the gate and painted the gate with the brass stain. Once dry, I popped this piece with foam tape over the white stamped panel I had colored with Copics. The speech bubble was stamped separately (Heather sent me a few on a sheet) so I fussy cut it and popped it with foam tape by the pets. I adhered this all to the woodgrain panel I had die cut with the larger stitched rectangle and put it on a A2 top fold kraft card. Die cut and stamped the sentiment banner - done!

I'm adding this to Lori's Summer Link-up over on Merry Monday, the place to go for inspiration to get your Christmas card stash ready. Merry Monday will be back to challenge us in September, meanwhile I hope you're finding inspiration from Heather's and my challenges!

If you didn't see my challenge to Heather yesterday, find it here - it's emboss/resist and I had fun with it! I look forward to seeing what Heather creates! Thanks for stopping and I hope you're having a crafty week!!

Friday, July 22, 2016

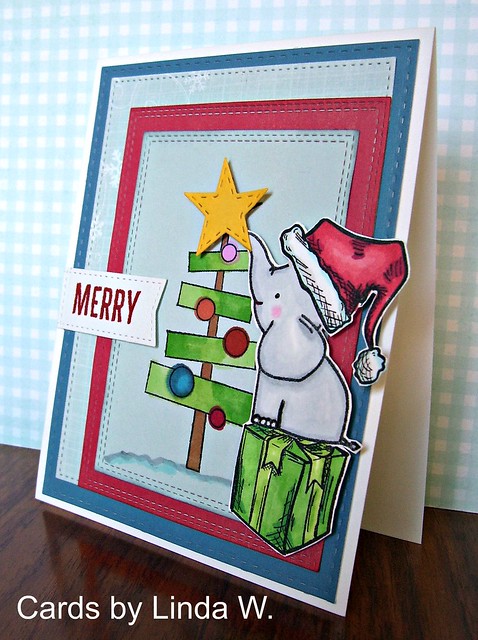
Merry Elephant

Happy Friday - I'm back with another card for Heather's challenge to me this week. Challenge is to use a non-Christmas stamp for your Christmas card. As I was flipping through my stamps sets on Monday, I considered using the elephant in the sweet Avery Elle "Ellie" set but moved on to make a chair card (see it here). Every time I passed my crafty space this week, I was drawn to that elephant image. Here's what I created with it today:

Merry elephant
Supplies: Stamps: Hero Arts G5805 Shari's Tree No. 3; CL802 Christmas Crystals (sentiment);
Stampers Anonymous Tim Holtz Collection CMS237 Crazy Things (present & Santa hat); Avery Elle ST-15-09 Ellie
Paper - Neenah Solar White; Hero Arts Azure; Authentique Cozy 6x6
Copic Markers; Fired Brick Distress Ink
Dies: My Favorite Things Die-Namics Blueprints 20 & Double-Stitched Rectangles; 
Simon Says Stamp Bundle of Stitched Shapes (star & large rectangle)

I started by stamping the Santa hat, masked it and then stamped the elephant, masked him and then stamped the present. Colored the final image with Copic markers and fussy cut it. Popped it with foam tape on the layered rectangles. I stamped the tree on the pale blue rectangle and colored with Copics. Unfortunately the Authentique paper wasn't Copic friendly so there was a bit of bleeding but I was fine with it.

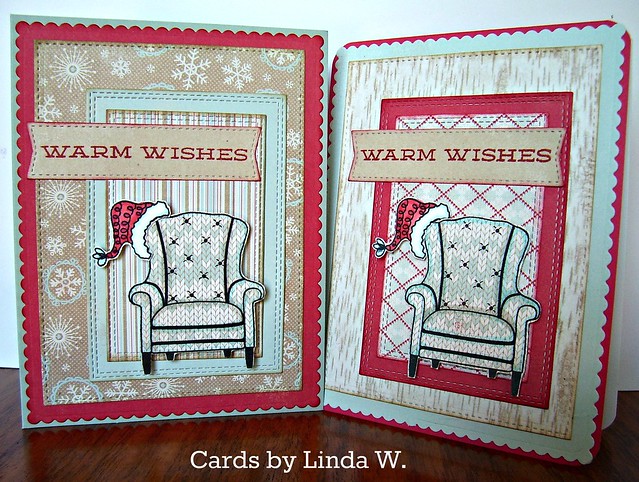
While I was at it, I made a few more chair cards. I used Authentique Cozy papers on these and the sentiment is from Hero Arts/Studio Calico clear set 331232 Spread Joy. Otherwise the supplies were as shown on my other chair card.

Warm wishes chairs

I like these versions but still like the original the best. I challenged Heather to make a one-layer card. See my sample card here. Can't wait to see what she creates!

Thanks for stopping!

Monday, July 18, 2016

Heather's Challenge 3 - Use a non-Christmas image

Hello everyone! My friend Heather threw a curve ball today in our little summer of Christmas challenges! She challenged me to use a non-Christmas image as the focal point to a Christmas card. Hmmmm - what to do?....

We often do Scrambles (timed challenges) on the Hero Arts Flickr Group. I've learned to grab what's near and go with it. Today I had a stack of non-Christmas stuff still sitting around from Kathy's 30-day Coloring Challenge and I found a fun retired Hero Arts set I thought would be perfect. The set features chairs and other living room furniture and the biggest chair reminded me of a Santa chair! Can you tell I've been watching too many Christmas movies on the Hallmark Channel this month?! Here's my card:

Christmas chair
Supplies: All Stamps by Hero Arts - CL480 Wish You Were Here (chair); CL368 Create Your Own Snowman (Santa hat); CL906 Color Layering Dimensional Bird (sentiment)
Inks - Memento Tuxedo Black; Tim Holtz Distress Inks (Black Soot, Fired Brick)
Paper - Hero Arts Punch Layering Paper; Authentique Festive 6x6 paper pad
Other: Copic Markers
Dies: My Favorite Things Die-Namics Blueprints20 & Double Stitched Rectangles

Thanks for the super fun challenge, Heather! See my challenge to her from earlier today (sorry for two posts in one day!!). Have a crafty week!!

Friday, July 15, 2016

A More Elaborate Christmas CAS

Hi all - I'm back with another card for Heather's challenge to me this week to make a CAS Christmas card. I went to visit my parents this week and, on the way, stopped at CF Stamps. They carry tons of dies and I always find something there! This time, I picked up a couple of dies and a cling stamp (you're sure to see this stamp on an upcoming challenge to Heather...). I started playing with one of the dies - Penny Black's Dancing Leaves. The "berries" on it matched so well with the PB Whirl Wreath I used earlier this week, I decided to make a wreath card using both dies. Here's the card:

Joy Wreath


Supplies: Paper - Neenah Solar White; Reflections (Michaels) green, Anchor Paper vellum, the Paper Studio glitter paper. Other: Reflections clear gems
Dies - Penny Black Whirl Wreath & Dancing Leaves
Stamps - Hero Arts CL474 Special Wishes (wreath) CL644 Bring on the Merry (sentiment)
Ink - Time Holtz Distress Ink: Fired Brick & Pine Needles

I cut two Whirl Wreaths and glued them together rotating the second one so they weren't lined up. The bottom one was card stock sponged with a bit of Pine Needles Distress ink. The second one was cut from green vellum. I cut the Dancing Leaves twice from a darker green card and snipped them apart to fit it into the Whirl Wreath. While I was digging though my stamps for a JOY stamp to put in the wreath's center, I found a 2010 Hero Arts Christmas wreath stamp (retired) that I thought would be perfect under the die cut wreath. Here's a photo of the original version with the more elaborate one alongside:

Wreath duo


Still a lot of white space so I think it qualifies as clean and simple? Anyway, let me know which card you like better. Obviously the original was easier and perfect for mass production, but the second was fun to layer.

Thanks for stopping and hope you're having a crafty weekend! If you stop back on Monday, I'll have another Christmas challenge for Heather.


Wednesday, July 13, 2016

Heather's Christmas Challenge 2 - create a CAS card

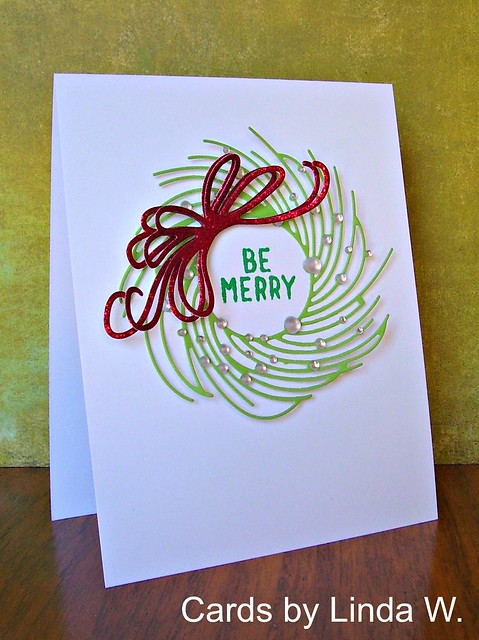
Heather's challenge to me this week - create a CAS Christmas card. Hmmm, the clean & simple style isn't one I use very often but I thought right away of a fun wreath die. Here's my card:

Be Merry Wreath
Supplies: Paper - Neenah Solar White; Hero Arts grass layering paper; the Paper Studio glitter paper   
Die - Penny Black Whirl Wreath (bow cut twice and layered with foam tape); Gems - Michael's Reflection

Thanks to Heather for the fun challenge and I can't wait to see what she (or anyone else who wants to play) creates with the challenge I issued this week. Another Christmas card made - yay!

Have a crafty week and thanks for stopping by!!


Thursday, July 7, 2016

Christmas Quilt Card

Hi all - Just got home this afternoon from a trip to visit my parents and my aunt & uncle. I headed right to my crafty space to take up Heather's challenge to make a Christmas quilt card. I'm sure she figured I'd go for my Taylored Expressions quilt die - instead I picked a My Favorite Things Die-Namics die set which has some quilt elements. Having cut several to have parts to piece it, I can make more of this type of card - just didn't have time to get 'er done today. Here's my card:

Christmas Quilt
Supplies: Stamp: Hero Arts DC170 Merry Stamp&Cut
Dies: My Favorite Things Die-Namics Blueprints 20 & 21; Merry die from Sunny Studios "Santa's Helpers" set
Paper: Neenah Solar White; Hero Arts pool card stock (darkest shade); DCWV glitter paper; 
Penny Black "Holiday Trimmings"; scrap of red for the quilt outline.
Ink: Tim Holtz Distress Ink - Fired Brick; Other: foam tape for dimension

Thanks to Heather for the fun challenge and I hope everyone's enjoying the holiday week!! And remember my challenge to Heather this week - I'd love to see your Christmas tree card if you decide to play along!

Thanks for stopping by!!