Welcome to my blog!

Thanks for visiting my blog. As the title suggests, I love to scrapbook, stamp, and sing! I will share cards and scrapbook pages I create, as well as information about my music - Barbershop harmony.

Sunday, September 26, 2021

Kitty with a Cauldron

Hey crafty friends - I made a quick card this afternoon for the current Tic Tac Toe Challenge #132. My friend Betty (created by bjk) hosts this week with a fun board she made - I just had to play along!! 

Here's my card:

Supplies: Paper - Ms Sparkle A2 card; Neenah white and black; 
Doodlebug & My Mind's Eye patterns
Stamps - Sunny Studio Bewitching
Dies - A Jillian Vance Design Art Deco Backdrop Die Set;
Sunny Studio Bewitching Dies
Other - Copic Markers, Stickles, foam tape, 
Memento Tuxedo Black ink


I used the top left to bottom right diagonal of Die Cut*Free*Fall/Halloween Theme. Betty likes Halloween so I brewed up a cauldron full of fun for her. I couldn't resist Sunny Studio's cute kitty. She'll be useable all year round since the witchy hat is separate. Found a fun MME ombre paper and cut it with a deco die. The die set has a large A2 frame and then interior layers for matting. I didn't want to use the entire frame but trimmed some pieces for the right side of my card. Not sure if I like it but, oh well...

I used some Penny Black Halloween stamps for the background; thanks again to my friend Jean (Right as Rain) for sending them to me! The sentiment is from the kitty set. And here's a snippet of my first photo - I kept looking at it and realized my cauldron was upside down!! My first thought was, did I color the flames wrong - LOL. Had to carefully peel off the errant cauldron, flip it & reattach, then take a new photo - such a pain.

So that's my card for today - thanks to Betty for the fun TTTC board and to the rest of Team X for their inspiration! I'm also adding my card to Darnell's September NBUS Challenge since my kitty set is getting its first play today. Thanks Darnell for helping me use my stash!!

Hope you have a crafty day - thanks for visiting!


Tuesday, September 21, 2021

Plaid Be Merry!

Welcome, crafty friends! It's a beautiful day in Minnesota with gorgeous blue skies - really makes you want to get out there & enjoy it! So what do I do? Stay inside and make a card... Here's my third and final entry at the current CAS Christmas Card Challenge to use plaid.

Supplies: Paper - Hero Arts Dove White Top Folded A2 card;
Neenah Classic Crest Solar White 110lb
Stamps - Hero Arts Swirl Christmas & 
Family and Friends (both retired)
Stencils - CZ Designs Simple Patterns Trio;
Tim Holtz Stripes
Other - Pine Needles & Barn Door Distress Inks;
Hero Arts Red Royal ink; Parklane gem

I wanted to play with some Cathy Zielske stencils I just bought from Simon Says Stamp. The set comes with three - I just used the diagonal striped one here, brushing Pine Needles Distress ink onto a white A2 panel. It really makes a nice rectangle. Then I created the messy plaid by brushing Red Barn with Tim Holtz stripes vertically and Pine Needles horizontally, basically letting it go outside the diagonal rectangle to the sides and top. Realized my bottom border wasn't straight so I die cut my panel to get a nice spot for the sentiment. Cut 2 additional rectangles and layered for dimension. Stamped the reindeer over top of the plaid & added a gem, then adhered to an A2 top fold card (love these HA Dove cards!!).

I'll also add my card to Darnell's September NBUS Challenge since my CZ stencil is getting first play today. Thanks to all for fun challenges & to you for visiting!! Have a crafty day - now I'm off to enjoy the great outdoors!!


Saturday, September 18, 2021

Thanks Twofer

Happy weekend everyone - hope you get some time in the craft room! I had a chance this morning to create a couple of thank you cards. I was searching through my crafty stash and, lo & behold, found a binder full of embossing folders - yay!! A old Cuttlebug Thanks folder with loads of letters came forward to play in Let's Squash It! #12 - Sand It! using a numbers &/or letters folder. Also, I'll be guest designer at Day of the Month Card Club next month; my card will work perfectly for their September Challenge - World Gratitude Day

Supplies: Paper - Hero Arts Dove A2 card;
Paper Studio Brights & Glitter cardstocks;
Neenah Classic Crest Solar White:
Tim Holtz Classic Kraft Stock
Embossing Folder - Cuttlebug Thanks (retired)
Dies - My Favorite Things Blueprints 8 & 32 (retired);
Stamps - Sunny Studio Words of Gratitude

I embossed and sanded a piece of Tim Holtz kraft core cardstock using the Thanks folder, then distressed the edges too. I had a die cut blue panel that I used to arrange my thanks and some red glitter pieces cut with Blueprints 8. I received the September My Monthly Hero kit in the mail on Thursday & had to play with it. Besides a stamp set and gorgeous layering stencils, there are two word dies. I used the outline portion of one of them. 

The little sentiment strip is from a new set by Sunny Studio. I taped the entire set into my MISTI with washi tape and stamped a white on black panel (didn't photograph it). Also stamped and white embossed a black panel; take a look at how fun this is:


After carefully hand trimming the lower right sentiments, I used my paper trimmer to cut strips from the remainder. Now I have loads of these little sentiment blocks with very little effort!! And now, a Twofer:

Additional Supplies: Paper - Sunny Studio Sweater Weather
Dies - My Favorite Things Blueprints 20 (retired);

I actually embossed this panel first - inked the ef with Salt Water Taffy ink (Taylored Expressions) for a chalkboard effect. Next I embossed the panel & ran blue ink along the raised edges, then sanded it. You can't really see the sanding effect well at all - very disappointing! That's when I went to the TH kraft core cardstock for my Squash It entry.

I'll also enter card one into Darnell's September NBUS Challenge since the thanks die is new and so is the sentiment strip stamp set. Thanks to all for fun challenges!

Thanks for visiting!


Wednesday, September 15, 2021

Girl in Forest

Hey crafty friends - hope you're enjoying your day! I'm sharing this little girl card for inspiration at Die Cut Divas today - we're just doing two posts from the team this month 1st & 15th. We're using digital images by our sponsor Morgan's ArtWorld but they're not required for the challenge which has the theme of Anything Goes. Besides the card details for my little girl, I have a bonus card below!!


Supplies: Paper - Hero Arts Dove White;
Paper Studio Brown; Neenah White; Momenta Watercolor print
Digi - Morgan's ArtWorld (Creative Art Design Studio) Children Set 1
Dies - A Jillian Vance Design Stitched Dot Rectangle Background
Momenta Word Fetti (retired)
Taylored Expressions Birch Tree Cutting Plate
Stamps - Hero Arts Winter Time Fun
Other - Copic Markers; foam tape; white gel pen

To purchase our sponsor's images, please visit their website at Creative Art Design Studio.

Visit Morgan's ArtWorld Facebook Group HERE.


https://www.facebook.com/groups/848616968526756/

Our random prize winner, to be announced 10/3, will win some digi images from our sponsor!


Diva Arlene (A Bit of This and That) printed me some images for my posts since I have no printer. Anyway, this girl with the tree and flowers were on a page so I needed to fussy cut them all to arrange on my birch cover plate. Since I cut the birch trees in white, I decided not to color anything but the girl image. The bunny, shaded a bit but basically white, is from a Hero Arts stamp set. I had cut a bunch of words from the Word Fetti die set and decided to use "live laugh love" for the sentiment. Done!

And here's a bonus butterfly card:

Supplies: Paper - Ms Sparkle A2 card; Momenta watercolor print
Digi - Morgan's ArtWorld (Creative Art Design Studio) Fae 18
Dies - A Jillian Vance Design Stitched Dot Rectangle Background;
Elizabeth Craft Designs Small Butterfly (retired) but 
Frantic Stamper had a couple left HERE
Stamps - Simon Says Stamp CZ Design Silhouette Sentiments
Other - Copic Markers; foam tape; white & black gel pens; 
Hero Arts ink; Park Lane gems

I love the digis for the variety of sizes you can print; thanks again to teamie Arlene for printing them! Like my previous Morgan digi butterflies, I gave this one a die cut body. The Copics I used can also be found at that previous post. I was enabled by my friend Lin (Sending Hugs) to get the Silhouette Sentiments set - thanks Lin! You can see her cards with that set HERE.

Looking forward to seeing your Anything Goes creations using a die cut &/or embossing folder in our Diva gallery by 9pm Pacific time on 9/30/21. Thanks for visiting!!


Tuesday, September 14, 2021

Big Birthday Balloons

Hey there - I'm back to redeem myself at Let's Squash It!! where I failed to read the fairly large print in the challenge post. I hastily read only the title and copied the banner that said to sand it. Well, you're to sand it alright, but must use an embossing folder with numbers or letters. OK - out with my previous card that contained neither and on to something new for Challenge 12!

Supplies: Paper - Echo Park Dots & Stripes;
Paper Studio red A2 card; Tim Holtz Jewel Kraft Metallic
Embossing Folder - Sizzix 3D Happy Birthday
Dies - My Favorite Things Blueprints 26 (retired)
Stamps - Hero Arts It's Your Day & 
Birthday Sayings (both retired)

Most of my embossing folders aren't with me at present so I didn't think I had anything with a number around. Then Gail pointed out it could be letters too. LOL - just bought a new 3D folder last week when I was doing a paper search at Hobby Lobby. Also bought another embossing folder with the cut feature but it contains neither a # nor a letter...too bad. I also found a few glimmer plates on clearance, practically free!! Luckily I resisted buying one I already own.... 

For today's card, I die cut three MFT balloons and embossed them with the birthday folder, then sanded. Added to some striped paper on an A2 card, along with the strings and bow. It looked a bit bare so I stamped some party words on there - done!

Sorry again Gail, Jo & Alice for my error - hope this one works at Let's Squash It!! I'm also adding this to the current NBUS challenge since my embossing folder is new. I can also add to the current Watercooler Wednesday Challenge All About Occasions. Thanks to all for fun challenges - I'll try to read more carefully next time I enter one. Wish me luck!!

Thanks for stopping by & have a crafty day!!


Sunday, September 12, 2021

Sanded embossing

Hey crafty friends - I'm a bit washed out from watching too many 9/11 documentaries. Ones I picked, though, focused on survivors and it was great to hear what they've done with their lives in the past 20 years! I also celebrated my baby sister's birthday and she enjoyed the cake (no candles) I got for her.

Today I'm sharing a card inspired by the Let's Squash It!! Challenge #12 Sand It! **Update - it can't be for the challenge because my embossing folder doesn't have a number. I don't have any of those with me at present.

Supplies: Paper - Ms Sparkle A2 kraft card; 
Tim Holtz kraft metallic; Neenah white 
Embossing Folder - Taylored Expressions Nordic Holiday (retired)
Dies - A Jillian Vance Design Sweet Gingerbread Add On Set &
Taylored Expressions - Birch Tree Accessories;
Other - Parklane gems; Stamp on It vellum;

I started out with a stitched rectangle embossed with the Nordic Holiday. The pattern seemed crooked so I trimmed it and backed with white and adhered to kraft for the Scandinavian look. Was going to just add the deer with a merry die cut but decided to put vellum behind him. Ugh, the background still looked crooked so I added some snowbanks and then a long, printed sentiment strip to cover up a wrinkle. 

I definitely don't like how the vellum looks pink atop the metallic red - not just in photo but in real life - darn it!! Oh well, another Christmas card for the stash and I really love the sanded kraft metallic paper. I'd not done it with this paper until now - great effect!! 

Thanks for stopping - hope you have a crafty day!!


Friday, September 10, 2021

A Retirement Bouquet

TGIF crafty friends! Hope you have a special weekend planned - those of us in the US will be observing Patriots' Day tomorrow in remembrance of the horrendous events of 20 years ago. It's also my baby sister's birthday so we have joy from that dimmed by the deep sorrow from 9/11/2001. But we will celebrate her birthday with a cake - no candles, she said.

For today I have another card featuring the Hero Arts Togetherness Bouquet - this time I stamped it onto watercolor paper and colored with Distress reinkers. You can see a mini slimline version I did last month HERE. The new version will go to my neighbor Therese who's retiring this month. She loves flowers and maintains a stunning garden that I envy.

Supplies: Paper - Neenah white; Momenta watercolor print;
Paper Studio silver A2 card; scraps of various greens;
Strathmore cold press watercolor paper; Co'redinations White Glove
Stamps - Hero Arts Togetherness Flower Bouquet;
A Jillian Vance Design Tweet WordsAltenew Floral Frame
Dies - A Jillian Vance Design Stitched Plaid Coverplate;
My Favorite Things Blueprints 28 (banner - retired);
Spellbinders Sentiments One; CAS-ual Fridays Garden Fri-dies (retired)
Taylored Expressions Rustic Floral
Other - various Distress Reinkers; Michael's gems

I had to go on the hunt for white glitter paper today since my Paper Studio (Hobby Lobby) Christmas pad mix didn't have any left. Well, didn't find that Christmas pad at the Hobby Lobby I visited and they didn't have any single sheets of white. Then I tried Michael's - no luck. Finally found some at JoAnn's. Die cut Congratulations from the white glitter (it's a very subtle one) and then stacked atop some plain white ones. The little flagged banner is a really long one and I just did the trick of cutting down the end. The sentiment stamp actually says "Congrats on your retirement" but I just did some surgery and snipped off the Congrats - it'll come in handy as a single word later. I also stacked some white die cuts behind the watercolored bouquet for some dimension.

That's it for now. I'm sending this card to Watercooler Wednesday - All About Occasions Challenge and the current NBUS Challenge since my Tweet Words stamp set is new. Hope that's not too little of an NBUS, Darnell...

Thanks for stopping & happy crafting!


Tuesday, September 7, 2021

What the Elf?!

Hey crafty friends - it's always hard to get back on track after a holiday weekend. Luckily, a new Christmas Kickstart Challenge has posted today! After my early morning dental check-up I hurried home to start something right away. Challenge 54 asks for a funny card so I went with a 2017 Hero Arts stamp set with puny elf messages.

Supplies: Paper - Sunny Studio All is Bright;
Paper Studio teal and red; Neenah White
Die - My Favorite Things Blueprints 2 (retired)
Stamps - Hero Arts Irreverant Elf Messages (retired)
Other - Copic Markers

Besides the puny elf messages like "but first lemme take an elfie" and "no elf'n way", the set contains oodles of little icons & elf heads. I first stamped a grid of 9 (3x3) heads using a MISTI. Then I spotted an old film strip die with 5 openings. So I added 2 more heads to vertical row 1, colored them with Copics (hand drawing the bodies), and put them behind the grid windows. Added a candy striped panel, solid strip and the sentiment - done! Thanks to Jo & elf Anesha for a fun challenge!!


Monday, September 6, 2021

More Christmas cards

Happy Labor Day to those celebrating in the great USA!

I'm still working on my Christmas stash - in barely 3 months we'll have to begin mailing them! I'll start by sharing another poinsettia card with plaid for the current CAS Christmas Challenge.

Supplies: Paper - DCWV A2 card; Pink & Main Jolly;
Paper Studio Holiday & glitter; Neenah white
Dies - Hero Arts Paper Layering Poinsettia
Stamps - Simon Says Stamp Diagonal Stripes;
Hero Arts red and green inks; Twisted Citron Distress Ink

This time I used a solid but two toned poinsettia with some green plaid leaves atop a stamped plaid border. My intention was to stamp plaid through a forest stencil - it turned out badly, take a look:


Last Thursday I received a Sunny Studio order with a new forest stencil set - love, love, love it. Had to give it a go and made the card below yesterday. So today I thought it would be fun to try stenciling a plaid through it - nope, too small a stencil area for those big red rubber stripes. Oh well, I used the bottom plaid panel for my poinsettia card and the rest went to recycling. I even had to cut off the nice white area above the tree since my inky fingers blobbed it, sigh... I used two brands of diagonal striped backgrounds, each in its separate MISTI. Made it so easy to ink with one color then pop the panel into a second MISTI for the other stamp with a different color.


Supplies: Paper - DCWV A2 card; 
Neenah white & black; Paper Studio glitter
Dies - A Jillian Vance Design Sweet Gingerbread Add On Set &
Mowed Lawn, Evergreen Bough, & Pine Needles Distress Inks

The Sunny Studio stencil set contains three panels and I used all three multiple times with three different Distress Inks to create my forest. Thought it would be fun to add a die cut tree from a new die set I bought from AJVD recently. I'm adding my stenciled forest card to NBUS 30 since the stencil set got first use here. ** Update - Jennifer McGuire shared a different forest stencil card here today, with a video - love how hers turned out although she wasn't the inspiration for mine. These layered forests have been done before - I don't claim mine was the first :)

That's it for today, friends - have a wonderful day!!


Friday, September 3, 2021

Plaid poinsettia

Hey everyone - it's a gloomy day here in Minnesota but the September CAS Christmas Challenge brightened things up! Theme = plaid, how fun!! I still had a bunch of materials out from a previous poinsettia card and decided to make a CAS plaid version!

Supplies: Paper - Neenah white; Lawn Fawn Perfectly Plaid - Winter;
Pink & Main Jolly; Paper Studio Holiday & Old World Winter
Dies - Hero Arts Paper Layering Poinsettia;
A Jillian Vance Design Mini Slimline Backdrop Set;
Other - Honey Bee gems;

The plaid poinsettia has two layers of the red plaid from Old World Winter and the middle layer is from Pink & Main's Jolly. I used the AJVD slimline set for my trio of rectangles; the plaid one is from Lawn Fawn's Winter plaid. Sorry if the photo is bad; it is VERY gloomy & rainy today! 

If you checked out my previous slimline poinsettia card, I'd be interested to know which one you prefer. The Hero Arts poinsettia die I used is a fave and I use it often every year - first year for mini slimlines though!

Julia, one of the CAS Christmas DT, wonders how the Christmas card production goes. Well, with this one I'm up to 47 so better than one per week but nowhere near where I should be! Thank goodness for CAS Christmas to inspire me!!

That's it for today! Thanks for stopping and happy crafting!!


Thursday, September 2, 2021

August 2021 Card Chain Challenge Reveal

Hey friends - It can't be September 2nd already, can it?? Oh my, this year is flying by!! Today we're revealing cards sent around the world for the August Card Chain. Twenty-five people participated; see the entire chain HERE. My card went to the delightful Joanne (Ambrosia and Iron) in the UK.

Supplies: Paper - Anchor Paper & Paper Studio (solids);
Carta Bella Devoted (patterned/retired)
Dies - Taylored Expressions Rustic Layered Floral
Avery Elle Pierced Hexagon (retired)
Other - Park Lane gems;

I used the colors and the sketch (modified a tad).


The sketch seemed to call for a square card which was perfect for my overly large Avery Elle hexagon, used in lieu of the sketch's square element. I got the AE set half off on one of my summer shopping sprees at Anchor Paper - couldn't resist it after Jeanne (Reba Li Creates) enabled me! While it is retired at Avery Elle, I spotted it back in August at Frantic Stamper (go here if desired - there weren't many left, though, so it may be gone by the time this post runs). I searched my patterned papers and found the perfect piece - luckily there was enough for a small strip! Next, I looked for a flower to be the circle element from the sketch and came across a fave TE flower. Now the funny part - Joanne received my Feb 2020 CCC card and I used the same flower!! Sorry about that, Joanne - you'd think I could've found something else in my tons of stash!! At least it was a slightly different color....

I received this darling card from Lia (Lia's Design) in the Netherlands. I just love the seagull with the shells and glittery waves!! Thanks Lia and thanks too for the darling travel stickers!!


Thanks to Gail & Jo for continuing the Card Chain Challenge - quite a challenge with the delays in the various postal services!! You have until September 7th if you'd like to sign up to participate for September - details HERE.

Thanks for visiting!!


Wednesday, September 1, 2021

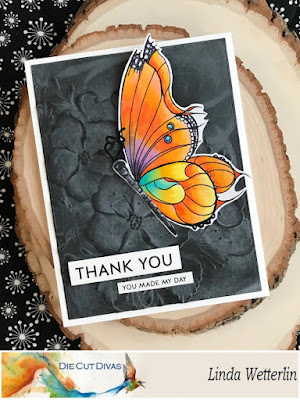
Butterfly on Black

Hey crafty friends - I'm glad you stopped by! I'm sharing this butterfly card for inspiration at Die Cut Divas along with the entire team. We're using digital images by our sponsor Morgan's ArtWorld this month but they're not required for the challenge - Anything Goes which starts today!! Besides the card details, I have a bonus card below!!

Supplies: Paper - Hero Arts Dove White;
Paper Studio Black
Digi - Morgan's ArtWorld (Creative Art Design Studio) Fae 18
Embossing folder - Altenew Decorative Florals 3D
Dies - A Jillian Vance Design Stitched Dot Rectangle Background
Stamps - Hero Arts Color Layering Dragonfly
Other - Copic Markers; foam tape; white gel pen;
Color Infusions Memory Thread;
Simon Says Stamp Sentiment Strips Thanks

To purchase our sponsor's images, please visit 
their website at Creative Art Design Studio.

Visit Morgan's ArtWorld Facebook Group HERE.


https://www.facebook.com/groups/848616968526756/

Our random prize winner (to be announced 10/3) will win some digi images from our sponsor!


Here's a photo of the Copic Markers used plus the inspiration for my butterfly colors:


I received some handmade earrings as a gift and the business card of the jeweler contains a beautiful butterfly. I did my best to copy the colors and love how it turned out! I doodled some extra white dots and added a body (trimmed from a dragonfly stamp) with antenae. Hard to see in the photo but the antenae are a thick thread you can shape - very fun! I twirled them on a paper piercer.

Next, I die cut a stitched rectangle and embossed it using the Altenew ef. I inked first with white ink and then with some black on the raised parts. Please note that my sandwich wasn't thick enough and the 3D embossing didn't reach its full potential. I had embossed these panels before I made some other cards with this ef back in August - see the full 3D embossed effect here & here if desired. Adhered the embossed panel to a top fold A2 card, added the butterfly and sentiment strips - done! I left off any additional embellishments so as not to detract from my colorful butterfly.

And here's a bonus butterfly card:

Supplies: Paper - Ms Sparkle A2 card; Paper Studio black;
Momenta watercolor print
Digi - Morgan's ArtWorld (Creative Art Design Studio) Fae 18
Embossing folder - Altenew Decorative Florals 3D
Dies - A Jillian Vance Design Stitched Dot Rectangle Background;
Elizabeth Craft Designs Small Butterfly (retired) but 
Frantic Stamper had a couple left HERE
Other - Copic Markers; foam tape; white gel pen;
SSS sentiment strip

I love the digis for the variety of sizes you can print; thanks to teamie Arlene for printing them! Thought this smaller butterfly was so darling but also thought it needed a body so I gave it a die cut one! I attempted to ink the ef when I embossed the panel for this card too. Guess I chose the wrong ink because it got smeared but I continued blending until I got a usable background. The smaller butterfly looked adrift on the big background so I corraled it with a Honey Bee frame. My friend Betty (created by bjk) sent me some and enabled me to buy the die after I tried her cuts!!

Looking forward to seeing your Anything Goes creations using a die cut or embossing folder in our Diva gallery by 9pm Pacific time on 9/30/21. Thanks for visiting!!