Welcome to my blog!

Thanks for visiting my blog. As the title suggests, I love to scrapbook, stamp, and sing! I will share cards and scrapbook pages I create, as well as information about my music - Barbershop harmony.

Sunday, August 30, 2020

Crazy for Swiss Dots

 Back again with some more paper piecing on cute critters - I went crazy for dots!! Here's my card:

Supplies: Paper - Paper Studio kraft A2 card; Bazzill brown;
Neenah Classic Crest Solar White; Doodlebug Rainbow Swiss Dots;
BoBunny Enchanted Harvest; Lawn Fawn Let's Polka
Stamps - Hero Arts CM355 From the Vault Cute Animals (hippo), 
CL155 Playful Animals (monkey & sentiment) - retired, 
CL438 Let's Chill (palm tree) - retired, 
and CL377 Be Happy (sun) - retired
Other - foam tape; Darice googly eyes; Copic Markers;
Hero Arts reactive inks; Distress Inks - Twisted Citron and Mowed Lawn

After finishing yesterday's cute critter scene, I watched a Barbershop Harmony online contest - top 10 high achieving quartets over 6 decades who'd never won their International Championship. Very fun and they'll announce the winners on Monday. Check it out on YouTube here if you want to watch a bit. When it ended, I was sucked into making another cute critter card - couldn't resist a darling Hero Arts From the Vault set, appropriately named Cute Animals. I've had it about a year and am just now getting to use it!! I chose the hippo image and built my scene from there, paper-piecing with various dotted papers. The sun isn't paper pieced - I just stamped and cut it out. Parts of the monkey and palm tree, the hippo and the coconuts were all paper-pieced. Thought the monkey would be cute with googly eyes.

My card is going to the following challenges: Stay Crafty with Hero (#14 Critters), A Blog Named Hero (Cute), Sweet Stampin' (Paper-piecing), and NBUS Challenge since my Cute Animals set is getting its first use. Thanks to all challenge holders for the fun!! Thanks to you for stopping by and have a crafty day!!


  Grab our badge to display on your blog.

Saturday, August 29, 2020

Cute Critters!

Happy weekend, friends - hope you're getting time outdoors as well as in the craft room!! Beautiful day in Minnesota (yes, we have them!) and I managed to pull weeds from the landscaping (not my favorite thing in the world). But I still had time this afternoon (& basically took it all) to make a cute critter card to enter at both the Stay Crafty with Hero Challenge - # 14 Critters and the new A Blog Named Hero Challenge - Cute. Here are my cute critters:

Supplies: Paper - Paper Studio brights & kraft;
Neenah Classic Crest Solar White 110 lb;
Lawn Fawn Let's Polka 6x6 (retired)
Stamps - Hero Arts CL438 Let's Chill (retired)
Dies - My Favorite Things Blueprints (retired)
Other - Copic Markers, pencils for shading;
Hero Arts clear lacquer

There were a bunch of beach challenges out there this summer and I pulled out a darling Hero Arts set (used it for my August guest designer Twofer here). Never made it to any beach challenge, oh well.... The set was still in the "pending return to proper place" pile (not yet a mountain) so I decided it would be perfect for both challenges! 

I planned the card using an A2 sized white panel and my Hero Arts MISTI, plunking stamps down to arrange my scene. I stamped the tree, ball and crab right on the panel, then drew lightly where I wanted my beach and ocean. I colored the crab directly on the card with Copics, then paper-pieced the ball and tree, adding accents with Copics. I paper-pieced because the Sweet Stampin' Challenge has that as the theme and my friend Dawn (Dawn's World), who's on the Design Team, shared a brilliant card with that technique here. Figured I might as well hit another challenge while at it!!

Next, I water colored the beach, ocean and sky (reactive inks & Antique Linen Distress). Note to self - next time do this BEFORE paper-piecing, although I think I did ok along the image borders . Ocean got a bit dark - no worries, spritzed more water and dabbed off (as Jennifer McGuire said - use heavy weight cardstock). Die cut the panel with a stitched rectangle and stamped the sentiment (it comes as one phrase, I snipped apart to get one word below the other). Finally stamped the birdie, colored with Copics, fussy cut, added lacquer to the sunglasses & popped onto the panel. Glued panel to kraft card and done - finally!!

Thanks to all challenge holders for the fun and thanks to you for the visit!!
PS - If you care to see "my masterpiece" of paper-piecing, visit my Flickr post here.


Friday, August 28, 2020

Foiled! And Foiled Again!!

Hey everyone - I have to laugh when I hear the word foiled. I think of that villian in the old Rocky & Bullwinkle cartoons who would said "curses, foiled again" whenever his evil plot failed. But now I'm talking about foiling on cards using the Spellbinders Glimmer Hot Foil system. Here's my card (I kept as much shadow off as I could):

Supplies: Paper - Spellbinders Vintage Mementos (from July kit)
Paper Studio silver A2 card & white cardstock
Spellbinders oval plate from the  Glimmer Hot Foil System set
Stamps - Hero Arts CG279 Musical Clef and 
Raisin Boat Feel the Beat (both retired)
Other - Recollections flowers, Spellbinders silver foil

I was shopping at Hobby Lobby a few weeks ago and noticed they had the Glimmer Hot Foil System set on special. I resisted - didn't need that, I said to myself. Then Jennifer McGuire showed all her fabulous cards and tips here - she made it look fun & easy. So today when I went to Hobby Lobby, I told myself I'd get the set if it was still on special. It was; so here I am with foiling on a card!! This one will go to one of my chorus members for our Stay-in-Touch program. It's a version of a previous card but I figure, with over 100 to make, I might as well modify each batch. I make & send about 8 cards every two weeks.

The oval was my first attempt at foiling - here's how it looked right after:


As you can see, I got foil where I didn't want it and my oval went a bit off the page. To get around the first problem, I fussy cut the oval. I flipped the flat end to the bottom & used flowers to cover it up! Next I tried some sentiments - Best Wishes came with the set and the rest came in a separate set I also purchased. One plate shifted in the machine ruining the "Thanks a Bunch" sentiment, oh well - I'm just learning, right? Otherwise, I got a bit better at it!


Next I tried a letterpress onto watercolor paper using the oval plate and Hero Arts ink:


Isn't that gorgeous? I love the texture of the watercolor paper showing through - so pretty in real life! I'll make a card with that panel sometime soon. I'll add my card to Virginia's August Show and Share (my last of four entries) and to Darnell's NBUS Challenge since my glimmer plate is new. Thanks again to both of them!

That's it for today - off to play with my new machine!!

August's Show & Share Grab our badge to display on your blog.

Thursday, August 27, 2020

Spellbinder's Card Kits

 Hey there - I'm playing around with a new die and some ephemera from a Spellbinder's card kit. Here's my slimline card:

Supplies: Paper - Anchor Paper & Paper Studio
Ephemera from Spellbinders July kit
Dies - A Jillian Vance Design (AJVD)  Slimline Stitched Plaid Cover Plate Die

This was a simple card. Cut a slimline base, added the die cut panel and the ephemera - done!! I also did an A2 card using the kit ephemera, textured card base & vintage papers, plus dies from AJVD Stitched Dot Rectangle Backdrop Die Set, some 3M washi & Honey Bee gems. Here's that card:


I have to say that three different friends, Jean (Right as Rain), Rosemary (Hey There .... rosigirl) & Virginia (Yes, Virginia) have inspired me so much with different Spellbinders kit projects that I finally enrolled! I've been buying Spellbinders for many years, nearly as long as I've been crafting, but haven't tried a subscription until now. Sorry - don't know who, if anyone, got "credit" for me enrolling... But thanks for the enabling, friends!! Oh, and to Rosemary for getting me hooked on AJVD too!!

I'll add this to Virginia's August Show and Share and to Darnell's NBUS challenge. Thanks for the fun challenges, ladies!! 

That's it for today - thanks for visiting!!

August's Show & Share Grab our badge to display on your blog.

Wednesday, August 26, 2020

Another Partridge

 Hey there - yes, yes, I know CAS Christmas's challenge with the Twelve Days of Christmas ended yesterday. But a partridge is a holiday bird so I'm using it for Christmas Kickstart - Christmas Birds. Here's my card:

Supplies: Paper - Hero Arts Decorative Woodgrain
Neenah Classic Crest Solar White 110lb;
Paper Studio Holiday; Momenta watercolor prints 8x8
Stamps - Stampin' Up Arrange a Wreath
Dies - Stampin' Up Wreath Builder;
Concord & 9th Happy Holidays Label Dies
Other - 3M Scotch packing tape; gems by unk;
Memento & Distress inks; brown pencil

Simple card - just stamped & die cut; added some gems - done!! I used the trick I learned from Dawn (Dawn's World) to use packing tape atop card stock for a glossy finish. Love that tip and I've done it several times since.

Long story - I'll give the short version. I ended up ordering from Stampin' Up a week ago Sunday. I had seen several cards (including this one at Marcia's Stampin' Pad) using a Subtle embossing folder - really wanted it! Then I spotted this beauty by Debbie (Secret Stamper) who happens to be a consultant for Stampin' Up & had a coupon code. Love me a good coupon code so I headed over to SU to get the ef. Of course they had some new holiday stuff and I ended up ordering a few other items, including the set with the partridge. Excellent, prompt service & the partridge arrived before the CAS Christmas 12 Day challenge ended but by then I was partridged out. I'd already made two partridge cards using the Silhouette. Plus, a couple other people had done cards with this SU set including Heather (Heather's Pages) whose card I loved!! Decided I didn't need to make another entry for CAS Christmas.

Today, I suddenly had the urge to get out the partridge & remembered that Christmas Kickstart wants birds. So I got another card made for the stash, regardless of the challenge I missed - LOL. I'll also add my card to the current NBUS Challenge since my partridge set is getting first play today. Also adding to Watercolor Wednesday where it's all occasions this time. Thanks to Jo and elf Marcia & to Darnell & to Marsha & team for hosting fun challenges. Thanks to you for stopping by!!

 Grab our badge to display on your blog.

Monday, August 24, 2020

Dancing Music

 Happy Monday! It's a gloomy rainy one here and I keep singing that Carpentiers song about Rainy Days and Mondays! No need to let it get me down, though, because I have the current Hero Arts Stay Crafy with Hero Challenge #13 to entertain me! Here's my card:


Supplies: Paper - Poptone Black Licorice;
Neenah Classic Crest Solar White
Stamp with matching die - Hero Arts CM135 Thank You Messages
Other - Copic Markers; Wink of Stella; Hero Arts pearls


We're taking inspiration from the Hero Arts A Card A Day video series at Creativebug which you can watch free right now! Libby Hickson, Hero Arts Designer (Libby's Little Addition) shares loads of great tips!! Thanks Libby, Hero Arts & Creativebug!! I was again inspired by Day 9 to use a cover die.

I diecut the cover die from white and from black cardstock. On the white panel I colored the musical staff ribbon with Copic marker and glued to a black card. I popped the musical stuff out of the black panel and glued them over the white ones. Stamped and die cut the heart thank you sentiment, added a couple more white hearts for dimension and some Wink of Stella - done!!

A twofer:


I used the black negative and glued right to a pink card (January MMH kit). Glued a sentiment from Simon Says Stamp Birthday strips and an Altenew rose (Bitty Bloom 3D Die Set). I cut the rose from a scrap of pink and then colored two of the pieces with darker Copics before gluing them together. Bit of Wink of Stella - done!

I'm adding the white one to Darnell's NBUS Challenge since the cover die got its first play. I'm adding the black one to Di's Pixie's Snippets Playground Challenge since the rose was cut from snippets. Thanks to both for fun challenges! Thanks to you for visiting!!

 Snippets Playground Badge


Sunday, August 23, 2020

Hello Friend Tag Card

Hey friends - thought I'd play a bit with a Pink and Main card kit I bought back in July. I'm not a subscriber but I was surfing their site for goodies (for one, the set I used here) and picked up this February 2020 kit called Enchanted Garden - so darling! Here's my card:


Supplies: Paper - Kraft card from Hero Arts 01/2020 My Monthly Hero kit;
Pink and Main Enchanted Garden 6x6 pad; 
Ms Sparkle & Co Woodgrain Neutral;
Gina K Designs Tranquil Teal
Dies - My Favorite Things Blueprints (retired); 
A Jillian Vance Design Stitched Dot Rectangle Backdrop Set;
Pink and Main Enchanted Garden exclusive tag dies
Other - Stickers and ribbon from the Enchanted Garden kit

The Pink and Main tag die set has two tags - the one you see above, including the little topper, and a scalloped one. Besides the die for a round hole, there's one for a heart - that's the bitty heart above. The coordinating stamp set has the same type of flowers so I can't wait to get busy with those too. 

This card went off in the mail to Darnell's friend Verna G. who can always use some cheer! I'm adding it to Virginia's August Show and Share where her optional theme is Tag & to Darnell's NBUS Challenge #17 since my tag die is newly used. Thanks for fun challenges, Virginia & Darnell! And thanks to you for visiting!

August's Show & Share


Saturday, August 22, 2020

Floral Cover Plate

Hey friends - I'm back with another card for the Stay Crafty with Hero Challenge #13! For this challenge we're finding inspiration in the Creativebug/Hero Arts video tutorials (A Card a Day with Hero Arts) featuring Hero Arts Designer Libby Hickson (Libby's Little Addiction). Right now you can view all 31 tutorials without a Creativebug subscription. Here's my card:

Supplies: Paper - Kraft card from Hero Arts January 2020 kit
Strathmore 140lb Watercolor Paper; Neenah white;
Simon Says Stamp Sentiment Strips Birthday
Other - Yasutomo watercolors; Honey Bee Gems;
Copic Black Multiliner; Gelly Roll white pen


I used Libby's Day 9 technique of using a cover die. I die cut the Flower Garden from watercolor paper and water colored it. After it dried thoroughly, I added a second white die cut layer behind for dimension. Mounted the panel to a kraft card, added the sentiment strip and some gems - done!!

If you haven't watched the tutorials, please consider them while they're available for free! I've watched them all and will probably pop in again - they're short and concise; perfect for a quick review. There's plenty of inspiration to be found with Libby and Hero Arts - thanks to both for creating them and to Creativebug for the free access!!

I'm also adding this card to Darnell's NBUS challenge since my Flower Garden die just got its first play. If you'd like to see more inspiration with this cover die, check out my friends' beautiful creations: Lin's here & here and Betty's here. Thanks for the enabling, Lin and Betty! Thanks to you for visiting!

Grab our badge to display on your blog.

Friday, August 21, 2020

Twofer Moon

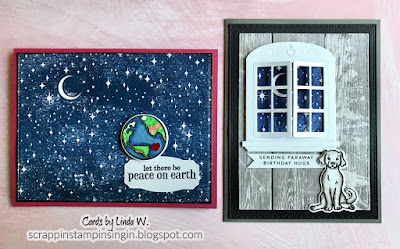
TGIF!!! Or as Darnell and her hubby would say "Wait, is it Friday again?" I'm one of the guest designers this month over at Darnell's Twofer Challenge where the theme is Sun/Moon. The other GD is the talented Mac Mable (The Sweetest of Peas). For my challenge launch cards on the 10th I used a sun image. Then I was out shopping (big surprise) the other day and spotted the gorgeous Hero Arts Star Light Star Bright cling stamp. It's the night sky with a crescent moon. Had to pick it up and give it a go for this challenge. Here's my Moon Twofer:


I started by stamping the entire image twice using various blue inks and varying pressure to get a more natural sky look to it. I cut one panel into a horizontal rectangle and the other into a vertical square to put behind a window diecut. Here's a closer look at each with supply list:

Supplies: Paper - Neenah Classic Crest Solar White;
Fireweed cardstock - January 2020 My Monthly Hero Kit
Dies - My Favorite Things Blueprints (retired);
WeR Memory Keepers Rectangle Labels
Other - Hero Arts inks and heart gem; Wink of Stella

Once I had my horizontal rectangle panel finished, what to do with it? I considered it as a background for a tent image from the August My Monthly Hero kit - but for what occasion? Then I thought about a rocket image - hmm, didn't want to go looking for it. Then the globe image popped into my head when I spotted the sentiment in my Christmas stash - perfect & I knew right where to find it! Thought this would make an unusual Christmas card! Funny thing about the label I used. I always have a huge pile of these (the strip die cuts 5 at a time) to use for my "handmade by" on a card back. I usually stamp about 20 at a time but I had a pile of blanks - tried one and liked it! I colored the earth using internet inspiration photos but it's a bit lame, oh well... 

Supplies: Paper - Neenah Classic Crest Solar White;
DCWV Ms Sparkle & Co A2 card & Woodgrain Neutral;
Poptone Black Licorice;
Simon Says Stamp Sentiment Strips Birthday
Stamps - Hero Arts CG755 Star Light Star Bright Bold Print and 
Nov 2019 My Monthly Hero Kit (sold out) - dog w/matching die
Dies - Art Impressions Window Die ;
Other - Copic Markers, foam tape

Many others have done it, but I wanted to try a window view of the sky & had a darling Art Impressions die for it. I may have used it once but I couldn't find any photos of a previous card with it. Very cute die, in any event! Was going to put a wing-backed chair beside the window (see a card with one here) but I couldn't find that stamp set. Then I thought of an animal and remembered a cute dog from the November 2019 MMH kit - there's another kit that hasn't seen any play til now!! I have a pile of sentiment strips cut up from Simon Says Stamp and I thought this birthday one was kinda funny - like a bday card to ET or something! 😀😀I colored the doggy in the same taupe family as the card but wonder if he's too plain? Maybe I'll turn it into a she and give her a jeweled collar...

Will also add my card to Darnell's NBUS Challenge #17 since my sky and dog stamps both got first play. Remember, you have until the 24th (11:55 PST) to play along at the current Twofer and until the end of the month for NBUS. Thanks to Darnell for both challenges and for having me as a guest at Twofer this month!!

Have a great weekend and thanks for the visit!!

Thursday, August 20, 2020

Cardinal with Birdhouse Pop-up Card

Hey everyone - hope you're having a lovely day!! On Tuesday I got my hair cut & since I was out and about anyway, why not drive another 40 minutes further to Anchor Paper, my "local" stamping store?! My newsletter said all crafts were 20% off, including new stuff, so it was well worth the trip! They were just getting in some new Christmas supplies, including the absolutely adorable Bird House Pop-up Easel Set from Poppystamps. I couldn't resist it, plus a few other goodies... Here's my card:

Supplies: Paper - Paper Studio; Authentique Glistening 6x6;
Neenah Classic Crest Solar White 110lb
Dies - Poppystamps Bird House Pop-up Easel Set
Stamps - Hero Arts CL343 Holiday Sayings (retired)
Other - Copic Markers; Crystal Stickles; foam tape;
white Gelly roll pen; Hero Arts gems (retired)

I bought the die set specifically to use for the current Christmas Kickstart Challenge - Christmas Birds. While we see cardinals all year round here, the male's bright red color makes it easy to associate with Christmas. I have other bird items in the stash but just felt like something new - you know how that is! And if you'd care to see another card with this set, please go here and leave some love for the talented Pam (Expressions with Heart) whose card is the one linked from the Poppystamps site, deservedly so!

I'm also adding my card to Darnell's NBUS Challenge, since my die set is getting its first play, and to Virginia's August Show and Share (didn't use the optional tag theme).

Here are the views of it closed and from the  side:


Thanks to Jo (Just a Dotty Pudding) and her elf, Marcia (Marcia's Stampin' Pad) for a fun Christmas challenge! And thanks to Darnell (djkardkreations) and Virginia (Yes, Virginia) for hosting their challenges! I'm glad you visited me today - enjoy your day!!

 Grab our badge to display on your blog.

August's Show & Share

Wednesday, August 19, 2020

Sanctuary

Hello from my private sanctuary! Isn't that what home feels like these days? I had another play with the Hero Arts August 2020 My Monthly Hero Kit - such a fabulous kit - I love it!! I created my card specifically for the current (#13) Stay Crafty with Hero Challenge.

Supplies: Paper - Poptone Black Licorice; 
Neenah Classic Crest Solar White 110 lb
Stamps - Hero Arts August 2020 My Monthly Hero kit (with matching dies)
Dies - My Favorite Things Blueprints (retired)
Stencil  - Hero Arts SA001 Large Lotus Pattern 
Other - Hero Arts Aqua Glimmer Metallic Ink (January 2020 MMH kit - sold out);
Speckled Egg Distress Re-inker; Shaving cream; Copic Markers; foam tape

With the challenge announcement, Hero Arts alerted us to free access to a series of Hero Arts/Creativebug tutorials by Libby Hickson, a Hero Arts designer who blogs at Libby's Little Addiction. I watched all 31 of them and a couple more than once! Even experienced crafters can gain new knowledge from tips Libby shares; thanks Libby!! With the current Stay Crafty challenge you take inspiration from one of the videos - I chose the shaving cream one (Day 30). Libby says early on this is an old technique - do you know, I'd never tried it!! She did it over a stencil so that was my first experience with it. I'll share the photos of my stenciled pieces - I made two:


Libby recommended a travel size shaving cream and I was lucky enough to find one at Target. A lot of the shaving stuff is gel now so you have to read the cans carefully!! Somehow I think the technique would be lost using the gel - LOL! Libby mentioned it's best to use a stencil with a lot of open space for this technique. First thing I did was to ignore her advice - the peacock feather stencil has a lot of nooks and crannies but I still wanted to try it. Well, some parts turned out better than others as you can see! 

Next I had a go with the lotus flowers - more open areas on this stencil. This one turned out better so I used it for my card. I die cut the panel with a stitched rectangle drew a green line to mark off the bottom. Stamped my sentiment and created a grassy area using a bit of dot coloring as Jennifer McGuire showed here. I love how it blended in with the shaving cream background! Die cut, stamped and colored the images and arranged on my card - done! Not very realistic to have a pile of only 6 books - LOL; I have at least five piles of recently read books (each with more than 6 books)!! Why don't I put them away in a bookcase, you ask? Just like them close, I guess.... 

Here's a look at this darling kit which is still available as of this post; I can't believe it hasn't sold out already!
Kit

Thanks again to Hero Arts for continuing the Stay Crafty Challenges and for having Libby create the tutorials! Thanks to Creativebug for offering free access to this series too! Finally, thanks to you for visiting me!!