Welcome to my blog!

Thanks for visiting my blog. As the title suggests, I love to scrapbook, stamp, and sing! I will share cards and scrapbook pages I create, as well as information about my music - Barbershop harmony.
Showing posts with label digi. Show all posts

Saturday, January 31, 2026

Last Day for Die Cut Divas January Challenge!

Hey friends - if you haven't entered four projects in Die Cut Divas January Challenge, you can still play up until 9pm Pacific Time today. We're using our new stuff so join us - any new item works; just remember to use a die cut &/or embossing folder in your design. You can see inspiration from the end-of-month part of the Diva team HERE.


Supplies: Paper - Neenah Classic Crest Solar White;
Astro Designs black; scraps of green
Digi stamps - Sunbird Spark Garden Fairy
Dies - Poppystamps Scalloped Pinpoint Frames
Memory Box Little Dragonflies (retired)
Other - SSS sentiment strip; Recollections gems;
Copic markers; Hero Arts Sparkle lacquer


Sunbird Spark is giving a $20 CAD gift card as the prize for our random winner.

I printed off the fairy image (a new digi file for me) and trimmed to a rectangle. Colored with Copics and added sparkle to the fairy wings. Blended some blue ink around the edges of the "sky". Next I die cut a black pierced mat (the scalloped frames set cuts inner mats) and adhered it behind the fairy panel. Added it to an ombre A2 card. I did cut a trio of dragonflies from a scrap of green, added a gem to each head and sparkle to the wings. Adhered them around the fairy scene. A printed sentiment finished the card.

Since my digi stamps are newly used, I'll add this card to Darnell's January NBUS Challenge #82.

For my bonus I used another new Sunbird Spark digi, also printed and colored with Copics.


The file comes with the girl image plus 3 items for her to hold & some sentiments. I printed them all then chose the bouquet and "just for you" sentiment. I fussy cut the girl and the bouquet image then layered onto a die cut oval. Used a sketch I spotted recently at Card Chaos CAS(E) where side panels are torn & added to an A2 card leaving a space down the center. The patterned paper is from BoBunny's Love Letter 6x6" pad that I've had for years.

That's it for today, friends! I'll be busily watching Justine Hovey's Summit - enjoyed the Thursday & Friday sessions that I could finish. Will do more later...

Thanks for stopping by & have a crafty day.


Wednesday, January 21, 2026

Zen Calm

Hey everyone - it's my day to post at Die Cut Divas. We have Sunbird Spark as the sponsor for our January Challenge - Use New Crafty Item. Perfect as we start a new year!


Supplies: Paper - Neenah Classic Crest Solar White;
Paper Studio ombre A2 card; scrap of black
Crate Paper Retro Summer
Digi Stamps - Sunbird Spark Zen Time
Other - Glossy Accents; Hero Arts enamel dot;
white gel pen; Copic Markers


Sunbird Spark is giving a $20 CAD gift card as the prize for our random winner.


My new item is the digi stamp from Sunbird Spark - thanks to them for sharing it with the Diva team! I printed it off with some other digi stamps on my ink jet, trimmed to a rectangle & colored it with Copic Markers. I left the background white. Very calming, right? I matted the rectangle with black & added to an A2 card layered with a patterned stitched rectangle. I added glossy accents to the clock, bottle & glass. A digi sentiment from the same file & a die cut flower completed the card.

Since my digi stamps are newly used, I'll add this card to Darnell's January NBUS Challenge #82.

Bonus time! Others on the team have used this adorable reading dinosaur, another new digi for me - love it!


Supplies: Paper - Neenah Classic Crest Solar White;
Paper Studio A2 card; Taylored Expressions Latte;
Lawn Fawn Rainbow Ever After Petite
Digi Stamps - Sunbird Spark My Favorite Chapter
Penny Black Wood Floors
Other - foam tape; white gel pen

The dinosaur, books and sentiment were printed at the same time as my yoga person. I did two sizes of the book image for some interest. I colored the images with Copics and fussy cut them.

Next I die cut a stitched rectangle with a pastel striped paper & the floor from latte cardstock. Adhered to an ombre purple A2 card. Added the dino, books & sentiment. A few white gel pen details finished the card.

That's it, friends. Thanks for stopping and I hope you'll join us in the January Diva Gallery!


Saturday, June 28, 2025

Fun in the Sun!

Happy weekend everyone - hope you're enjoying it! First up, another fun in the sun card:


Supplies: Paper - Recollections & Spellbinders cardstock;
MFT Sand, Surf & Sky; scraps
Stamps with Dies - Hero Arts Studio June 2025 Card Kit
Dies - Spellbinders Under the Sun & Amalfi Breeze;

In case you don't know, Craft Roulette is a YouTube show airing Fridays at 6:30 Central. Besides weekly challenges from spinning the wheel for parameters during the show, members can also do bonus cards with different parameters that appear on the site each week. This last week it was Z-fold, Any Colors, Old, Something from my "Mesk" (messy desk), plus an optional 5th of Unusual Color. I did a classic Z by folding back the front of a kraft A2 card. Added mat layers of old patterned paper.

I still haven't finished my Spellbinders Weekender cards yet & in fact, "borrowed" the sun from Jennifer McGuire's first card which I had started during the event. Her sun has some rays and it spins on the card - very fun. I'll just make another sun when the time comes...

The girl on a beach towel was an add-on that Spellbinders offered - we all agreed it was nice to see a more realistic figure! I made her during this week's crafty Zoom call - both she & the sun were on my "mesk" (along with a lot of other stuff!). I love the bright color of the sun which I feel is an unusual one; it's called Saffron in the Spellbinders ColorWheel.

The cute little cup also comes in the beach girl set, plus the towel fringe. The set doesn't come with a towel, figuring everyone can form a rectangle. I found the perfect size die in my well-loved AJVD set! Since my beach girl is new, I'll add my card to the June NBUS Challenge #75.

For a bonus, I have my Craft Roulette card from Episode #273 which aired last night:


Supplies: Paper - Recollections; Neenah Solar White
Digi - Angie Blom Camping Adventures 
Stamps w/dies - Lawn Fawn Love You Smore (dies)
Stamps - Hero Arts Bring on the Merry (retired)
Other - foam tape; gel pens; Copics;
sentiment from the stash (old HA)

Host Mary had Justine Dvorak (‪@stationarybyjustinellc‬) as her guest, such a talent! Justine does a process video on her CR cards plus many other card making videos (especially with Spellbinders) which I enjoy watching. Check her out - nice Minnesotan - lives west of me about 2 hrs! The wheel spun some tricky parameters; I didn't finish my card until 90 minutes after the show!!


  • Project - Lady's card: I made a birthday card for my sister-in-law; the bear is a lady.
  • Colors - Candy Wrapper: Just about any color can be found on a candy wrapper!
  • Element - Camp(s)(ing): I used a digital camper image; colored with Copics.
  • Random - Belt(s): The camper stripes looked like belts but to be on the safe side, I hand drew a belt on the lady bear.
The camping stamp set that came to mind is at the satellite studio. Darn it! So I went to Angie Blom's website and searched for a camper digi - bingo! Purchased & printed - I expected a smaller print based on my trial print on copy paper. Nope, the minute I loaded cardstock I got a jumbo camper. Oh well - I made an A9 card (8.5x11" cardstock folded in half). That's a dreaded project to get on the wheel but it worked just fine for me!

Next I stamped and die cut the Lawn Fawn elements to add. Colored w/Copics. Found a sentiment in the bits box and popped it on. Besides a belt, I gave my lady bear a bow; this was stamped from an old HA Christmas set & fussy cut - done!

Thanks for stopping and have a crafty day!!


Thursday, June 26, 2025

Rudolph on Gift Box

Hi all - I'm back again with my third & final card for Christmas Kickstart Challenge #99 with Christmas Critters. Rudolph takes center stage in a super cute digital image from Whimsy Stamps.


Supplies: Paper - Bazzill A2 card; Neenah Solar White;
My Favorite Things Colorful Christmas
Digital - Whimsy Stamps Rudolph
Stamps w/dies - Taylored Expressions Season's Sweetings (dies HERE);
Hero Arts Gingerbread House Stamp & Cut 
(retired at HA but one left in stock HERE at Frantic Stamper)
Dies - Poppystamps Nordic Treeline;
Other - Copic Markers; foam tape; white gel pen

When I bought a new printer last fall, I surfed various companies for digital images to have on hand if needed. I found four different files at Whimsy Stamps, Rudolph being one of them. I printed him off, die cut with a stitched rectangle, colored with Copics and matted on red. I applied Glossy Accents to give him a shiny nose.

Added the panel to an A2 card covered with ornament patterned paper. Colored a couple Nordic trees from the treeline die cut and trimmed them off the line to add to the bottom left. While dipping into the bits box for a sentiment, I found a bitty gingerbread cookie so colored it & added to Rudolph's lifted hand. Done!

I'm also sending my card to Darnell's IDEAS where Anything Goes this week. And to the June NBUS Challenge #75 since the digital image is newly used today. 

I'm got my new brakes pads yesterday & had lunch with my friend Connie. Driving to our respective homes we both ran into heavy rain. I live in the east Twin Cities metro & she and her hubby in the far southwest. Luckily - no hail fell on either of us! Much as we need rain, that much in a short time was causing flash flooding & some of my plants took a beating. Oh well, they'll come back...

Thanks for stopping by and have a crafty day!!


Tuesday, January 21, 2025

Merry Cactus!

Hello everyone - time for my Die Cut Diva inspiration post! I'm sharing the first card below at the Divas HERE but you can only find the details, plus bonuses, right here!!


Supplies: Paper - Neenah Solar White; 
Paper Studio Holiday
Digi - Whimsy Lounge Lizard 
Stamps - Hero Arts Merry Cactus to You (retired)
Hero Arts Tag Frame Infinity Dies (retired)
Other - Copic Markers; foam tape; 
Hero Arts Sparkle Lacquer; Glossy Accents

The Divas have no "sponsor" this month but Whimsy has donated a lovely $15 gift card to their online store. Thanks Whimsy!! We will award the prize by random drawing on February 3rd. 

I love Whimsy & have enjoyed seeing their digital releases but hadn't been able to buy any until now. Now that I finally have a new printer - woo hoo, I invested in a few of them. I downloaded Lounge Lizard last week and it's getting first play here - so fun to color!!

Sized the image in Word and printed. Allowed to dry thoroughly, then die cut with a stitched rectangle. Colored with Copics and added sparkle to the star & Glossy Accents to the light bulbs and the lizard's eyes. Stamped an old HA cactus sentiment on a scrap of white & die cut it with a label, plus a shadow. Assembled on an A2 card - done!

I'll add my card to Darnell's January NBUS Challenge #70 since Lounge Lizard is newly used. My card will also go to Merry Little Christmas Challenge #60 (my 3rd entry). 

Ready for a couple bonus cards? You saw a tag card with penguins for Craft Roulette early this month. Well, I made several sets of penguins in one sitting with my new Whimsy Penguin Pals set and used a couple of them on cards I needed:


Supplies: Paper - Recollections A2 card; Neenah white;
scraps; dotted paper by unk
Stamps - Stampabilities (Hobby Lobby) Birthday
Dies - Whimsy Stamps Penguin Pals
Spellbinders Balloon Birthday Wishes (DOML-May23)
Layered Mix & Match Sentiments (retired) 
Other - Copic Markers; foam tape; gems

Besides the penguin set being new, the label was from a Spellbinders subscription box from May 2023 that got first play. Funny thing though, I found it on sale in Arizona & bought it for my sister's stash - so it was newly used there. My own set is around here somewhere... Also newly purchased for my sister's stash - the Sunny Studio snowflake frame set which included the sentiment Winter Wishes. I squeezed in a Spellbinder's birthday die cut to make this a winter bday card for my great-niece, Annika. Stamped and fussy cut the cupcake and gift, then colored with Copics. The dotted paper was in a make & take we did in Arizona; I didn't catch the brand. My sister liked part of the make & used it, but not the dotted paper. I repurposed it here.

Update: thanks to Gundi for the referral, I'll link my penguin birthday card to Dream Factory Challenge #135 - Surf's Up. The movie is about penguins so you can take inspiration from that critter, not just surfing.

Here's another penguin card; the Whimsy set makes three different sizes.


Additional supplies - BoBunny Tuxedos & Tiara's patterned paper
Dies - Doodlebug Designs Many Thanks (retired)
label by unk
Other - Diamond Stickles

That's it for today friends. Happy crafting & I hope to see you in the January Diva gallery!


Tuesday, January 14, 2025

Bauble Branch

Hey there - finally back with something not for Craft Roulette - LOL. Holidays were busy with being gone to visit family in AZ for two weeks. I still have my Christmas decorations up to enjoy them a bit more before packing them away! And I'm sharing a Christmas card since it's always time to build that stash!!


Supplies: Paper - Neenah Solar White;
My Favorite Things Colorful Christmas Text (retired)
Digi file - Bauble Branch by unk
Other - Copic Markers; Recollections gems

I started by covering an A2 card with holiday texty paper. I printed a bauble digi file that I've had a while and can't tell the brand. Looking at it I'm guessing Hero Arts, oh well... It's retired, whatever it is.

Colored the bauble branch panel with Copics and die cut with a stitched rectangle. Sponged some Tumbled Glass DI in from the corners and edged with Black Soot DI. The sentiment was part of the digi package, along with another sentiment & a couple more images - such a great value. I'm happy to have a working printer again & be able to use my digis!! I finished the main bauble with some gems in the center & at the end of each snowflake prong.

I'm sending my card to Christmas Kickstart Challenge #94 where Jo & elf Julia are Bringing the Baubles (ornaments to us Americans). I'll also link up to Merry Little Christmas #60 (my second entry).

Thanks for visiting and have a crafty day!!


Saturday, August 31, 2024

Final Day for the August 2024 Die Cut Divas Challenge!

Hey everyone - I'm part of the end of month post at Die Cut Divas today. We're sharing last minute inspiration for our August Challenge with the theme of embossing & sponsored by SheepSki Designs.. It ends tonight at 9pm Pacific time. 

I shared card one below but also have two bonus cards only here:


Supplies: Paper - My Favorite Things black;
Copic & printer friendly white; scrap of pink
Digi - SheepSki Designs Floral Heart
Dies - Hero Arts Thinking of You Stamp & Cut;
Lawn Fawn Platform Pop-Up (bow)
Lifestyle Crafts Nesting Lace Circles
Other - Copic Markers; Versamark ink; 
Ranger clear embossing powder


For my first card, I used the same heart image as a previous card but minus the butterfly. Once again sister Diva Arlene (A Bit of This and That) printed off some images and she made this one larger than the other. Too large for an A2 card so I decided to make it a circle card. I found an old QuicKutz scalloped circle die set - the largest one was a perfect fit! I die cut two from black cardstock and scored the back before adhering together & adding the heart circle (colored with Copics). I'd planned to wet emboss a sentiment this time & did. Just not the usual stamp & emboss. Instead, I applied Versamark ink to a black die cut and clear embossed it - such amazing shine!

After assembly, I noticed a black Copic stain on my circle - darn it! I had used a Copic 100 marker to color the edges of the scallops & my fingers were a bit stained. It was a small spot but I couldn't cover it up with a white gel pen. So I die cut a LF bow and added to the card to cover the spot. The tail piece of the bow is horizontal when die cut but I snipped it in half and glued the tails hanging down. Good save, eh?

Ready for a couple bonuses? First a daffodil card:


Supplies: Paper - Copic/printer friendly cardstock;
Paper Studio A2 card
Stamps - unk for sentiment
Dies - Elizabeth Craft Stitched Rectangles (retired)
Other - Copic Markers; Hero Arts Pitch Black ink;
Versamark ink; Ranger clear embossing powder

I colored the daffodils three different ways based on photos I found on google. On the SheepSki site for this image, the inspiration photo has some hand drawn lines on the glass vase so I tried to replicate that. Thought it added some shape to it. This time I stamped and clear embossed the sentiment. Put the stamp set I used in a safe place, then couldn't find it to note the brand - oh well...

For my final bonus, I got another Christmas card made!! Arlene sent me this sweet birdie image and I had fun coloring it with Copics. Added some sparkle to the snow and matted it in black. Embossed a 4.25x5.5 piece of Bermuda cardstock using a new Honey Bee embossing folder. Since the folder is newly used, I'll send this card to Darnell's August NBUS Challenge #65.


Supplies: Paper - Copic/printer friendly cardstock;
Hero Arts Bermuda; MFT black; Paper Studio Glitter
Digi - SheepSki Designs Winter Robin
Dies - Elizabeth Craft Stitched Rectangles (retired);
Recollections Handwritten Works (retired)
Embossing Folder - Honey Bee Snowflakes 3D
Other - Copic Markers; Hero Arts Sparkle lacquer

The JOY came out of the bits box where it had languished forever! I had to search my blog to find what brand it was (Michael's) - LOL. Anyway, it was cut with a bright pink glitter paper but my berries were red and I wanted red. So I colored it with increasingly darker red Copics - still retained some pink so I added some dark pinkish Copic to my berries - good enough!

That's it, friends - hope to see your last minute creations in the August Diva Gallery using embossing. If it's wet embossing, be sure to include a die cut in your design!

Thanks for visiting & happy crafting!!


Wednesday, August 21, 2024

Floral Heart

Hi everyone - It's my turn to post at Die Cut Divas today! I'm sharing the card below, plus I have a bonus card only here.


Supplies: Paper - Park Lane gold cardstock;
My Mind's Eye patterned; Paper Studio A2 card;
Betterpress Porcelain
Digi stamp - SheepSki Designs Floral Heart 
Embossing Folder - Taylored Expression Weathered (retired)
Press Plate with die - Spellbinders You Are Everything Sentiments
Other - Betterpress Hydrangea ink; Copic Markers;
Park Lane gems


We have SheepSki Designs as our sponsor this month and for the August Diva Challenge our theme is Embossing - either wet or dry, your choice! Plus you must use a die cut or an embossing folder on your project. For my card, I chose dry embossing & used a retired Taylored Expressions folder on gold cardstock. Trimmed the panel to layer onto an A2 card.

Thanks once again to Arlene (A Bit of This and That) who printed off some Sheepski images since my printer remains offline. I fussy cut the heart wreath and the butterfly, then colored with Copics. I backed the heart with some My Mind's Eye lacy paper & added to the card with foam tape. Added a pressed sentiment, the butterfly and some gems - done!

Ready for a bonus? This time I used an image featuring a trio of vases, colored with Copics, along with another embossed Weathered background.


Additional Supplies: Paper - Hero Arts Dove A2 card
Digi Stamp - SheepSki Designs Mini Vases

That's it for today, friends. We Divas hope to see your project in our August gallery sometime before 8/31/24 at 9p Pacific Time. A random draw from eligible August entries will determine who wins 3 images from SheepSki.

Thanks for stopping by & happy crafting!


Friday, June 30, 2023

Reindeer Wannabe?

Hello everyone - I'm part of the last of the month inspiration team at Die Cut Divas today. We're  wrapping up a month of playing with critters by SheepSki Designs but any critter will do for our June Diva Challenge. Just remember to use an embossing folder or die cut in your design along with your critter.

I'm going the Christmas card route today with a cute critter trio. I feel it's like that game you played as a kid - "one of these things is not like the other...". Remember that? This digi really makes me smile with the doggie & his branch antlers sneaking between the two reindeer.


Supplies: Paper - Neenah white; Paper Studio brights & stripes
Digi Stamp - SheepSki Designs My Spy
Stamp with Die - Hero Arts Beautiful Butterflies Bundle
Dies - Art Impressions Large Snowflakes
Other - Copic Markers; Recollections gems;
ephemera sentiment from a Paper Studio kit


Thanks again to Andrea at Sheepski Designs for sharing these adorable images with the DCD team & personal thanks to teamie Arlene (A Bit of This and That) for printing them off for me. Again Arlene included a couple different sizes so I could do more than one card. For my first card, I started with the larger sized imaged and colored it with Copics. I fussy cut around the chins and added the panel to a striped one, then layered to a red mat & added to an A7 card. A sentiment from the ephemera pack of a Paper Studio scrapbook kit and some die cut snowflakes & gems finished the card.


Here's today's bonus - the doggie with reindeer image sized smaller. Arlene had already cut the panel with a notched die who's name I don't know - resembles a Momenta set I have.... This time I added a single die cut snowflake (same AI set) and a different ephemera sentiment from the same Paper Studio kit. Similar look but not a duplicate - love it! I'd be interested to hear which one you prefer - let me know in the comments!


Remember - you only have until 9p Pacific time today to share your critter project - hope to see you in the June Diva gallery!! 

Thanks for stopping and, as always, Happy Crafting!!


Wednesday, June 21, 2023

Thinking of You Froggies

Hello everyone - my turn to provide Die Cut Diva Inspiration today! We're playing with critters by SheepSki Designs but any critter will do for our June Diva Challenge. Just remember to use an embossing folder or die cut in your design along with your critter. 


Supplies: Paper - Parklane A2 card; Neenah white
Digi Stamp - SheepSki Designs My Pad
Stamp with Die - Hero Arts Beautiful Butterflies Bundle
Dies - A Jillian Vance Design Stitched Dot Rectangle Backdrop Set
Other - Copic Markers; Hero Arts Clear Lacquer; white gel pen


Thanks to Andrea at Sheepski Designs for sharing these adorable images with the DCD team & personal thanks to teamie Arlene (A Bit of This and That) for printing them off for me. She always includes a couple different sizes so I can do my bonus cards. For my first card, I started with the larger sized imaged and colored it with pastel Copics. Added clear lacquer to the eyes and some dots on the body with Copics and on the flower with a white gel pen. Die cut the panel with a stitched rectangle and stamped a sentiment. Adhered it to an A2 panel and added a stamped/die cut/colored butterfly. Done!


Here's today's bonus - the froggie image sized smaller. This time I added some die cut cattails and a bitty dragonfly. The other two dragonflies from the set landed on a previous card. This one went to a friend's hubby who landed in the hospital - he absolutely loved it! Brings me a smile too...


Supplies: Paper - Parklane A2 card; Neenah white & black;
BoBunny Double Dotted 6x6 patterned
Digi Stamp - SheepSki Designs My Pad
Stamp with Die - Hero Arts Friendly Messages Bundle
Dies - A Jillian Vance Design Stitched Dot Rectangle Backdrop Set;
Frantic Stamper Cattails; Memory Box Little Dragonflies (retired)
Other - Copic Markers; Hero Arts Clear Sparkle Lacquer; white gel pen; 
Versamark ink & Ranger Sea Foam White Embossing Powder

You have until June 30th at 9p Pacific time to share your critter project - hope to see you in the June Diva gallery!! 

Thanks for stopping and, as always, Happy Crafting!!


Friday, March 31, 2023

Final Day for Anything Goes at Die Cut Divas!

Hello and welcome! I'm part of the last day inspiration crew over at Die Cut Divas

Our March Anything Goes Challenge ends today at 9pm Pacific time. 

We've been using digis from our amazing sponsor Scrapflower Estudio but all you need is a die cut &/or embossing folder in your design. Here's the card I'm sharing:


Supplies: Paper - Park Lane A2 card; scrap of brown;
Authentique Renew and Echo Park Reflections 6x6 pads
Digi stamp - Scrapflower Estudio Reading Nordic Gnome
Dies - Penny Black Wood Floors
Other - Copic Markers 

Scrapflower Estudio

I combined two images from this adorable new file from Scrapflower Estudio. I colored & fussy cut each image, then created a scene with some patterned paper for wallpaper & a die cut wood floor. I trimmed bits of a patterned paper for the sentiment. Quick and easy!

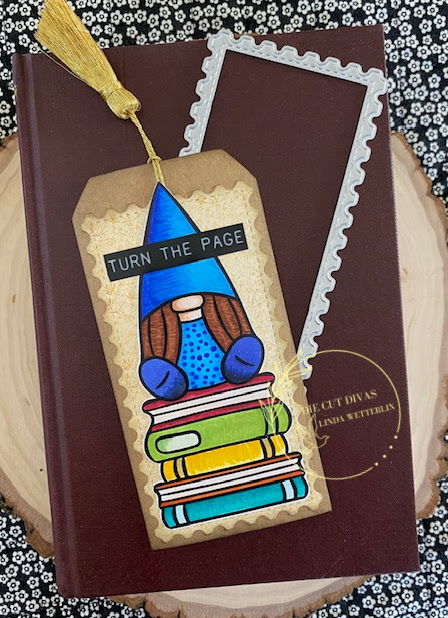
Now for a bonus - I used a different size print of the girl gnome from the same file. I colored her with Copics & fussy cut, then added to a postage stamp mini slimline die cut. Layered onto a precut bookmark, added a Tim Holtz sentiment sticker & a tassel - done!

Supplies: Paper - Basic Grey Serenade 6x6;
Paper Studio kraft tag
Digi stamp - Scrapflower Estudio Reading Nordic Gnome
Dies - Kat Scrappiness MINI Slimline Postage Stamp Edge
Other - Copic Markers; Paper Studio tassel;

Thanks again to teamie Arlene (A Bit of This and That) for printing off this month's digis for me!!

I just finished "Lightening Strike" by William Kent Krueger - love the Minnesota setting for his Cork O'Connor sheriff character. What are you reading now? Share in the comments, if desired.

That's it from me. I hope you can squeeze in a project for the Divas' March Challenge! Thanks for visiting & have a crafty day!


Tuesday, March 21, 2023

Anything Goes with Scrapflower Estudio

Hey there - I'm providing inspiration at Die Cut Divas today using digis from our amazing March sponsor Scrapflower Estudio. We have "Anything Goes" as the theme - no need to use digis; just be sure to use a die cut &/or embossing folder in your design.

Supplies: Paper - Park Lane A2 card; 
Graphic 45 Artisan Style 6x6 (2015)
Digi stamp - Scrapflower Estudio Reading Nordic Gnome
Dies - Hero Arts Stacked BooksPenny Black Wood Floors
Other - Copic Markers & Hero Arts water reactive inks

Scrapflower Estudio

I love, love, LOVE to read so I was delighted to see this adorable new file from Scrapflower Estudio. Perfect for Copics or pencils or whatever your fave medium for coloring! I chose Copics to color my reading gnome - looks like an English Literature professor in his study - LOL. I colored & fussy cut, then paired him with a die cut stack of books colored with water reactive inks. I left the sentiment off the front but will put something book related on the inside.

Literally, a book stack like this appears many places in my house - some already read & others waiting. I just finished "The Therapist" by B.A. Paris - love all the twists in that one! 

Now for a bonus - another gnome from the same file. For the girl gnome atop books, I added another book stack. This time I die cut it from Neenah, colored with Copics, and cut into three parts. Added a few books to the bottom of the girl gnome stack & tucked the rest behind her. Had one little cocktail sticker left from other cards and it found its way onto a book stack. The preprinted sentiment was in my bits box - not sure of the brand.


That's it for today - hope to see you in the March Diva gallery! And if you are reading something & want to share, let me know in the comments. 

Thanks for visiting! And special thanks to teamie Arlene (A Bit of This and That) for printing off this month's digis for me (still no working printer at my house). Happy crafting (and reading)!!