Welcome to my blog!

Thanks for visiting my blog. As the title suggests, I love to scrapbook, stamp, and sing! I will share cards and scrapbook pages I create, as well as information about my music - Barbershop harmony.
Showing posts with label CAS Christmas Card Challenge. Show all posts

Sunday, September 6, 2026

A Reindeer Bauble

Hey crafty friends & Happy Sunday! Labor Day holiday tomorrow in the USA - in Minnesota it signals the final day of the Minnesota State Fair. Still not planning to attend - our weather has been sweltering for this time of year!! Instead, I'm back with another reindeer card:


Supplies: Paper - Neenah Classic Crest Solar White;
Paper Studio Snow Pine patterned paper; cardstock scraps
Dies - Penny Black Moonlit;
Hero Arts Circle & Wood Frame Infinity Dies;
Impression Obsession Pine Branch;
Birch Press Design Block Print Petal Ornament
Other - B0000, Y00 & E18 Copic; 
Spellbinders puffy sticker sentiment
& Berry gems

I die cut the deer from a scrap of cardstock and colored the antlers with a darker brown Copic. Added a gem to the nose. Next I die cut the two bauble layers. The scalloped one has a large tree but I removed it by rotating the die cut to get scallops all around the interior. This operation also cut off the bauble hanger so I die cut a silver one from a BPD set. I also die cut a circle of pine paper to back the bauble. Shaded the snow edge with a pale blue Copic & the moon with a yellow one. Assembled the bauble and added the deer.

Next I die cut two wood frames and stacked for dimension. Added the frame to a top folding A2 card. I die cut a branch and added it to the frame along with the bauble. A little puffy stitcker NOEL from an old Spellbinders kit completed the card.

This is my second entry for the September CAS Christmas Challenge (Woodland Critters) & at Christmas Kickstart Challenge #114 (Reindeer Games). I will also send my reindeer to Merry Little Christmas Challenge #70 (also entry #2) where Anything Christmas Goes. I'm also playing at Darnell's September NBUS Challenge #90 since my reindeer bauble die set got first use here. I didn't buy it when it first came out in 2020 but I have had it for quite a while! Excited to finally use it!!

Thanks for stopping by & enjoy the long weekend!! 


Friday, September 4, 2026

Sweet Reindeer

Hello and TGIF, everyone! The Minnesota State Fair is in full swing but I avoid it - too hot & humid with huge crowds. Instead, I stay home and craft - lol. My card today fits a few challenges:


Supplies: Paper - Neenah Classic Crest Solar White;
Spellbinders A2 card & Betterpress Pebble; scraps
Pressplate w/dies - Spellbinders Home for Christmas Sentiments
Dies - Memory Box Festive Fawn;
Poppystamps Scandinavian Snowflake Plate (retired);
Birch Press Design Wavy Hillside (retired)
Other - B0000 Copic; foam tape; white gel pen

I was excited to see that the September CAS Christmas Challenge has Woodland Critters as the theme. Then I popped over to Christmas Kickstart Challenge #114 where I found that Jo and her elf Loll are doing Reindeer Games. Wow - a perfect pairing for a new Memory Box die I ordered in August!

I die cut the deer from scraps of cardstock and assembled. I die cut a snowflake coverplate and snowy hill (lined with a Copic) & added to an A2 card. Popped the deer onto the card with foam tape (just behind the head). Added a Betterpressed sentiment from the stash and some gel pen details to the deer. Done!

I will also send my reindeer to Merry Little Christmas Challenge #70 where anything Christmas Goes. I'm also playing at Darnell's September NBUS Challenge #90 since my reindeer die set got first use here.

Thanks for stopping by & have a crafty weekend!! I'm sure to be back with my entry to Craft Roulette Episode #335 which airs tonight at 6:30pm (slideshow from last week starts at about 6:10pm).


Monday, August 10, 2026

A Sleigh with Mice!

Hi friends! I was so delighted that CAS Christmas returned as a monthly card-making challenge! I missed the first one in June but managed to get a card done for the second in July. Was even a top pick - woo hoo! Crafty friend Julia (Create with Me) is hosting the August CAS Christmas Challenge with the theme of Santa's Sleigh & I knew just which die set to use!! Here's my card:


Supplies: Paper - Neenah Classic Crest Solar White;
Spellbinders A2 card; Paper Studio cardstock;
TH kraft metallic
Stamps w/dies - Lawn Fawn Simply Celebrate Critters 
Dies - Poppystamps Luxury Sleigh;
Other - Hero Arts white enamel dots;
white gel pen; foam tape; B000 Copic;
Memento Tuxedo Black & 
Color Box Robin's Egg inks

I ordered the sleigh die set from Poppystamps & received it recently. Last night I did an initial cut of it (except for the bow) and assembled it. It was sitting on the craft table wanting a home & I decided to use it for Card Chaos (15 minute cards - a show on YouTube). It's ok to use stuff from the bits box. 

I took a white textured A2 card from an old Spellbinders kit and inked just the edges. I'm not sure why it looks so blue in the photo! Added a die cut hill and then popped the assembled sleigh on with foam tape. For Card Chaos we were to use tiny critters so I stamped & die cut the quintet of Lawn Fawn mice from Simply Celebrate Critters. I only colored the left 3 w/some quick Copic coloring and trimmed them to be three separate items. Glued them onto the sleigh. Stamped a speech bubble & sentiment, then die cut. Added it above one of the mice. After my 15 minute card session ended, I realized I forgot the sleigh's bow! I had it ready to cut in green so die cut it, assembled and added it to the sleigh. I also added a couple enamel dots to the sleigh's flowers. 

Do you often "finish" a card only to have to go back and really finish it?? I hope this is CAS enough for the challenge. I just have the one focal point with a sentiment, even if it has a lot of pieces :)

I will also add my card to Darnell's August NBUS Challenge #89 since my sleigh got first play here. And to Just Us Girls Challenge #835 where it's die week!

Thanks for visiting and I hope you're having a crafty week!!


Friday, July 24, 2026

Snowman Fun!

TGIF friends - I'm glad the weekend approaches! I'm here with a snowman card for the July 2026 CAS Christmas Challenge. I was delighted to see that Loll brought this challenge back in June but I didn't get there. Had to make the effort this month - here's my card:


Supplies: Paper - Neenah Classic Crest Solar White;
Paper Studio Ombré A2 card
Stamps w/dies - SSS/Memory Box Good Cheer (retired)
Memory Box Countryside Circle (retired)
Other - printed sentiment strip from stash;
Copic Markers; white gel pen; foam tape

I wanted to use more snowman images I'd stamped after being gifted the SSS/Memory Box Stamptember 2025 set - love this set! You can see my first card HERE - a much busier card so I reined it in for a CAS design.

I die cut a stitched rectangle from Neenah white and included a Memory Box die that cuts a window in the same pass. Added the panel to an ombré card along with a printed sentiment strip. Colored my stamped snowman with Copics, added gel pen details and popped onto the card. Very quick and easy. While the MB die is retired, Birch Press has a similar version called Block Print Starry Night Scene; I used it HERE if interested.

I made a second version in pink on Monday during Card Chaos Episode #54 where the theme was Pop of Pink (mine was the pink card). At Chaos you only have 15 minutes for the card and I managed this one in 14 minutes. Here, I added some pearl dots that came in an Inky Stamper kit since the single sentiment strip seemed a little bare. 


Chaos has two rounds so I made a second card:


Supplies: Paper - Neenah Classic Crest Solar White;
Spellbinders texty paper from an old kit; 
BoBunny red print; Paper Studio cardstock
Dies - Memory Box Blooming Poinsettias
Other - free printed sentiment strip from 
Debbie J's Crafting Corner
SSS Starshine dots;
Black Soot Distress Ink

I found some Spellbinders paper that had a bright pink texty Christmas pattern & decided that would be my pop of pink. Added a strip of it to a top fold card formed from Neenah white. Die cut and assembled a poinsettia with leaves and added it to the card. Inked the edges of a printed sentiment strip & popped onto the card. Added enamel dots and was done in 12 minutes. I had a bunch more poinsettia pieces which I assembled later. For the second round I like to keep it simple so I have time to upload to the livestream.

I will add this card to Merry Little Christmas #69 where Anything Christmas Goes; this is my third entry.

That's it for today; thanks for stopping! I'll be watching Craft Roulette Episode #329 tonight; join us on YouTube at 6:10p CST (or watch later on replay), if interested. Happy crafting!!


Saturday, September 17, 2022

Sparkle and Shine!

Hi all - hope you're having a wonderful weekend! Since Tuesday I've been watching this year's Sweet Adelines International contests via webcast. Over 3000 went to Phoenix for the live convention but I stayed home this year. Due to the pandemic we had no convention in 2020 or 2021 so it was amazing to see so many quartets and choruses being able to perform in person again. I'm sad to see the convention webcast end tonight but glad for a new champion quartet The Ladies and chorus Rich-tones.

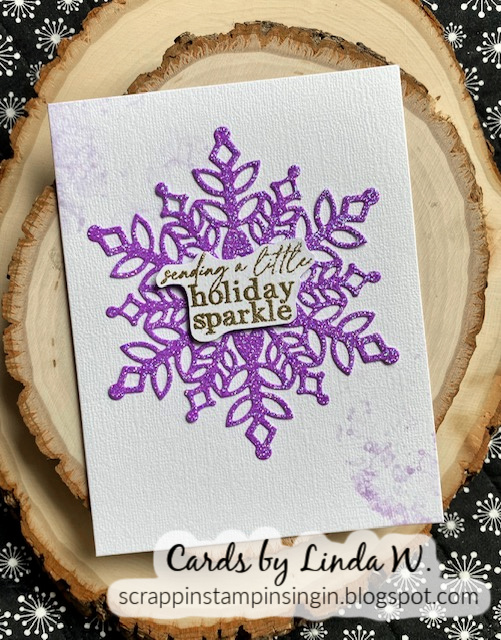
I managed to make another card today for the September CAS Christmas Challenge. Hideko asks us to use sparkle &/or shine this month so I used a bit of each - a sparkly snowflake and a shiny gold embossed sentiment.

Supplies: Paper - Spellbinders A2 card;
Paper Studio Glitter Cardstock; Neenah white
Stamps - Elizabeth Craft Designs Snowflakes
Dies - Elizabeth Craft Designs Classic Christmas Special Kit
Other - Ranger Princess Gold embossing powder;
Villanous Potion Distress Reinker

I couldn't bear to toss the gorgeous purple potion I brewed for the bubble techique I did for an August thank you card. The glass of liquid, complete with straw, has been sitting on the craft table for a couple weeks now & I have to keep reminding myself not to drink it!! If you haven't watched the bubble background video by Christine Stokes, do check it out - so fun!! Anyway, I thought some bubbles would be perfect in the opposite corners of the card before I added my snowflake. I also had the sentiment (stamped, embossed, & fussy cut) sitting on the counter. Thought it would look amazing in the center of the snowflake. That's it - so quick and easy!!

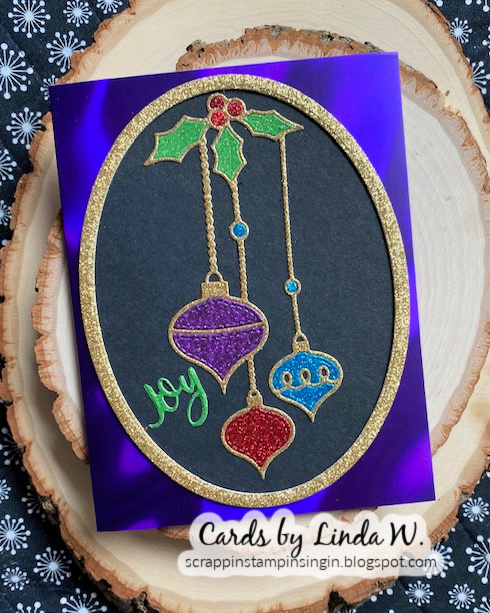
Ready for a bonus? Here you go:

Supplies: Paper - Poptone Black Licorice;
Hero Arts some MMH kit; Paper Studio Glitter Cardstock
Dies - Memory Box Newbury Ornament Vignette (retired);
Poppystamps Basic Ovals; Sizzix Joy (retired)

My earlier entry for the current CAS Christmas challenge used an outline ornament vignette. I later made several others in various colors (no photographs since they were the same design). This left me with a bunch of innards from only using the outline. I cut one more vignette from gold, glued it to a black card which had a gold oval frame on it, then inlaid it using the other colors.  All done, then I realized the oval & ornament vingette were crooked on the card - ugh!! I carefully trimmed around the oval and glued it to a purple (yes, purple) holographic card. That holographic card would have been too overwhelming on its own but I really love the gold framed oval on it!! Added a diecut JOY (trimmed down a bit) - done!

I'm adding the snowflake card to Darnell's September NBUS Challenge too since my snowflake die is new. I ended up buying a bunch of ECD products when they were our sponsor in July, then I shopped the Labor Day sale and just received that package. You'll be seeing more NBUS used soon, I hope!

Thanks for stopping!!


Sunday, September 4, 2022

Sparkly Ornament Vignette

Hey everyone - Happy Labor Day weekend if you're celebrating in the USA. Thought I make a quick card before I get too immersed in the Twins vs White Sox game coming up this afternoon! CAS Christmas just announced their September Challenge yesterday (Sparkle &/or Shine) and I decided to play along this morning with an extremely quick and easy card.

Supplies: Paper - Spellbinders white A2 card;
Paper Studio Glitter Cardstock
Die - Memory Box Newbury Ornament Vignette (retired)
Stamp - Elizabeth Craft Designs Classic Christmas Special Kit
Other - Hero Arts Navy Ink; 
Tim Holtz Tumbled Glass Distress Stain

I die cut the ornament vignette from glitter paper. Laid it on the A2 card to stamp the sentiment where I wanted it and to eyeball where to do a wash. Took my Distress Stain and swiped the card. Glued down the diecut - done! Since I'm so behind on Christmas cards, I'm going to make a bunch more of these in various colors. I saved the pieces that popped out of this outline to do an inlaid version later.

The sentiment stamp comes from last year's wonderful Elizabeth Craft Designs Classic Christmas Special Kit. I bought it when ECD sponsored us for Die Cut Divas but hadn't had a chance to use it until now. So I'm adding this card to Darnell's September NBUS Challenge too! 

PS - ECD is having a Labor Day Sale with 25% off & no, they've offered me nothing to say this :) They also have a bunch of stamps & dies in my "practically free" category under the SALE tab. I'm sure to be headed there before the holiday weekend ends.

Thanks for stopping and enjoy your day whatever you do!!


Wednesday, August 24, 2022

Squeeking in with a CAS pine

Hey there - I'm supposed to be doing other things but I had a card idea. So, of course, I had to drop everything else! Here's my card:

Supplies: Paper - Neenah White; 
Paper Studio glitter cardstock
Dies - Hero Arts Fir Trees Infinity Dies
Embossing folder - Sizzix (name unk)
Other - SSS sentiment strip; Paper Studio star gem

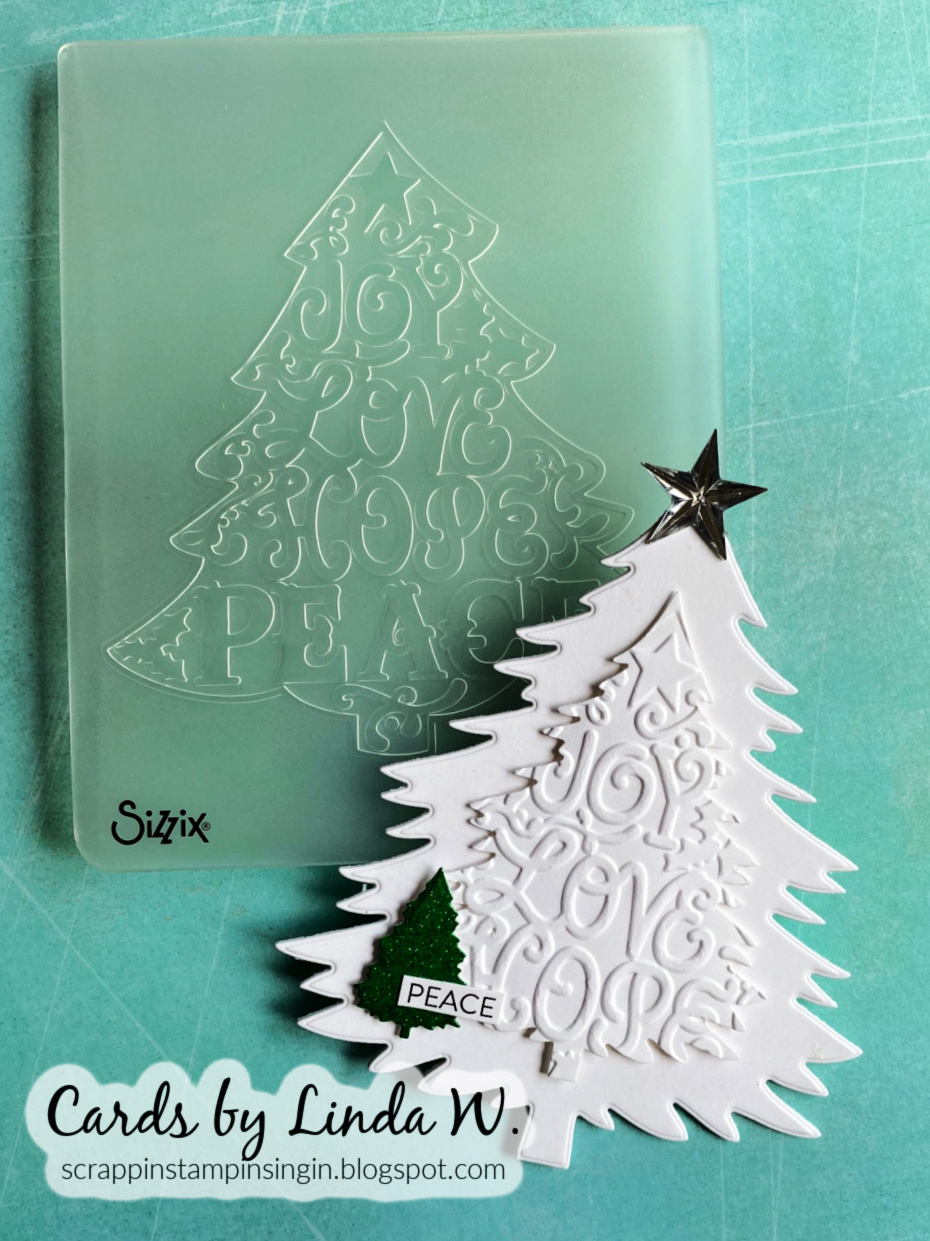
When I made a previous card for the August CAS Christmas Challenge (Pines), I had also pulled out my Hero Arts fir tree set. Decided to make a shaped tree card so it would fit both CAS Christmas and the August Let's Squash It! Challenge to use a shaped card with an embossing folder. It's the last hours for CAS Christmas but I made it!

I used a top fold A2 card and hung the die off the top a bit so I'd retain the crease when I die cut. I covered the fold with the tip of the star gem. Next I cut a smaller tree in white and embossed it. The tree embossing folder came with one of those older thick dies - it's around here somewhere... I made it work for the second layer of the HA tree set but the bottom word "Peace" didn't fit. I snipped a "Peace" off a longer sentiment strip and stuck it to my little glittery tree, also from the HA set. Done!

Thanks to these challenges, I'm gradually building my Christmas card stash - still woefully behind but oh well... Thanks for stopping!!


Wednesday, August 10, 2022

Peace in Pines

Hey everyone - quick post today. I'm playing along with the August CAS Christmas Challenge where Trina is hosting the theme of Pines. Hopefully this branch frame resembles pines, at least it does to me!!

Supplies: Paper - Spellbinders A2 card;
Poptone black; Tim Holtz Kraft Metallic;
Paper Studio glitter
Dies - Hero Arts Branches Infinity Dies &
Peace Stamp & Cut (retired but here at Frantic Stamper)
Other - Hero Arts Spring Enamel Accents (from a MMH kit)

Very quick and easy card - I simply die cut the frame from glitter paper and adhered to an A2 card. Die cut a silver Peace and a black shadow; adhered to card. Added some clear enamel dots - done!

Be sure to check out all the inspiration at CAS Christmas and have a crafty day!

Thanks for stopping by!


Tuesday, July 5, 2022

Santa Window

Hey crafty friends - hope you had a wonderful holiday weekend if you celebrated 4th of July. Low key for me - watched the Twins beat the White Sox in baseball & didn't even watch fireworks this year. I got back into the swing of things after the holiday by making a Santa card for the July CAS Christmas Challenge.

Supplies: Paper - Spellbinders A2 card;
Neenah White; Paper Studio red
Stamps - Art Impressions Santa Window
Dies - Hero Arts Square Infinity Dies
Other - Copic Markers;

Stamped and colored the Santa Window image, then die cut with a square die and matted in red. Added to A2 card oriented as a diamond along with a sentiment strip cut into two pieces. That's it - very quick and easy!

I'm always a bit confused by that "bubble" above Santa when I look at this image. On the AI site it's colored white/grey like a hill. To me it looks like Santa's lumpy gift sack so that's how I colored it. Very quick coloring but I was in a hurry, I guess... I can't find any other cards made with this stamp but I'm pretty sure I've used it at least once since its 2014 release. I love Rudolph peeking over Santa's shoulder.

Thanks for stopping and happy crafting!! And remember - we're doing "Christmas in July" over at Die Cut Divas if you want to join us!!


Wednesday, June 22, 2022

A Wreath on the Door

Hey friends - thought I'd pop back with another wreath for the June CAS Christmas Challenge. I love the theme and managed to snag a new door die on sale at Hobby Lobby 40% off or, as I like to convince myself, practically free! 

Supplies: Paper - Neenah Classic Crest Solar White;
Poptone Black Licorice; Tim Holtz red & scrap of silver
Dies - Spellbinders Open House Door Base
Stamps with dies - Hero Arts From the Vault Home Scene &
Santa's Door Accessories (retired)
Embossing Folder - Darice Stripes
Other - Copic Markers; Hero Arts Lacquer

Funny part - I already have a Spellbinders door from the October 2020 club. Oops, haven't even opened it yet! That'll be my next door card - LOL. Die cut and assembled the door - used a pearl for the door knob for more dimension. Stamped, colored & die cut the wreath, bow & kitty. Added lacquer to the berries. Embossed an A2 white card with the stripe ef to be the house & added the door elements - done. I couldn't find a spot for a sentiment so will just stamp the inside later...

I'll also add this to Darnell's June NBUS Challenge since my door set is new. And this card fits for the June Christmas Kickstart Challenge, I realized - since my card has a kitty. Pawsome!!

Thanks for stopping and have a crafty day!!


Thursday, June 9, 2022

A Holiday Wreath for CAS Christmas

Woo Hoo - CAS Christmas is baaaaack!! I'm so happy because, even with my regular entries at Christmas Kickstart, my card production has fallen woefully behind. For the CAS Christmas June Challenge,  host Linda (Lin's Craft Corner) requests that we include a wreath on our clean and simple holiday card - here's my offering:

Supplies: Paper - Neenah white; American Crafts plaid
Stamps with Dies - Spellbinders Wreath (retired SDS-093)
Embossing Folder - Taylored Expressions Weathered
Dies - Altenew Mix and Match Frames
Other - Copic Markers; 

I can't get enough of my new Altenew frame die set so the deckle rectangle makes another appearance, once again embossed with the TE Weathered folder - just love the texture. Added it to an A2 card along with a scrap of plaid. I stamped and die cut the retired Spellbinders wreath (from a lovely including three words and a pinecone spray) & colored with Copics. Backed it with 2 more diecuts before adding to the card. A simple preprinted sentiment matted in black finished the card.

Thanks for stopping by and have a crafty day!!


Saturday, October 9, 2021

Winter Village Gray and Red

Happy weekend!! I'm glad to get some time in the craft studio this morning! Today I'm sharing a card for Marcia's October challenge at CAS Christmas - use gray and red - so fun!!


Supplies: Paper - Neenah
Stamps - all by Taylored Expressions:
On Dasher, On Dancer
Inks - Memento Rhubarb Stalk & London Fog

The village stamp was a Taylored Expressions gift with purchase for October so I doubt the link I listed will work beyond this month. I've seen TE offer some of the previous year's gifts, though, so the village might come back in 2022. The Santa sleigh stamp was a gift from TE too - not sure if it was part of a set or a former stand alone stamp. I named it On Dasher, On Dancer because TE currently offers a die in this design.

Before stamping the village I masked off the bottom since the silhouette has more ground than I wanted to ink. I also used a negative circle mask to sponge a soft gray moon. My mask slipped a bit but I just went with it. Very quick and easy one layer - perfect for mass production! One could add stars etc but I kept it simple.

In case you're wondering about the paper Christmas tree, I created it last year in an online Concord and 9th class - if you missed my post about it, go HERE.

That's it for today friends! I'm also adding my card to Darnell's October NBUS Challenge since my village and sleigh are new. And to Watercolor Wednesday where Helen hosts All About Occasions. Thanks to all for the fun challenges and to you for visiting!

Happy crafting!!


Tuesday, September 21, 2021

Plaid Be Merry!

Welcome, crafty friends! It's a beautiful day in Minnesota with gorgeous blue skies - really makes you want to get out there & enjoy it! So what do I do? Stay inside and make a card... Here's my third and final entry at the current CAS Christmas Card Challenge to use plaid.

Supplies: Paper - Hero Arts Dove White Top Folded A2 card;
Neenah Classic Crest Solar White 110lb
Stamps - Hero Arts Swirl Christmas & 
Family and Friends (both retired)
Stencils - CZ Designs Simple Patterns Trio;
Tim Holtz Stripes
Other - Pine Needles & Barn Door Distress Inks;
Hero Arts Red Royal ink; Parklane gem

I wanted to play with some Cathy Zielske stencils I just bought from Simon Says Stamp. The set comes with three - I just used the diagonal striped one here, brushing Pine Needles Distress ink onto a white A2 panel. It really makes a nice rectangle. Then I created the messy plaid by brushing Red Barn with Tim Holtz stripes vertically and Pine Needles horizontally, basically letting it go outside the diagonal rectangle to the sides and top. Realized my bottom border wasn't straight so I die cut my panel to get a nice spot for the sentiment. Cut 2 additional rectangles and layered for dimension. Stamped the reindeer over top of the plaid & added a gem, then adhered to an A2 top fold card (love these HA Dove cards!!).

I'll also add my card to Darnell's September NBUS Challenge since my CZ stencil is getting first play today. Thanks to all for fun challenges & to you for visiting!! Have a crafty day - now I'm off to enjoy the great outdoors!!


Monday, September 6, 2021

More Christmas cards

Happy Labor Day to those celebrating in the great USA!

I'm still working on my Christmas stash - in barely 3 months we'll have to begin mailing them! I'll start by sharing another poinsettia card with plaid for the current CAS Christmas Challenge.

Supplies: Paper - DCWV A2 card; Pink & Main Jolly;
Paper Studio Holiday & glitter; Neenah white
Dies - Hero Arts Paper Layering Poinsettia
Stamps - Simon Says Stamp Diagonal Stripes;
Hero Arts red and green inks; Twisted Citron Distress Ink

This time I used a solid but two toned poinsettia with some green plaid leaves atop a stamped plaid border. My intention was to stamp plaid through a forest stencil - it turned out badly, take a look:


Last Thursday I received a Sunny Studio order with a new forest stencil set - love, love, love it. Had to give it a go and made the card below yesterday. So today I thought it would be fun to try stenciling a plaid through it - nope, too small a stencil area for those big red rubber stripes. Oh well, I used the bottom plaid panel for my poinsettia card and the rest went to recycling. I even had to cut off the nice white area above the tree since my inky fingers blobbed it, sigh... I used two brands of diagonal striped backgrounds, each in its separate MISTI. Made it so easy to ink with one color then pop the panel into a second MISTI for the other stamp with a different color.


Supplies: Paper - DCWV A2 card; 
Neenah white & black; Paper Studio glitter
Dies - A Jillian Vance Design Sweet Gingerbread Add On Set &
Mowed Lawn, Evergreen Bough, & Pine Needles Distress Inks

The Sunny Studio stencil set contains three panels and I used all three multiple times with three different Distress Inks to create my forest. Thought it would be fun to add a die cut tree from a new die set I bought from AJVD recently. I'm adding my stenciled forest card to NBUS 30 since the stencil set got first use here. ** Update - Jennifer McGuire shared a different forest stencil card here today, with a video - love how hers turned out although she wasn't the inspiration for mine. These layered forests have been done before - I don't claim mine was the first :)

That's it for today, friends - have a wonderful day!!