Welcome to my blog!

Thanks for visiting my blog. As the title suggests, I love to scrapbook, stamp, and sing! I will share cards and scrapbook pages I create, as well as information about my music - Barbershop harmony.

Tuesday, May 31, 2022

Last Day for May Anything Goes at Die Cut Divas

Hey Diva friends - I'm sharing the card below at Die Cut Divas today with the rest of the end-of-month team. It's the last day of our May Anything Goes Challenge with sponsor CAS-ual Fridays and we hope you'll pop over!

Supplies: Stamp/Die - CAS-ual Fridays Big Thanks Duo
Paper - Neenah white; Spellbinders A2 card;
Tim Holtz kraft core cardstock; Doodlebug
Other - Park Lane gems; Distress Inks; Copic Markers


I started with the idea to do a stamped rainbow of thanks down the edge of a white card. A couple colors went wonky when my paper shifted - really need a sticky mat for my MISTI!! Luckily I was able to save them by placing the die carefully over the stamped words. The die cuts the word into 3 pieces and I was a bit off a couple times. Just colored any white using a matching Copic marker. Then I glued the 3 pieces of each word together & onto the card - not perfect but I really liked how this turned out. The dotted border came from a Doodlebug Halloween pad and I trimmed it with a strip of black. Each word got a matching gem - done!

And now for a bonus: 


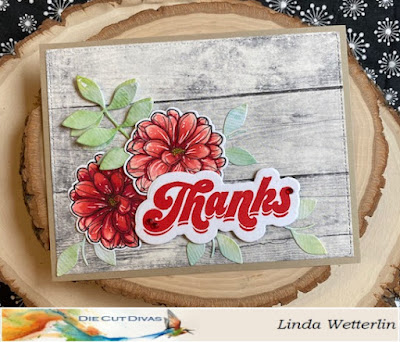
This is take two using the thanks set and some wood plank paper. This paper was browner than the piece I used for my May 21st bonus card so I used a kraft A2 card behind it. I'd already stamped the thanks in dark red onto white and then die cut the piece using the outline die. I stacked more outlines behind for dimension. I added some more of the greenery from the Garden Fri-dies (retired) and a couple flowers (colored with Copics) from another stamp/die set - Flower Duo.

Remember - you have until 9pm Pacific time to add your Anything Goes card using a die cut or embossing folder to the May Diva Gallery. Hope to see you there and thanks for stopping!!


Friday, May 27, 2022

Sending Birthday Wishes

Happy holiday weekend (Memorial Day on Monday in the USA)!! I'm enjoying my month as Guest Designer over at Darnell's May NBUS Challenge & wanted to share another card. As much as I'm trying to use old NBUS (never-before-used-shtuff), though, I keep ending up with brand new NBUS to use!! So, here I am using a brand new sentiment stamp set from Poppystamps and some freshly ordered MFT stitched blossoms.

Supplies: Paper - Momenta watercolor print; Bazzill white;
BoBunny; Paper Studio kraft A2 card & glitter
Stamps w/matching dies - Poppystamps Say It Big
Embossing Folder - Taylored Expressions Weathered
Dies - Altenew Mix and Match Frames
My Favorite Things Stitched Flowers
Inks - Tim Holtz Antique Linen Distress; 
Hero Arts Rose Madder

Poppystamps will sponsor Die Cut Divas later this year so I was loading up on some new items to use. Can't just use the old stuff, right? - much as I love it... Absolutely could not resist the Say It Big stamp and die set from the May Poppystamps release, along with a few other items. I stamped Sending Birthday Wishes and die cut it with the coordinating die, plus some extra outlines to stack behind for dimension.

I die cut a panel of BoBunny texty paper using a recent Altenew acquisition (see another card with it HERE). Embossed it with a fab TE folder giving a lovely texture which I brought out by sponging on some Antique Linen Distress ink. Another new addition to my stash - Stitched Flowers from My Favorite Things. My friend Lin (Sending Hugs) has used this set many times (see examples HERE and HERE). Each time I resisted, until finally I ordered one (plus a few other sets...). I had fun cutting flowers from my favorite watercolor print paper! The glittery centers were cut with a die from a new Poppystamps cake set. It comes with oodles of flowers, leaves and flower centers to put on the cake along with some candles & frosting bits. It's such a great set & I'm just starting to cut all the pieces for a cake card. I had a white Sunny Studio wreath in the bits box from when I was cutting a bunch of snowflakes. I used a Copic marker to color it green to match my leaves.

This card went to Betty (created by bjk). She shared a birthday card on her special day (the 19th) and I realized I'd totally skipped over the rest of the May birthdays in my book. Luckily I still had time to get two made & in the mail but Betty's had to be late - sorry!! She did receive it finally so I'm free to share.

Here's a masculine card made using the same sentiment plus paper & ephemera from the May Spellbinders card kit. Also included a globe cut from map paper and some travel icons from an old Hero Arts kit giving it a totally different look.


This one went to my cousin-in-law Dennis with a birthday today - Happy Birthday Dennis!! He texted me that he received his card yesterday so I thank Betty for saving me from another belated card!

Thanks for stopping and have a wonderful holiday weekend if you're celebrating! And be sure to stop by NBUS 38 with your May NBUS creations!


Saturday, May 21, 2022

Smile, You're Sassy!

Hey there crafty friends - it's my turn to post for Die Cut Divas today, sharing the card below. Plus I have a bonus for you! CAS-ual Fridays sponsored us for May and we chose the theme of Anything Goes!

Supplies: Paper - BoBunny Family Heirlooms
6x8 Collection; scrap of black
Paper Studio blush A2 card & glitter paper
Stamps - CAS-ual Fridays Frankly'isms
Dies - CAS-ual Fridays Sassy Smiles Duo;
Other - Park Lane gems; Black Soot Distress Ink


Prize - $20 gift card to their store to to USA or Canadian resident only
randomly picked from eligible May entries

I really get a chuckle out of the snarky sentiments in the Frankly'isms stamp set! I stamped a fun one on a stitched dot rectangle and added the gems to each descriptive word. Added the smile diecut to which I'd adhered a shadow and outline. Some pretty patterned papers on an A2 card - done! My auntie suggested I save this one for one of my sisters - LOL. For those who know them, I'll let you guess which one. :)

Now for a bonus:

Supplies: Paper - Tim Holtz Christmas 8x8 (2020);
Paper Studio Kraft; scraps of white, black & green;
Hero Arts Woodgrain (retired)
Stamp & Cut - CAS-ual Fridays Big Thanks Duo
Dies - CAS-ual Fridays Garden Fri-Dies (retired)

I love the CAS-ual Fridays Duo sets and Big Thanks is no exception! I bought it last year and it's finally getting first play here! I die cut Thanks from some woodgrain paper and the outline layer from black. Unlike with the Smile on card one, I took the time to add the little underline bits - gives it a whole new look! I stamped and fussy cut a subsentiment from the same set. Sadly, the Garden Fri-dies are retired - I just love this die set and use both the leaves and flowers often. Here I just slid some leaves around the T. And, again, who says you can't use papers from a Christmas pad all year round? Tim Holtz pads are particularly good for this.

I'll add this to Darnell's May NBUS Challenge where I'm guest designing - woo hoo!

Thanks for stopping and I hope to see your project in our May Diva gallery &/or at NBUS!!


Friday, May 20, 2022

Sympathy cards - part two

Greetings all - I'm back with part two of sharing some recent sympathy cards. I received a ton of cards from family and friends when my mom passed, including from my blogging friends & from former coworkers when I worked in Eau Claire WI over 30 years ago! So wonderful to have friends like that! One of them mentioned losing her mom recently & I hadn't heard the news before. Quickly made the following card for her family.

Supplies: Paper Park Lane A2 card; Neenah white
Other - Copic Markers; Antique Linen Distress Ink; white gel pen
Dies - A Jillian Vance Design Stitched Dot Rectangle Backdrop Set
Stamps - Joy Clair Thankful for You & Heartfelt Sympathy

I stamped a floral spray from Joy Clair's Heartfelt Sympathy set & colored with Copics. You can see a card using the other spray from this set here. The bible verse also came from a Joy Clair set - I used it on one of yesterday's cards - such a great verse. I stamped on white but it looked wrong so I sponged Antique Linen Distress ink around the edges - much better. The butterfly was a punched one that's been in my bits box forever - Heather (stamping and stitching) sent me a bunch eons ago. Thanks again, Heather! I gave it a body, though, trimming one from a Spellbinders set.

Next I'm sharing a card I sent to my brother and sister-in-law back in February. I hadn't posted it earlier and was reminded because this month I would've had kitty niece Misty to stay with me. Sadly she passed away after a short illness but she'd had a good long life! If you check my blog for Misty labels, you'll see several posts with photo. I'm lucky to have some saved videos on my phone; she's playing with different toys I kept at my house for her. RIP sweet Misty!

Supplies: Paper - Spellbinders (rainbow print from some kit);
Paper Studio A2 card; Neenah white & Poptone Black Licorice
Dies - Waffle Flower Rainbow Bridge Cat;
Stamps - Hero Arts I Love My Cat (retired)
Divinity Designs Mini Tag Sentiments

I die cut the rainbow bridge from black and backed with white. I colored in the rainbow with pencils as an afterthought and blended with an alcohol pen. Next time I'd do an inlay... Stamped the sentiment and the Meow in blue ink and glued the panel to a patterned paper rainbow background.

Hopefully no more sympathy cards to make for a long while! Thanks for stopping & enjoy your day!

Thursday, May 19, 2022

Sympathy cards - part one

Hi everyone - I'm not the only one to experience loss recently and I've had to make too many sympathy cards lately. I'll share a couple today and a couple tomorrow. My first card went to Hero Hostess sista Sally (Created by Sally) upon the passing of her beloved hubby Jem. She received my card so I'm free to share now. Still thinking of you, Sally, & sending prayers across the pond to you.

Supplies: Paper - BoBunny Garden Grove
Spellbinders A2 card; Paper Studio glitter; Neenah white
Dies - Altenew Lacy Doily and Mix and Match Frames;
Stamps - Sunny Studio Cherry Blossoms (with dies);
Taylored Expressions Simple Strips Background;

I was lucky enough to win an Altenew prize from a blog hop comment on my friend Virginia's blog (Yes, Virginia) back in April. It was a welcome surprize after losing my mom and I'm so grateful to Altenew. With my prize I ordered the doily die, enabled by this post by Virginia. I also bought the frame set which includes the torn paper die - perfect for layering. I die cut the doily from a coppery glitter paper and the torn paper from a piece of BoBunny. I had a bunch of cherry blossoms left from my March 31st DCD Sunny Studio post so arranged them on the doily. The bible verse came from a Joy Clair set I bought back when they sponsored DCD in April.

Since my doily and torn paper dies are new, I'll add this card to Darnell's May NBUS Challenge. I'm guest designer this month so please bring your NBUS on over. Next I have a sympathy card using an old My Monthly Hero kit. You can see birthday card with this floral spray here.


Colored this floral spray with Copics using the dot technique in different areas - really thought it added a lot comparing it to the other spray I colored. I used another one of the sentiments in the Taylored Expressions sentiment background stamp - very handy. 

Thanks for stopping & enjoy your day!


Tuesday, May 17, 2022

Another Christmas Mini Slim!

Hey there crafty friends - It's a busy week with chorus stuff (park performance last night - it went great! and Spring show this Saturday) but I had time to make another card for the May Christmas Kickstart Challenge - Mini Slimline!! Jo and Elf Arlene inspired us with some delightful cards and I had to play along again! 

Supplies: Paper - Tim Holtz black & silver kraft core and
Christmas patterned; Neenah white; scrap of pink
Stamp & Cuts - Hero Arts Christmas Trimmings (retired),
Winter Penguin (retired but found here at Frantic Stamper)
and Holiday Ornaments (retired)
Dies - Hero Arts Shoes and Hat (bow) & 
My Favorite Things Oval Shadows (retired)
Other -  Park Lane & Honey Bee gems
Copic markers

I started by forming a mini slimline card from a piece of Tim Holtz black cardstock. Next I adhered a layering panel of his Christmas paper (had more left from yesterday's scrap card!). Yesterday when I was pawing through the bits box, I found the grey ornaments and some penguins - thought they'd be cute on a mini slim. Added newly stamped & cut branches from the ornament set and a die cut Merry from the Christmas Trimmings set. I had a Merry in the bits box but it was kraft colored so I die cut a new one from silver plus a black shadow. I wanted an ice patch for my penguin and the MFT Oval Shadows die set is always good for that! It cuts 10 & I tried a few before I found the perfect size. Decided the penguin needed to be a girl so gave her a big bow from a new Hero Arts die set. I'd meant to use it for Mother's Day but didn't get there, oh well. Added some gems - done!

Since my bow die is newly used, I'm sending this card to Darnell's NBUS Challenge #38 where I'm guest designing all month - so fun!! Remember to pop over with some of your own NBUS, plus get a mini slim Christmas card made for Kickstart!!

Thanks for stopping!!


Monday, May 16, 2022

Elf with Embossed Scrap Background

Happy Monday - it's a gorgeous day here today and my chorus looks forward to singing at Como Park tonight!! While preparing my MC lines I managed to squeeze in another card for Let's Squash It! where Challenge 20 requires both dry embossing and scraps. 

Supplies: Paper - various patterns mostly BoBunny,
some Tim Holtz, Doodlebug & American Crafts;
Paper Studio red A2 card
Embossing Folder - Stampin' Up Wintry 3D (pine bough)
Dies - Spellbinders Dancin' Gnome
Stamp & Cut - Hero Arts Santa's Elves
Other - Copic Markers; SSS sentiment strip;
Antique Linen Distress Ink

I've said it before but I do have many boxes of scraps. Here's a photo of the one I dove into for the scraps I used. When I die cut rectangle backgrounds, I end up with a bunch of approximately 2" strips that are perfect to cut down for the strip technique Jennifer McGuire has shown many times.


And here's a shoot of some scrap pieces from which I'd cut strips and the arranging I was doing on a white panel. You can see how I love to cut random things from patterned papers - butterflies, tags, you name it!


After I had an arrangement I liked, I glued the strips down and trimmed the panel to fit in a new Stampin' Up embossing folder (just came in the mail last week!). It's narrower than A2 size but should've been long enough. I trimmed a bit more than intended so had to leave a border, oh well. After embossing the panel with the pines, I inked the raised parts with some Distress Ink.

Next, I looked it my bits box for a large snowflake - instead I found an elf already stamped and die cut. Quickly colored her with Copics and then die cut her a wooden stump using a scrap of brown. Gave her a sign made using a strip of black and a Simon Says Stamp sentiment strip.

The stump die comes in a Spellbinders gnome set that's finally seeing first play so I have two NBUS on this card. I'll add this to Darnell's May NBUS Challenge where I'm guest designer.

Thanks for stopping by and happy crafting!!


Wednesday, May 11, 2022

An embossed quilt

Hi everyone! Very gloomy, rainy day here - perfect weather to stay inside and craft! I'm playing along at Let's Squash It! where Challenge 20 requires both dry embossing and scraps. Oh, do I have scraps - boxes and boxes of them!! Embarrasing really.... I shared a photo of one meager box HERE - that's just the tip of the iceberg!

Supplies: Paper - Park Lane Ivory A2 card; 
Paper Studio Kraft; Patterns by unk
Embossing Folder - Sizzix Quilted by Tim Holtz (retired)
Dies - My Favorite Things Blueprints 2 (retired) 
Stamps - Hero Arts Year Round Sentiments (retired)
Other - Hero Arts Navy ink

First I die cut the quilt twice - once from a scrap of blue (maybe Basic Grey??) and once using two pieces of scrap patterned paper that I'd stuck side by side onto the same release paper. Carefully inlaid the quilt pieces into the blue frame and embossed the quilt with the Sizzix ef. Didn't have the packaging for the ef's name so I did the usual - went seaching on Flickr which lead me to THIS card by my friend Heather. It turns out I had embossed a quilted background panel for her!

Adhered the quilt to a rectangle diecut that I'd scored to separate the quilt from the sentiment (hard to see in the photo). Adhered that to an A2 card. Added a little star diecut from my bits box and stamped the sentiment - done! I love how this turned out & will definitely emboss more of these quilts - it adds such pretty texture!! My friend Linda's mom turns 90 on Saturday so Mama Connie will get this card.

Thanks for stopping by and happy crafting!!


Sunday, May 8, 2022

Happy Mother's Day USA!

Hey crafty friends - Happy Mother's Day if you're celebrating in the USA! It's a sad one for me, just having lost my mom last month. Yesterday would've been my parents' 67th wedding anniversary so that was another sad occasion. But we keep keepin' on and celebrating those still with us like Queen Mum Mary, dear friend and the mom of my former quartet lead singer. Here's the card I sent Mary; I previously shared the card I sent to my auntie, my second mom.

Supplies: Paper - Park Lane A2 Card; Spellbinders
Digi print - Joy Clair Designs Count Me In
Stamp - Paper Smooches All Year Cheer (NIB)
Other - Copic Markers

Who says you can't use paper from a Christmas pad for another holiday? On Friday I shared a card with papers from the 2021 Spellbinders Limited Edition Christmas kit and I've used an A2 layer of the plaid here. It's so pretty with the ombre lilac to grey. I had a digi print left from last month's Die Cut Diva sponsor Joy Clair Designs - decided to use it with the plaid for a simple card. The print has flowers top and bottom but I trimmed the top off for future use. Colored the panel with Copics, stamped the sentiment & done!

Here's a photo of my mom from last year's Mother's Day. She's holding a large flower pot I bought her which she enjoyed all the way til it froze last fall. She just about drove my dad nuts asking him if he watered it! Amazing what can happen in a year.


Take care all and enjoy time with your family - so precious!! Thanks for stopping!

Friday, May 6, 2022

A Christmas Mini Slimline!

Hey friends - It's been a busy week but I finally had time to finish a card for the May Christmas Kickstart Challenge - Mini Slimline!! Jo and Elf Arlene announced it Tuesday and I immediately decided to try a few sets I bought over the last year and have never used (surprise, surprise). Here's my card:

Supplies: Paper - Spellbinders, Neenah
Taylored Expressions Easy Strips 1/8"
Stamps - Sunny Studio Holiday Express (with coordinating dies)
Other - Lawn Fawn snowflake sequin; Park Lane gem;
Spellbinders foam ephemera; Copic markers

I started by forming a mini slimline card from a piece of Spellbinders green cardstock. Next I die cut all the train pieces and assembled - a bit fiddly but so fun. The set includes the train & Christmas tree dies, plus an ornaments & presents. I just used the train & tree dies and then added some foam sticker presents from the Spellbinders kit. I wanted a stamped Santa coming out of the engine's window & found one quickly in a Sunny Studio set I bought last August. That set has its own train to try next time - so darling and I'm sorry I didn't get a chance to use this set sooner!! While I was at it, I stamped and cut a reindeer from the same Sunny set. Colored Santa and Rudolph with Copics and added to my train. The little reindeer car is dipping in back - must be the weight of the presents! 

The background paper is also from the Spellbinders kit. Can you see the pale cityscape on it? I went simple on the railroad track (considered & rejected trying to cobble together a realistic looking track) using a narrow back strip. I used a sentiment from the same Sunny set and curved it to be smoke from the train - hard to see in the photo but I trailed a line of grey Copic C00 underneath it.

Spellbinders lists the All Aboard kit at $40 off right now so if you're looking for something special to make a bunch of cards, consider this kit! Wow - so many crafty goodies - I'm really sorry I didn't get into the box sooner!! Since my Spellbinders and Sunny Studio are newly used, I'm sending this card to Darnell's NBUS Challenge #38. By the way - I'm guest designing at NBUS this month! Hope you'll pop over with some of your own NBUS, plus remember to get a mini slim Christmas card made for Kickstart!!

Thanks for stopping!!


Monday, May 2, 2022

April 2022 Card Chain Reveal

Hey crafty friends - time once again to reveal cards that circled the globe for the April Card Chain Challenge. Thirty four people played and you can see the full chain HERE. My card went to the bee-utiful Gundi (papierelle) in Germany:

Supplies: Paper - Spellbinders A2 card; Neenah white;
upcycled Hallmark card (green circle); 
scraps of green (stem and leaves);
BoBunny Serendipity Collection (yellow)
Stamps - Hero Arts Jan2021 My Monthly Hero Kit (retired)
Dies - Taylored Expressions Bloomin' Accessories (retired);
Simon Says Stamp Painted Friend;
Hero Arts Nesting Circle Infinity Dies & Jan2021 MMH kit
Other - Copic Markers; Doodlebug enamel dot; 
Hero Arts gem; Stickles (Black Diamond & Star Dust)

I used the colors, sketch and theme of friendship as I often do. 

Color Palette Option

Sketch Option


The minute I saw the color bumblebee, my brain went to bee images. This lead me to a My Monthly Hero kit from last year - love this one!! I decided one element from the sketch could be a bee and another a flower. I started with a stamped flower from the kit but remembered a fun TE die set from Jeanne (Reba Li Creates). She gave it to me last year but I'm just getting around to using it - sorry about that, Jeanne - thanks again!! And thanks to Jo (Just a Dotty Pudding) who sent me the friend die cuts back in March. She sent white ones but I colored them black and stacked for dimension, then stickled the top layer. The bees wings got some Stitckles too.

I received this beauty from Joanne (Slices of Life) in Connecticut - just love the spring bouquet with the plaid paper behind it! Joanne is fairly new to the CCC but she's returned more than once - yay! Hope she keeps joining us!


If you'd like to join in for May, go HERE by May 6th. Thanks for stopping and have a wonderful day!


Sunday, May 1, 2022

May Guest Designer at NBUS!!

Hey crafty friends - with a mountain of NBUS (Never-Before-Used-Schtuff) in my stash, I am the perfect fit to play at the NBUS Challenge. Back in February owner & friend Darnell (djkardkreations) started taking on one Guest Designer per month - such fun! I'm delighted to be her GD for the May Challenge #38!! Here's my card:

Supplies: Paper - Spellbinders (blue); Neenah white;
 & Anchor Paper (grey linen card)
Stamps - Taylored Expressions Simple Strips Background
Dies - Spellbinders Stitched Petal Frame
Taylored Expressions Simple Strips
Other - Hero Arts gems; 
DMC Embroidery Floss (600, 604, 827); 
Artiste Silver Metallic Floss

Right before Darnell asked to guest design, I'd received a big box from Spellbinders. Not only did I have NBUS, I had brand new NBUS!! Funny thing - the die I used above was one I found at Hobby Lobby the following week - so even newer NBUS - yikes!

I die cut a thick, rich blue cardstock from an old Spellbinders kit using the coverplate. Decided to try silver metallic for stitching on it. Bad idea only because the silver I bought comes 8 strands & was difficult to split in half. The full 8 strands are too thick for the holes. I really liked the look, though, and kept at it for several hours. Then I decided some regular embroidery floss would be perfect on the rest. I split the 6-strand floss in half and 3 strands worked well. I also followed Spellbinders recommendation to use a #22 tapestry needle. Be sure to use a thick paper because you handle it a lot and wouldn't want it to tear! Later I found some beautiful metallic DMC thread that I'll try next time.

I embroidered and did counted cross stitch & needlepoint for many years. With paper, you have to watch out for the needle falling right back through the hole and off the thread - can't tell you how many times that happened...But once I got going, it went well. I secured the thread ends with a bit of glue when I completed a section. Once finished, I die cut a second panel and glued it to the back. This gave me a smooth panel to adhere to my card base. Some gems and a sentiment strip finished the card. If you want to see a gorgeous pastel version using embroidery floss, go here. My friend Lin (Sending Hugs) did a beautiful job on it!! She used some new Spellbinders stitched flowers here - so pretty!

Here's a bonus card, or as Darnell would say, a twofer:

Supplies: Paper - Neenah; Tim Holtz; Anchor Paper
Stamps - Taylored Expressions Simple Strips Background
Dies - Spellbinders Stitched Medallion
Taylored Expressions Simple Strips &
A Jillian Vance Design Stitched Dot Rectangle Backdrop

After all the stitching on the other card, I decided to try one without stitches - it's still amazing with loads of detail. I simply die cut the stitched medallion (from my big Spellbinders box) with the frame & then a solid panel with just the frame. Layered them and added to my rectangle diecuts and card base. Sentiment strip with backer and done! Very simple and fun to put together...

Thanks oodles to Darnell for offering the NBUS Challenge & for inviting me to guest design! I hope you'll join in this month using some of your own mountain of NBUS!!