Welcome to my blog!

Thanks for visiting my blog. As the title suggests, I love to scrapbook, stamp, and sing! I will share cards and scrapbook pages I create, as well as information about my music - Barbershop harmony.

Tuesday, August 30, 2016

Hearts for Christmas

Hi all - it's the last week of summer challenges between my friend Heather and me. Still having computer issues with her photo software, she emailed me this week's challenge:

 Include a heart on a Christmas card

How fun is that?! Heather knows that I love all things heart related so this one would be a no-brainer. The darling Lawn Fawn petite paper from the Peace Joy Love 6x6 pad (retired) immediately popped into my mind. It has the words printed throughout along with tiny stars and hearts - perfect! I die cut a stitched rectangle with that paper and then thought of the new Hero Arts Peace Stamp & Cut set. And oh - I also have their Joy and Love sets - woo hoo! Decided to use all three words, just like the paper. Merry Monday had this as challenge (I was the guest designer) back on June 20th so I can link it to Lori's Summer Link-up. Note - the last chance for the link-up is 8/31/16, then the Merry Makers will be back in September with new challenges - Yay!

After die-cutting the 3 words from red glitter paper and arranging them on the Peace Joy Love paper, I thought the paper seemed too busy. I loved its pool color, though, and found a light pool with snowflakes in the Penny Black Holiday Trimmings pad. Here's my card:

peace joy love with hearts

Supplies: Paper - Neenah Solar White, Anchor Paper Black, Paper Studio glitter paper, Penny Black Holiday Trimmings 6x6
Dies - Hero Arts DC187 Peace, DC175 Love and DC169 Stamp & Cut; snowflake from stash, 
Hearts from Sizzix Tim Holtz Crazy Things & My Favorite Things Die-namics Blueprints 20 (from the quilt die); 
Simon Says Stamp Bundle of Stitched Shapes (stitched rectangle)

Many thanks to Heather for all the fun challenges this summer! You can find my challenge to her for this week here. I'll look for her cards once she gets her software issue sorted - definitely won't be this week. Thanks for stopping by and have a crafty day!!

Monday, August 29, 2016

Santa challenge

Hi all - it's the 9th and final challenge to my friend Heather (and anyone else playing along). We've been issuing Christmas card challenges during July and August while Merry Monday was on hiatus. Note: Lori's summer link-up is still active until August 31st so check on uploading cards that might fit past Merry Monday challenges. I've tried to do it whenever I remember....

Challenge #9 - include a Santa on your Christmas card

Merry Monday has used this challenge in the past and I had such fun with it, I decided it would be a great way to end our summer challenge. There's no deadline for making a card; after all, we're always looking to add to our Christmas stash!! Here's my inspiration card for Heather:

Santa head Merry Christmas


Supplies: Paper - Hero Arts celadon card, the Paper Studio Old World Christmas (dotted paper), Neenah Solar White
Stamps - Hero Arts CL114 Joyful Greetings - retired (Santa) and CL343 Holiday Sayings (sentiment)
Other - Copic Markers, Scotch glitter washi tape, foam tape; Ink - Ranger Archival "Watering Can" (Wendy Vecchi)

This was another super simple card, perfect for mass production. Added patterned paper to bottom of an A2 card and layered a strip of washi at the top. Stamped the sentiment on the card's top right in the open space. Stamped the Santa head on a scrap of Neenah Solar White (Copic friendly) and trimmed it. Colored with Copic Markers and popped it onto the card with foam tape. Done!!

I will add this card to Lori's link-up and look forward to the Merry Makers' return. Can't wait for Heather's final challenge to me. Thanks for stopping and have a crafty day!

Wednesday, August 24, 2016

Sympathy cards for a chorus member's death

I got some sad news - one of our chorus members, Carol, passed away today after a long illness. While arrangements pend, I went ahead and made some sympathy cards with a musical theme. Carol also directed another chorus for over 40 years so I made a card for that chorus as well as her family. Here are my cards:

Pair of Treble clef sympathy cards
Supplies: Paper - Neenah Solar White, Hero Arts folded cards, Tim Holtz watercolor paper
Stamps - Hero Arts CL342 Everyday Sayings, CL476 With Sympathy (lilies), CG279 Musical Clef
Other - Tim Holtz Texture Paste, Distress Inks and Ribbon, Rays Stencil
May Arts ribbon, Penny Black Dancing Leaves die, gems

One of the songs we sing Internationally is "How We Sang Today" written & arranged by Vicki Uhr, another Sweet Adeline. Some of the lyrics include "I'm glad we laughed, I'm glad we loved, I'm glad we sang - Today". I'm glad I knew and had a chance to sing with Carol! Rest in Peace....

Tuesday, August 23, 2016

Needles and more needles!

Happy Tuesday everyone! I'm back with a card I made for Heather's challenge to me this week. She's having computer issues so sent me an email with the challenge details; here's what she wrote:

"Your challenge for this week - "Needles". - You can interpret this any way you want e.g. pine needles, using needles to do sewing, piercing etc."

What a great theme and I have a lot of pine branches from which to choose!! Here's my card:

Peace Love Joy Wreath
Supplies: Paper - Neenah Solar White, the Paper Studio Old World Winter (plaid) and Christmas glitter, Lawn Fawn Peace Joy Love (green plaid), Basic Grey Juniper Berry (red base for the bow's glittery filigree)
Stamps - Hero Arts CL889 Holiday Pine Branches (two styles of branches), CL343 Holiday Sayings (sentiment), 
CL474 Special Wishes (stamped background wreath)
Ink - Tim Holtz Distress Inks (Candied Apple, Cracked Pistachio, Iced Spruce, Evergreen Bough, Pine Needles)
Dies - Hero Arts DI147 Pine Branch Frame Cuts, Simon Says Stamp Bundle of Stitched Shapes (large stitched rectangle), My Favorite Things Blueprints 20 (smaller stitched rectangle) & 21 (banner), 
Creative Expressions craft dies CED1408 Classic  and CED 1211 Filigree 3D Itty Bitty Bows

I started out stamping a base wreath with Cracked Pistachio; this wreath is more leafy than piney but I added stamped pines all the way around using one of the small branches from the Holiday Pine Branches clear set. I used Iced Spruce ink for this step. I then die cut the panel into a stitched rectangle. A blob of misplaced ink toward the bottom made me die cut a partial stitched rectangle in the red/green plaid to cover it! Then I stamped and die cut fifteen of the four-pronged branch using Pine Needles, Evergreen Bough and Iced Spruce ink (5 of each). I curled them a bit before popping them onto the base wreath using glue dots. I die cut a classic bow with red paper and a filigree bow with red glitter paper. The filigree by itself looks beautiful but I didn't want to see through any gaps here. Assembled the bow and popped it with a glue dot onto the wreath. Layered the panel onto a larger stitched rectangle and adhered to a top fold A2 card. I die cut a pierced (is that bonus points, Heather?) banner and stamped with the sentiment. Added it to the card with foam tape. Done - another challenge met! Thanks to Heather for throwing it down this week, despite all her computer issues. 

Since this one has peace/joy/love on it (a past Merry Monday challenge), I'm adding it to Lori's Summer Link-up. Won't be long before Merry Monday will be back with new challenges - until then, I hope you've drawn inspiration from ones Heather and I have posted.

Thanks for stopping!

Monday, August 22, 2016

Christmas Word Challenge

I'm back with another challenge to my friend Heather - only one left after this!

Challenge #8 - make a Christmas word the focal point

I really had fun with this one because it was so simple. I die cut the word on the Silhouette. The word was all one cut with the O containing a snowflake but I wanted a more elaborate one. I decided to put a die cut circle and snowflake over the existing O in the design for more contrast. Popped it onto a stitched rectangle and a card - done! Here's the card:

Joy snowflake

Supplies: Paper - the Paper Studio Old World Christmas; Neenah Solar White, the Paper Studio Christmas glitter, card from stash by unknown - I bought them individually at a stamping store in my hometown (I have lots of yummy colors!)
Dies - Silhouette Design ID #110035 Joy Phrase, circle and snowflake dies by unknown,
My Favorite Things Die-namics Blueprints 20 (stitched rectangle)
Other - foam tape

I really liked the green patterned paper - the brocade look of it appealed to me. The snowflake was another one Heather sent me - thanks again, Heather!! It may take me a while but I make use of everything my friends send me.

Merry Monday has used this as a challenge in the past so I'm adding my card to Lori's summer link-up. The Merry-makers will be back in September with more Christmas card challenges. I appreciate them even more for all their hard work each week, after doing these challenges to Heather!! I appreciate Heather thinking up challenges for me this summer too. I can't wait to see what she dreams up for me this week and what she creates with my challenge - whenever she can get to it, no rush!!

Thanks for stopping and enjoy your day!

Saturday, August 20, 2016

More cards with the August 2016 My Monthly Hero kit

Hi all - I had some more time this week to play with the August My Monthly Hero kit (sold out) by Hero Arts. Just love this kit and have been having so much fun with it, plus the add-ons! First up, a simple thank you card:
Fairy merci

Supplies: Stamps - August 2016 My Monthly Hero kit (fairy); CL663 Thanks a Bunch (sentiment)
Paper - Pink pattern from Authentique Promise Collection, Tim Holtz watercolor, and Hero Arts Celadon card
Ink - Ranger Archival (Wendy Vecchi Watering Can); Die - DI320 Floral Border with Frame Fancy Die
Other - Hero Arts and Michael's gems/pearls; Stickles; Distress Markers; foam tape

I stamped and die cut one of the kit's fairy stamps (there are three), then colored her with Distress Markers and a water pen; I added the Star Dust Stickles from the kit to the wings. I die cut the add-on frame from patterned paper and rounded the corners. I adhered the frame to an A2 card and rounded the corners. Stamped the sentiment, added gems/pearls and popped the fairy on with foam tape - done!

Next, a bit more elaborate card for an upcoming birthday:
Happy birthday fairy
Supplies: Stamps - August 2016 My Monthly Hero kit (fairy), DC184 Ribbon Messages 
Paper - Neenah Solar White, black card stock, woodgrain vellum & Tim Holtz watercolor, 
and Hero Arts Designer Floral & Aubergine card
Ink - Tim Holtz Dusty Concord Distress Ink
Dies - DI320 Floral Border with Frame Fancy Die, border & fairy from kit, DC150 Happy Stamp & Cut
Other - Hero Arts and Michael's gems/pearls; Stickles; Distress Markers; foam tape

On this one, I glued the kit's vellum (I called it parchment in a previous post but I see Hero Arts labeled it as vellum) to a piece of black card. Just love the look of this which reminds me of birch bark. I die cut the kit's frame from this panel and backed it with a piece of glittery vellum from a previous kit (January, I think). I glued this to an A2 card and added the happy die cut. Then I die cut a panel of the designer paper in the kit using the add-on frame; I popped it on the card with foam tape. I have a stack of stamped and die cut fairies - this is the third of the three, all so darling! I watered colored this one with Distress Markers too and added the kit's Star Dust Stickles to the wings; popped onto the card with foam tape. I finished the sentiment with a banner stamped with birthday and tucked behind the top die cut. Added some gems - done!!

Thanks for stopping by and I hope you're having a crafty weekend!

Wednesday, August 17, 2016

Cards with the Hero Arts August My Monthly Hero kit

I was excited to find the Hero Arts My Monthly Hero kit for August (sold out) in my mailbox when I got home from a weekend trip! I was online the second it posted on 8/1, loving the fairy images and birch tree frame die cut. I couldn't resist the wonderful adds-on either, another frame die cut, a stencil and some wonderful Shakespearean and starry night sentiments. I found some time yesterday to make a few cards with some of the supplies. Here's card 1:

Fairy card 1
Supplies: Paper - Neenah Solar White card stock (card base), Tim Holtz watercolor paper, Anchor Paper black card stock, the Paper Studio Christmas glitter paper, woodgrain parchment from the August 2016 My Monthly Hero kit
Inks - Distress Inks Tumbled Glass, Weathered Wood,  Faded Jeans, Twisted Citron, & Picket Fence; 
Ranger Archival - Wendy Vecchi's Watering Can
Distress Markers - Shaded Lilac, Wilted Violet, Salty Ocean, Twisted Citron, Antique Linen, Mustard Seed, Fossilized Amber, Frayed Burlap, Spun Sugar, Tattered Rose
Stamps - August 2016 My Monthly Hero (fairy), CM106 Shakespearean Poetry (sentiment)
Dies - August 2016 My Monthly Hero (fairy and birch tree border), Hero Arts DI320 Floral Border with Frame Fancy Die
Stencil - Hero Arts SA082 Dreamy Nights
Other - Ranger clear embossing powder; May Arts ribbon, Stickles; Hero Arts gems; foam tape

I stenciled the Dreamy Nights with Picket Fence Distress Ink onto watercolor paper and clear embossed it. I sponged various Distress Inks on the panel and misted with water to blend. Once dry, I stamped the sentiment from one of the add-on clear sets. I adhered the panel to the card base and added the black layer with foam tape (die cut with the border die from the kit). Then I die cut the floral border with frame with the glitter paper and adhered it over the black border. I didn't like the black card left around this frame so I added the woodgrain parchment cut with just the frame.I stamped and watercolored the fairy, then die cut it with the matching die once dry. I popped it onto the card with foam tape and then added the Stickles that came in the kit. A few gems and the ribbon - done! 

Then I got a chorus email that we would honor a member battling cancer that evening. I didn't have much time but managed to make another quick card with the kit. So here's card 2:

Fairy card 2


I die cut the Floral border from a piece of ivory glitter paper and laid it over the card base. It looked fine, in fact I made another card this way (can't share yet since it's in route to the recipient). But I remembered the oval parchment left from the previous card and decided to try it behind the die. It softened the teal of the card base and I really liked the look. Fairy was stamped and die cut with the matching die, then watercolored (only different markers were Tumbled Glass and Mermaid Lagoon on her dress). The banner is from Lawn Fawn and the sentiment is from an old Hero Arts clear set. The gem came with the kit.

Thanks for stopping to peek at my first cards with this fabulous kit and add-ons. If you didn't get one, I'm sorry since it sold out quickly. I made another couple cards, one with a fairy and another without; I can see myself making many more cards with these supplies.

Tuesday, August 16, 2016

Inked Embossing Folder

Hi everyone - I'm back with a card made for Heather's challenge to me this week. She asked for a card using an inked embossing folder. I like this technique and how she spritzed it for her sample card. Here's what I created:

Joy Love Hope Peace tree
Supplies: Paper - Tim Holtz watercolor paper, Neenah Solar White, Anchor Paper black
Distress Inks - Cracked Pistachio, Evergreen Bough, Black Soot; Distress Marker - Frayed Burlap
Other - Lucky Clover Distress Stain; tinsel twine, Michael's Reflections gems, foam tape
Dies - Simon Says Stamp Bundle of Stitched shapes (stitched rectangle), My Favorite Things Die-namics Blueprints 20 (scalloped rectangle); Sizzix embossing folder - name unknown

I copied Heather's technique of inking and spritzing my embossing folder. Since I was using the heavily textured side of the watercolor paper, it didn't soak in completely. So I moved the ink around with a water brush, adding where necessary. Then I masked off the tree to spray some Distress Stain which I also spritzed and dried with a heat tool. Yes, I finally got a heat tool - no more hair dryer for my Chemistry 103 homework - LOL. To emphasized the text, I outlined it with a Frayed Burlap marker; I also added some around parts of the tree with a water brush. I die cut the dried panel with a stitched rectangle and adhered it to a scalloped mat, then added the tinsel twine. I popped the panel onto a top fold A2 card with foam tape. If I remember correctly, the tinsel twine was wrapping on a Christmas gift from Heather...thanks again, Heather!

Fun challenge and I like how my card turned out. Thanks for stopping and have a crafty day!!

Monday, August 15, 2016

Frame it for Christmas!

It's time for another challenge to my friend, Heather. We're both adding to our Christmas card stash - no need to rush to fulfill the challenge in the same week it's made! :)

Challenge #7 - Frame It! - use a frame on a Christmas card.

I made a card using this Silhouette design a few years ago and loved it. While I was searching my stash for something else, I found an extra die cut frame - yay! Thought it would be perfect for a challenge to Heather - I know she has many frames from which to choose. Here's my inspiration card:

Snowflake Frame

Supplies: Paper - Michael's Reflections Textured Brights card base (A7); Tim Holtz watercolor paper; pattern paper used to cut the frame - unknown (it has a faint horizontal blue stripe); Authentique Cozy (for sentiment banner)
Dies - Silhouette Design ID #15303 Snowflake Stamp (Hero Arts)
Stamps - Hero Arts CG376 Collage Music Background, CL241 Three Tree Christmas (sentiment)
Ink - Versamark; Tim Holtz Distress Inks - Tumbled Glass, Broken China, Salty Ocean
Other - 3M washi glitter tape; Stickles; Michael's Reflections clear gems; Ranger White Embossing Powder, foam tape

I stamped the music background in Versamark and white embossed it on watercolor paper. I sponged the various blue inks on it, blending them with water. The Silhouette frame is very detailed and I remember having to size it large enough so I could separate the snowflakes without tearing them. As sized, it needed a 5x7 or larger card base; I used an A7 card and added the washi tape to fill in the left side. After I anchored the frame over the dried music background using foam tape, I thought that this would've made a fun shaker card. LOL - I made this card before Heather's challenge to me last week to do a shaker. Funny huh, I must have been sending her a telepathic message!

Can't wait to see Heather's creation and her next challenge to me! Thanks for stopping!!

Thursday, August 11, 2016

Creative Chemistry 103 Day 2 homework

Happy Thursday! I was able to complete the homework for Day 2 of Creative Chemistry 103. The gallery closes tomorrow night so I'm happy to have one more day to add (prize winners will be chosen tonight). It's been a busy summer so I'll continue to work on the techniques as I'm able. Here's a photo of the tags I made for all five techniques Tim Holtz showed us that day (8/2):

Creative Chemistry 103 Day 2 tags

Left to right - Distress Paint Resist, Distress Paint Lifting, Distress Stain Rub Resist, Distress Luminous Mica, Distress Marker Spritzed Watercolor

I enjoyed these lessons too - I think my two favorites were the Remnant Rub Resist and the Mica Spray. Read on for a closer look and a supply list....

I combined the tags from the first two techniques into one photo to save time. My first try at the Paint Lifting wasn't so great so I did a second one (on the right ).

Creative Chemistry 103 Day 2 tags First two techniques
Tag one supplies: Stencils - Dot Fade THS006 and Holiday Knit THS028 
Distress Paints - Antique Linen, Weathered Wood
Distress Stains -Wilted Violet, Salty Ocean, Tumbled Glass, Shaded Lilac
Stamp - Stampers Anonymous Tim Holtz CMS141 Christmas Time;
Distress Ink for edges - Black Soot and definition;Ranger #8 Manila Tag
Tags two and three supplies: various TH stencils & Distress Paint colors; Ranger #8 Manila Tag

For tag one I stamped and stenciled the paints on (used a brayer on the stamp). This sent me on the merry chase to find my brayer - finally found it in with my embossing supplies - whew! Once dry I swiped the tag through the Distress Stains, then dried it. Can you see Santa and the reindeer? After I took the photos I added more Black Soot ink with a foam tool; this gave it more definition. Please tell me someone else out there uses a hair dryer as a heat tool.... (mine has a cool air feature and I use it on LOW).

Here are my tags for the final three techniques; again, I saved time by photographing them together.

Creative Chem 103 Day 2 Last 3


Tag one supplies - Remnant Rubs (from Botanical and Elements), Distress Sprays - Fossilized Amber, 
Abandoned Coral, Twisted Citron; Black Soot Distress ink for edges; Ranger #8 Manila tag
Tag two supplies - various Distress inks; Distress Sprayer with water; 
Distress Mica Spray - Antiqued Bronze; Ranger #8 Manila Tag
Tag three supplies - Distress Markers (probably about 12 of them) and Distress Marker Spritzer; Ranger #8 Manila Tag

With the remnant rubs, the trick is to be random. I did ok but got a few odd bits in there. The photo doesn't capture the gorgeous shine of the mica spray on the middle tag - sooooo amazing! It was fun trying to pick up the misted inks off my craft sheet. I got a few blobs that a re-mist didn't help - oh well, I liked it anyway! My Spritzer technique needs some work but I did pretty well with most marker colors I picked. A couple of my markers just didn't want to play nicely so I skipped on to another one. I didn't try to cover the whole tag or blend it in any way. I just added a bit of Salty Ocean to finish the tag edges.

Thanks for stopping for another Creative Chemistry post - maybe I'll be able to blog the remaining homework when I get to it....

Wednesday, August 10, 2016

Creative Chemistry 103 - Day 1 homework

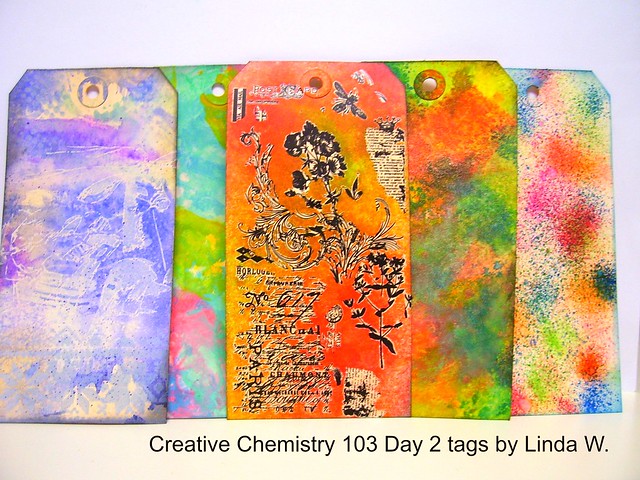
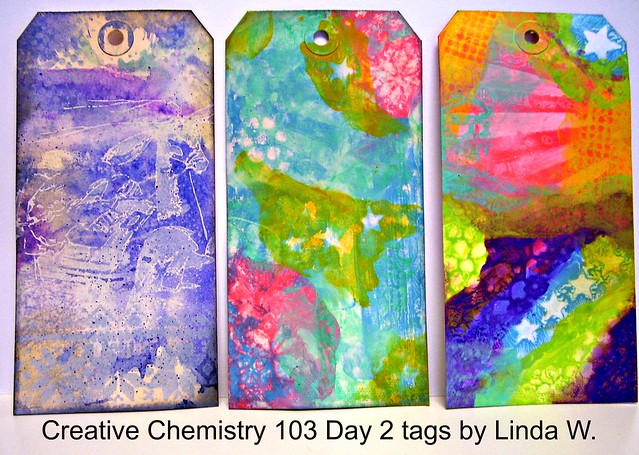
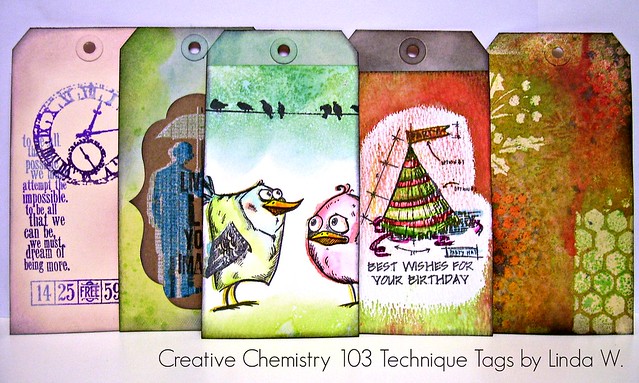
Hi all - I'm taking Tim Holtz's latest Creative Chemistry class (103 - started 8/1) and enjoying it thoroughly! Have reviewed all the lessons but am quite behind on the "homework". Last night I finally settled down to finish the Day 1 techniques. Tim has you do all the techniques on #8 tags so you can put the details on the back from a printed pdf  - very fun! Here are all 5 technique tags from Day 1:

Creative Chemistry 103 Day 1 tags
Left to right - Distress DIY Ombre, Distress Highlight Stamping, Distress Off-set Stamping, Distress Washed Watercolor, Distress Micro-Glaze Resist

Read further if you want to see each tag alone with a supply list....

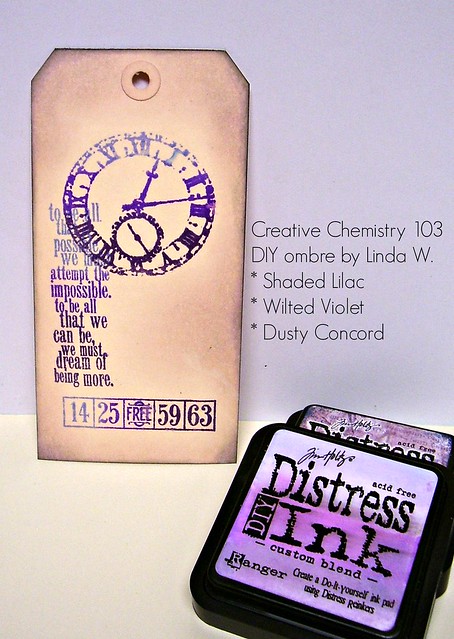
The first technique called for making and using a Distress DIY Ombre pad. I bought some custom ink pads when they first came out but had yet to use them - typical. On Day 1 of class, I couldn't wait to make an ombre pad with purples - used Shaded Lilac, Wilted Violet, and Dusty Concord refill inks. This was my first chance to stamp with it though. I stamped with 3 different clear stamps and really liked how it turned out. To finish, I sponged around the images with a couple other colors . A note about this stamp set - it's old - from 2009's Tim Holtz Visual Artistry Collection. If you search his line on Simon Says Stamp, you will see the images repackaged in different sets now. Here's a closer look:

DIY ombre tag
Supplies: Ink - Distress DIY ombre, Milled Lavendar, & Black Soot
Paper - Ranger #8 Manila Tag; Stamps - Tim Holtz Clear Stamp "Life's Possibilities"

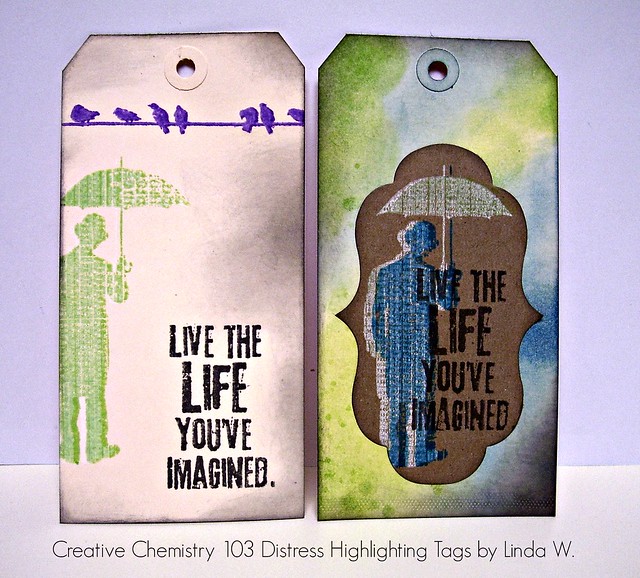
Next was the Distress Highlight Stamping technique. I've done this with other kinds of inks but this was the first time using Picket Fence - very fun. I had a pile of manila tags out and first did it on manila - oops. It was supposed to be on kraft. I probably have some kraft tags around here somewhere but I didn't want to waste time looking. So I cut a kraft label and did the technique on it, then added to a manila tag. Here's a photo of both versions - you can barely see the effect on manila but the Picket Fence still softens the colored ink. It's much more dramatic on the kraft.

Distress Highlighting Tags
Supplies: Ink - Distress Twisted Citron, Wilted Violet, Picket Fence, Salty Ocean, Milled Lavendar & Black Soot, 
Ranger Archival Wendy Vecchi Watering Can; Die - Tim Holtz Styled Labels
Paper - Ranger #8 Manila Tag, Hero Arts kraft; Stamps - Tim Holtz Clear Stamp "Life's Possibilities"

Third - Distress Off-Set Stamping. For this one, you stamp in a light ink, watercolor the image, then stamp again; a bit off-set, with an archival ink. I decided to color some Crazy Birds - so cute. To finish, I added birds on a wire - just for fun :)

Distress Offset Stamping Tag
Supplies: Ink - Distress Antique Linen, and a variety of other inks, Ranger Archival Wendy Vecchi Watering Can
Paper - Ranger #8 Manila Tag; Tim Holtz Watercolor Paper
Stamps - Stampers Anonymous Tim Holtz Collection CMS212 Bird Crazy, Tim Holtz Clear Stamp "Life's Possibilities"

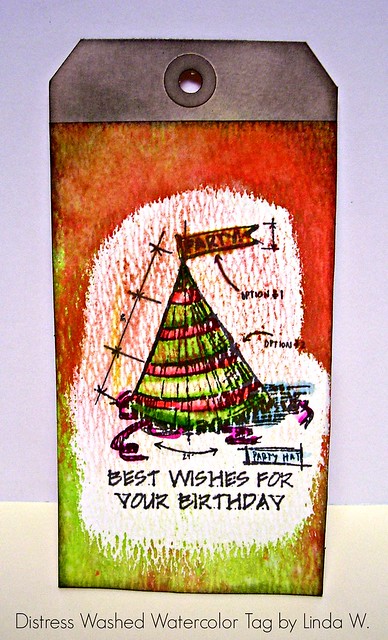
Fourth - Distress Washed Watercolor. Oh my, mine didn't turn out so great! I didn't get enough micro-glaze in the area around the top of the party hat. When I sprayed some Distress Stain, I got a bunch of droplets where I didn't want them - oh well...

Distress Washed Watercolor Tag
Supplies: Distress Stains - Abandoned Coral, Twisted Citron; Inks - Black Soot, various Distress Markers
Paper - Ranger #8 Manila Tag, Tim Holtz Watercolor Paper; Other - Distress Micro-Glaze
Stamps - Stampers Anonymous Tim Holtz Collection Simon Says Stamp Stamptember 2015 

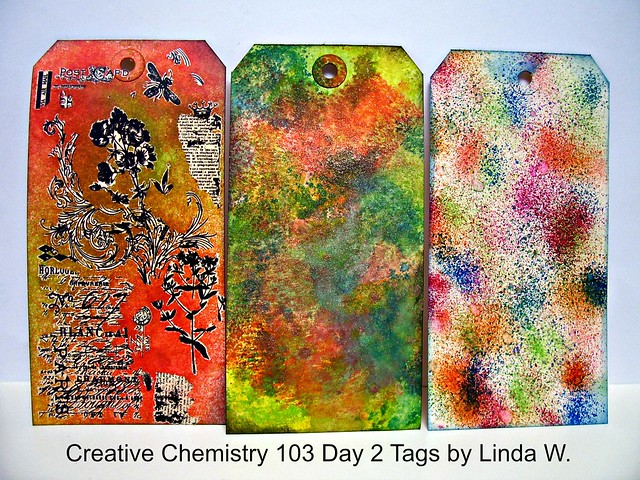
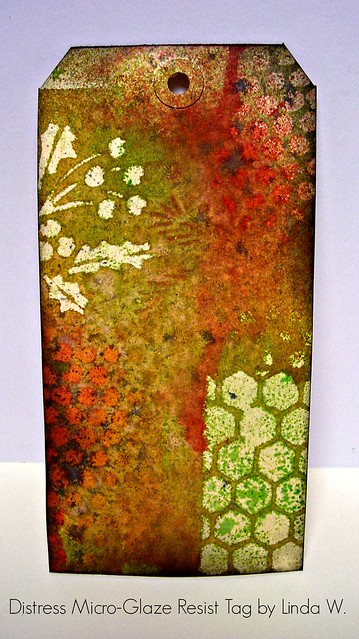
Fifth & Final - Distress Micro-Glaze Resist. This was such fun, even though I wasted a lot of time looking for my pile of stencils. I only managed to find a loose Christmas one and one packaged with a stamp set. Wow - I need to organize my stash!! For this technique you stencil with the micro-glaze and spray over it, dry it and repeat with more stencils and sprays. As you layer, the effects are more subtle since you do them over color. The first layer, once your wipe the spray off the glazed areas, is more stark with the manila tag showing through. Of course, you can leave some of the spray as I did on parts of my manila. To finish it, I highlighted some of the resisted areas with some Black Soot ink.

Distress Microglaze Resist Tag

Supplies: Ink - Distress Black Soot; Distress Sprays Abandoned Coral, Twisted Citron, Fossilized Amber, Hickory Smoke
Paper - Ranger #8 Manila Tag; Stencils - Stampers Anonymous Tim Holtz Collection THMM101 (a combo stencil and stamp set I found at Michael's), Festive THS029

I won't have a chance to blog all the homework but I enjoyed doing Day 1. The class is still open but once it ends with a live forum, you can still take the class at Online Card Classes. I love this option since we don't have any local places doing classes right now! Thanks for stopping and have a crafty day!

Tuesday, August 9, 2016

Christmas Shaker Card

Happy Tuesday everyone! Busy day for me yesterday with an early (and long, but fun) chorus rehearsal but I spotted Heather's challenge this morning and off I went to create a shaker card. I haven't made many shaker cards but they are such fun!! I liked Heather's inspiration card using a floating word and a snowflake so I decided to incorporate those elements. Here's my card:

Joy shaker standing view
Supplies: Paper - BoBunny Altitude Collection, Neenah Solar White, the Paper Studio Christmas Glitter
Dies - Spellbinders Nestabilities Labels 36, Hero Arts DC169 Joy Stamp&Cut
various snowflakes, My Favorite Things Die-Namics Blueprints 20
Other - Vellum (from a Hero Arts My Monthly Hero kit), foam tape, Michael's Reflections gems, Hero Arts pearl,
shaker mix from Heather plus Michael's Reflections chunky glitter "Glitz" 

First I made a window/frame using two of the Spellbinder nestie dies and some white glitter cardstock. Then I cut a piece of black & grey bokeh paper from the BoBunny pack and the vellum using the larger die. I glued the vellum behind the frame and added foam tape around the opening on the back side. Then I added my shaker mix. Thanks to Heather for the gorgeous mix of black/grey shaker elements - perfect for the background paper! Thought for sure I had some snowflake sequins around here someplace but couldn't find them... so I added some white glitter to the mix. Popped my bokeh panel on - done with the shaker! I love BoBunny papers and this 6x6 pad has so many yummy patterns!! I finally settled on a snowflake pattern, which I cut using the MFT scalloped rectangle, to layer onto my card base. Added the shaker to the layered card base. The JOY die from Hero Arts fit perfectly across my shaker window, then I added on a trio of snowflakes from my stash and some gems/pearl. The bottom snowflake came from Heather - thanks again!

Here's a view of the card laying flat on the table:

Joy shaker

Thanks to Heather for another fun challenge! See my challenge to her HERE and thanks for stopping!

Monday, August 8, 2016

Tag - You're it!

Time for another summer Christmas challenge to my friend, Heather - this week I was delighted to use a tag die I got from her. Thanks again, Heather!! One note - although we put challenges out each week, we may not get to play them in the same week. Just depends on how busy the week is! Lately, Heather has been quite busy and is still working on challenge 5 - no worries - I'm posting this one for whenever she can play. :)

Challenge # 6 - Use a Tag on your Christmas card

I used the inlay technique to fill the tag's cut out lettering which was a bit tricky. I tried a product called Peel 'N Stick which was super sticky - it was not forgiving if you put your letter in at a wrong angle! I had to recut a few letters and put glue on them, after struggling to get the misapplied letter out!! Not to mention getting my fingers stuck in the open spots while I was filling in others. I definitely liked Stick-It better for this type of project. Here's my inspiration card:
Do Not Open tag


Supplies: Paper - Kraft card by unknown, Anchor Paper black; the Paper Studio Pine St. Square & Old World Winter patterned papers and glitter paper; My Mind's Eye Lost & Found Christmas (special edition) - for the Santa head; 
Dies - Xcut Do Not Open Tag, Simon Says Stamp Bundle of Stitched Shapes, My Favorite Things Die-Namics Blueprints 20, Circle die by unknown; Other - May Arts ribbon and string twine, foam tape

The tag alone on the card layers looked a bit plain so I decided to put something in the top corner to anchor it. I found the perfect vintage Santa in a circle on a piece of MME paper - yay! I really liked the addition.

How are your Christmas cards coming along? I have over 40 cards made already - I'm so excited!!

Thanks for stopping and have a wonderful Monday!


Wednesday, August 3, 2016

Meeting a crafty friend!

Hi all - hope you're enjoying your day! Yesterday I had the chance to lunch with a crafty friend, Betty. We met at an Applebee's - yum! After nearly a year apart, we had lots to talk about. I couldn't meet her without taking her a card and another ATC (did this last year too). Here they are:

Friend Card and ATC

Supplies: Paper - Anchor Paper kraft and vellum, Hero Arts Designer paper (for ATC), BoBunny Butterfly Kisses 6x6 pad
Dies - Penny Black Dancing Leaves, Tim Holtz ATC, Hero Arts DI178 Color Layering Orchid Frame Cuts, 
My Favorite Things Die-Namics Blueprints 20 (stitched rectangle)
Stamps - Hero Arts CL834 Stamp Your Own Plant, CL947 Color Layering Large Orchid; CG445 Big Words
Inks - Hero Arts Unicorn White; Tim Holtz Distress Inks Wilted Violet, Twisted Citron, Frayed Burlap, Lucky Clover, Tattered Rose, Dusty Concord, Shabby Shutters; Gems - Hero Arts Foliage Mixed Accents, Michael's Reflection clear

When I met Betty in person for the first time last year, she brought me a bag of goodies that included the cling stamp set with the Friend stamp - love it! Thanks again, Betty! On the card I stamped it with Wilted Violet ink and overstamped it with the Unicorn White for a softer look - the MISTI makes this technique a breeze!

Funny thing, after knowing Betty online through the Hero Arts Flickr Group for years, I found out she's from my hometown! Graduated from a rival High School though - LOL. Anyway, it was great to see her again and chat over a delicious meal.

Thanks for stopping by and have a crafty day!!

Tuesday, August 2, 2016

Use Blog title to create a Christmas card

Happy Tuesday everyone! That Heather - she dreams up the craziest challenges!! This week I'm to create a Christmas card that somehow incorporates my Blog title - Scrappin', Stampin' & Singin'. I didn't have to think for long :) and off I went. Here's the card:

Merry Christmas Polaroid
Supplies: Paper - Anchor Paper black, the Paper Studio glitter paper, Neenah Solar White
Stamps - Hero Arts CG222 Music Background, Paper Smooches Warm Hearts (holly)
Dies - Simon Says Stamp Holiday Frames, Cheery Lynn Whistle a Happy Tune
Ink - Hero Arts Unicorn White; Other - Copic Markers, foam tape, Glossy Accents

I don't do much scrapbooking anymore and rarely blog about it. To incorporate that element in my card, I decided it had to have a photo! The Polaroid die from Simon Says Stamp called to me to pop in a photo from my retirement party. I thought a sparkly lavender frame would pull the color from my sweater in the photo. There's also black in the sweater so I decided to stamp a music pattern in white on a black card. I added a musical clef die cut. Sad, but true, I had to pilfer the die cut off a leftover gift bag I made for the chorus boutique - I couldn't find my clef die!! To finish with another stamped element, I used a sweet holly image that I colored with Copic markers and fussy cut. I added Glossy Accents to the berries. Done!

Fun challenge and I loved Heather's sample card incorporating the stitching in her Blog title; she does it so well! If you missed my challenge to her, see it here. Happy crafting and thanks for stopping by!!

Monday, August 1, 2016

Same stamp challenge

Happy Monday and, wow, it's August already!! I'm back with another Christmas card challenge to my friend Heather. We're doing this for July and August while Merry Monday takes a break (remember you can still upload to Lori's Summer Link-up here).

Challenge #5 - Use the same stamp - Penny Black's Snow Family

I know Heather has this stamp because she stamped off a few images and sent them to me to color. Thanks again, Heather!! I have a nice pile of various images to color when I have a chance and this sweet snowman trio caught my eye for this week's challenge. Here's my card:

Snow Family circle

Supplies: Stamps - Penny Black's Snow Family; Hero Arts CL343 Holiday Sayings (sentiment); 
Our Daily Bread Snowflake Background
Dies - Simon Says Stamp Circles (2 sizes); My Favorite Things Die-Namics Blueprints 28 (banner)
Ink - Hero Arts Unicorn White; Distress Ink - Salty Ocean
Paper - Card Base by unknown, the Paper Studio glitter paper; Other - Copic Markers

I colored the image Heather sent me with Copic Markers, then die cut it into a circle. I cut a hole in the top of the card base using a smaller circle and stamped it with the snowflake background, then added a glittery border cut using both circles. I adhered the snow family on the inside of the card, then added a sentiment banner across the opening. Here's how it looks propped open:

Seasons Greetings Snow Family

Any snowman image would do if someone is playing along and doesn't have the Snow Family. I can't wait to see what Heather's creates and also what she has in store for me this week!

Happy creating everyone and thanks for stopping by!