Welcome to my blog!

Thanks for visiting my blog. As the title suggests, I love to scrapbook, stamp, and sing! I will share cards and scrapbook pages I create, as well as information about my music - Barbershop harmony.

Monday, June 26, 2017

Merry Moose

Hi all - time for another Merry Monday challenge, then the Merry Makers are taking July and August off. Lori will post a Summer Link-up, though, so we can still continue to create based on past challenges - yay!! Lori's challenge this week - use a moose on your Christmas card.


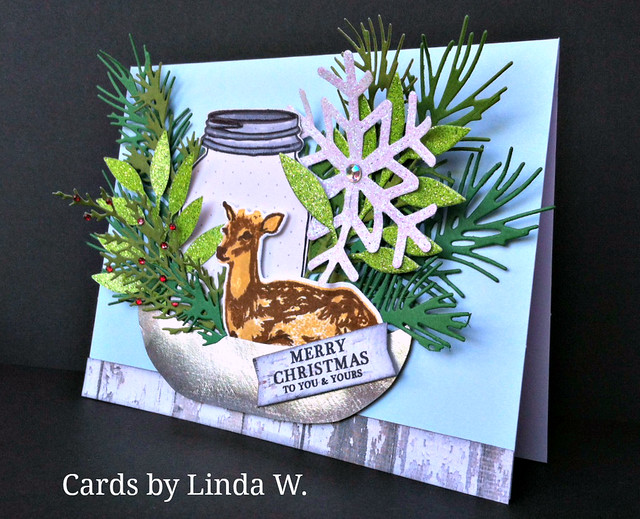
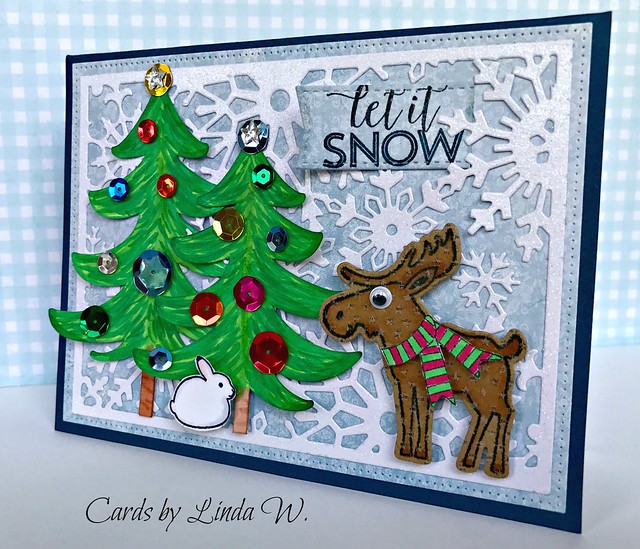
Nina offered such a challenge last year and I had zilch so I used a Silhouette image (see that card here). This year I headed back to the Silhouette to find a new moose (there are oodles). I bought a few and fired up the Silhouette to start cutting a moose and a few trees. While it cut, I suddenly remembered a little Hero Arts stamp & cut set with a moose. Hmmm, did I buy it? Yes!! Here's my card:

moose scene
Supplies: Paper - Michael's blue card, Neenah Classic Crest Solar White, 
BoBunny 'Tis the Season, the Paper Studio Christmas Glitter, My Mind's Eye Kraft Funday
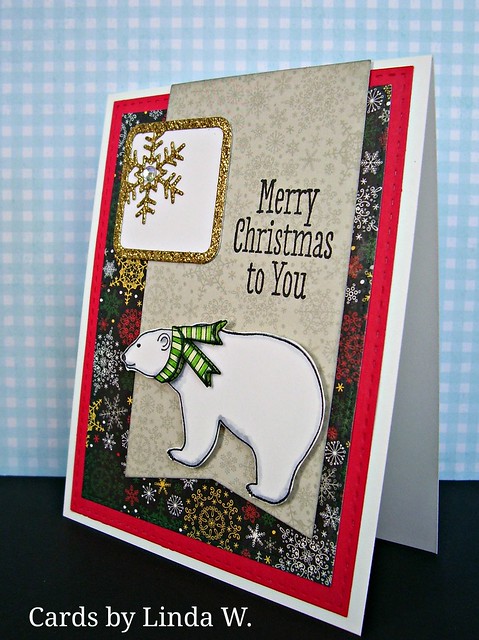
Stamps - Hero Arts DC164 Woodland Set by Lia Stamp & Cut and H6112 Polar Bear
Dies - My Favorite Things Die-Namics Blueprints 20 and 21, Impression Obsession Snowflake Background
Other - Foam tape, Copic Markers, Darice sequin assortment, Michael's star gems,
Silhouette Design ID 50884 Trees by Hero Arts

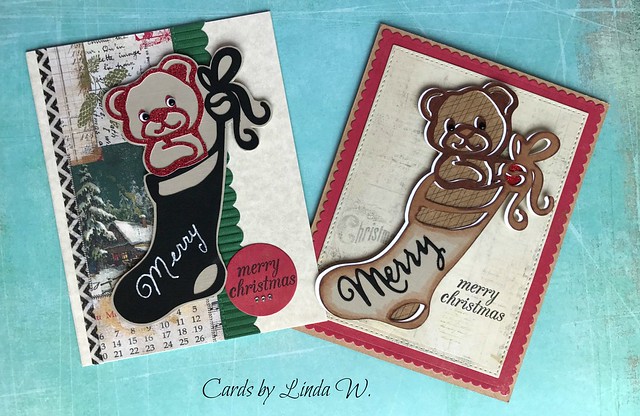
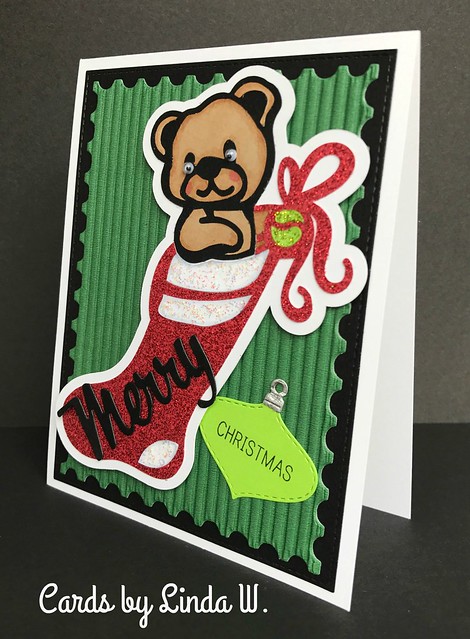
I cut the trees using white paper, then colored with Copics. I really don't like my shading which I tried to make like branches - ugh. So I covered the trees with sequins - too much?? Looks fun in real life. Weird paper on the moose - when I shaded with Copics, I got a resist effect from the pattern (looks like little stars and lines). The stamp has a little dot for an eye so I decided Mr. Moose needed a google eye. The stamp set contains a scarf but it looked too small to me. I stamped and fussy cut the polar bear's scarf from last week's card. Mr. Bear had a thicker neck so I just snipped off a few stripes and it fit perfectly!

If I don't finish the Silhouette moose this week, I can always work on it for the Summer Link-up! Have a great week and be sure to check out all the wonderful cards by the Merry Monday Design Team. I saw too many cute items that might find their way into my stash!

Thanks for stopping!!

Sunday, June 25, 2017

Pair of Teddy Bears and ornaments

Hi all - yesterday I made a teddy bear card and had a few Silhouette pieces left from the image I'd cut four times. I also had a few extra "merry" words and some ornaments that I'd die cut. I decided to use up the remaining bits and made three more cards last night and this morning.

Teddy pair
Supplies: Paper - Neenah Classic Crest Solar White & Natural A2 card,
Core'dination kraft A2 card, Pop-tone Beige & Black, 
DCWV Corrugated Christmas, the Paper Studio Glitter, Authentique and My Mind's Eye patterned
Dies - Hero Arts DI345 Nesting Postage Stamps Infinity Dies DI 199 Circle Infinity Dies,
DC195 Christmas Trimmings Stamp & Cut; 
My Favorite Things Die-Namics Blueprints 20 and 23, Impression Obsession Patchwork Ornaments
Stamp - Hero Arts CL722 Merry Christmas Messages
Other - Copics, Foam Tape, Hero Arts black pearls, Michael's gems, white gel pen, washi tape
Silhouette Design ID 162331 Teddy Bear in Stocking (by Totally Jaime)

Merry ornaments
Supplies: Paper - Hero Arts Black, My Favorite Things watercolor print, Michael's green, 
American Crafts plaid (from Target Hot Spot Christmas 2016), Tim Holtz kraft metallic (silver)
Dies - Hero Arts DI345 Nesting Postage Stamps Infinity Dies, DI199 Rectangle Infinity Dies,
 and DC170 Merry Stamp & Cut, Impression Obsession Patchwork Ornaments
Stamp - Hero Arts DC170 Merry Stamp & Cut 
Other - Foam Tape, Michael's star gem


I'll enter the teddy bear cards in this week's Merry Monday challenge to use a bear on your Christmas card. Thanks for stopping and have a wonderful day!!

Saturday, June 24, 2017

A Scramble and a Teddy Bear

Happy Saturday everyone! It's a bit chilly and windy here today - I almost blew out of my lane on the drive home from visiting my parents. I made it safely, though, and in time to play in Arlene's Scramble on the Hero Arts Flickr Group. We get to pick any 90 minutes during a 24 hr period but I was there right at her starting point - noon my time. It's still ongoing as I post this, so check it out! Arlene asked for two things - a die or punched item and something popped up. Nice and easy so I didn't have to think too hard! Here's my card:

Thanks for everything
Supplies: Dies - Hero Arts DI345 Nesting Postage Stamps Infinity Dies and DI198 Rectangle Infinity Dies
Paper - Memory Box Red Pepper card, My Favorite Things (watercolor),
 My Mind's Eye Lost & Found Market Street (music) patterned papers, scrap of black
Stamps - Hero Arts CM135 Thank You Messages
Other - Michael's gems, foam tape, Worn Lipstick Distress Ink, Memento Tuxedo Black Ink

I needed a card to thank my aunt for taking me to lunch yesterday, then she insisted on buying the items I picked at a stamping store in my home town. I got some bird silhouette dies, a cling stamp set and a package of cards (used one for the thank you). I stamped the banner and fussy cut it, then popped with foam tape over the stack of rectangles. I stamped the "for everything" right onto the music paper but it smeared so I covered it with a die cut rectangle - good save, eh?

After the Scramble, I decided to make another card for this week's Merry Monday challenge. Linda hosted this week and she said "teddy bear" in her personal blog post & had the cutest one on her card. The wording at Merry Monday said "bear" &, even though a teddy bear was pictured, I used a polar bear for my first card. I wasn't the only one to go in that direction, but I decided to find a teddy bear on the Silhouette (there were a bunch!). Here's what a came up with for card two:

Teddy Bear in Stocking
Supplies: Paper - Neenah Classic Crest Solar White, Pop-tone Beige & Black, Michael's green, 
the Paper Studio Glitter, Tim Holtz kraft metallic (silver), DCWV Corrugated Christmas
Dies - Hero Arts DI345 Nesting Postage Stamps Infinity Dies and DC116 Fancy Cut Christmas Stamp & Cut (retired), 
My Favorite Things Die-Namics Blueprints 13, Impression Obsession Patchwork Ornaments
Stamp - Hero Arts DC170 Merry Stamp & Cut 
Other - Copics, Foam Tape, Stickles; google eyes
Silhouette Design ID 162331 Teddy Bear in Stocking (by Totally Jaime)

This design is an outline one so I cut it four times, plus made an offset mat of it for a base. I cut the black and glitter images apart, pieced them back together and glued them to the white mat. Then I inlaid the brown and white pieces (Note - the green bauble in the stocking is white, colored with a Copic and stickled). The brown and white pieces were shaded with Copics before I inlaid them. I have some fun corrugated paper and decided to die cut it into a postage stamp - wow, really flattened it out nicely - looks and feels like velvet in real life! I popped teddy on the postage stamp, leaving a blank spot in lower right that I didn't like. So I stamped "Christmas" on an ornament to balance out the stocking. The black Merry was already die cut and ready - decided it looked best on the stocking itself.

That's it for today - thanks for stopping & I hope you're enjoying the weekend!!
 

Monday, June 19, 2017

Beary Fun!!

Merry Monday today and I was excited to see that my card for last week's inspiration photo challenge was chosen as the challenge winner - yay! Thanks again to Kathy for a fabulous challenge!!

For this week's Merry Monday challenge, Linda asks us to include a bear on a Christmas card. 


I knew I'd have to show some love to a NBUS (never-before-used-stuff) polar bear stamp from Hero Arts. I couldn't resist this woodblock stamp even though I tend to buy more clear stamps these days.

Polar bear
Supplies: Paper - Neenah Classic Crest Solar White, the Paper Studio glitter, Bo Bunny Merry & Bright
Stamps - Hero Arts H6112 Polar Bear and CL644 Bring on the Merry (sentiment - retired)
Dies - Simon Says Stamp Bundle of Stitched Shapes and Holiday Frames;
My Favorite Things Die-Namics Blueprints 13, 20
Other - Copics, Foam Tape, Michael's gems

I stamped the bear and shaded him with Copics. I stamped and colored a second scarf - fussy cut it and added to the bear with foam tape for dimension. Don't you love the snowflake paper? The gold snowflakes really pop so I decided to add a glittery gold snowflake element pulling it into the banner. Sad but true, I couldn't find the stitched rectangle in the Blueprints 13 set with the banner I used. So I quickly used the SSS rectangle, then found the MFT one right in the package - ugh! Sometimes I can't see what's in front of my face!!

That's it for today. Be sure to check out the fabulous creations by the Merry Monday Design Team. They have such diverse, yet amazing styles - I really enjoy the inspiration they provide each week!

I'm off to rehearse chorus music - we had a retreat Friday night and most of Saturday with a wonderful coach all the way from Arizona, Lori Lyford - Director of the Scottsdale Chorus (multiple Sweet Adelines International gold medal chorus ). With Father's Day yesterday, I didn't have time to review some of the enhancements Lori made to our music so I'd better get busy! Thanks for stopping by!!

Monday, June 12, 2017

Inspiration photo at Merry Monday

Hi everyone - hope you didn't get blown away by storms yesterday! We had some powerful ones come through and ended up canceling an outdoor chorus performance in a park. Oh well, next year....

Kathy offers a beautiful inspiration photo for this week's Merry Monday challenge!


The main image has so many layers and wonderful details that it might be a bit overwhelming to decide where to go. My eye was drawn immediately to the sweet little deer on the second tier and I knew I had to use the fabulous Hero Arts Color Layering Deer set. Here's my card:

Deer with jar display
Supplies: Distress Inks - Walnut Stain, Gathered Twigs, Antique Linen, Scattered Straw, Black Soot
Stamps - Hero Arts CL985 Color Layering Deer, CL896 Winter Scene (jar), CM101 Vintage Christmas Wishes (sentiment)
Dies - Hero Arts DI309 Color Layering Deer Frame Cuts, Impression Obsession Pine Branch, My Favorite Things Die-Namics Blueprints 13 (banner) and Leafy Greenery, Tim Holtz Alterations Mini Holiday Greens
Paper - Ms Sparkle & Co (JoAnn's) light blue A2 Card, Tim Holtz kraft metallics, various scraps of green, Heidi Swapp white glitter paper, My Mind's Eye On the Bright Side (patterned), Neenah Classic Crest Solar White
Other - Michael's gems, foam tape, Copics

I had to laugh - I read the MM post shortly after 7a and launched into my card right after I started some laundry. Totally forgot to eat breakfast until I looked at the clock and saw it was already 10a! Quickly grabbed some eggs and finished my card & the laundry.

I started by stamping the sweet deer and free-hand cut a silver dish for my display. The jars in the inspiration photo appeared to be an old fashioned ivory so I stamped a jar on ivory dotted paper. Stamped and die cut a sentiment banner, the greens and the snowflake. Arranged it all to my liking and adhered to the card with glue and foam tape. Added some gems (the red ones were clear colored with a red Copic) - Done!

Be sure to check out the beautiful Design Team cards at Merry Monday this week! They all had some fantastic takes on the inspiration photo!! Thanks for stopping by!


Monday, June 5, 2017

Time for Blue

Merry Monday everyone! Yes, time for another challenge - this week Debbie wants a monochromatic blue Christmas card.


We have enjoyed some sunny and hot weather, including the bluest skies! I was delighted to make a blue card and decided to make a navy blue ornament on a watercolor blue background similar to the inspiration photo. Here's what I created:

Monochromatic blues
Supplies: Paper - Michael's blue A2 card, Neenah Classic Crest Solar White,
BoBunny Tis the Season 6x6 (light blue) My Favorite Things Watercolor Wash Brights 6x6
Stamps - Hero Arts CL798 Winter Sparkle (ornament) CL890 Holiday Greetings (sentiment)
Dies - My Favorite Things Die-Namics Blueprints 18 and 21, Lawn Fawn Stitched Snowflakes
Hero Arts DI104 Ornament Frame Cuts (retired)
Ink - Hero Arts Navy; Other - May Arts ribbon, Michael's gems, foam tape

I started by die cutting the two panels with diagonal edges and adhering them to a white panel (a neutral is allowed in a color challenge) leaving a window for the sentiment. I then cut the panel into a pierced rectangle and adhered it to a blue A2 card. I stamped the sentiment in the open white window and stamped & die cut the blue ornament from another piece of white card. I popped the ornament onto the lower corner with foam tape. Not being one for CAS, I added a couple of snowflakes to create a focal triangle with my ornament. A few gems and a bow - done!!

I got up early to make treats for tonight's chorus rehearsal. We always celebrate birthdays the first rehearsal of the month by serving yummy treats. I volunteered to bake for June and since it's been quite warm (high 80s F) I wanted to fire up the oven early in the day. I made two flavors of bars with an oatmeal crumble - strawberry and cherry so I'd have nearly 8 dozen - not enough for the entire chorus if everyone came but there will be a few missing, I'm sure. Summer vacations have begun so we usually don't have over 90 present. I also bought fresh strawberries for those needing a healthy option. Here's a photo of one pan cooling on the counter:

bars

The recipe comes from the Ultimate Southern Living Cookbook ("the Bible" of cooking and baking according to my friend Heidi). I have never gone wrong with any of the recipes I've tried. I squeezed in making my Merry Monday card while the bars baked. Now I'm off to get things ready for the rest of the day.

Thanks for stopping by & be sure to check out all the wonderful cards by the Merry Monday Design Team!


Thursday, June 1, 2017

Birthday Fun

As I mentioned in yesterday's post, my Mom had a birthday on Tuesday (the "real" Memorial Day, she always says). We celebrated with a pizza from Papa Murphy's (the Cowboy, in case you're wondering, with some modifications) and a sweet little birthday cake from the bakery. LOL - I had a jumbo 8 from her 80th bday cake but the store didn't have that style anymore so I ended up with a smaller 2 - thought it looked cute though!

Mammy bday 2017

I made two birthday cards using a lovely Graphic 45 8x8 paper pad - one went to Mammy and the other to her sister-in-law, my Aunt Marie. Mammy loves both birds and flowers but she got the bird card since Aunt Marie prefers flowers. Don't laugh - the stamp set I used has a happy die but I couldn't find it! Had to use one from MFT to go with the birthday I stamped...

Botanical Tea bday cards
Supplies: Paper - Hero Arts Foliage Layering Paper (lightest shade); Michael's green paper; 
Graphic 45 Botanical Tea Collection (patterned papers)
Stamps - Hero Arts DC150 Happy Stamp & Cut (birthday)
Dies - My Favorite Things Die-Namics Blueprints 20 (stitched rectangle) & Blueprints 26 (happy)
Other - Hero Arts sequins, Michael's gems

My nephew Michael celebrated his 15th birthday last week and I struggled to decide what to make for a teen-aged guy! He loves playing basketball so I found a fun Silhouette design to try. I just loved how it turned out with all the layers!

Hoop it Up
Supplies: Paper - Pop tone Black, Neenah Classic Crest Solar White, the Paper Studio glitter, 
Michael's green & orange, My Favorite Things Watercolor Wash
Stamps - Hero Arts DC150 Happy Stamp & Cut (birthday); DC149 Congrats Stamp & Cut (on your)
Dies - My Favorite Things Die-Namics Blueprints 20 (stitched rectangle) & Blueprints 18 (star);
Silhouette Design ID 150551 Hoop it Up Title from Miss Kate Cuttables
Other - Michael's star gems, foam tape

That's it for today. I'm off to clean up my crafty supplies so I'll have a fresh slate to make Father's Day cards. Hope you're having a wonderful week!