Welcome to my blog!

Thanks for visiting my blog. As the title suggests, I love to scrapbook, stamp, and sing! I will share cards and scrapbook pages I create, as well as information about my music - Barbershop harmony.

Friday, September 30, 2022

Thanks a Pumpkin Latte!

Hey everyone - Today I'm part of the end of month inspiration at Die Cut Divas. You only have until 9pm Pacific Time to link up to our September Anything Goes Challenge. We're using products from our sponsor STAMPlorations but you can use any brand as long as you include a die cut &/or embossing folder.

Supplies: Paper - Spellbinders A2 Card;
BoBunny Double Dots; Doodlebug Swiss Dot
Digi - STAMPlorations Autumn Pumpkin Mug
Stamp - My Favorite Things Perk Up (retired)
Die - Hero Arts Flourish (retired but HERE at Frantic Stamper)
Stencil - Hero Arts Chevron Stencil Pair
Other - Copic Markers; Mustard Seed Distress Ink


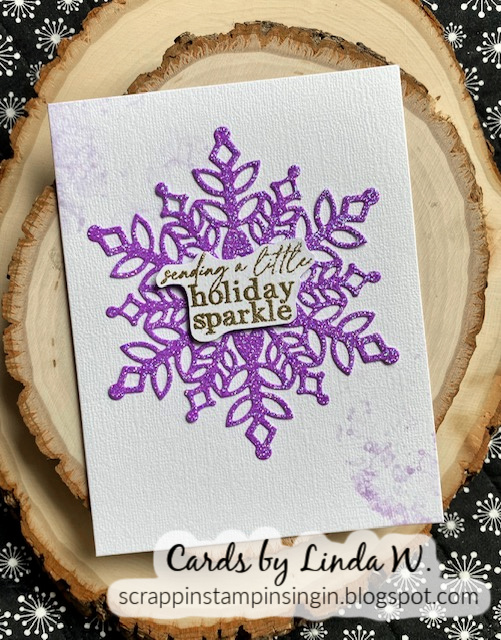
I used a larger version of the cup I used in my art journal (see this post if you missed it). I colored it a bit differently and added to an A2 card along with some "steam" (die cut from very light grey dotted paper) and a stamped/fussy cut sentiment. Very fun & simple. Since I had my dot stencil out from my CAS Mix Up entry, I sponged a dot border but without gesso this time.

And now for a bonus! I added to my art journal using some fab digi fall fruit baskets that Diva Arlene (A Bit of This and That) printed for me. 

Supplies: Paper - Tim Holtz Vintage Shabby; Neenah white
Digi - STAMPlorations Thankful for Autumn
Stamps - Elizabeth Craft Designs Holiday Special Kit (with die);
Hero Arts/Studio Calico collaboration I Love Books (retired);
Cornish Heritage Farms Denim Background (retired)
Other - Copic Markers; black Sharpie; 
Hero Arts Forest Green ink; Memento Rich Cocoa Ink

I colored the baskets with Copics & fussy cut, along with a printed, fussy cut subway art sentiment. The "bloom where you are" sentiment doesn't seem to match the stamped tree and the baskets but I was hoping to include a photo of my apple trees in full bloom. Couldn't find one - darn it. Instead I stamped, die cut and colored the girl image and stamped/colored/fussy cut the young tree image from ECD. I stamped an extra board for the sign and put it facing toward the apples (it says "orchard"). The other signs say "hayride" and "maze", all handwritten. I also added "planted" to the sentiment in my own handwriting - just for fun. Oh, and on my girl image - after coloring with blue Copics, I masked off all but the jeans and stamped the denin background on them using Hero Arts cornflower ink.

The stamped tree under the sentiment comes from a 2011 Hero Arts/Studio Calico book label set that I used for the first time today! Hmmm - 11 years on Mount NBUS, not good. I even had to break the package seal to get into it! I will add my journal page to Darnell's September NBUS Challenge since not only the book label but the small tree and girl are all new.

Hope to see your projects in the Diva gallery! Then be sure to stop back at Die Cut Divas tomorrow for a new challenge & on October 3rd for the announcement of our random winner from September. That winner will receive a code for $20 off Sherry's beautiful digi images at STAMPlorations.

Thanks for stopping by!!


Friday, September 23, 2022

Cottage in Snow Globe

Hey there - hope your weekend is off to a great start! I'm back with my third and final entry for the September Christmas Kickstart Challenge Home for the Holidays. We're to include a house, furniture -  anything to remind you of home.

Supplies: Paper - Neenah white; BoBunny Winter Getaway;
Paper Studio Holiday (red) & Glitter (silver);
 scraps of copper, woodgrain & yellow
Cottage Globe & Tidings of Joy (retired but HERE at 123stitch)
Hero Arts Layering Snow Globe (snowflakes)
Stamp with die - Sizzix Joy (retired - stopper for pop up)
Other - Copic Marker B000; Honey Bee gem (on door)

Preparing for Poppystamps to sponsor the Die Cut Divas, my sister Diva Arlene (A Bit of This and That) had sent me some cuts from their snow globe set. All I had to do was look at them to know I wanted the set for my own. I found it at my local stamping store, along with some add on sets. I used the cute cottage & fence from one of them. My photo shows the globe popped up but it folds flat for mailing. By the way, we're doing Anything Goes for September & would love to see your project using die cuts &/or embossing folders!

That's it for today. I'll also add this to Darnell's September NBUS Challenge since my snow globe set, cottage and fence are all getting first play today. Plus, Poppystamps has an Anything Goes Challenge this month so I'll pop over there too!

Thanks for visiting!


Thursday, September 22, 2022

A Couple of Birthday Cards

Hey everyone - hope you're having a wonderful week! Today I'm sharing birthday cards made for a married couple - ladies first:

Supplies: Paper - Park Lane A2 card; Michael's lime green;
Momenta watercolor print & a scrap of green & yellow prints
Dies - My Favorite Things Stitched Blooms;
Embossing Folder - Spellbinders Wedding Ring Stitch (retired)
Other - Michael's gems;

This card went to the amazing Darnell (djkardkreations) for her July bday. I realized I'd never posted it. Back in June I created a bunch of cards using die cut stitched flowers from My Favorite Things - don't know how I ever resisted ordering this die set earlier! Love, love, love!! To ground the flower cluster I used a vellum hexagon I had in the bits box (maybe Spellbinders?) and arranged it all atop a bright green panel diecut with a dot stitched rectangle then embossed.

I'm remembering to post now because Darnell's hubby had a bday yesterday. A few years ago he had commented that Darnell received a lot of cards. Not wanting him to feel left out, I started sending him a birthday card - I sign it from a crazy card-making friend of Darnell's. :) Anyway, Darnell reports that he received it timely and liked the tool paper (a fave of mine for manly cards).

Supplies: Paper - Park Lane A2 card;
Paper Studio browns; Basic Grey Bowties (2012 retired) 
Dies - My Favorite Things Blueprints 13 (retired)
Other - Target Halloween stars stickers (retired)

That's it for today. I'm off to attend a class for storytellers - it starts today at a local theater & runs 7 weeks, once a week. At the end, there's supposed to be a performance. I haven't decided if I'll participate - we'll see. Reminds me of my voice class in college that culminated in a recital - oops, missed it! Wish me luck...

Thanks for stopping!

Wednesday, September 21, 2022

Rainbow Coffee and Donuts

Hey there - I'm sharing the card below at Die Cut Divas today! We're doing Anything Goes in September with the option of adding an Autumn theme. STAMPlorations sponsored us and generously donated a $20 code toward digital stamps which is all they're selling right now. They have some absolutely gorgeous images and I enjoyed coloring them!! You do not have to use STAMPlorations products to play along but I'm sure they would appreciate your support.

Supplies: Paper - Poptone Black; 
Copic friendly white;
Hero Arts Latte Layering Paper (retired)
Digi - STAMPlorations Coffee Donut Row
Dies - Hero Arts Slimline Infinity Dies
Stamps - My Favorite Things Itty Bitty Basics
Other - Copic Markers


I'm still without a working printer so thanks to Diva Arlene (A Bit of This and That) for sending me some prints. This long Coffee Donut Row print was perfect for a slimline card. I kept it simple - colored the image, matted it with black and added to a latte card. Stamped the bitty sentiment - done!

Ready for a bonus? Read on....

Supplies: Paper - Tim Holtz 
misc. scraps; Copic friendly white
Digi - STAMPlorations Autumn Pumpkin Mug &
Dies - Hero Arts Autumn Leaves;
Elizabeth Craft Designs Home Jungle Special
Stencil - Elizabeth Craft Designs Summer Journal Special
Other - Copic Markers; white gesso; 
Tim Holtz Antique Linen Distress Ink;
TH sentiment label

Elizabeth Craft Designs sponsored the Divas in July and I bought a little art journal to play with. Today's is the first page I've created for it, using a couple dies & a stencil from two different ECD journal sets (all new to me - page & leafy frond, dots stencil). I also used some older Hero Arts fall dies and a sentiment & mug from STAMPlorations. After diecutting the page and inking the edges, I applied some gesso through a stencil - it blobbed some which was fine with me. "Create without Fear", right? After it dried, I added some more stenciled dots to both sides of the page. Colored and fussy cut the cup. Fussy cut the sentiment and edged with Distress Ink. Die cut some fall items & glued everything to the page. Added a little TH sentiment label to the right half - done!

I'll add my journal page to Darnell's September NBUS Challenge since my journal items are new.

Thanks for stopping by and I hope to see your project in the Diva September Anything Goes gallery by 9/30/22 at 9pm Pacific Time! The random winner of the STAMPlorations gift code will be announced on October 3rd.


Saturday, September 17, 2022

Sparkle and Shine!

Hi all - hope you're having a wonderful weekend! Since Tuesday I've been watching this year's Sweet Adelines International contests via webcast. Over 3000 went to Phoenix for the live convention but I stayed home this year. Due to the pandemic we had no convention in 2020 or 2021 so it was amazing to see so many quartets and choruses being able to perform in person again. I'm sad to see the convention webcast end tonight but glad for a new champion quartet The Ladies and chorus Rich-tones.

I managed to make another card today for the September CAS Christmas Challenge. Hideko asks us to use sparkle &/or shine this month so I used a bit of each - a sparkly snowflake and a shiny gold embossed sentiment.

Supplies: Paper - Spellbinders A2 card;
Paper Studio Glitter Cardstock; Neenah white
Stamps - Elizabeth Craft Designs Snowflakes
Dies - Elizabeth Craft Designs Classic Christmas Special Kit
Other - Ranger Princess Gold embossing powder;
Villanous Potion Distress Reinker

I couldn't bear to toss the gorgeous purple potion I brewed for the bubble techique I did for an August thank you card. The glass of liquid, complete with straw, has been sitting on the craft table for a couple weeks now & I have to keep reminding myself not to drink it!! If you haven't watched the bubble background video by Christine Stokes, do check it out - so fun!! Anyway, I thought some bubbles would be perfect in the opposite corners of the card before I added my snowflake. I also had the sentiment (stamped, embossed, & fussy cut) sitting on the counter. Thought it would look amazing in the center of the snowflake. That's it - so quick and easy!!

Ready for a bonus? Here you go:

Supplies: Paper - Poptone Black Licorice;
Hero Arts some MMH kit; Paper Studio Glitter Cardstock
Dies - Memory Box Newbury Ornament Vignette (retired);
Poppystamps Basic Ovals; Sizzix Joy (retired)

My earlier entry for the current CAS Christmas challenge used an outline ornament vignette. I later made several others in various colors (no photographs since they were the same design). This left me with a bunch of innards from only using the outline. I cut one more vignette from gold, glued it to a black card which had a gold oval frame on it, then inlaid it using the other colors.  All done, then I realized the oval & ornament vingette were crooked on the card - ugh!! I carefully trimmed around the oval and glued it to a purple (yes, purple) holographic card. That holographic card would have been too overwhelming on its own but I really love the gold framed oval on it!! Added a diecut JOY (trimmed down a bit) - done!

I'm adding the snowflake card to Darnell's September NBUS Challenge too since my snowflake die is new. I ended up buying a bunch of ECD products when they were our sponsor in July, then I shopped the Labor Day sale and just received that package. You'll be seeing more NBUS used soon, I hope!

Thanks for stopping!!


Thursday, September 15, 2022

Pop Up Anniversary

Hi there - enjoying the last bits of summer? I am! I'm back today with an anniversary card for my friend Linda and her hubs.

Supplies: Paper - Neenah white; scrap of Basic Grey brown;
Tim Holtz Vintage Shabby;
Dies - Elizabeth Craft Designs Lorna Label PopUp (retired)
Stamps - Unity I Did. I Do. I Will. (with die)
Other - Park Lane and Michaels gems

Looks rather plain from the outside, then there's a surprise pop up inside!

Add'l Supplies: Paper - Hero Arts pink from a MMH kit;
My Favorite Things Petite Gingham
Stamps - Hero Arts Best Wishes (retired);
Taylored Expressions Simple Strips Background &
Dies - A Jillian Vance Designs Stitched Dot Rectangle Backdrop Set;
Taylored Expressions Simple Strips Die
Other - Copic Markers

I started by cutting the pop up into a pink card, then cut a second one with the gingham and trimmed off just the pop up portion and glued it to the pink. Added a birdie couple I colored & fussy cut, plus a sentiment banner.

I'm adding this card to Darnell's September NBUS Challenge since I'm using this darling 2014 Lorna pop up set for the first time. I love all the labels and extras in this set - wish I would've played with it sooner! Eight years isn't too bad for first use - I've been worse - LOL!

Thanks for stopping!!


Tuesday, September 13, 2022

Anniversary Card with Floral Screen Embossing

Hello and welcome! I'm playing along at Let's Squash It! Challenge 24 where Jo, Gail and guest designer Jenny have asked for cards containing 2/3rds embossing and 1/3 white space. No rulers will be used thankfully!

Supplies: Paper - Park Lane A2 card;
Momenta watercolor print
Embossing folder - Cuttlebug Floral Screen (retired
but I saw it on Etsy here if you want to view it better)
Dies - Taylored Expressions Easy Strips 1/8" & Simple Strips
Poppystamps Floral Cake Pop Up Easel (flower);
My Favorite Things Stitched Flowers (leaves)
Other - Taylored Expressions Simple Strips in Reverse - Love

Very simple card! I embossed a panel of the watercolor print paper but it was in the folder backwards! Didn't want to use the debossed side so I just used the white side and ran some pinkish ink over the raised bits. I trimmed it to a 4x4" square & cut it on the diagonal. Added a black strip to each diagonal and adhered into the corners. I had a sentiment strip, flower and leaves already in my bits box; decided to add them at the angle too.

Thanks for stopping!


Monday, September 12, 2022

Vintage Home Scene

Hi all - I'm back with another home themed Christmas card for the September Christmas Kickstart Challenge. I was inspired by Elf Tina (Treebug) & her vintage inspiration card.

Supplies: Paper - Park Lane A2 card; Neenah white:
Paper Studio Glitter; BoBunnySnowfall
Stamps - Hero Arts From the Vault Winter Joy &
MMH 11/2019 (sentiment)
Dies - Spellbinders Fancy Edged Ovals (retired);
Other - Park Lane gems;
Tim Holtz Distress Inks - Antique Linen & Tea Dye

I started by stamping two of the images from the Winter Joy set onto a white A2 sized panel. I connected the two by drawing hills between them with a Sharpie. Decided to cut the panel into an oval. I was set to use it in white with a grey scalloped mat when some brown snowflake paper from BoBunny called to me. The white oval was too stark so I vintaged it up with some Distress Ink and matted on a glittery brown scalloped layer. The "sky" needed something so I added a snowflake cluster from the snow globe die set. Stamped & fussy cut the sentiment, then distressed it too. Added some gems - done!

Another Christmas card for the stash - yay! Thanks for stopping & happy crafting!


Saturday, September 10, 2022

From Our Home to Yours

Happy Saturday - at least in my neck of the woods! I received an order from Sunny Studio Stamps and owner Mendi will be shocked that I actually started creating already! One of the sets works perfectly for the September Christmas Kickstart Challenge with a home related theme - houses, city scapes, fireside scenes, etc. I got busy yesterday and this morning & created this card:

Supplies: Paper - BoBunny dots; Neenah White
Stamps - Sunny Studio Scenic Route (with dies) &
Hero Arts Gingerbread House (sentiment)
Other - Copic Markers; Star Dust Stickles

I shopped Sunny's 7th birthday sale and picked up the set with trees and houses, along with some other fun images. My main goal was to snag the new Penguin Party set. Who can resist those darling penguins?! Ok, maybe my friend Betty (created by bjk) but I certainly can't!

When I get my crafty orders, I process any dies that need snipping and create a template for quick stamping in the MISTI. Here's an example:


I've tried doing more than one image at a time but it works best to focus on one image. I simply pop the diecut into the negative. I often have scraps of 110lb Neenah white that I can use up with some diecutting. Usually, though, I use the diecuts from the template plus cut another couple full 4.25x5.5" sheets of them. Today I ending up using just one penguin in my scene but I'll have plenty for other projects by the time I'm done!! 

I stamped and die cut the houses (just does the top border) but my die cutting went a bit wonky so I trimmed it with a scissors. Next I stamped the trees/hills below the houses. You can also die cut this and pop for dimension but I chose simple stamping. Colored everything with Copics and added some Stickles. Stamped a sentiment & assembled, using a scrap of dotted blue as my sky. I put a bit of foam behind the houses so they'd stand out a bit. Done!

Will also add to Darnell's September NBUS Challenge since my scene and penguin stamps are new.

Thanks for stopping and have a crafty weekend!!


Thursday, September 8, 2022

Butterfly with Gesso Dots

Hey everyone - I hope you're having a great week! After the holiday weekend, I'm struggling to remember what day it is - does that happen to you? Anyway, I'm glad it's only Thursday!

The talented Hilary (Fiddling About) hosts this month at CAS Mix Up and asks for stencils & gesso. Since I know Hilary through the Card Chain Challenge, I thought I'd make the effort to play along! If I ever had any gesso, I can't find it in the stash so I went out and bought some. I got it in the art area at JoAnn's and it's very thin - oh well, live & learn....

Supplies: Paper - Park Lane A2 card; Neenah white;
Poptone Black Licorice
Stencil - Hero Arts Chevron Stencil Pair
Stamp with die - Hero Arts Color Layering Monarch Butterfly
Die - A Jillian Vance Design Stitched Dot Rectangle Backdrop Set
Other - Artsmith Gesso, Tim Holtz Mustard Seed Distress Ink

I've had this Hero Arts stencil set for ages and decided to give it some love. I had a thought to do a border for another butterfly I had sitting here. I applied the gesso through the stencil onto a white stitched rectangle and left to dry. Came back later and blended Distress Ink slightly off to further off the dots - sorta hard to see in the photo. Matted it in black and glued to an A2 card. Cut a TE sentiment strip into 4 bits and added going down the border. Curled the wings up on a monarch and popped up with some foam tape - done!

Thanks to Hilary and the CAS Mix Up Team for a fun challenge! Since it was out on the craft table, I also used some gesso with a new stencil for an upcoming Die Cut Divas project. Please watch for it on the 21st and if you have an Anything Goes project, be sure to upload it to our September gallery.

Thanks for stopping!


Sunday, September 4, 2022

Sparkly Ornament Vignette

Hey everyone - Happy Labor Day weekend if you're celebrating in the USA. Thought I make a quick card before I get too immersed in the Twins vs White Sox game coming up this afternoon! CAS Christmas just announced their September Challenge yesterday (Sparkle &/or Shine) and I decided to play along this morning with an extremely quick and easy card.

Supplies: Paper - Spellbinders white A2 card;
Paper Studio Glitter Cardstock
Die - Memory Box Newbury Ornament Vignette (retired)
Stamp - Elizabeth Craft Designs Classic Christmas Special Kit
Other - Hero Arts Navy Ink; 
Tim Holtz Tumbled Glass Distress Stain

I die cut the ornament vignette from glitter paper. Laid it on the A2 card to stamp the sentiment where I wanted it and to eyeball where to do a wash. Took my Distress Stain and swiped the card. Glued down the diecut - done! Since I'm so behind on Christmas cards, I'm going to make a bunch more of these in various colors. I saved the pieces that popped out of this outline to do an inlaid version later.

The sentiment stamp comes from last year's wonderful Elizabeth Craft Designs Classic Christmas Special Kit. I bought it when ECD sponsored us for Die Cut Divas but hadn't had a chance to use it until now. So I'm adding this card to Darnell's September NBUS Challenge too! 

PS - ECD is having a Labor Day Sale with 25% off & no, they've offered me nothing to say this :) They also have a bunch of stamps & dies in my "practically free" category under the SALE tab. I'm sure to be headed there before the holiday weekend ends.

Thanks for stopping and enjoy your day whatever you do!!


Saturday, September 3, 2022

Another Stained Glass Window

Holiday weekend here in the USA and instead of enjoying the last summer weather & the State Fair, I'm indoors making cards. Oh well... Went to Hobby Lobby yesterday - it's nextdoor to Goodwill where I was donating some clothes. I thought I'd reward myself :)

Supplies: Paper - Spellbinders white A2 card;
Neenah White; Poptone black; scrap of grey & metallic
Embossing folder - Sizzix Tim Holtz Arched
Stamps - Taylored Expressions O Holy Night (retired)
Dies - Taylored Expressions Label Stacklets 5 (retired); 
Simon Says Stamp Peace Love Hope Joy
Other - Copic Markers; Stickles


I found this batch of items on clearance and my total with tax was less than the regular price of the floral die set! You know me & the "practically free"? Well, the little princess stamp set was under $2!! I decided to use the Arched embossing folder first because I had a stained glass window stamped from when I made a window shaped card in August. I used ink on the ef's inside but messed up - it ended up on the debossed side (good idea for next time). So I swiped a cube of whitish ink over the raised bits, then trimmed it to layer on an A2 card. 

I fussy cut the stamped window, then die cut a white label layer for a narrow border and the next larger layer in a gold metallic with a coppery tinge. I colored the window with Copics and was edging it in black marker when the pen slipped and I nicked the bottom with the little C, tried to remove it with alcohol, then cover it up with white - ugh. Finally put a peace sentiment over it - covered it perfectly - yay! The peace was trimmed from a larger diecut that says peace/love/hope/joy. I started with a grey piece I already had in the cut box but it blended in too much so I added the black one, leaving grey as a shadow. Just love how the arched embossed background echoes the arched window!

I'll add the card to Darnell's September NBUS Challenge since my embossing folder is getting first play. She'll see me again when I get around to using those other newbies!!

Thanks for visiting & enjoy your weekend!!


Friday, September 2, 2022

August 2022 Card Chain Reveal

Hey crafty friends - another month has flown by and it's time to reveal cards that zipped (or sometimes crawled) around the world via snail mail. Twenty-nine people participated in the August Card Chain Challenge - you can see the full reveal HERE. My card found its way across the pond to dear Jo (Jo's Blogs) who, like me, had Covid 19 this summer. Thankfully we both recovered quickly!

Supplies: Paper - Parklane A2 card, Neenah white:
My Mind's Eye The Sweetest Thing; Michael's green
Stamps - Sunny Studio Captivating Camellias;
Dies - Sunny Studio Frilly Frames Eyelet Lace &
Other - enamel heart from a Hero Arts kit; various inks


Colour Palette Option
Sketch Option
Big surprise - NOT - I went with the colors, sketch, and theme of friendship. I even popped some flowers on there (one of the other themes) but no fruit. I was eager to use - finally - the Sunny Studio Captivating Camellias color layering stamp set I bought when it was released January 2021. Not bad, a year and a half to use something....sorry, Mendi!

As usual, I die cut a bunch of white flowers and leaves and popped them into the negatives to stamp with my MISTI - makes a great assembly line for each layer. I stamped my flowers in various shades of purple for the color grape - one was even named Grape Juice. That color was pretty dark so I stamped the final layer in silver to get a softer look in those spots. I used three shades of green for the leaves, including Lime Green. Really liked how these turned out and, like many examples I saw at Sunny Studio, I skipped stamping the yellow flower center layer - just left it white.

The sketch seemed to include a mat layer so, to make it extra feminine, I used a fave Sunny Studio Frilly Frames Eyelet Lace. I found the perfect kumquat card base & floral patterned paper to echo my camellias and used a scrap of lime green for my sentiment label.

I received this darling card from Joanne in California. Aren't those little fishes the cutest?! Such a fun, decorated envelope too - thanks, Joanne!!


That's it for today. If you haven't already signed up for the September Card Chain, you can still link up by September 6th.

Thanks for stopping by and have a crafty day!!