Welcome to my blog!

Thanks for visiting my blog. As the title suggests, I love to scrapbook, stamp, and sing! I will share cards and scrapbook pages I create, as well as information about my music - Barbershop harmony.
Showing posts with label NBUS Challenge. Show all posts

Tuesday, November 19, 2024

Baking Spirits Bright

Hi all - I'm back with my second card for National Gingerbread Cookie Day over at Day of the Month Card Club Challenge #69. I'm using new Simon Says Stamp dies with a newly used sentiment stamp I bought last season.


Supplies: Paper - Recollections A2 card;
Sunny Studio Critter Country; TH silver kraft metallic;
scraps of kraft and white
Dies - Simon Says Stamp Holiday Baking Essentials 
Stamps w/dies - Taylored Expressions Season's Sweetings (dies HERE)
Other - foam tape; white gel pen; Copic RV16 & E50

I die cut a rectangle from a Sunny Studio buffalo plaid paper & added to an A2 card top fold card from Michael's. I die cut the baking elements from various scraps. Stamped and die cut a sentiment. Added everything to the card after detailing with a gel pen and a Copic. Done! I thought it was fun to combine the rolled & cut out dough on the left with the baked cookies on the right.

I'll also add my card to Merry Little Christmas Challenge #59 where Anything Goes Christmas (5th entry of 8 max if I'm counting correctly) & to Darnell's November NBUS Challenge #68 since the sentiment and some of the baking elements were newly used.

That's all for now. Thanks for stopping by & have a crafty day!!


Sunday, November 17, 2024

Pink Ornament on Aqua

Happy Sunday, everyone - I spotted Color Hues Challenge #99 yesterday and just had to play along! Marcia is hosting and chose Pink/Aqua as her color combo - so yummy!! Here's my card:


Supplies: Paper - Recollection top fold A2 card; 
scraps; striped by unk; Betterpress Porcelain;
Dies - Simon Says Stamp Reeded Ornament;
My Favorite Things Blueprints 26 (bow);
Impression Obsession Pine Branch (retired at IO 
but a couple left at Frantic Stamper HERE);
Press Plate w/die - Spellbinders Seasons Greetings Evergreens
Other - foam tape; Hero Arts enamel dots

I just received an order from Simon Says Stamp last week. I couldn't resist their Reeded Ornament set from the new Festive Fun collection. It's getting first play on this card. I used a tried & true sketch of an ornament hanging from pine boughs. 

I die cut some aqua striped paper (it was a rogue piece, not with a pad so brand unk) using a stitched rectangle. Added to an A2 card. Next I cut two pine boughs from some aqua scraps (paper brand unk - might be MFT) & then the ornament from pink scraps (again, maybe MFT). The ornament hanger was cut from scraps of a neutral silver Tim Holtz kraft metallic. Assembled and added to the card. The Betterpressed sentiment came from the Christmas bits box. Die cut a bitty bow from a fave MFT Blueprints set & added it to the ornament along with a gem - done! 

I'll also play at the Tic Tac Toe Challenge #260 using the bottom horizontal row - Die Cut, Metallic Element & Festive Sentiment. And also at Darnell's November NBUS Challenge #68 since my ornament is newly used.

That's it for today, friends. I'm very behind on Craft Roulette - went to a party Friday night so missed the LIVE. Haven't watched the replay yet but hope to get to it later today...

Thanks for stopping by & have a crafty day!! 


Wednesday, November 13, 2024

A Bunch of Christmas Cards!

Hey there - I'm back with a bunch of Christmas cards, definitely needed for the stash! First up a card using a darling snowmen stamp I picked up in Kansas City a couple weeks ago:


Supplies: Paper - Hero Arts Bermuda;
Neenah Classic Crest Solar White
Stamps - Woodware Craft Collection Snow Balls;
Hero Arts Christmas Holidays Stamp Cut,
North Pole Express, & Cozy Penguin (all retired);
Sunny Studio Snowman Kisses
Other - Copic Markers; Memento Tuxedo Black ink;
Hero Arts Creamsicle, Dusty Blue, Emerald Green, & Red Royal inks;
Glossy Accents; Hero Arts Sparkle Lacquer

When I was in KC for the Sweet Adelines International convention (more on that in future), I had a free morning. Of course, I sought out a craft store! Found the charming LS Scrapbook Boutique in Lee's Summit, not too far from downtown KC. I had a lovely chat with owner Stacie &, though they focus on scrapbooking, found some card-making goodies, including the snowmen stamp.

I stamped the image onto a piece of Neenah white that was already die cut into a stitched rectangle. Colored it with Copic Markers. I stamped a sentiment  & snowflake from the same set, then added snowflakes from 4 other sets to get different sizes. I used ink colors to match my coloring. Finally, I added sparkle lacquer to the star and Glossy Accents to the heart. I did a second version of this card that I'm not sharing. I used some stamped/die cut snowflakes and found I liked the ones stamped directly on the panel better.

I'm adding this card to the November We Love Stamping Challenge where the theme is Christmas or Anything Goes. I'll also send my card to Darnell's November NBUS Challenge #68 since my snowmen stamp is getting first play here. 

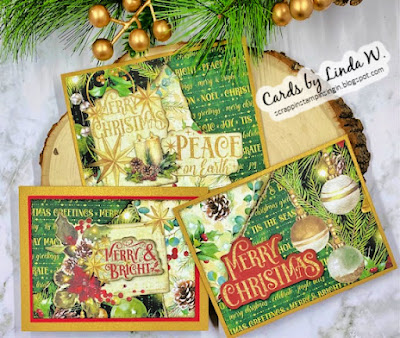
Next, I have a set of cards using some gorgeous Graphic 45 papers I also bought on my trip. For the first two I die cut panels from the patterned paper using my fave dot stitched rectangle, then added ephemera. I added items to a gold Park Lane A2 card. The Graphic 45 collection is called Merry & Bright (12x12 paper pack/ephemera pack).


Then I made three cards using the "Stack and Whack" technique shared by Natasha Foote (video 1099). My friend Dawn (Dawn's World) shared her cards with this technique yesterday and I had to try it! I put them all in one photo:


Basically you stack 3 pieces of paper and tear the stack into three pieces randomly, then put them back together mixed up. I glued my piece to a A2 piece of typing paper & die cut the results into various stitched rectangles. I topped them with Graphic 45 ephemera; quick & easy!

That's it for today, my friends! So glad you took time to visit & I hope you have a wonderful day!!


Tuesday, November 12, 2024

Gingerbread Couple

Hi everyone - it's been a while since I joined Darnell and her IDEAS program (see her beautiful cards HERE) so I thought I'd jump into D is for Dies this week. And the designers are celebrating National Gingerbread Cookie Day over at Day of the Month Card Club Challenge #69 so I got out a die set to play along. Thought it was past time to use a darling Spellbinders set I bought last year but hadn't even opened yet. 

Here's my gingerbread couple:


Supplies: Paper - Taylored Expressions Hot Fudge & Latte;
BoBunny Snowfall Collection 6x6"; vellum;
scraps of blue and glitter paper, plus pink for the cheeks; 
Spellbinders Betterpress Pebble
Dies - Spellbinders Dancin Gingerbread;
My Favorite Things Stitched Oval Scallop Frames (retired)
Press Plate w/die - Spellbinders Merry & Bright Sentiment Strips
Other - Spellbinders Betterpress Thunder ink

I die cut a rectangle from a BoBunny patterned paper pad & added to an A2 card formed from Latte cardstock. I die cut the gingerpeople from the same Latte. Their frosting and clothes were die cut from scraps. I adhered scraps of Hot Fudge cardstock behind the faces and inlaid the peachy cheeks, die cut from scraps. Assembled the gingerpeople.

Next I die cut a piece of vellum using a scalloped oval frame. What's left is a zig-zag edged oval which I used as my cookie platter. Added this to the card then popped the gingerpeople atop it. A Betterpressed sentiment finished the card.

I'll also add my card to Merry Little Christmas Challenge #59 where Anything Goes & to Darnell's November NBUS Challenge #68 since my gingerbread set is newly used.

That's all for now. Thanks for stopping by & have a crafty day!!


Saturday, November 9, 2024

Thanks a Bunch!

Hey friends - I'm back with my card for Episode #240 of Craft Roulette which aired last night:


Supplies: Paper - Neenah Solar White;
Paper Studio kraft; Tim Holtz jewel kraft; scrap of green
Stamps - Hero Arts Thanks a Bunch Monkeys &
Owl-oween (retired)
Embossing Folder - Spellbinders Scattered Tropics (3EOM-May24)
Dies - Lawn Fawn Grassy Border;
Hero Arts Tag Frames Infinity Dies (retired);
Other - Copic Markers; foam tape

Host Mary Gunn FUNN had the delightful Eileen Hull as her guest. Eileen designs for Sizzix; you can find her current products HERE. I wish I would've had one of her dies for last week's parameters!! Here's what the wheel spun for us:


  • Project - Card For A Helper: I made a thank you for a neighbor who took in my mail and watered my new landscaping while I was with my sister and dad for nearly a month.
  • Colors - Cereal Box: Just about any colors would work! I pulled Green & Yellow from Lucky Charms & many cereals are Brown, eg Grape Nuts.
  • Element - Jungle: I embossed with Jungle foliage & included a jungle critter.
  • Random - Paper Sack: Stamped sack is from a Halloween set I had sitting out.

I die cut a stitched rectangle and embossed with the tropical background. Sanded the 3D embossing to reveal the kraft core. Die cut a strip of grass and added to the panel, then adhered to an A2 card.

Next I stamped the scene elements and die cut or fussy cut as needed. Colored with Copic Markers. Stamped and die cut a sentiment label. Assembled elements on card with glue and foam tape - done! I checked the CR gallery this morning and several people had the same idea with monkeys & bananas - great minds, right? My card was a lot simpler than some of them! I didn't manage to finish during the show but it was only 30 minutes later - maybe it needs something more? Anyway, here's a close-up of the scene:


I'll add my card to Darnell's November NBUS Challenge #68 since my monkey stamp set got first play here.

Funny thing - I was working on my blog early this morning in my pjs when I realized I had to pick up a decorated cake and head off to a brunch! Needless to say I had to get ready quickly, head to the bakery then the event! I made it, even picking up two friends along the way!! So I finished this post when I got home....

That's all for today! Thanks for stopping by!!


Friday, November 8, 2024

A Pair of Wise Men Cards

TGIF everyone - While I was making yesterday's card, I found some wonderful patterned papers featuring Wise Men & thought I'd make a couple more Christmas cards. I'll add one to Christmas Kickstart #92 where the theme is "Wise Men Three"; the other is just a quick bonus.


Supplies: Paper - Park Lane A2 card;
Hobby Lobby Star of Bethlehem;
Spellbinders Betterpress Porcelain; scraps
Birch Press Designs Ornament Basics;
Hero Arts Nesting Circle Infinity Dies (retired)
Press Plates w/dies - Spellbinders Merry & Bright Sentiment Strips
Other - foam tape

I started by fussy cutting an ornament printed on a piece of the Star of Bethlehem paper. I didn't like my cutting so I die cut the image with a circle die. I die cut a BPD ornament and added the circle. The BPD topper and a Poppystamps bow & string finished the ornament.

Next I found a piece of desert scenery paper from the same paper pad & die cut it with a stitched rectangle. Adhered to an A2 card, then added the ornament with foam tape. To finish, I added a Betterpressed sentiment strip.

I'll also add my card to Merry Little Christmas Challenge #59 where anything goes. And to Darnell's November NBUS Challenge #68 since my bow & string die set is newly used.

For a bonus, here's a quick card made with another patterned paper from the Star of Bethlehem pad. I die cut it with a stitched rectangle, matted with a white rectangle & adhered to an A2 card. The same sentiment as above, Betterpressed in a different ink, finished the card. Perfect for mass production!


That's it for today; I'm looking forward to another Craft Roulette episode tonight - maybe I'll see you there (6:30p Central Time)! Thanks for stopping by!!


Tuesday, November 5, 2024

Sunny Farm Days

Hey there - I'm back from Kansas City where I competed with my chorus in the Sweet Adelines International contest. We came in 12th - yay! Would've liked the top 10 but we weren't far out of it & this with 30% new members!

I watched Craft Roulette Episode #239 from Friday night on replay when I got home since I was too busy at the convention. Also, both Mary Gunn & I were too busy to get together even though I was in her neck of the woods, oh well... Here's my card:


Supplies: Paper - Neenah white; many scraps;
Spellbinders Betterpress Porcelain; Paper Studio kraft;
Authentique, MFT and Lawn Fawn patterns
Stamps - My Favorite Things Aug18 Freebie
Dies - CREAlies On the Move #18;
Yvonne Creations Country Life Farm Border
Press Plates w/dies - Spellbinders A Little Message Sentiments 
Hot Foil Plate w/die - Spellbinders Summertime Sentiments (GOM-Jun24)
Hero Arts Celestial (HERE at Frantic Stamper)
Other - Copic Markers; foam tape; May Arts ribbon

Mary had Jenn Gross (Journey Coach Jenn), who's on the Design Team for Pear Blossom Press, as her guest. Jenn also serves as a Brand Ambassador for Rabbit Hole Designs. The wheel spun another interesting set of parameters for us:


  • Project - Interactive: I used a CREAlie flip diecut & tied it with a ribbon.
  • Colors - Picnic: Red/white for a common tablecloth & wine, watermelon, etc. Brown for a basket & whatever colors for picnic foods!
  • Element - Farm: I used a farm animal stamp set.
  • Random - Paper Strips: one sentiment was a strip plus I used a few cut strips.

I have several different die sets which could be considered interactive. The flip card set was closest so I went with it. Die cut the card, then adhered it to a white panel covered with a picnic tablecloth patterned paper. I sandwiched the ribbon between these layers. It's a white sheer sparkly ribbon that catches the light with different colors (looks a bit purple in the photo...). Die cut the various layers to the card and adhered. 

Die cut a farm silhouette and adhered to the main inside layer. Cut strips of green papers, solid and patterned for some "grass". Stamped and fussy cut the farm animals & colored with Copic Markers. Die cut a sun and added to the card with foam tape, leaving room for the ribbon to slide through for closing the card. Chose a couple Betterpressed sentiments, one of which I cut into two pieces (that was pressed with a hot foil plate). Adhered the main sentiment with foam tape and glued the strips flat. Here are a couple more views - standing & pressed flat:


That's it for today. My farm animals got first play here so I'll add my card to Darnell's November NBUS Challenge #68.

Thanks for stopping & have a crafty day!!


Thursday, October 31, 2024

Happy Halloween and Last Day for October Die Cut Diva Challenge!

Happy Halloween everyone! Today's the last day to enter our October Die Cut Diva Challenge. We've been celebrating World Card Making Day all month long with our cards using dies &/or embossing folders. Come join the fun by 9pm Pacific time today! 

The Divas are sponsored this month by the amazing My Favorite Things who generously donated a $25 prize. We will draw from eligible October entries and award it randomly on 11/3. Here's my inspiration card with the last day Diva team:


Supplies: Paper - My Favorite Things Christmas Cheer;
Neenah white; Recollections green; scraps
Dies - My Favorite Things Stacked Merry,
Let it Snowflake (retired), &
Stitched Oval Scallop Frame (retired);
Other - gem by unk

I formed an A2 card with 1/2 a sheet of cardstock. Use part of the remaining 1/2 to die cut a frame. When the frame with an inside scallop cuts, you get an edged oval so I used that part. Die cut the snowflakes from white cardstock and the MERRY from both red and black. Die cut a rectangle of striped paper and added to the card with a strip of red. Assembled the MERRY and added to the oval along with one snowflake. Glued the other two snowflakes under the oval and added to the card. A pink gem finished the card.

Bonus time - I'll share a Halloween birthday card for my dear friend from high school, Denise. I made a similar non-birthday Halloween card for my friend Heather. This one has no MFT products...


Supplies: Paper - Neenah Classic Crest Solar White;
Taylored Expressions Halloween (retired)
Die - Waffle Flower Postage Collage
Stencils - Waffle Flower Postage Collage Spooktacular
Inks - Hero Arts and Memento
Other - Waffle Flower Subsentiments Boo; white gel pen

Die cut the postage collage from Neenah, then stenciled with the 4-step Spooktacular set. Three of the stencils have recommended colors so I used those; I used a pale lilac for the background step. Added some details with a white gel pen & a printed sentiment. Adhered to an A2 card covered with Halloween patterned paper - done!

Since my Spooktacular stencils are newly used, I'll add my card to Darnell's October NBUS Challenge #67.

Thanks for stopping and hope to see you in the Diva gallery!


Sunday, October 27, 2024

Amazing Things Thank You Card

Hi everyone - hope you had a wonderful weekend! I had some time to make a card before I tackled yard work. Decided to use a stencil set & make my second card for Just Us Girls #750 where it's stencil week. 


Supplies: Paper - Spellbinders A2 card &
Betterpress Porcelain; Momenta watercolor print;
My Favorite Things Floor to Ceiling; scrap of brown
Press Plates - Pinkfresh Studio Amazing Things 
Tropical Florals (retired but HERE at Frantic Stamper);
Pinkfresh Studio Amazing Things
Stencils - Pinkfresh Studio Amazing Things 
Inks - TH, Hero Arts, SSS & MFT (see photo below)
Other - foam tape; white gel pen

I pressed the floral stem and both sentiments onto porcelain paper, then stenciled. The coordinating PFS stencil set contains 5 stencils - three for petals and 2 for leaves; very quick and easy! Here's a process photo with the inks; I use my MISTI for stenciling - the magnets hold the stencils in place.


Next I die cut the floral stem and sentiments with the coordinating dies. Die cut a brick patterned paper with a stitched rectangle & adhered to an A2 card. Die cut a couple jumbo leaves to fill in behind the floral stem & a label for the sentiment to land. Assembled and done.

I'll also link up to Darnell's October NBUS Challenge #67 since my Amazing Things products got first play here. And I'll also play at the Pinkfresh Studio October 2024 Challenge where they're doing ink blending (which includes layering stencils!). You don't have to use all the colors shown in the mood board.

That's all for today; thanks for stopping by!!


Saturday, October 26, 2024

hi Hello!

Hi & hello, everyone!! Watched Craft Roulette Episode #238 last night & made a card during the show. Since I'd already posted yesterday, I waited to share my card until today:


Supplies: Paper - Olive by unk;
Neenah Classic Crest Solar White; scraps
Stamps - Hero Arts Old Letter &
Watch Gears (both retired); Sunny Studio Berry Bliss
Spellbinders Faux Stitched Sentiments & Floss (DOM-Apr24);
Taylored Expressions Easy Strips - 1/8" 
Stencil - My Favorite Things Smart Mask - Diagonal High/Low Strip
Inks - Taylored Expressions, SSS, Altenew, TH Distress

Host Mary Gunn FUNN had Meghann Andrew (her YouTube) as a 1st time guest. Meghann has done both scrapbooking and cardmaking & will be teaching at the Concord & 9th Winter Retreat 2025. She works for Scrapbooks and Cards Today magazine; see the fall issue online HERE

The wheel spun some nice & easy parameters; Meghann was lucky to have her pick come up for the Random item:


  • Project - Collage: I created a collage with stamping.
  • Colors - Italian Restaurant: Found a palette on Pinterest HERE - Lime/Olive/Salmon/Rust.
  • Element - Short: I stamped hi, short for hello.
  • Random - Diagonal Lines: I used the same stencil as on a recent Diva card; it leaves a diagonal area blank. I framed it with diagonal strips.
I started by stenciling an A2 panel of Neenah white using the MFT high/low strip stencil and Limeade ink. Leaving the stencil in place, I masked off the lower part and stamped the text/postage on the upper part using Crushed Olive Distress ink. Next I stamped the watch gears with Pumpkin ink & also in Blush ink, then in Limeade (with a little blush left on the stamp so it went a bit brown - oops). Probably should've added some text on the lower part, oh well...

I die cut the panel with a stitched rectangle and added 1/8" strips to frame the diagonal opening. Adhered it to an A2 olive green card base formed from cardstock. The 8.5x11 piece was in a mixed package, unlabeled so I think it was part of some card kit - maybe SSS??

Die cut HELLO twice and layered. Stamped hi directly in the diagonal window and adhered HELLO. The hi is actually "hi sweetie" but I did a little surgery to get the hi alone. I left it at that, adding no gems, etc. Nice & flat!

Since I used a stencil, I'll add my card to Just Us Girls #750 where it's stencil week. I'll also link up to Darnell's October NBUS Challenge #67 since my hi and HELLO are newly used here.

That's all for today; thanks for stopping by!!


Friday, October 25, 2024

A Nordic Moose scene

TGIF everyone - I'm looking forward to another episode of Craft Roulette tonight - maybe I'll see you there! The slide show with last week's cards starts shortly after 6pm CST.

Meanwhile, I made my third and final entry for Christmas Kickstart #91 where Jo and elf Faith have a lovely mood board (exact matching not required).


Supplies: Paper - Spellbinders A2 card; Neenah white;
Authentique & Recollections blues; scraps of red & pink
Stamps - Hero Arts Jolly Christmas (retired)
Dies - Poppystamps Nordic Moose & Nordic Treeline;
Waffle Flower Christmas Banners;
Elizabeth Craft Designs Lost in the Woods (retired)
Other - Copic Markers; foam tape


I covered an A2 card with a pale blue paper. Next I die cut the trees from a dark blue A2 panel and also from a white one, trimming off the white trees. Shaded the snow a bit with a B0000 Copic. Layered and added to the card. 

Isn't the moose adorable? I die cut him from a medium blue (except the antlers). I die cut the antlers and nostril backing from a pale pink cardstock that I colored over with an E11 Copic to try to get that beige-y pink tone in the mood board. I colored his hooves with a B66 Copic & also shaded his closed eye, then added a white dot so it looks open. Next I die cut his sweater from scraps of red and white, then assembled & added to the card. 

Mr. Moose was looking downward - at what, I wondered? Decided to add a tree stump which I die cut from an ECD outdoorsy set. Next I stamped and colored a birdie from a 2008 HA set. Popped atop the stump & the scene was complete! 

I'll also add my card to Darnell's October NBUS Challenge #67 since my moose and tree dies are newly used.

That's all for now; thanks for stopping!