Welcome to my blog!

Thanks for visiting my blog. As the title suggests, I love to scrapbook, stamp, and sing! I will share cards and scrapbook pages I create, as well as information about my music - Barbershop harmony.

Tuesday, February 28, 2017

Orchid sympathy card

Cindy inspired me with a card she created using one of my favorite Hero Arts color layering sets. I thought a branch of orchids would be perfect for a sympathy card I needed for my friend Mary who lost one of her dear friends.

orchid card
Supplies: Stamps - Hero Arts CL946 Color Layering Orchid in a Pot, CM124 Color Layering Fuchsia (sentiment), & 
S5449 Fabulous Flourish
Ink - Tim Holtz Distress Oxide Cracked Pistachio and Tattered Rose Distress Ink; 
Ranger Archival Watering Can by Wendy Vecchi, Hero Arts Soft Sky
Dies - Hero Arts DI177 Color Layrering Orchid in a Pot Frame Cuts, DI199 Circle Infinity Dies,
My Favorite Things Die-Namics Pierced Rectangle Frames

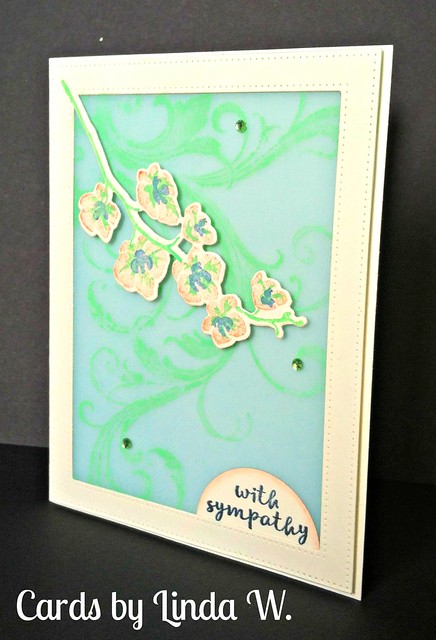
I had an ivory card I thought would be so serene with a piece of blue vellum from the February My Monthly Hero Kit (sold out). I stamped the vellum with the flourish inked in a new Distress Oxide ink and thought it needed something. Decided to frame it with a favorite pierced rectangle frame. The MISTI made stamping the layered orchid a breeze! I die cut the orchid from a scrap of ivory paper first and then stamped the die cut while inlaid in the negative. Worked great! I stamped the sentiment on the top 1/2 of a circle and slid it into the window. Added a few gems - done.

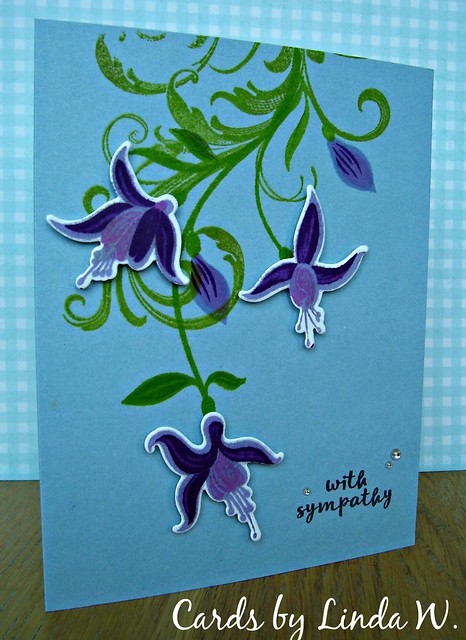
I never have a stash of sympathy cards laying around - guess I'm superstitious. Whenever someone passes, it's always a rush to get a card made. I had to make two cards because Mary's friend was godmother to my former quartet's lead singer. Well, got them done in time to take to chorus last night for hand delivery - wish I wouldn't have needed make them but that's life. I didn't photograph the second card since I used a trusty layout with a butterfly that I've used before.

Thanks for stopping by and I hope to be back tomorrow with some Easter cards I made for Cards for Hospitalized Kids.

Monday, February 27, 2017

Shimmer and sparkle

Photo Source
Hi everyone - Here's a card with shimmer and sparkle for Merry Monday's challenge 237:

Joy with snowflakes
Supplies: Paper - Core'dinations Pastel A2 card, Penny Black Holiday Trimming 6x6 pad, scraps of black and red,
Heidi Swapp and the Paper Studio glitter paper
Stamp - Hero Arts CG685 Hand Drawn Snowflakes Bold Prints
Dies - Hero Arts DC169 Joy Stamp & Cut, Simon Says Stamp SSSD111504 Snowflake Block
Ink - Tim Holtz Distress Oxide Ink - Cracked Pistachio; Other - Stick-It

This card went in a totally different direction from when I started. But I kept the snowflake block I had die cut from white glitter paper and adhered to pink patterned paper. It just traveled from layout to layout until I settled on this one. I had cut a larger rectangle of the poinsettia paper and noticed it had some minty green leaves - hmmm, I'm working on Easter cards and had some pastel card bases, including a minty green one. Decided to use it. The proportions were all wrong with the rectangle and the snowflake block, though, so I changed to just a strip of the poinsettia paper. To enhance the card base, I stamped the snowflake background using some new Distress Oxide ink - my goodness, is that a lovely creamy ink or what?! It has a bit of a shimmer too IRL. I cut 4 joys out of red cardstock and one from glitter cardstock and layered them for some dimension. Done! Besides dithering about my layout, the longest part of this card was peeling the Stick-it off the snowflake block and getting it onto the patterned paper - it's a delicate die cut and I had used very thin glitter paper (Heidi Swapp) which was the only white I had. One could easily mass produce this card by skipping the snowflake die and just using a patterned snowflake paper, stamping the joy instead of die cutting it. I might try that next...

Thanks for stopping and be sure to check out all the inspiration at Merry Monday - the Design Team has some great cards this week!!

Wednesday, February 22, 2017

Another Stocking card for Merry Monday

I'm back with another stocking card for this week's Merry Monday challenge. Had to laugh - I was thinking about a cute woodblock stamp I bought in 2011 and was sure it was a mouse in a stocking. Nope - it was a mouse in a mitten - LOL! Go here, if interested, to see the card I made with it back then. So what if the mouse was in a mitten on the stamp, I knew I could cut the mouse out and use him with a stocking. That is, if I could find the stamp!! I looked all over - no luck. But I did find the stamp I used on the 2009 fireplace card I mentioned in Monday's blog post.

stocking quartet
Supplies: Stamp - Hero Arts K5254 Christmas Stockings (retired)
Paper - Neenah Solar White, Anchor Paper black, American Crafts Christmas 6x6 patterned pad
Dies - My Favorite Things Die-Namics Blueprints 21
Hero Arts DI345 Nesting Postage Stamps & DI367 Nesting Clouds Infinity Dies
Other - Copic Markers, Stickles, May Arts Ribbon, foam tape

I stamped the stockings and colored with Copics, then added some Icy Stickles. I matted the image onto a postage stamp die cut and layered onto a pierced rectangle with an added bow, added to a top fold A2 card - done. I also finished a second version of the fireplace with stockings I posted on Monday. I had cut duplicates of the pieces while I was at it on Monday so this one was easy to put together. This time I used the holly garland from the Tim Holtz decorative strip die which seemed to call for a quartet of stockings. Because the mantle was so busy, I skipped adding any presents at the foot of the fireplace.

Fireplace version 2
Supplies: Paper - Authentique (assorted 6x6 pad) for brick, My Mind's Eye Wood Designer cardstock for mantle, base, log, and flooring), Penny Black Holiday Trimmings (wallpaper & rug), the Paper Studio Glitter for stockings, Neenah Solar White, Hero Arts Blush Mix (grenadine) and Foliage (pine) Layering papers, scraps of yellow and black
Dies - My Favorite Things Fireplace and Blueprints 21 (pierced rectangle), Tim Holtz Alterations 658760 (holly garland), Hero Arts DI367 Nesting Clouds Infinity Dies (cut in half for the rug)
Stamps - Hero Arts CL983 Holiday Tags (sentiment)
Inks - Distress Inks - Fired Brick; Memento Black; Other - Copic Markers, foam tape, Michael's Reflections gems

That's it for today. Thanks for stopping by!


Monday, February 20, 2017

Stockings on the mantle

Merry Monday everyone! It's a gloomy, rainy day here - soooo unusual for February in Minnesota!! Well, nothing to bring sunshine like a fun Merry Monday challenge - this week Lori challenges us to use a stocking on your Christmas card.

photo credit

fireplace view 1
Supplies: Paper - Authentique (assorted 6x6 pad) for brick, My Mind's Eye Wood Designer cardstock for mantle, base, log, and flooring), Penny Black Holiday Trimmings (wallpaper), the Paper Studio Glitter for stockings, Neenah Solar white for stocking trim, presents and banners, Hero Arts Blush Mix Layering paper (grenadine), scraps of yellow and black
Die - My Favorite Things Fireplace and Blueprints 21 (pierced rectangle), Tim Holtz Alterations 658760 (beaded garland)
Stamps - Hero Arts CL727 Lisa's Mix & Match Messages (banners), CL983 Holiday Tags, CM119 Holiday Cheer (presents)
Inks - Distress Inks - Cracked Pistachio, Lucky Clover, Fired Brick; Memento Black
Other - Copic Markers, foam tape

If interested, here's my creative process for this card - Read the challenge, thought about it while I ate breakfast and started some laundry. Bing - I have a never-before-used Fireplace die set from My Favorite Things - thought it might work. I easily found the die because I started organizing my sets last week - otherwise I'd have had the incredible journey looking for it - LOL. Yes, it has three little stockings!! Had to snip all the die pieces apart with my wire cutter - wish I would've done that when I got the set (that is my new resolution). Then I started to ponder from what paper to cut the fireplace die??? Hmmm - I remembered a piece of brick paper in an Authentique pad and spotted a scrap in my scrap box. Ugh, not a big enough scrap - darn. Flipped through a pile of paper pads and finally found one last remaining piece of that paper - phew! This process went on with all the other die cut bits - good thing, though, I cut enough for two cards while I was at it.

I remembered a Tim Holtz garland I've used on other cards - thought it might work so cut a bit - yes, it worked! Next I needed some "wallpaper" and "flooring" for my scene, added it to a folded card, then adhered the fireplace with foam tape. I decided the scene needed a rug (used a cloud die). Hey, a few presents might look cute - stamped, colored and fussy cut, added to scene. What to do above the fireplace? I considered doing a holiday "painting" but ended up just doing a sentiment banner and calling it done. Then I grabbed a photo - done in about 3 hours, including the load of laundry washed, dried, and put away between card steps. Off to run errands, then time for lunch and that was my morning!

Such fun - thanks to Lori and the other Merry-Makers for great inspiration cards - be sure to check them out and play along if you want a head start on your Christmas cards. Here's a side view for a better look at the dimension (lots of foam tape on this one):

fireplace view 2

Oh, and if you're interested, go here to see an early fireplace card I made back in 2009 for a Hero Arts challenge. On that card I created my own fireplace and hand drew the bricks - using patterned paper and dies was a lot easier!! Thanks for stopping and have a crafty week!!

Saturday, February 18, 2017

Rainy background for a Scramble

Hi all - there's a Scramble happening at the Hero Arts Flickr group - 90 minutes to create and upload a card based on the presented theme. Sometimes the host allows us to pick any 90 minutes during a 24 hr period and that's what LaVon did. So if you're interested, hop on over to her post for the details - just need to be done by 11am CST on 2/19/17. In fact, I may go back in for a second 90 minutes before the end time!

LaVon's theme - create a background - perfect! She offered three inspiration examples - an emboss/resist, stamping over a blended ink, and a background created of stamped mini images. I decided to go with a stenciled background, having just received the February 2017 My Monthly Hero kit on Wednesday (see my previous post with it here). The kit included some cloud masks with the stencil, a stamp set with a sweet little girl holding an umbrella and a perfect sentiment, and much more! I started with two of the cloud masks, inking around them on a die cut rectangle using the kit's blue ink and sponge. Then I used the stencil and some Stormy Sky Distress ink to add the falling rain and some shadows on just the edge of the clouds. Finally, I lightly inked some Stormy Sky clouds and a ground with Black Soot and Stormy Sky using the stencil. I die cut the girl with umbrella using the matching die, then stamped using the MISTI - perfect alignment that way! Colored her with some yellow and orange Copics. Here's the card:

Dance in Rain
Supplies - February 2017 My Monthly Hero Kit; Neenah Solar White card stock; Copics; foam tape
My Favorite Things Blueprints 21 (pierced rectangle); Distress Inks; Memento Tuxedo Black ink

I considered adding some Glossy Accents to the rain drops but, knowing me, I would've mess them up so left it simple. Thanks for stopping and hope you're having a great day!!

St Paddy's Day Cards for Hospitalized Kids

Hi all - back with St Patrick's Day cards I made for Cards for Hospitalized Kids. I first learned of this charity in January and was told they needed more cards for non-Christmas holidays. I mailed them 40 Valentines back in January and thought I'd try to put together a package for St Paddy's Day. My goal was 10 cards but I managed to put 20 cards in the mail today. They like to receive cards at least 2 weeks before the holiday so I'm in plenty of time. Here's a group photo:

St Patricks Day cards
Supplies: Authentique papers - Charmed and Emerald 6x6 pads; Hero Arts layering paper (for card bases)
Silhouette ID 74993 Open Shamrock with Hearts by Jamie Cripps (I just used the solid layer)
Stamp - Hero Arts CL498 Celebrate Every Day (sentiment); JoAnn foam stickers; Marvy gel pen; Lucky Clover Distress Ink

After die cutting the shamrocks I stamped the sentiment & added either dots or faux stitches with a white gel pen. The inside of the cards said "unique & amazing - You're the best" along with a leprechaun top hat and a shamrock from 3 different Hero Arts sets. I set up the inside on my MISTI and quickly did the 20 insides.

I enjoy spending some of my retirement days creating cards that will bring joy to kids and I love seeing photos on the website of their smiles when receiving the cards. Now I'm thinking - what can I do for Easter?!

Thanks for stopping by and hope you're enjoying your weekend!!

Wednesday, February 15, 2017

Cat in Window with My Monthly Hero

Hi all - I was excited to find the February My Monthly Hero kit (already sold out), plus some add-ons, in my mailbox tonight! But where to start, there is so much goodness in this kit!!

► 1 4×6″ clear stamp set
► 20 coordinating dies
► 1 coordinating stencil, with several cutouts included
► 1 Soft Sky ink cube
► 1 sponge for daubing
► 2 thin rolls of glitter washi tape in blue and silver
► 1 skein silver embroidery thread
► Vellum in blue and patterned white

The stamp set has darling cloud, umbrella and rain images, along with matching dies plus more. I fell in love with the window die and thought it would be perfect paired with the cat & moon dies. I needed a thank you card for my brother and sister-in-law for treating me to dinner on my birthday. Here's my card:

thanks cat
Supplies: February 2017 My Monthly Hero kit (window, cat, & moon dies)
Hero Arts Cerulean and Latte layering paper; Neenah Solar White and scrap of black and patterned
Stamp - Hero Arts CL663 Thanks a Bunch; Other - foam tape (behind cat)

I can't resist including a photo I took of their cat who just spent over a week with me during their vacation. Misty loves to lay on this bench my dad made me - don't ask me why. She went home with them last night after my birthday dinner - I miss her already!

Misty

Misty was a great "helper" while I made cards during her visit. She especially loved chewing on the edge of a Neenah envelope box - I finally had to empty it and give it to her as a toy!

Thanks for stopping by and I hope you're having a crafty week!

Tuesday, February 14, 2017

Happy Valentine's Day!

Happy Valentine's Day everyone!

Valentines

I had a wonderful birthday, starting with a Singing Valentine to a Middle School teacher. Many Sweet Adelines and Barbershop Harmony Society choruses do Singing Valentines as a fund-raiser and City of Lakes Chorus is no exception. It's a lot of fun to see the different reactions of the recipients. Today I was singing with Karla, Shirley and Bonnie. The cupcake in the photo was from Karla. I made the card using an Xcut embossing folder I got from my friend Heather (love it - thanks again, Heather!). Here we are doing a Valentine for Karla's daughter Kenzie, sent from her boyfriend serving in Kuwait.

Singing Valentine
L to R - me, Bonnie, Kenzie, Shirley, Karla

Kenzie was in the middle of a class at St Catherine's University but the professor knew we were visiting, as did a bunch in administration. We usually gathered a crowd of bystanders wherever we went. Fun story about the costume - Karla and I decided to wear the red chorus jackets half the chorus, including Karla and Bonnie wore. Shirley and I wore blue jackets for chorus so we borrowed red. Well, I forgot to put Bonnie's name on the email, then we neglected to talk about costumes at Monday night's chorus rehearsal. Long story short, Bonnie wore whatever red she had - we decided she looked perfect in her vest! I also did two Valentines on Saturday with Cindy, Ellen, and Mary. We surprised Dan, the husband of a chorus friend, at a church retreat. Then we sang for a young couple at a St Paul restaurant - so adorable! And we all managed to wear the red jacket but each of us embellished to our own style (mine, the minimalist - LOL).

Singing Valentine for Dan
L to R - me, Ellen, Dan, Mary, Cindy

Tonight I had dinner at Applebee's with my brother and his wife. They'd been on a cruise and I took care of their cat Misty. She went home with them which makes me sad - I'll miss her! Anyway, hope you had a wonderful Valentine's Day and thanks for stopping!!

Monday, February 13, 2017

Snowman for Merry Monday

Photo Source - Pinterest 
Hi everyone - back with another Merry Monday card! Why so late? LOL - it's almost 5pm here and usually I have a card posted long before now. Friends wonder how I'm so fast to post usually. Well, I get up on Mondays and read the new challenge with my breakfast, then I start to create. Today, my retired quartet Chord Company got together for brunch at my former tenor's house. We enjoyed sitting around recalling our adventures as a quartet, eating yummy food and even celebrating my birthday a day early. I got home about 2pm and thought I'd try to create a card for MM before I rehearse my chorus music. This week Linda challenges us to USE a SNOWMAN (or woman/family etc). Two weeks ago I made a card with 5 stamped snowmen but no worries, I have plenty of snowman stuff in the stash. Decided to go with an embossed one. Here's the card:

Snowman
Supplies: Hero Arts Celadon folded card and Powder Layering Paper & Neenah Solar White
Stamp - Hero Arts Hand Drawn Snowflakes Bold Prints CG685 and Frosty Wishes CL800
Embossing folder - Tim Holtz Snow Flurries and Snowman Texture Fades 656944
Other - Copic Markers, Distress Inks, Target $ bin snowflakes, Michael's gems

Funny story about this embossing folder - back when Archiver's had brick and mortar stores and put on ScrapFest each year, Tim Holtz would come to teach a fabulous class. One year he gave us all the Sizzix Texture Fade set that included the snowman - it wasn't even out for sale yet. We were so excited to get it but typical me - it came home to find its way into a drawer for years. I was glad to let it see the light of day today!! When I embossed, I didn't get much contrast even after inking the snowman. So I shaded around him with some Copics and really liked the result. I also sprayed some Distress Stain and still found it lacking so I stamped a bit with the same background I used on the card base. Finally satisfied.

Well, I'd better head off to practice. Thanks for stopping and have a wonderful evening!!

Sunday, February 12, 2017

Happy Mail and one more CAS for Merry Monday

Hi all - I was out doing a few Singing Valentines yesterday - had great fun with City of Lakes Chorus mates Cindy, Ellen, and Mary. We sang at two different places - a church retreat and a restaurant - for two dear gentlemen. Then I went to see La La Land with my friend Linda (we were always known collectively as "the Lindas"). Interesting movie - I liked it but it ended differently than I expected.

I arrived home to find a package from my friend Heather for my upcoming birthday. Thanks, Heather!! She couldn't resist sending me a die I admired - she used hers on this card she made for Merry Monday, receiving Honorable Mention. She also sent a lovely birthday card and some fairy, heart and Celtic diecuts she had cut - can't wait to use those!

I put the die into use right away and made a quick card for this week's Merry Monday challenge to make a CAS card. Besides the die cut, I added just a bit of paper at the bottom to ground it and a couple of star embellishments. To give the words on the die some pop, I simply colored every other row with some Copic markers. I see I should've colored the die before I glued it to the card as there are a few light spots - oh well... Also - got a new neutral grey Copic that decided to put a blob on one of my HOs. It didn't blend out very well - oh well to that too! Here's the card:

Text Christmas Tree

Supplies: Paper - Anchor Paper red cardstock, Authentique Emerald, Basic Grey Juniper Berry (strip at bottom)
Die - Xcuts 504065 Christmas Tree
Other - Copic Markers, Star embellishments by Jolee

That's it for today. Enjoy the rest of your weekend and thanks for stopping!

Friday, February 10, 2017

More Color Layering - Fuchsia

Back today with another of my new color layering stamp sets from Hero Arts - yay! See yesterday's post to read all about my fun shopping trip. Quite often, I buy new stuff only to have it sit around, sometimes for years. Well, I'm trying to change that behavior and was successful launching my new color layering sets. They are so wonderful and I have a few more on my wish list that Anchor Paper didn't have yesterday.

Fuchsia sympathy
Supplies: Paper - folded card by unknown (it's a slightly shimmery blue in real life)
Hero Arts Stamps - S5449 Fabulous Flourish, CM124 Color Layering Fuchsia
Dies - DI349 Color Layering Fuchsia Frame Cuts
Inks - AF392 Fuchsia Layering (Passion Flower, Ultra Pink, Grape Juice, Moss) 
plus a light green from a My Monthly Hero kit; Other - Michael's Reflections gems

I thought it would be fun to have the fuchsia coming down through the same flourish I used yesterday. This time I stamped only the lower part of the flourish just off center. Then I stamped the vines for the fuchsia using the MISTI. I stamped a second partial vine in the upper right (masking off the card where I didn't want vines) so I'd have two buds. Buds went directly onto the card but I wanted to do the flowers on the matching die cuts so I could play around with where I wanted them. I used the packaged layering inks but the pink didn't come out as bright as I would've liked - should've stamped twice! That probably works better since I ended up making this a sympathy card. The sentiment, plus three others, came with this set; I need a sympathy card to send to my cousin Diana who lost her dad this week. Hope this card brings comfort.

Thanks for stopping by and hope you have a crafty weekend! I'll be doing some early Singing Valentines (City of Lakes Chorus fundraiser) tomorrow and then more on Tuesday. It's always a fun time!

Thursday, February 9, 2017

Color Layering Peacock

Hi all - back again with a card I made late this afternoon. It all started yesterday when my Copic blender dried up. I decided I would get to the art store sometime this week but the store ended up having a special event - today only - so off I went! It's a few suburbs over from me and there are plenty of other fun spots to visit while in the neighborhood. First stop - Anchor Paper (what I consider my "LSS" local stamping store) where I thought they might have a Penny Black cling stamp that my friend Virginia featured in this post. Sure enough, they did! Then I spotted a sale bin with 30% off Christmas dies. Yes! Found the Penny Black dove die Virginia featured in several posts, this being my fave. Thanks for the enabling, Virginia!

After grabbing a couple card stock packages, I headed to the check-out counter. Once there, I spotted a staffer working on a sample card using the new Hero Arts Color Layering Peacock. She was doing a marvelous job with it and I asked when the new products would be coming to the store. She said some had arrived, they just weren't out on the floor yet. She pulled out a box containing one of each of the new products they had so far and allowed me to select some - yay! Besides the peacock set, I got the fuchsia set both with matching dies and the ink package. Next stop was the art store where I picked up Copic stuff on sale - no need for a coupon. Then I hurried home to dive into a card - here's my first take on the Color Layering Peacock:

peacock birthday
Supplies: Paper - Hero Arts powder folded card, Neenah Solar White
Hero Arts Stamps - S5449 Fabulous Flourish, CL759 Enjoy Today, CM126 Color Layering Peacock
Hero Arts Die - DI351 Color Layering Peacock Frame Cuts
Hero Arts Ink Collection AF394 Peacock Layering (Lemon Yellow, Emerald Green, Deep Ocean, Navy)
Other - Hero Arts Foliage Mixed Accents, Michael's Reflection gems, Gold Uni-ball Gel pen 

Seeing the suggested ink package in use at the LSS convinced me to buy it. I will definitely try other color combos but this gave me a great starting point. I now have a card for an upcoming birthday for a dear, elegant lady - woo hoo! The flourish and the feather were stamped with the same Lemon Yellow ink - the flourish is a rubber stamp and the feather is a clear stamp; interesting, eh? Anyway, absolutely adore Hero Arts color layering stamps - such fabulous details and easy to use. Of course, the MISTI was essential to the success of my peacock. I die cut first and used scrap paper in the negative to help me line up each layer. I used the gold gel pen (from the December 2016 My Monthly Hero kit) to add some dots to the tail and crown.

Thanks for stopping! If you don't have an LSS nearby, the new Hero Arts will be available at their online store starting Feb. 14th.

Wednesday, February 8, 2017

Another CAS Christmas card

Back again with another CAS Christmas card for this week's Merry Monday. This time I went ahead and used the current sketch at CAS(E) this Sketch where I've visited but never played before. I had time this week and decided to jump into that pool too! Here's my card:

CAS Christmas
Supplies: Paper - Neenah Solar White and a scrap of black
 Dies - My Favorite Things Die-Namics Blueprints 21
Inks - Hero Arts Intense Black, My Monthly Hero October 2015, Distress Embossing Ink
Stamps - My Monthly Hero October 2015, CL796 Peace Poinsettias, CL983 Holiday Messages and Frames
Other: Ranger Seafoam White Embossing Powder, Copic Markers

The large poinsettia was stamped in black and colored in Copics; the other stamped flowers are the color-layering type which had no outline. I felt they looked odd without it, given the large flower with an outline, so I added one with a black marker. Hope they don't look too weird!! Anyway - I felt the flowers needed something to tie them together so I started adding some blue shading. Well, my Copic blender pen ran dry and my B00 was none too juicy - this was not going the way I'd hoped! So I tried smooshing some regular old alcohol around the blue - was satisfied that it was usable at least! Another Christmas card done! 


Thanks for stopping by!!

Tuesday, February 7, 2017

Some birthday cards

Happy Tuesday! We had some freezing rain this morning now turning to snow - a perfect day for some nice vegetable soup! I bought the ingredients and just have to get slicing and dicing this afternoon. Meanwhile, here are a couple of birthday cards I finished on Sunday for some friends.

I struggle with masculine cards but I found this fun Silhouette card file with a border of tennis balls and a tennis racket. Since the birthday boy plays a mean tennis game, I thought it would be perfect! As sometimes happens, the cut border didn't match up with the cut card (no alterations made by me). So I made it work by snipping parts of the border and not bothering to try to fit them to the card edge. The ball on the tennis rack was a different Silhouette file, along with a die cut circle behind.

Tennis Birthday
Supplies: Silhouette files - Design ID10498 Tennis Ball Outline & 117821 Tennis Card
Paper - Neenah Solar White (including the hand which I inked black), Reflections yellow, Anchor Paper silver
Ink - Hero Arts Intense Black
Sentiment stamp from Hero Arts CL677 Fantastic Birthday (retired)

The next card is for a woman friend. I often use this design, just varying the sentiment and embellishment - it makes a quick but attractive card. This time I embellished with a new-to-me butterfly. Funny thing, the patterned paper is from a Christmas pad but it definitely doesn't scream Christmas to me - perfect for a birthday!

Butterfly Birthday
Supplies: Paper - Basic Grey Juniper Berry, Penny Black Painted Blooms, scrap of black, ivory card
Sentiment stamp from Hero Arts CL574 Say it All (retired)
3M glitter washi tape; My Favorite Things Die-Namics Flutter of Butterflies - Solid & Flutter of Butterflies - Lace

Yesterday I posted a CAS card for this week's Merry Monday. While I was at it, I stamped three additional panels so I quickly finished cards with those last night when I got home from chorus rehearsal (yes, I was up late!).

Crystal ornament trio
Supplies: Stamps - Hero Arts CL619 Greetings for the Holidays (retired) & CL802 Christmas Crystals
Paper - Neenah Solar White, Anchor Paper Black, and Hero Arts Blush Mix Layering Paper (grenadine)
Ink - Hero Arts Intense Black & Red Royal, Mustard Seed Distress Ink
Die - My Favorite Things Die-Namics Blueprints 21 (pierced rectangle)
Other - Copic Markers, Michael's Reflection Gems, Wink of Stella (clear); Fossilized Amber Distress Spray

I did the top two same as my MM card - colored w/Copics and topped with Wink of Stella, but on these I added some grey shadows for a bit of dimension. On the bottom card, I used the back of the crystal stamp to stamp the color - makes a quick way to color a symmetrical stamp. Reversing the stamp doesn't work well with the MISTI so I used an acrylic block. I didn't always line it up perfectly but no matter - it was quick and easy. Decided to add some Distress Spray - one spritz went a long way as you can see!! Yay - three more Christmas cards done! I'm trying to do multiples each week so I have more to donate.

Thanks for stopping and hope you're enjoying your day!!


Monday, February 6, 2017

CAS (Clean and Simple) at Merry Monday

Hi all - it's Monday so time to check out the new challenge at Merry Monday! This week, Kathy asks for a CAS (Clean and Simple) Christmas card. Well, that's definitely a challenge for me and not a style I employ very often. The MM Design Team offers some beautiful cards for inspiration so check them out!


When I think of CAS, I think of Rosemary - the Queen of CAS of my blogging friends. Coincidentally, she is the guest designer for the current challenge at CAS(E) this Sketch, a fun challenge site for this clean and simple stuff - congrats again, Rosemary!! I've visited that site (which has a CAS definition and loads of inspiration) several times but have never played in their challenges.The current sketch involves 5 items with a sentiment. Since we did something similar at MM last week, I searched through the earlier sketches and found one from 2015 to try:


A jumbo sentiment with three items below - how fun & easy is that? According to their definition of CAS, the card is usually one layer but can include an extra one or two, if simple. I don't have good luck with one layer cards so decided to do my stamping on a separate rectangle. That way, if I messed up my stamping, I wouldn't be wasting a card base!! Here's what I created:

CAS Merry Christmas
Supplies: Stamps - Hero Arts CL619 Greetings for the Holidays & CL802 Christmas Crystals
Paper - Neenah Solar White and Hero Arts Blush Mix Layering Paper (grenadine)
Ink - Hero Arts Intense Black & Red Royal
Die - My Favorite Things Die-Namics Blueprints 21 (pierced rectangle)
Other - Copic Markers, Michael's Reflection Gems, Wink of Stella (clear)

I made four of these CAS panels fairly quickly using the MISTI. After stamping the sentiment on all four panels, I decided to hang three ornaments from the bottom of the sentiment. Positioning the stamp where I wanted it on the left, I was able to move the paper along the MISTI edge, stopping at the other two locations to stamp again - easy peasy!  I colored the ornaments with Copics and put Wink of Stella over top. A tiny gem for the hanger and done! I have three more panels to color and will probably do more shadows than I did on this one.

Thanks for stopping by and have a crafty day!

Thursday, February 2, 2017

Valentines for Family & Friends

Hi all - I made so many Valentines for Cards for Hospitalized Kids but I still needed a bunch of cards for family and friends. Old & new goodies from Hero Arts and My Favorite Things came to the rescue along with some fun patterned papers - in no time I had six cards made last night!

Abstract heart duo
Supplies: Sentiment - Hero Arts CL402 Valentine Sayings (from 2010 - a fave)
Dies - Hero Arts DI348 Heart Confetti Fancy Die & DI334 Nesting Hearts Infinity Dies ,
My Favorite Things Die-Namics MFT-1030 Abstract Heart & Blueprints 20 (scalloped rectangle)
Paper - Neenah Solar White, Doodlebug "Sweet Things", American Crafts (glitter paper - from Target Hot Spot bins)

Couldn't decide if I liked the sentiment banner horizontal or angled - what do you think? I just love the new Heart Confetti Fancy Die by Hero Arts! It make a fabulous background, plus you have a bunch of bitty hearts for confetti or for embellishments. To make it a bit more feminine, I ran it through the Vagabond a second time with the MFT scalloped rectangle. Then I couldn't resist the Abstract Heart die released in January by My Favorite Things. Sister Tami makes quilts so I decided to cut and paper-piece a bunch of the hearts - such fun!! I made an extra set of these two cards - my siblings, including sister/friend Connie, will all get this design. My parents are getting the heart bouquet card I made for a recent Scramble. I made the following cards for my aunt and uncle and for a dear friend, Ferne. Ferne always sends out Valentine cards, instead of Christmas cards. One year she got behind on Christmas and didn't get her cards out so she sent Valentines instead. That practice stuck and she's been doing it for decades!

Patterned paper Valentine pair
Supplies: Sentiment - Hero Arts CL402 Valentine Sayings (from 2010 - a fave)
Dies - Hero Arts DI334 Nesting Hearts Infinity Dies & DI198 Rectangle Infinity Dies,
My Favorite Things Die-Namics MFT-1030 Abstract Heart & Blueprints 20 (stitched rectangle)
Paper - Neenah Solar White, Doodlebug "Sweet Things", American Crafts (glitter paper - from Target Hot Spot bins), Michael's Reflections "Vintage Valentine's Day" paper, It Takes Two card front

I had saved an old printed card with the heart basket and decided it was time to upcycle it. A simple stitched mat and a die-cut heart with the sentiment & I was done! Ferne is also a singer so the treble clef patterned paper was perfect for her! I simply added other papers cut in rectangles along with a die cut heart.

Yay - I'm well on my way to finishing this year's Valentines! How are you doing with yours? Thanks for stopping and have a crafty week!!