Welcome to my blog!

Thanks for visiting my blog. As the title suggests, I love to scrapbook, stamp, and sing! I will share cards and scrapbook pages I create, as well as information about my music - Barbershop harmony.
Showing posts with label box. Show all posts

Thursday, July 31, 2025

Last Day for July 2025 Diva Birthday Challenge

Hey crafty friends - If you need a quick birthday project and are using dies &/or an embossing folder, check out our July Die Cut Diva Birthday Challenge! You have until 9pm Pacific Time today to link up. 

Our end of month team has some inspiration at DCD where I'm sharing my gift box below. You can only find the details and a bonus on this personal post.


Supplies: Paper - My Favorite Things
Watercolor Wash & Orange Sherbet; scraps
Stamps - MFT Mini Messages & More
Dies - MFT Everyday Gift Box,
Arched Happy Birthday,
Other - Hero Arts Grape Slush ink

We were to be sponsored by My Favorite Things which sadly has closed. We'll still be offering a $25 gift card randomly drawn from eligible July entries; just to a different store than MFT.


I will miss MFT very much! I've said before how much I love their Blueprints but I also love their boxes! This sweet gift box fits a gift card or a small jewelry box.

I die cut the box bottom & top, plus a scalloped layer & the tag, all included in the gift box set (link is to Frantic Stamper where they still have one left as of this writing). Assembled the box with the layer. Stamped a sentiment on the tag. Die cut a bday sentiment and outline layer, plus some flowers from various sets. Very quick and easy! Here's a view with the box lid off where you can see the gift card inside:


Ready for a bonus? This time I made an A2 sized birthday card:


Supplies: Paper - Spellbinders A2 card;
My Favorite Things Watercolor Wash;
Neenah Solar White; scraps 
Stamps - MFT All Occasion Scripted Greetings
& Let's Celebrate
Dies - MFT Stitched Center Strip,
 Die Cuts and Scraps, Drink Décor,
Party Décor, Long Stem Barware,
Garnish
Other - Hero Arts enamel dots; foam tape

Die cut all the elements and assembled. The frame was cut four times and stacked. I backed one and stamped before I stacked the rest. Added the elements and dots, trimming any excess & adhered to an A2 card. Quite easy, even the sprinkles on the cupcake.

I will add my card to Darnell's IDEAS (Anything Goes this week) and to her July NBUS Challenge #76 since my drinks and décor are newly used here. Also to Seize the Birthday #310 using the Anything Goes option. My fave color (purple) is on the box, not the card...

Thanks for stopping by and please link your final projects to our July Diva Birthday Challenge! (limit 4 max) by 9pm Pacific Time! Happy crafting!!


Sunday, June 30, 2024

Snowflake Box

Hi friends! Last day of June already - Summer is going by too fast!!

I'm part of a last day post at Die Cut Divas; we're sharing final hours of inspiration for our June Challenge. We've been using our favorite die cuts this month; I hope you can get a quick project in to join us! You have until 9pm Pacific Time to link up. 

Here's my project for today (a bonus follows):


Supplies: Paper - Core'dinations plaid; Neenah Solar White; 
Poptone Blue Raspberry; Michael's lime green
Dies - Elizabeth Craft Designs Book Box &
Other - TH Black Soot Distress Ink;
Taylored Expressions printed sentiment


Elizabeth Craft Designs sponsored this month's challenge.

They've offered a $25 gift card for our random June winner - thanks!!

So, I've already said that my absolute favorite die cut shapes are hearts but boxes of any kind also delight me! And I love snowflake dies too - I have too many!! I combined these loves for my project. 

Die cut the box and wrap around piece, a topper layer & a side layer which you can see below. I stamped the topper and side layers with a texty print. Next I die cut two of the snowflakes from the 3piece set & layered. Assembled the box, added the layers and the snowflake. A preprinted sentiment finished the top. Here's the box side:


Add'l supplies: Hero Arts Christmas Trimming Stamp & Cut (retired)
Star cut out with one of the snowflakes above

You can see a previous book box HERE. 

Ready for a bonus? I just love ECD journaling dies so I thought I do a page for my little ECD art journal that I started in 2022 (see other pages HERE & HERE if desired). I've been remiss in adding to it, haven't I? Oh well...


Supplies: Paper - Core'dinations plaid; Neenah Solar White; 
Poptone Blue Raspberry; Michael's lime green
Dies - Elizabeth Craft Designs Snowflakes;
Lawn Fawn Winter Wonderland Window (small flakes)
Kits - Elizabeth Craft Designs Lost in the Woods
(used the page die, dots & boots stamp & boots die) &
Classic Christmas Special Kit (used 2 of the snowflake dies)
Stamp with die - Colorado Craft Company Cozy Cat
(die HERE)

I die cut the page from aqua plaid, trimming off the end since I have a smaller journal. Scored the center. On the front side I stamped some dots in aqua. On a scrap of Neenah, I stamped & colored the boots, then die cut. Die cut snowflakes & assembled the page. Added a CCC sentiment from the bits box. I'll have to work on the interior and back pages later. I'm adding the journal page to Darnell's June NBUS Challenge #63 since my Lost in the Woods kit is getting first play here.

That's it for today. Please check out our June Challenge and share your project with favorite die cuts by 9pm Pacific Time. Thanks for visiting!!


Sunday, March 31, 2024

Happy Easter & last day for the March Die Cut Diva Challenge!

Happy Easter wishes to everyone celebrating today!! Most of my immediate family will celebrate in Arizona but I was going to take my friend/sister by choice Connie and her hubby to Easter buffet at Afton House Inn. We did the Thanksgiving buffet once and it was very good. I ended up coming down with a bit of a sniffle so we'll have to reschedule. Boo hoo!

I'm sharing at Die Cut Divas today along with the rest of the end-of month team. It's Anything Goes for this month at the Divas - just remember to use a die cut &/or embossing folder & get your last entries in by 9pm Pacific time today.

First I have some darling Easter treat boxes made using a new Lawn Fawn die set:


Supplies: Paper - Neenah Classic Crest Solar White 110lb;
Lawn Fawn Fruit Salad Petite; Graphic 45 Time to Flourish;
Scraps of green
Dies - Lawn Fawn Carrot Treat Box
Stamps with Dies - Carrot 'bout You (coordinating dies HERE),
Carrot 'bout You Banner Add-On (coordinating dies HERE)
Other - Copic markers, Memento Tuxedo Black ink;
Hero Arts Ultra Pink & TE Pumpkin


Lawn Fawn has generously donated a $25 gift card to their online store 
for our random winner. Thanks, Lawn Fawn!

The box was just released for Spring 2024 and so were the stamped/die cut additions. So easy to put together and Kelly Marie has a great tutorial video on the product page. I simply die cut the box from patterned papers and the carrot tops from some green scraps & assembled per the video. Stamped, die cut and colored the bunnies, sign & banner and added to the assembled box. Both are filled with Easter candies - yum!! I'll add my carrot treat boxes to Darnell's March NBUS Challenge since they're new. 

For my bonus today, I made some little chick boxes - so cute for Easter!


Supplies: Paper - Lawn Fawn retired & 
scraps of Neenah white, black and orange
Dies - Lawn Fawn Tiny Gift Box &
Other - White gel pen

Simply die cut and assemble the box following the video tutorial Kelly Marie shares on the product page. Die cut and add the chick elements form the add-on set. These boxes had room for two Dove candies each. I will link my chicks to the current Dream Factory Challenge where no bunnies are allowed on your project. And my yellow chicks fit the current I Spy with My Little Eye Challenge to included something yellow.

And I can't forget to wish Hilary (fiddling about) a happy birthday today! Here's the card I sent her using Spellbinders Spring Reflection (DOML-Feb23) and a bunch of snippets along with a background of MFT's colorful canvas in a fave color of Hilary's - green! The sentiment came from a Betterpress set You are Everything Sentiments. Hilary received the card a while ago (you never know about the post) but waited til today to open it!


Happy Birthday, Hilary!!

That's it for today. Hope to see you in the March Diva gallery by 9pm Pacific time today! 

Thanks for visiting & enjoy your Easter!!


Thursday, March 21, 2024

A fun Easter Platform Pop-Up!

Hey everyone - I'm sharing at Die Cut Divas today but am also posting here with a bonus. It's Anything Goes for this month at the Divas - just remember to use a die cut &/or embossing folder.

Here's my platform pop-up card combining new and older supplies 
from our fabulous March sponsor, Lawn Fawn! 


Supplies: Paper - Neenah Classic Crest Solar White 110lb;
Lawn Fawn Petite Rainbow Plaid & Dotted; Paper Studio green card;
Scraps of pink/yellow/orange
Dies - Lawn Fawn Platform Pop-Up,
Stamps with Dies - Lawn Fawn Hay There, Hayrides!
(coordinating dies HERE),
Carrot 'bout You (coordinating dies HERE),
Carrot 'bout You Banner Add-On (coordinating dies HERE), &
Other - Copic markers, Memento Tuxedo Black ink;
Hero Arts Ultra Pink & Green Apple inks


Lawn Fawn has generously donated a $25 gift card to their online store 
for our random winner. Thanks, Lawn Fawn!

I had loads of fun putting this pop-up card together on Tuesday. I have to admit, it was a long process - what I like to call one of my masterpieces - LOL. Just did simple stamping, coloring and die-cutting, then assembled but it took several hours! Oh, and I masked off the fence and sponged green on the lower part of the wrap-around. The platform was released in 2022 but the fence add-on just came out this spring. Kelly Marie has a great tutorial video on the platform's product page - so easy to assemble!

Here are a couple more views - from top & flattened (fits an A2 envelope):


You can see a Christmas version of the platform pop-up with a different add-on HERE. And if you're still with me, here's a bonus project - a little thanks treat box using Lawn Fawn's Fancy Box set. Very quick & easy to die cut and assemble. I probably could've done a dozen of these in the time it took to make the platform card!


That's it for today. Hope to see you in the March Diva gallery - you have until 9pm Pacific time on 3/31/24 to join us! I'll add my pop-up to Darnell's March NBUS Challenge since the Easter stuff is all new. I'll also join the current Lawn Fawnatics Challenge #169 where the theme is to be inspired by a favorite book, movie or song - my book is Peter Rabbit, of course. My farmer looks a bit happier than the one in the book, though, & that's Peter driving the carrot car!

Thanks for visiting & happy crafting!


Thursday, September 21, 2023

A Bon bon Box plus a Bonus!

Hello there! I'm posting today at Die Cut Divas with inspiration for our September Challenge - Anything Goes. The team is using products by our sponsor Elizabeth Craft Designs (ECD) but you can use any products desired. Just be sure to use a die cut &/or embossing folder in your design & you're good to go!

Given "Anything Goes", I decided to make a gift box using ECD's large Bon bon box die set.

Supplies: Paper - Paper Studio Star of Bethlehem & glitter cardstock;
Desert storm from Anchor Paper (for tag)
Stamps - Divinity Designs Mini Tag Sentiments
Other - May Arts craft twine; Hero Arts Navy ink; Copic Marker


Years ago ECD carried a small bon bon box, cut with one die, which I don't have. It was quite petite and couldn't hold much so they designed a larger one. You just need to die cut two box pieces & assemble. In her video tutorial, Els suggested cutting a square to put on the bottom. I added such a square (3.18") to the exterior bottom and also to the inside bottom to add strengh. 

Does my box paper look Christmasy? No, right?! It's from a Hobby Lobby brand pad that features Nativities, deserts and skies - so pretty! Then it has a couple of leafy patterns, like this one, that could work for any season. I decorated my box with a bow & tag; both dies are included in the large bon bon box die set. Very quick & easy! The glitter cardstock for the bow is white on the back so I used a blue Copic marker to color it before assembling.

Here are a few more views - open with a gift inside (a bracelet box), side, & front close-up.


Still with me? Now for a bonus - a Christmas card. I definitely need many more of these before the end of November!

Supplies: Paper - Neenah Classic Crest Solar White:
Hero Arts pine (retired); 
Hobby Lobby Christmas Bo-Ho-Ho (texty background);
My Mind's Eye Necessities 6x6 ("floor")
various scraps for presents & tinsel
Stamps - ECD Santa Claus
Hero Arts Peeking Snowman
Other - Jolee star; Copic Markers; foam tape

While preparing for this month with ECD, I bought some new goodies, including the Santa Claus stamp set along with coordinating dies. I just couldn't resist that cute old fashioned Santa face! I also picked up the journaling die set containing the Christmas tree, presents dies & more - always a great value. I thought it would be fun to have Santa peeking around the tree. I used a HA peeking snowman die to cut a body and stuck the Santa head (colored with Copics) over top of the snowman head! Oh, and I cut off the snowman's scarf tails and rearranged one arm so Santa could hold a present.

Since I used new stuff, I'll link up to Darnell's September NBUS Challenge.

Thanks for stopping and I hope to see you in the September Diva Gallery by 9/30/23 at 9p Pacific Time.


Tuesday, February 21, 2023

Gold and more gold!

Hey everyone - do you love gold? If yes, then our February Die Cut Divas Challenge is for you! 

I'm providing inspiration at Die Cut Divas with the card below, using products by our fabulous sponsor Hero Arts. When I got into card making in 2007, Hero Arts was my go-to brand and still is! Love, love, love this company and their products, including My Monthly Hero kits (I own all but one). Can't forget to mention I'm a proud Hero Hostess from 2011, back when their Flickr group was active.

Supplies: Paper - Hero Arts Black Watercolor Paper
Tim Holtz Kraft Stock Metallic Classics gold & silver cardstock; 
Dies - Hero Arts Lily of the Valley & 
Stamps - Hero Arts Wild Columbine
Other - Versamark Ink & silver embossing powder; 
Tim Holtz embossing folder (name unk); foam tape


Process: Die cut lilies from silver & stem/leaves from gold metallic cardstock. Die cut and emboss an oval, trim to half. Arrange lilies and "hill" & adhere to black card, popping up a few flowers & the "hill" with foam tape. Stamp thank you in versamark and emboss with silver ep. Very quick and easy, yet so elegant!  

Here's a bonus for you - a golden matchbox!

Additional Supplies: Dies - Hero Arts Matchbox &

I couldn't resist adding the new Hero Arts Matchbox and Box of Chocolates die sets to my January My Monthly Hero kit. Adorable!! At about 4:44 minutes into the Hero Arts January product release video HERE, there's a quick tutorial on putting together the matchbox. So easy and fun to make! It would be great for gifting earrings or other small items. The full bow was cut twice, plus the center area an extra time. On one bow I trimmed the tails off and adhered the loops upside down to the bow for a layered look. Added the extra center with a foam dot then tucked the trimmed tails under the other ones.

And here's a photo of it open. My friends Linda & Lynn each received a matchbox with a little gift inside for their birthdays earlier this month. Not the pin shown; that one snuck in from my jewelry box just for the photo. 😊


I'm adding the matchbox to Darnell's February NBUS Challenge since it got first play here. 

That's it for today, friends. Please enter your golden project using a die cut or embossing folder into the February Diva gallery by 9 pm Pacific Time on the 28th. Our winner will be randomly selected from eligible February entries and announced on March 3rd. Hero Arts has generously donated an amazing $50 gift card for our winner - yay!

Thanks for visiting!


Sunday, July 31, 2022

Last Day for Christmas in July at Die Cut Divas!

Hey crafty friends - it's already the end of July and summer in Minnesota is flying by!! Time for the last day of the month post at Die Cut Divas where I'm sharing the project below. Be sure to head over and see what the rest of the team posted for some last minute Christmas in July Challenge inspiration!

Supplies: Paper - Paper Studio solids and glitter, 
A Country Christmas 12x12"
Dies - Elizabeth Craft Designs Book Box,
Other - Parklane gems;

The fabulous Elizabeth Craft Designs sponsored us for July and the Diva team enjoyed creating with their amazing products! I couldn't resist the book box die set once I saw Els doing this video of it in action. The set contains 16 dies at a great price point. Since the Divas were doing Christmas, I decorated my box for the holidays using some other ECD die sets. This box will be great for holding a little gift when the time comes! Here's a closer look from the bottom:


This was my first box and I used some paper I've been playing with recently - A Country Christmas (sadly retired at Hobby Lobby). It's not double sided but I've since cut some books from another brand's double sided paper - so pretty! It was just a matter of die-cutting the book, flower and greenery pieces, then assembling them. Very fun!! The flower set comes with just a large center but I knew I had a Lawn Fawn snowflake set with a similar small version - perfect! I popped a gem in each center and added a pre-printed sentiment strip - done! And here's a side view and a view of the box partially open:


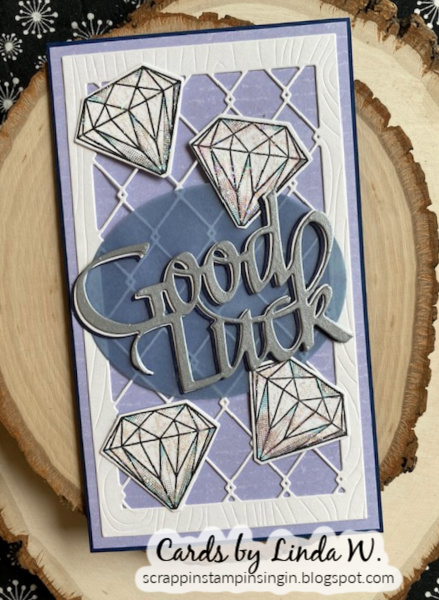
Still with me? I do have a bonus card today but it has nothing to do with Christmas! Earlier this month I attended a Sweet Adelines International Education Symposium. You may remember I went to England in 2019 for the last one (none in 2020 or 2021 due to pandemic). The 2022 event took place at Trinity University in San Antonio Texas and they offered the first-ever Diamond Division (over age 60) quartet contest. Some chorus and Regional friends competed so I'm sharing one of the Good Luck cards I made. This one features a jumbo ECD sentiment - love it and as of writing this post, it was on sale at ECD (& as I like to say, practically free!!). My friends Upbeat Quartet appreciated the card and I'm sure it helped them take second place - woo hoo!! 

ECD die - Good Luck
Other supplies - Spellbinders & Neenah paper;
Art-C Stamp & Cut (diamonds)

The mini-slim frame was one Diva Arlene (A Bit of This and That) sent me (thanks again, Arlene!) but she enabled me to buy my own die - love this one. I thought the vellum oval kept the sentiment from getting lost on the wire background. I shaded the diamond with a light blue Copic and added Stickles.

That's it for today! Hope I've inspired you to upload a last minute Christmas project (using a die cut or embossing folder) into our July Diva Gallery. You have until 9pm Pacific Time today to enter. 

Thanks for stopping!!

Friday, March 19, 2021

Let's Squash an Embossed Box!

Hey there - hope you're enjoying the week! I wanted to play at Let's Squash It!! for the Box Challenge. Off I went and made my little box, photographed it and was about to blog it. Oops - didn't read the challenge properly - you need to make a FLORAL embossed box. Back to the drawing board and I found an ancient Cuttlebug floral folder to emboss a second box:


Supplies: Paper - Hero Arts blush (middle of 3 shades; retired);
Lawn Fawn Watercolor Wishes
Dies - Taylored Expressions All Tucked In &
Designer Mini Tags (retired)
Stamp - Taylored Expressions Itty Bitty Sentiments (March gift)
Embossing folder - Cuttlebug Stylized Flowers (retired)
Other - Stickles; Picked Raspberry Distress Ink

I die cut the box and embossed it. The flat box is too big for an A2 ef, so I had to emboss the flap separately. For an embellishment I embossed a scrap left over from die cutting the box, placing it over a flower in the ef. The leaves were leftovers from a previous project. The TE March gift stamp set perfectly matches their mini tags dies; I've had them for years & just love! If interested, see a Christmas card with these tags here.

Thought I might as well share the original box, even if it didn't have a scrap of floral embossing.... I used one of the jumbo Cuttlebug folders into which the flat die cut box fit perfectly.


Supplies: Paper - Hero Arts blush (lightest & middle of 3 shades; retired);
Lawn Fawn Watercolor Wishes
Dies - Taylored Expressions All Tucked In &
Designer Mini Tags (retired);
My Favorite Things Flight of Butterflies - Lace (retired)
Embossing Folder - Cuttlebug Kitchen Weave
Other - Baker's Twine from Target $1 bin;
Kitsch Flamingo & Black Soot Distress Inks;
Memento Rose Bud ink

And here's a closer look - I'm holding it in my hand so you can see the petite size.


I'll also add a box to the current NBUS challenge, simply for the sentiment. I just got the set in the mail yesterday and was excited to use it for the first time!! Thanks TE for the gift!!

Thanks for visiting and I hope you'll stop back on Sunday for my Die Cut Diva post - we're doing Slimline Cards with Sunny Studio this month; hope to see you in the gallery!!