Welcome to my blog!

Thanks for visiting my blog. As the title suggests, I love to scrapbook, stamp, and sing! I will share cards and scrapbook pages I create, as well as information about my music - Barbershop harmony.

Tuesday, October 31, 2023

Star Flowers Birthday and a Bonus!

Hi friends - Happy Halloween!! It's the last day for our October Die Cut Diva Challenge and I'm part of the end-of-month team post. Our sponsor Birch Press Design has such wonderful layered die sets and we had such fun with them! Thanks to BPD for providing a $20 gift card to their store for our random winner!

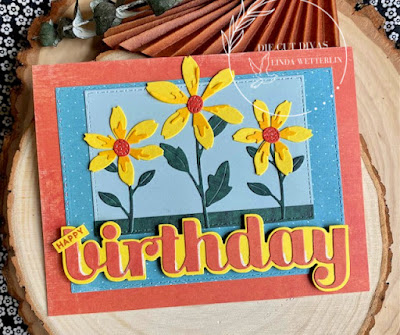
Here's my card for today:

Supplies: Paper - Park Lane A2 card;
My Mind's Eye On the Bright Side;
Hero Arts Arctic; scraps of yellow and green
Stamps - My Favorite Things Itty Bitty Basics
Dies - Birch Press Design Star Flowers Contour Layers,
Other - sparkle gold gel pen; foam tape


This summer my favorite local craft store had a sale on BPD, Poppystamps & Memory Box so I bought some of each! This is my first time playing with the Star Flowers and the stems from the Delicate Floral Buds set - so cheery! Thought I'd use them  on a bday card for my cousin Debi. Just die cut and assemble - easy peesy! Since I was just using the birthday word from the set, I stamped a bitty HAPPY on a scrap and adhered it to the b. I added some gold glitter gel to the flower centers - done!

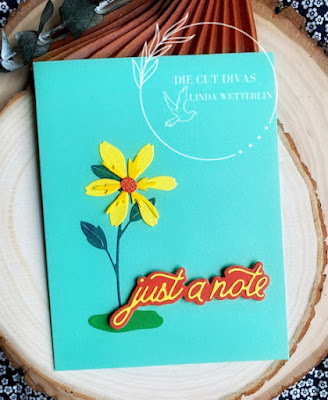
Now for a bonus using a single star flower and a stem. Keeping it clean and simple, I adhered the flower, a "ground" diecut using MFT and another BPD layered sentiment Handwritten Just a Note and Outline.


If you'd like to see another design using the Star Flowers, check out this beauty by teamie Dawn (Dawn's World). I loved her clusters of the flowers in opposite corners! Since my Star Flowers are getting first play, I'll add card one to Darnell's October NBUS Challenge.

That's it for today - hope to see you in the October Diva gallery by 9p PST today! Have fun trick-or-treating!!


Monday, October 30, 2023

Joy Cup and Cozy Cup!

I'm baaaack! As promised I'm sharing a holiday to-go cup card for the current Just Us Girls Challenge where they're doing clean and simple (CAS) with a center focal point. 


Supplies: Paper - Neenah Classic Crest Solar White;
scrap of red (Bazzill, I think)
Stamps with Dies - Hero Arts Coffee Cup Tags (retired)
Dies - Kat Scrappiness Joy Shadow Sentiment
Other - Mark Richards Nailheads (berries);
Paper Studio Christmas Mini Epoxy Sticker (on O);
Copic Marker BG0000


When I made yesterday's card for JUGS, I considered using the Hero Arts holiday to-go cup set. Instead I went with one of their mittens set first but couldn't resist going back to the to-go cup idea. I stamped & die cut both cups from the set - one with whipped cream and one with a lid. The whipped cream drink is a Frappuccino - I like the Vanilla bean one with added Java Chips from Starbucks! Die cut the sentiment with shadow and assembled, adding a poinsettia sticker to the O. Stamped & die cut the holly and used red nailhead stickers for the berries. Arranged the cup on a top-fold A2 card made with Neenah, popping up the sentiment with foam tape - done.

Hero Arts released the to-go cup stamp set in 2015 and I just had to have it, along with the coordinating dies. I'm embarrassed to confess that today's card was its first use - shame on me!! I remember reading someplace recently that you should always lift the stamps from the acetate when you first get them. Sooooo true!! I had to be extra careful peeling these neglected stamps from their packaging!! Luckily they survived intact.

I'll also add this card to Darnell's October NBUS Challenge & to the current Stay Crafty with a Blog Named Hero where they're doing Holiday cards.

Next, a twofer - I finished the other cup card, adding a doily behind it (cut from the Elizabeth Craft Small Doilies set). I did the sentiment on the cup cozy for this lidded cup, figuring it's a hot drink. The sentiment was embellished with a couple more enamel stickers from Hobby Lobby.


Yay - two more cards for the Christmas stash! I'll be back tomorrow with the end-of-the-month Die Cut Divas so I hope you'll return. Our October Challenge ends tomorrow at 9pm Pacific Time - we're doing layered die cuts this month with Birch Press Design as our sponsor. Hope to see you there!

Thanks for visiting & have a crafty day!! 


Sunday, October 29, 2023

Warm Wishes Mittens

Happy Sunday everyone! I'm sharing a clean and simple (CAS) card for the current Just Us Girls Challenge. Be sure to check out the fabulous inspiration by the Design Team & guest. Here's my take:


Supplies: Paper - Neenah Classic Crest Solar White
Stamps with Dies - Hero Arts Holiday Mittens (retired)
and Winter Hearth Stamp & Cut (sentiment)
Other - Copic Markers (BG000, BG01, BG49, R24, R29);
Hero Arts sparkle lacquer


I spent yesterday afternoon doing some crafty cleanup. All I had left was to vacuum up the die cut bits that had fallen onto the carpet. Then I spotted the new JUGS challenge & the cleanup was forgotten!

I had a holiday to-go cup set in mind but landed on the mitten set first as I was flipping through a Christmas box. Stamped and die cut the mittens, then colored with Copics. Added some sparkle to the snowflake. Stamped the sentiment and arranged the mittens on a top-fold A2 card made with Neenah, popping one mitten up with foam tape - done. This would be a great card for mass production! 

Thanks to the team at JUGS for a fun challenge! I'll be back tomorrow with the holiday to-go cups since I pulled out that set after finishing the mittens card. Thanks for visiting & happy crafting!!

Saturday, October 28, 2023

Stitched Mushrooms with Fairy

Happy weekend! I spent several hours yesterday working on a project for the current Day of the Month Card Club where they're celebrating National Mushroom Day. I haven't participated there in a while but my friend Gundi (papierelle) inspired me to join in with this beauty. Here's my take on the challenge:

Supplies: Paper - Neenah Classic Crest Solar White;
Various scraps of kraft, green, orange & red
Stamps - Hero Arts Apr 2016 My Monthly Hero kit (retired)
Stamps with Dies - Hero Arts Friendly Messages Bundle
Embossing Folder - Spellbinders Mushroom Harvest
Dies - Spellbinders Enchanted Stitched Mushrooms;
Hero Arts Apr 2016 My Monthly Hero kit (retired)
Other - Copic Markers; Hero Arts Sparkle Lacquer;
DMC embroidery floss (732, 817, 841,3341);
foam tape; white gel pen

The September Spellbinders box had a gorgeous 3D embossing folder featuring mushrooms & the mushroom stitching dies. I was eager to use them & thought the fairy and frame from a fave My Monthly Hero kit would coordinate nicely. Process:
  1. Die cut all mushroom elements and stitched where indicated, then assembled. 
  2. Embossed an A2 panel with the mushroom ef & adhered to an A2 card. 
  3. Die cut the MMH frame, inked the edges & popped onto the card with foam tape. 
  4. Added the mushrooms with foam tape where needed. 
  5. Stamped, die cut and colored the fairy and added her to the scene.
  6. Stamped & die cut the sentiment (with extra cuts for thickness & shadow).
  7. Added sentiment near the mushrooms.
I finished the card this morning by chosing a sentiment. Finally decided that this would be the perfect birthday card for a friend who likes stitching on cards. Since my mushroom ef and dies are newly used, I'm also adding this card to Darnell's October NBUS Challenge.

Thanks for stopping by & have a crafty weekend!


Wednesday, October 25, 2023

Happy Halloween Birthday!

Hey friends - I don't make many Halloween cards but I have a friend with a Halloween birthday & family who loves Halloween so I usually create a few. My friend Denise and I went to high school together, plus marched in Blue Stars Drum and Bugle Corps in our youth. I used a fun TE haunted house die along with some old Hero Arts Halloween stamps.


Supplies: Paper - Park Lane A2 card; Hero Arts Pitch Black;
Scraps of orange, white and green
Stamps - Paper Smooches All Year Cheer (nib)
Hero Arts Color Layering Moonlit Night, Owl-oween, & 
Frightful (all retired)
Dies - Taylored Expressions Haunted Mansion
Other - glitter gel pen

I started with a lilac A2 card and inked the upper edges and corners with Black Soot Distress ink. The house die takes up most of the card but I squeezed in a stamped witch flying across the moon. Stamped and fussy cut the ghosts, pumpkin, and spider. Popped the ghosts into their windows & backed them with some scraps of green watercolor paper. I stamped the kitty before adhering that panel behind its window. I used two Paper Smooches sentiments, adding the Birthday after the Happy Halloween, then fussy cutting. I glittered the pumpkin, kitty eyes and ghost eyes with a gel pen. 

I made three other Halloween cards using the same basic design with some variations & without the "birthday" - ha, ha. For example, I left the spider off the card for my brother and his wife. Donna hates spiders and calls for my brother to take care of any that she sees - LOL. Another card featured some added bats. I forgot to take photos of those cards - oh well...

I'll send this card to Darnell's October NBUS Challenge since the haunted house die is new. I was also inspired by Bonnie (Stamping with Klass) to join the current Two Old Bats Halloween Challenge - their gorgeous mood board has a haunted house.

Thanks for stopping & have a crafty day!


Monday, October 23, 2023

Happy Birthday Dad with a Fun Tool Caddy Card!

Hey friends - we celebrated my dad's birthday this weekend - 92 years young! Here's the card I made him featuring new goodies from My Favorite Things:

Supplies: Paper - various scraps;
Tim Holtz Metallic Kraft Stock; Paper Studio Wood Cardstock
Dies - My Favorite Things Cool Caddy
In the Toolbox Set 1 and Set 2
Tim Holtz Sizzix Sidekick Starter Kit (numbers)
Stamps - My Favorite Things Tool Talk
Other - Michael's Recollection bday sticker

Isn't this just the cutest little box card? The tools look so realistic! I added the age #s to the paint brush and used a strip sentiment from the coordinating Tool Talk stamp set. A pre-fab dimensional sticker finished the sentiment. I put a rectangle on the caddy's back with the bday message. I cut two of the handle for strength - just glued the center as you can see from the top view.

Here are a couple more views (folded flat & from top):


Here's a photo of Dad & me with him holding his card:


My sister-in-law made the cake - it's called Wacky Cake & tastes delicious!! Donna doesn't frost it because my Dad loves to plop Cool Whip on top. We had a game of Phase 10 which Donna won this time, although Dad was a close second. My brother and I trailed by a lot, oh well. 

I'll add this card to Darnell's October NBUS Challenge since all my tool caddy stuff was used for the first time here. I bought the entire bundle so there are dies to do a craft caddy too - so fun!!

Thanks for visiting and have a crafty day!


Sunday, October 22, 2023

Happy Fall Y'all & Die Cut Stickers Galore!!

Happy Fall Y'all - I was inspired by Lisa (My Paper Tales) to create a fall card for the current Just Us Girls Challenge. Ina from their DT has chosen a gorgeous fall color palette & mood board with rich fall leaves - love it!! 

Supplies: Paper - Just Stamp on It A2 card;
scraps of white & of a rusty patterned paper (I think
 it's from a fall pad I got at Target years ago);
unk brand of vanilla cardstock
Stamps with Dies - Hero Arts Friendly Messages Bundle
Embossing FolderCascading Leaves and Stripes
Dies - My Favorite Things Bitty Fall Leaves'
Inks - Various Hero Arts & Tim Holtz DOI


My Spellbinders box always comes late in the month of issue, then it takes me a while to use it. The JUGs Challenge was the perfect time to pull out the Cascading Leaves and Stripes embossing folder from September. I die cut a rectangle from a vanilla-y yellow paper to approximate the lightest of the color palette, then sponged the rest of the colors (as close as I could come to them with the inks I have with me). The sweet little leaves came from the MFT September release - just got those in my mail last week.

I'll add this card to Darnell's October NBUS Challenge since my ef and leaf dies are newly used today. I haven't played at the Snippets Playground in quite a while but they're doing anything goes and all my leaves and the sentiment were cut from snippets (I've shown my box of snippets in the past - take a look HERE if you'd like; it's even fuller now!!).

Next I'm sharing some quick and easy Christmas cards using some 3D stickers.


Supplies: Paper - Paper Studio A2 cards & Vintage Christmas;
Authentique A Magical Christmas
Dies - Hero Arts Nesting Oval Infinity Dies;
A Jillian Vance Design Stitched Dot Rectangle Backdrop Set
Other - Jolee's Santa stickers; 
ephemera from Spellbinders Nov 2020 card kit

Last week I ran to grab a coffee and visit the post office (OMG - the gorgeous new Christmas postage stamps!!). Michael's craft store wasn't too far from there so I popped in. I wanted to add a few quick musical note stickers to some pre-printed chorus cards and knew they'd have some (yes!). 

As I'm trudging through the meandering check-out lane (designed to tempt you with extra stuff to buy), I spotted a four bin rack of sticker packs - 99 cents each!! We're talking good Thickers, Jolee and others - wow! Besides the Santa ones I used here, I picked up some Thicker alphabet stickers and some kitties. I limited myself to 6 sets otherwise I would've pawed through the bins for hours - LOL. Maybe your store has a similar discount bin, if not - so sorry!

On card one - I just die cut a rectangle and some ovals, added to an A2 card and popped on the stickers. Found an ephemera ticket & sentiment - done! On card two - I hand cut a snowbank and added some glitter to the edge (hard to see in photo). Adhered to a patterned A2 card and applied the stickers - even quicker and easier than card one!! Yay - a couple more for the stash.

Thanks for stopping &, as always, happy crafting!!


Saturday, October 21, 2023

Herbarium Layered Christmas

Hi friends - it's my day to post at Die Cut Divas! We're doing layered dies (be it a set or just your own layers) for our October Die Cut Diva Challenge. Birch Press Design has such wonderful layered die sets and the team is enjoying working with them this month. Thanks to BPD for providing a $20 gift card to their store for our random winner!

Supplies: Paper - Park Lane A2 card;
Neenah Classic Crest Solar White; Hero Arts Pitch Black;
Tim Holtz Kraft Metallic
Michael's Recollections green glitter & red
Dies - Birch Press Design Herbarium Plate Layer Set &
Other - Recollections gems


I bought the Herbarium Plate Layer Set recently and was excited to use it today. I started with a minty green A2 card then die cut the 3 Herbarium layers in glitter green, white, and red. Assembled, then added some red gems for berries & a BPD Christmas sentiment. I layered the Merry Christmas (love BPD's Sugar Script sentiments!!) with a black shadow and stacked the outline for dimension as well as adding a gold shadow - layering at its most simple.

For my bonus this time, I'm sharing a card I made this summer for my adopt-a-member AJ. If you missed it, alumni from my drum corps days adopted current members (read more HERE). I haven't finished sharing the rest of the cards I made but I'll do that one of these days. One of them used a BPD layered set so I saved it to share on this post:

Supplies: Paper - various - can't remember brands
Dies - Birch Press Design Kinsley Heart Plate Layer Set
Other - Spellbinders ephemera from their June kit; Kaisercraft gems

I couldn't resist the Kinsley Heart set - so gorgeous! I searched my cardstock on hand & found some to coordinate with the Spellbinder's June ephemera. Die cut the 3 layers and adhered them. Added some gems and the ephemera - done! Maybe the birdie gets a bit lost but I didn't want to cover up any layered hearts - love, love, love them!!

Both cverplate die sets got first play here but I'll just add card one to Darnell's October NBUS Challenge since I made it in October.

That's it for today - hope to see you in the October Diva gallery by 9p PST on Halloween 2023!


Tuesday, October 17, 2023

Anniversary and New Baby

Hi all - I'm back to share an anniversary card and a card welcoming my newest cousin. First, the card I sent to friends Heather (stamping and stitching) and Philip, celebrating 29 yrs of wedded bliss. They have received it and were pleased with it - yay!

Supplies: Paper - Hero Arts layering paper (retired);
Neenah Classic Crest Solar white: 
Scraps of yellow and black
Dies - Hero Arts Sept 2023 MMH kit (sold out);
A Jillian Vance Design Stitched Dot Rectangle Backdrop Set;
Creative Expressions Happy Anniversary
Stamps with Dies - Hero Arts Sept 2023 MMH kit
Stencils - Hero Arts Sept 2023 MMH kit
Other - white gel pen; foam tape

Here's a graphic of the sold out premium kit's contents:


I die cut a stitched rectangle & then die cut the set's fall window into it. Next I used the inks in the kit to stencil the window & sponged the edges too. Adhered to an A2 card. Then I stamped, die cut and colored the critter couple to resemble foxes. Popped them onto the card and added a layered sentiment. I chose the guitar playing critter since Philip plays guitar and the Heather critter is enjoying it!

I'll add this card to Darnell's October NBUS Challenge since my MMH kit got first play here.

Earlier this month my cousin (not sure how many times "removed" in that geneology stuff) brought his wife & sweet little newborn to visit my dad and me. We took turns holding baby Parker - he's so tiny at two months old; he was light as a feather!  We have photos but are keeping them private...

I made this card (sorry for the poor photo) for the happy family. They didn't open the envelope while here and I haven't heard if they liked it... 

Supplies: Paper - Authentique patterned;
various scraps; A2 card
Dies - Elizabeth Craft Designs Small Doilies;
A Jillian Vance Design Stitched Dot Rectangle Backdrop Set
Stamps - Hero Arts CL662 New Baby (c2013-retired)
Other - B Copics for shading; foam tape

I love the little bear image! No dies for these old stamps so I fussy cut the bear and baby carriage. Stamped the sentiment and rounded the corners with a punch. Die cut a background & a doily and assembled - done!

That's it for today, friends. Please check back on Saturday if you'd like some inspiration to join in our Die Cut Diva October Challenge. Happy crafting!


Monday, October 16, 2023

Four Petal Bloom Reflection Bday Duo

Hi all - I've moved off Christmas card production to work on more October birthday cards. I've already shared some using Spellbinders Four Petal Sweet Flowers stamp set (see those cards HERE if you missed them).

Today's feature a duo using the Four Petal Bloom Reflection die set. You may remember I attended an Altenew/Spellbinders virtual event back in February (HERE if you missed that post) and I thought I'd have another go. I finished card one yesterday and card two this morning:


Here's a view of each separately:


The embossed texture comes from a lovely set of handmade paper cards from Michael's craft store. I've had them forever and am forcing myself to use them! See other cards made with them HERE. Besides the Four Petal Bloom Reflection set, I also used the Essential Four Petal Labels and bday sentiments - card one from a company no longer in business and card two from Hero Arts: Friendly Messages Bundle. Tim Holtz kraft metallic in gold (card one) and silver (card two) were used for the base layer. Card one will go to my sister-in-law and card two to my niece-in-law. 

I'll also add to the current Allsorts Challenge where they're doing TEXTURE and dear Hilary (Fiddling About) is the Guest Designer. I don't get there very often but thought the team would appreciate this lovely texture, even if it's prefab!

Thanks for stopping by & I'll be back again with more October bday cards plus an anniversary card!


Thursday, October 12, 2023

Christmas Tree Tag with Kitty

Hey there - very gloomy, rainy day here - perfect for crafting!

I'm back with my final entry for the special October Christmas Kickstart Challenge in memory of Janis Woolbright (Her Peaceful Garden). I made it to fit the the tic-tac-toe element that Gail (Crafty Nomad) added to Day 8 at CKC & that's my final entry there too.

Supplies: Paper - Park Lane A2 card;
Neenah Classic Crest Solar White; Tim Holtz Kraft Metallic
Stamps with dies - Hero Arts Fluffy Stockings Stamp & Cut (retired)
Dies - Elizabeth Craft Designs Oh Christmas Tree;
Other - Copic Markers; foam tape; Memento Tuxedo Black ink;
Recollections Christmas chipboard; Luxury Ribbon; DMC gold floss

Here's Gail's Tic-Tac-Toe Board; I used the middle vertical column - ribbon, tag, gold.


I hadn't used the center vertical column in my previous cards so I thought I'd show it some love today. I started by die cutting a Christmas tree from TH gold kraft metallic cardstock. To make it a tag, I die cut a hole using the smallest HA infinity circle die (love, love, love this set!). The gorgeous silver ribbon came from one of my UK friends - sorry I forgot who, but thanks!

I wanted to use the cute kitty in stocking image from Hero Arts so colored one & thought about how to add it to the tree tag. While I was searching for ribbon, I found a package of fabulous glittery chipboard sentiments with a snowflake. Tried one and it fit perfectly on the tree & the kitty looked cute over the snowflake. Assembled and added to an A2 card with a bow made by piercing two holes and threading embroidery floss through them. The card base has script stamping but it's wiped off - the card is glossy and the ink never dried. I wiped it with a paper towel which left a very light & pretty texture that finally dried.

I figure the tree tag can be removed from the card and either used as a gift tag or a tree ornament. It'll go to a cat loving friend with an in-person delivery. That way I don't have to worry about putting the chipboard through the mail - it's pretty thick.


Thanks for stopping and happy crafting! I'm done with Christmas cards for a bit - need to work on October birthday cards next...


Wednesday, October 11, 2023

Christmas Kitties with Fireplace

Hello friends - I'm still rolling with the kitty theme at the special October Christmas Kickstart Challenge in memory of Janis Woolbright (Her Peaceful Garden). This is card 5 of a possible 6 on the main challenge. I also managed to meet the the tic-tac-toe element that Gail (Crafty Nomad) added to Day 8 at CKC (this is card 2 of a possible 3).

Supplies: Paper - Echo Park Reflections (woodgrain);
Paper Studio Holiday, scraps of white and kraft;
Authentique A Magical Christmas (plaid)
Stamps with dies - Lawn Fawn Simply Celebrate Critters (dies HERE);
Stamps - Hero Arts Color Layering Snowy Tree (retired),
Christmas Trimmings Stamp & Cut (retired)
Dies - A Jillian Vance Design Stitched Dot Rectangle Backdrop Set
Other - Copic Markers; foam tape;
Hero Arts Cherry Ink; Memento Bamboo Shoot ink

Here's Gail's Tic-Tac-Toe Board; I used the right side vertical - pp, scraps, stamp.


This card took all afternoon - lots of moving parts but so fun to put together! Just stamp, die cut or fussy cut, color & assemble. I did a fireplace card with the quintet of mice from the LF set last year (different fireplace) - see it HERE if you missed it & are interested.

I'm also sharing my kitty card at Show Us Your Pussy Cats Furrything Goes Challenge & at the current Stay Crafty with a Blog Named Hero Challenge where the theme is Holiday! Celebrate!

Thanks for stopping and you'll probably see me back soon! 😸