Welcome to my blog!

Thanks for visiting my blog. As the title suggests, I love to scrapbook, stamp, and sing! I will share cards and scrapbook pages I create, as well as information about my music - Barbershop harmony.
Showing posts with label Guest Designer. Show all posts

Saturday, January 6, 2024

Penguins at Day of the Month Card Club!

Hello crafty friends! I'm delighted to guest designing again at Day of the Month Card Club - this time for Challenge 59 celebrating Penguin Awareness Day!! Here's my inspiration card:


Supplies: Paper - Park Lane gold A2 card;
Neenah white; Hero Arts Glitter Basics; 
Recollections green; Lawn Fawn Petite Spiffier Speckles
Stamps - Hero Arts Holiday Foliage Messages
Stamps with dies - Sunny Studio Penguin Party (dies HERE)
Dies - Memory Box Pine Tree Grove;
A Jillian Vance Design Stitched Dot Rectangle Backdrop Set
Other - Copic Markers; foam tape


Somehow I missed the email about the challenge until after the due date for my card - oops! But with a follow-up from the team, I got busy!! Fortunately, I had a stack of stamped penguins in my bits box and was able to put together a card quickly. Just colored the penguins, die cut some layered die cut trees & snowy hill, stamped a sentiment, added everything to a stitched rectangle & then the card - done!

I hope I've inspired you to join in this fun challenge. Learning from last year, I'm ramping up my Christmas card production early in the year so I don't come up short when it comes time for mailing!!

Happy crafting and thanks for stopping by!

Winner Challenge 57

Saturday, December 10, 2022

Embossed Snowflake Fun - Guest Designing at Let's Squash It!!

Hey everyone - I'm excited to be Guest Designing for the December Let's Squash It! Challenge!! I was Empress of Squash in October, winning with my tree card - woo hoo! Hosts Gail and Jo have become great friends of mine since I started playing at LSI and other challenges they host like The Card Chain Challenge and Christmas Kickstart. This month's theme at LSI - SNOWFLAKES & STARS!! I have oodles of embossing folders with either one but I went the snowflake route. Here's my card:

Supplies: Paper - Park Lane A2 card; Spellbinders White;
Embossing Folder - Hero Arts/Sizzix Snowflake Background Set (retired)
Dies - A Jillian Vance Design Stitched Dot Rectangle Backdrop Set;
Art Impressions Lg Snowflake Dies;
 Spellbinders Snowflake Splendor & Holiday Greetings (both retired
but found HERE & HERE at Frantic Stamper; FS calls the latter Snowflake Bliss)
Other - Hero Arts Glitter Hero Paste
TH Salty Water Taffy Distress Stain & Villanous Potion Reinker;
Hero Arts Taffy Reactive Ink

I was playing with a bubble technique in the opposite corners of a card, like I did HERE, but my bubbles were too large. I wasn't getting the same subtle corner effect  that I did on that previous card. My solution - bubble the entire panel - fab! Then I decided to spritz a bit with Salt Water Taffy Distress Stain. That got a bit heavy in spots but the large die cut snowflake covered the worst spot - LOL.

After drying the panel, I die cut it with a stitched rectangle and ran it through the Vagabond with a snowflake embossing folder. Next I swiped some Hero Arts Taffy ink on the raised bits, then used my finger to spread some glitter Hero Paste here & there. Once thoroughly dry, I ran it through with the ef a second time - this really brought out the pattern and also flattened the areas that had warped.

Next I added various shimmery snowflakes and the sentiment, then adhered everything to an A2 card. Here's the funny part: I'm looking at the embossing folder (found in a box of unpackaged ones) and thinking - hmmmm, this looks like it should have more details. Then it hit me - this belongs to one of those old stamp & emboss sets! I have a bunch from a Hero Arts/Sizzix collaboration; the snowflake set was released in 2012 and retired long ago. Here's a shot of the ef with it's matching stamp - they are reunited!


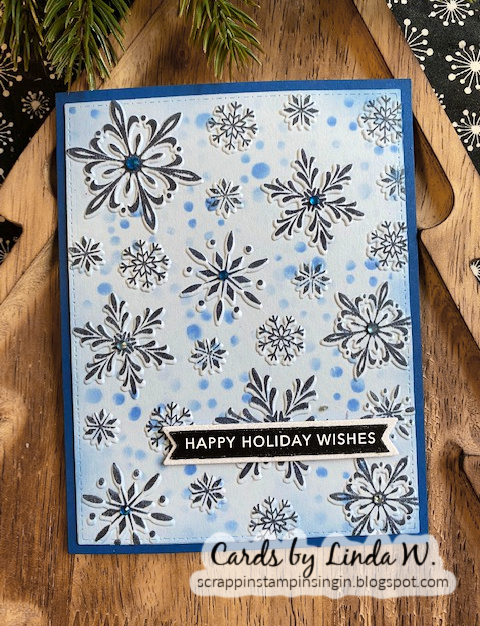
And why not, since I found the matching stamp, make a card with the combo?! So here's your bonus:

Supplies: Paper - Paper Studio blues;
Stamp & Emboss Set - Hero Arts/Sizzix Snowflake Background Set (retired) 
Inks - Hero Arts Navy & Cornflower
Stencil - Hero Arts Sprinkled Dots
Other - Docrafts gems;

I stamped the cling snowflake background onto pale blue cardstock using navy ink. I die cut the panel with a stitched rectangle and used the stamp's matching ef. I sponged some cornflower blue ink around the edges, then used the same ink to stencil some falling snow in the bare spots. Glued the panel to a navy card, added some gems & another TE sentiment strip backed with glitter paper - done! I'm curious - which version do you like better - plain embossed or stamped/embossed? Both were fun to make! 

And I couldn't resist a threefer. Was shopping (big surprise) at Hobby Lobby and they had 40% off a bunch of dies and efs. I found a beautiful snowflake set by Momenta (no name listed & it's not available at Hobby Lobby's website). Besides the ef, there are 7 dies - a great value!

Embossing Folder - Momenta name unk

I inked the raised bits with some white ink and popped on a couple snowflakes from the stash. The rather spiky looking purple one is from Elizabeth Craft Designs Snowflakes set. The sentiment is from SSS sentiment strips collection & fussy cut. Very quick and easy!

Thanks for sticking with me to the end of this long post! And thanks to Gail and Jo for inviting me to guest design. Hope to see you in the Let's Squash It! gallery!!

Thanks for stopping!


Sunday, May 1, 2022

May Guest Designer at NBUS!!

Hey crafty friends - with a mountain of NBUS (Never-Before-Used-Schtuff) in my stash, I am the perfect fit to play at the NBUS Challenge. Back in February owner & friend Darnell (djkardkreations) started taking on one Guest Designer per month - such fun! I'm delighted to be her GD for the May Challenge #38!! Here's my card:

Supplies: Paper - Spellbinders (blue); Neenah white;
 & Anchor Paper (grey linen card)
Stamps - Taylored Expressions Simple Strips Background
Dies - Spellbinders Stitched Petal Frame
Taylored Expressions Simple Strips
Other - Hero Arts gems; 
DMC Embroidery Floss (600, 604, 827); 
Artiste Silver Metallic Floss

Right before Darnell asked to guest design, I'd received a big box from Spellbinders. Not only did I have NBUS, I had brand new NBUS!! Funny thing - the die I used above was one I found at Hobby Lobby the following week - so even newer NBUS - yikes!

I die cut a thick, rich blue cardstock from an old Spellbinders kit using the coverplate. Decided to try silver metallic for stitching on it. Bad idea only because the silver I bought comes 8 strands & was difficult to split in half. The full 8 strands are too thick for the holes. I really liked the look, though, and kept at it for several hours. Then I decided some regular embroidery floss would be perfect on the rest. I split the 6-strand floss in half and 3 strands worked well. I also followed Spellbinders recommendation to use a #22 tapestry needle. Be sure to use a thick paper because you handle it a lot and wouldn't want it to tear! Later I found some beautiful metallic DMC thread that I'll try next time.

I embroidered and did counted cross stitch & needlepoint for many years. With paper, you have to watch out for the needle falling right back through the hole and off the thread - can't tell you how many times that happened...But once I got going, it went well. I secured the thread ends with a bit of glue when I completed a section. Once finished, I die cut a second panel and glued it to the back. This gave me a smooth panel to adhere to my card base. Some gems and a sentiment strip finished the card. If you want to see a gorgeous pastel version using embroidery floss, go here. My friend Lin (Sending Hugs) did a beautiful job on it!! She used some new Spellbinders stitched flowers here - so pretty!

Here's a bonus card, or as Darnell would say, a twofer:

Supplies: Paper - Neenah; Tim Holtz; Anchor Paper
Stamps - Taylored Expressions Simple Strips Background
Dies - Spellbinders Stitched Medallion
Taylored Expressions Simple Strips &
A Jillian Vance Design Stitched Dot Rectangle Backdrop

After all the stitching on the other card, I decided to try one without stitches - it's still amazing with loads of detail. I simply die cut the stitched medallion (from my big Spellbinders box) with the frame & then a solid panel with just the frame. Layered them and added to my rectangle diecuts and card base. Sentiment strip with backer and done! Very simple and fun to put together...

Thanks oodles to Darnell for offering the NBUS Challenge & for inviting me to guest design! I hope you'll join in this month using some of your own mountain of NBUS!!


Wednesday, October 6, 2021

Celebrate - It's My Party!!

Hey crafty friends - I'm delighted to be the Guest Designer at Day of the Month Card Club! We're celebrating "It's My Party" Day this month

Supplies: Paper - Neenah white;
Paper Studio black and glitter;
Momenta watercolor print
Dec 2016 MMH kit (sold out)
Stamps - Hero Arts Sparkle Clear - Party (retired) & 
Dec 2016 MMH kit
Other - Paper Studio Bright Abstract vinyl; Copic Markers;
3M foam tape, Hero Arts flower gem & clear lacquer

The actual celebration lands on October 11th and you can check out Leslie Gore singing the famous song on the Ed Sullivan Show (remember it?) HERE. You can see the Day of the Month Card Club August challenge winners post featuring my card HERE

For this month's theme, I had some fun with a Picket Fence Slimline set - love, love, love this one!! I started by adhering a strip of adhesive backed vinyl to white cardstock. Then I die cut it with the scalloped slimline rectangle, then cut a second one in white for the back. Scored the back piece and glued to front for a card base. 

Next I die cut the celebrate four times - pink glitter, black and two white. Layered the white for dimension, then glued the black, then white to the pink for shadow & depth. I glued the word to a narrow textured blue rectangle since the vinyl is so busy. Then I stamped the two circles and die cut both plus a larger pink circle. The stamp set I used came out in 2008, not long after I began making cards! The only alteration - the bigger circle sentiment says "It's a Party"; I did a little surgery and cut out the a, stamped it and then stamped "my" from a "Be my Valentine" sentiment. Yup - did a little surgery there too. All the stamps fit back together perfectly for stamping the original sentiments. I used Copics to add some blue to one circle and popped the smaller circle with foam tape. The little flower gems came with the stamp set and I hadn't used a one until now.

Things looked a little bare so I decided to add some party stuff. First thing that came to mind was a fun My Monthly Hero kit from - yikes - nearly 5 years ago. Love this one and use it often. I die cut the sunburst from the same pink glitter cardstock, plus a couple of the little stars. Then I stamped and die cut a party mask from the kit's stamp set. If you want to see more cards I made with the little masks, go HERE. If you'd like to see the vinyl embossed, go HERE.

Hope to see you in the challenge gallery which remains open until the end of the month! Thanks to Gundi, Rosi & Izzy for inviting me to guest design this month!!

Thanks for stopping & have a crafty day!!


Thursday, December 10, 2020

First Guest Designer at Let's Squash It!!

Hey crafty friends and sister Squashettes - I'm Guest Designing this month at Let's Squash It!! following a win at their inaugural challenge back in October with my robot card. Thanks to Gail and Jo for offering this fun challenge! For December - challenge # 3 - they chose the theme of Embossing Folders with Die cutting or fussy cutting. Both must be on your card - here's my creation:


Supplies: Paper - Paper Studio A2 card and solid papers;
Basic Grey Aspen Frost patterned papers;
Dies - My Favorite Things Square Grid Cover Up (retired)
Embossing Folders - Stampin' Up Subtle 3D;
Taylored Expressions Nordic Holiday


I started out with a grid die thinking it would be fun to emboss the different squares. While I used two embossing folders, I decided not to emboss every square. I embossed the grid outline piece with Stampin' Up's Subtle 3D folder; just love the soft texture it adds! Both the soft mint and aqua squares are embossed with Taylored Expression's Nordic Holiday - such a fun one! I did pretty well aligning the reindeer squares; the poinsettia ones didn't fit on the squares neatly and I was fine with that bit of randomness. I die cut an entire cover-up using two patterned pieces of Basic Grey's Aspen Frost paper and then mixed them with the embossed pieces to fill the grid windows. A pre-made sentiment strip finished the card.

Thanks again to Gail and Jo for inviting me to Guest Design! Thanks to you for stopping by and I hope you'll pop over to Let's Squash It!! to link up your cards using embossing with a die cut or fussy cutting. You have until 23.59 GMT on the 31st to play. If you need some last minute Christmas cards, now's a perfect time to opt in, although any occasion is welcome! Happy crafting!!

I was the Empress of Squash
for October 2020!!