Welcome to my blog!

Thanks for visiting my blog. As the title suggests, I love to scrapbook, stamp, and sing! I will share cards and scrapbook pages I create, as well as information about my music - Barbershop harmony.
Showing posts with label love. Show all posts

Saturday, February 28, 2026

Final Day for Diva Red and/or Pink

Hey friends - we have final day inspiration at Die Cut Divas for our February Challenge. We're asking everyone to use primarily pink &/or red in your creation. You have until 9pm Pacific Time today to link up for a chance to win a $25 gift card from our fabulous sponsor, Hero Arts!

All my card details and a bonus can be found below:


Supplies: Paper - Recollections A2 cards &
glitter cardstock; Paper Studio cardstock;
My Favorite Things Watercolor Wash
Dies - Hero Arts Stamp & Cut Love You XL
(retired at HA but still HERE at Frantic Stamper)
& Box of Chocolates (retired)
Other - SSS sentiment strip (you);
EK Success heart stickers;
Hero Arts inks - Red Royal & Cotton Candy

Loads of red and pink here!! I cut down a red A2 card to a 4.25" square. Stamped a pink watercolor print with the Andy Warhol text using red ink. Trimmed to a mat and adhered to the card. Took a darker red A2 card and die cut the chocolate box. Cut the bow from pink glitter paper, doing an extra cut of the loops and center, trimmed any excess, added some inking and layered for more dimension. Adhered the box and bow to the card.

Next I die cut the love from pink and stamped the text on it with pink ink. Made a second cut from black and layered. Added a small "you" sentiment strip. Glued to the card, then added some heart stickers.

For my bonus I used an adorable truck die set that I've had a while that I'd never used until now.


Supplies: Paper - Recollections A2 cards &
cardstock; Paper Studio cardstock;
My Mind's Eye Happy Day; scraps
& Tulip Bouquet (sentiment);
Spellbinders 2024 Advent Calendar Day 19
Dies - Hero Arts Farmers Market Truck
Other - EK Success heart stickers;
Hero Arts inks - Red Royal & Cotton Candy;
Copic Markers; foam tape

The truck is one piece except for the tailgate panel. I die cut those two pieces from the deep red A2 card pieces left from card one. I then die cut parts of the main truck - tail lights, tires, bumper from scraps and layered onto the dark red truck base. Next I die cut 5 hearts of varying sizes & papers, then filled the truck bed. I die cut a second tailgate panel in pink and trimmed it down for layering. Stamped the sentiment in red. Die cut the dog once in white and then the scarf portion in pink; trimmed the latter and layered onto the white. Colored the dog's nose with Copic markers and shaded the body.

I die cut two patterned papers for the background, matted in black and added to a red A2 card. Added the assembled truck and dog with foam tape. A sentiment strip stamped from a Spellbinders set, plus a couple enamel hearts finished the card. I'll add this card to Darnell's February NBUS Challenge #83 since the truck die set was newly used. 

That's all for today. Thanks for visiting and we hope to see you in the February Die Cut Diva ChallengeHappy crafting!!


Saturday, February 22, 2025

Celebrating American Heart Month

Happy Saturday! I'm here with a card I made last night during Craft Roulette Episode #255.


Supplies: Paper - Neenah white; 
Paper Studio pastel A2 card;
Paper Studio Pink; TH Jewel Kraft Metallic;
Doodlebug Sweet Things 6x6"
Dies - Hero Arts Hero Studio Jan'25 kit &
Other - Paper Studio enamel hearts

Host Mary Gunn FUNN had Amy Schrock (@amyswares‬) as her guest. Amy loves stencils and does 3 regular weekly YouTube videos. Check her channel out at the link furnished, if desired. The wheel was particularly nice to us, including landing on the fave A2 card format that Amy was hoping for!! Mary & Amy made some really cute toaster cards using products from Trinity Stamps (for National Toast Day, celebrated the last Thursday in February).


  • Project - A2: I used a premade A2 card base.
  • Colors - Valentines: I did red & pink, plus neutral white & a Valentine pattern.
  • Element - February: I went the "celebration of the month"* route.
  • Random - Metallic or Foil: I used metallic cardstock on a heart & sentiment die cut.

I still have loads of Valentine stuff laying around & decided on hearts, given February is *American Heart Month. Of course, anyone who knows me has heard how much I love hearts!! I used the same Hero Studio kit from the birthday card I shared on my Valentine's Day post; I just skipped the shaker part. Definitely no time for that during the show, given how slow I am with my foam tape!!

I die cut a metallic red heart to put atop the ray textured background (instead of using it to die cut a window). Then I added a patterned die cut heart & a solid pink (same as background) die cut heart. Added the panel to a premade mint A2 card. Next I die cut a metallic With Love sentiment, plus two white ones (for dimension & shadow) & the white hearts from the same set. Added to the card - done!! Very quick and easy. Guess I could've shown some love to one of the other sentiments in the set - "Love You" or "Be Mine" - oh well....

I'm curious which card you like better - this one or the shaker? Feel free to let me know in the comments!! And if you like the shaker - what are you waiting for?? Get your shaker card (including use of a die cut or embossing folder) into our February Die Cut Diva Challenge!! We'd love to see you in the gallery!!

That's it for today - have a crafty weekend!!

Tuesday, February 11, 2025

With Love event Class Four Cards

Hi everyone - Final day of cards I made in the fourth class of the online With Love event offered by Scrapbook & Cards Today (SCT) last Saturday. You can see a group photo of the batch of cards, what the session kit contained, plus the class one cards with Meghann Andrew HERE. You can see class two cards with Cathy Zielske HERE and class three cards with Dana Joy HERE

Anyone who knows Jennifer McGuire (the crafting GOAT) has heard of her "Share Handmade Kindness" mantra. SCT thought that would be a great collaboration for this event. Jennifer described how it all began & shared some stories of cards she's donated - very inspiring!

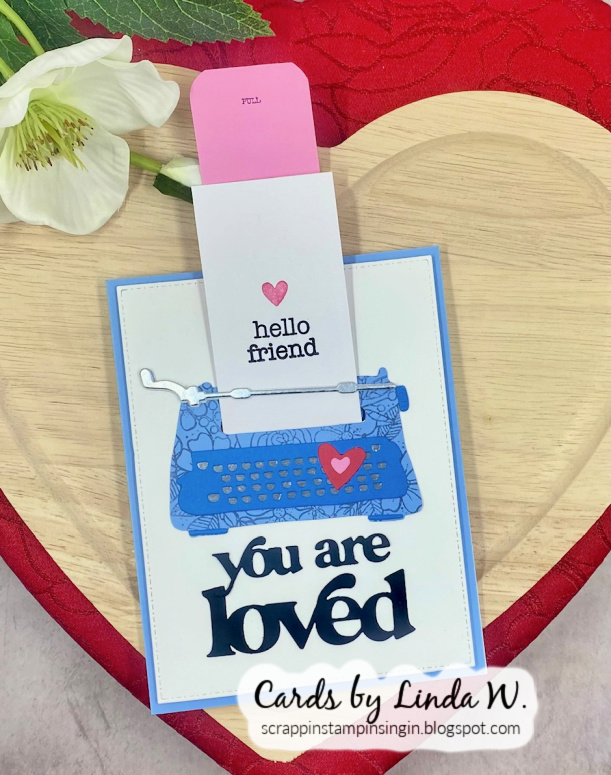
Card one is an interactive card - the white page pulls up from inside the typewriter to reveal the hidden message. Amazingly easy to put together - we did a lot of homework on this one! Jennifer mentioned she loves to inlay so would probably inlay all the typewriter keys - yikes!! For the class we just backed the keyboard die cut with silver.


Jennifer had us trim "so very" off the die cut sentiment for a different look. The typewriter is stamped with the bouquet stamp for some interest; you could also cut it in a patterned paper. I didn't photograph the card with the pull-out tucked in. Oh, Jennifer also trimmed her card to shorter than A2 so it would fit into an A2 envelope. Not me - I'll just pop it into a larger envelope!

Card two is a window card, different that Meghann's in that it's interactive. Putting it together gave me many problems. I'm still trying to decide if it's useable. 


Jennifer wanted the shutters to close over the window so when you take the card out of the envelope (with shutters closed), the shutters pop open. When assembled there was a gap in the center so they didn't look closed. Jennifer used solid color cardstock & cut a second set of shutters, trimmed off the tabs (that go behind the window assembly) & "cheated" in a bit when gluing atop the existing shutters. That way, they closed perfectly.

I had die cut my shutters with white backed cardstock. I didn't like the white on the inside so I cut a third set of shutters to glue over the white. Made a very thick stack and I don't like the look from the side, oh well. You can see in the photo how I tried to cover the white edge with a grey Copic.

The other element Jennifer did that I skipped was to have the window peek into the card's inside. She glued the bouquet panel to the inside where you'd write your message. Her inside message was a strip hidden by the Hello Friend on the front.

When I cut the hole for the window into the card front, my opening seemed too large. I ended up gluing the bouquet-stamped panel directly behind the window. Of course, detail loving Jennifer would've sandwiched acetate in the window but she left that step out in the instructions. I was just glad to finish this during class!

Jennifer did a bonus session called "Mix It Up". She turned the window box greenery and flowers into a wreath & the window curtains became a bow - so clever!! I don't have her engineer brain but I know I'll get a lot of use from this kit!!

To wrap up, SCT announced two more of these one-day events coming up in 2025. One will take place in July (holiday cards) and one in September (Halloween cards). Registrations will open to the general public on Feb. 14th; With Love participants could register now so I did! Products and instruction are first class - well worth your time and money!

Thanks for checking out my class cards & happy crafting!!

With Love event Class Three cards

Hey there - I'm back with cards I made in the third class of the online With Love event offered by Scrapbook & Cards Today (SCT) last Saturday. The day included four classes taught by Meghann Andrew, Cathy Zielske, Dana Joy & Jennifer McGuire, plus Jennifer did a little bonus session. You can see a photo of the batch of cards, what the session kit contained, plus the class one cards with Meghann HERE. You can see class two cards with Cathy HERE

The sweet Dana Joy taught at her first SCT event and did great. She has contributed to the Hero Arts blog and has a YouTube channel (@Dana Joy). 

Card one used some of the same supplies that Cathy used yesterday but in a different way. Dana showed us inking after die cutting the sentiment; I inked a white strip and die cut from it. That way I was able to make the sentiment at right in the phone by die cutting the shadow from the inked remainder. I backed it with a white shadow & then inlaid the inked bits and another white sentiment for more dimension. Dana made her hearts look more like a typewritten page; I cascade them.


Card two used the subway tile stencil Meghann used, plus a die that cuts little envelopes & a sweet string bow die. We also stamped sentiments and postmarks on the envelopes (except the hidden yellow one).


Card three used the floral bouquet stamp with coordinating stencils & die. Somehow I'd gotten black ink on my pink pad so my roses got dark, oh well - still useable. After die cutting the bouquets I arranged them in the corners, trimmed the excess and stamped the sentiment. The little bits trimmed off were saved for future cards.


That's it for today; I'll be back tomorrow with class four cards. Thanks for visiting!

Sunday, February 9, 2025

With Love event Class One cards

Happy Super Bowl Sunday! I'm writing this while listening to the game. Get it together Chiefs!!

I had a wonderful time yesterday at the online With Love event offered by Scrapbook & Cards Today (SCT). This was my first session with them and I LOVED it!! The day included four classes taught by Meghann Andrew, Cathy Zielske, Dana Joy & Jennifer McGuire, plus Jennifer did a little bonus session. She called it "Mix It Up", meaning she took event kit items and used them creatively. She loves to think outside the box! The day was opened and closed by Catherine Tachdjian, the owner/publisher, including prizes. Sadly, I didn't win anything...

Here's a shot of all the class cards I made (note: card 3 in row 3 is upside down - I didn't notice when I photographed):


And here's a shot of the kit contents (except the cardstock) - can you believe it? 45 dies, 2 stamp sets and 7 stencils, plus generous card stock for both card bases and layering - such an incredible value!! Oh, and a large mesh storage bag with the event logo came with it. You had to furnish your own colored cardstock. The instructors listed what they used but I dug through my own stash (mostly Recollections from Michael's and Paper Studio from Hobby Lobby), rather than order more. Die cut sentiments (with shadows) included: 
  • you are
  • so very loved
  • sending
  • here for you
  • you shine (not used for any class cards)


I'll post separate photos from one class each day for the next few days. Some classes also shared bonus cards which I may or may not have recreated. I'll share how I modified my card from what the instructors taught. First up, cards from Meghann Andrew's class; she coordinates online content for SCT:

Card one is a shaker with inked acetate (Ranger Patina Alcohol ink). Filler is from the kit's heart confetti die plus some mix I got at Michael's. My house is so dry and static-y that loads of mix stuck to the acetate. Oh well, some also shook freely. Meghann used darker cardstock & ink on her sentiment. I just love the subway tile stenciling!


On card two, Meghann did ink blending on her cups using the coordinating stencils. I chose to color my cups with Copic markers. The sentiments were stamped through the stencil after ink blending it (masking off for the "table").


On card three, Meghann used the flower center die to cut orange flower centers. I used some black enamel dots that came from Cindy (Escape to Stamping) for my upcoming birthday. Thanks again, Cindy!! I also used a different sentiment.


I also completed one of Meghann's bonus cards since I had done all the homework, including finishing card one the day before the event! She shared instructions for a second bonus card which I'll try to make at some point. For this bonus card, she had us using part of the negative that's left from die cutting the heart confetti.


I'll link up to Darnell's February NBUS Challenge #71 with card one since that was my first play with new supplies.

That's it for today. Thanks for stopping by and I hope to see you tomorrow for the second set of cards from the With Love event - class taught by the delightful Cathy Zielske.


Friday, August 30, 2024

Craft Roulette 230

Hello everyone - Happy Friday night!! I typically don't post twice in one day but I watched Craft Roulette Episode #230 live tonight & yes, I made my card during the show. Decided to just go ahead and post since I have a busy day tomorrow...


Supplies: Paper - Neenah Solar White; 
Hero Arts Layering Paper (retired);
My Favorite Things plaid
Stamps - Hero Arts Four Hearts (c2012 retired)
Other - Hero Arts & Memento inks;
Park Lane gems; printed sentiment

Mary Gunn FUNN had Lea Lawson (@LeaLawsonCreates) as her guest. Lea is a crafter plus the Marketing Manager at PinkFresh Studio. Here's what the wheel spun for us:


  • Project - Shaped Card: I made a postage stamp shaped card.
  • Colors - Peacock: I used blue/green/purple.
  • Element - Tall: I made a tall mini-slim card.
  • Random - XOXO: The heart I stamped is printed with XOXOs.

I die cut two mini slim sized postage stamps, scored the back one and adhered the front one. Added a mat layer die cut with the next smaller postage stamp. Stamped and white embossed the heart, then inked with green/blue/purple. Fussy cut it & added to the card with foam tape, then glued a stripe sentiment across it. Three gems completed the card.

That's it for tonight! Please stop back tomorrow for our last of the month Die Cut Diva post & thanks for visiting!

Sunday, February 18, 2024

Heart Frame Love You

Hi all - hope you're enjoying the weekend! I was having a lovely day with some shopping & card making until I logged onto the computer to post my card. I just read news of some tragic shooting deaths in a suburb southwest of me in the Twin Cities - horrible! My thoughts and prayers go out to the families of the victims. I'm sure they'll share more details during the evening news but it weighs on my heart!

Seems appropriate to be posting a LOVE card - wish there was more love in the world! I was reminded today by Hilary (Fiddling About) that she's hosting the February challenge at We Love Stamping. They're doing a Romantic or Anything Goes theme - your choice. I've been meaning to play & went the romantic route using a fave Hero Arts cling background stamp from 2009:


Supplies: Paper - Neenah Classic Crest Solar White;
Paper Studio Glitter; Hero Arts Pitch Black; Michael's A2 card
Stamps - Hero Arts CG129 Heart Frame
Dies - A Jillian Vance Design Stitched Dot Rectangle Backdrop Set;
(Love You dies in the Classic kit too but not the flowers)
Other - Copic Markers; Altenew Tea Rose Enamel Dots'
TH Distress Oxide inks - Spun Sugar & Kitsch Flamingo

I stamped the background on Copic friendly Neenah, then die cut it with a stitched rectangle. Sponged Distress Oxide inks on the edges, then colored the pattern with various red and green Copics. Gave it a black mat & adhered to a top fold A2 card. Next I die cut the sentiment multiple times, stacked & shadowed behind the glitter with black. Adhered to the card. I had a leftover white flower and some leaves from a previous card; colored them with Copics to match my background. Added a heart enamel dot to the center & added to the card - done!

I bought a kid's plastic craft tray in the Target Hot Spot last year - $5 or less. It has a nice surface with bins on either side & fits across your lap. I've been using it while watching tv - either to eat a snack or to work on crafts - very handy!! Some cable tv channel is having a Harry Potter marathon this weekend so I was watching one of the movies this afternoon whilst coloring my frame & assembling my card.

I'm also joining the current The Flower Challenge where you need hearts and flowers, plus the February Stay Crafty with a Blog Named Hero Challenge - "Do You Believe in Love?" I do, I do!

That's it, friends - thanks for stopping by & stay safe out there!!


Sunday, June 11, 2023

Yellow Rose Wreath

Hi everyone - hope you're enjoying the weekend! I spotted a beautiful yellow roses card by my friend Joanne (Ambrosia and Iron) yesterday and was inspired to get out my Altenew Garden Picks die set. These roses are such fun to cut and assemble! I decided to add them to a wreath and finished my card this morning.


Supplies: Paper - Authentique Promise & Jubilee 6x6 collection;
Park Lane A2 card; Paper Studio Paint Shop; scrap of brown & kraft
Dies - Altenew Garden Picks;
A Jillian Vance Design Stitched Dot Rectangle Backdrop;
My Favorite Things Sunflower Wreath;
Memory Box Floral Window (magazine freebie)
Other - Wplus9 Autumn Splendor enamel dots

I die cut two wreaths and three white flowers from the same MFT set. Arranged them with the Altenew roses & leaves atop a pale yellow gingham circle so it would stand out from the basketweave background. Decided to add a band of orange checked paper behind the circle. A sentiment from a MB die set (free in issue 97 of Die Cutting Essentials magazine) finished it off.

Joanne set the challenge Everything's Coming Up Roses at Daring Card Makers for this week and I wanted to play along. I've not played at that challenge before, despite being inspired many times by Joanne's creations on the DT. Thought it was past time that I joined in! Thanks to Joanne & the Daring Card Makers for the fun!!

My friend Betty (created by bjk) is the featured designer for the current TIC TAC TOE Challenge 212 and my card works for that too - center horizontal line Wreath/Free/Die Cut. 


Thanks for stopping by! Happy crafting!!


Wednesday, May 31, 2023

Last Day of Diva Tic-Tac-Toe

Welcome everyone - didn't the month of May fly by?! 

Today I'm part of the end-of-month post with Die Cut Divas for our May Tic-Tac-Toe Challenge. We're using products available at Frantic Stamper, our May sponsor, but you can use any supplies. Just remember to include a die cut or embossing folder & use a row from the board in your design. Here's my card:


 Supplies: Paper - Neenah White; Paper Studio Brights;
MFT black; Paper Studio Paint Shop patterned; American Crafts striped
Stamps - Hero Arts Key to My Heart (available HERE 
at Frantic Stamper; matching dies at FS HERE)
Stencil - Hero Arts Petal Burst (HERE at Frantic Stamper)
Dies - Hero Arts Nesting Hearts Infinity Dies (HERE at Frantic Stamper);
A Jillian Vance Design Stitched Dot Rectangle Backdrop Set
Other - Reflections gems; Memento Tuxedo Black ink; Versamark ink;
Ranger Sea Foam White ep; upcycled clothing ribbon


I had fun with the middle horizontal row of the tic-tac-toe board (Ribbon, the word Love, Heart), pulling out some newer Hero Arts with an old fave. I die cut a heart & stamped the word LOVE & white heat embossed it. Added some stenciling with my new Petal Burst. I stamped & fussy cut the sub-sentiment, stamped then die cut and colored the heart lock and key. Covered the gold with clear lacquer. Die cut some rectangle layers in red, black and print. Added some ribbon & done! 

Since the heart stamp set is getting first play here, I'll add my card to Darnell's May NBUS Challenge.

For my bonus today, I thought - what the heck - I'll do a "cover all" checking all the boxes! 


Supplies: Paper - BoBunny Penelope 6x6; Neenah white;
Paper Studio A2 card and Paint Shop 12x12 patterned
Stamps with dies - Hero Arts Garden Critters Bundle (HERE at Frantic Stamper)
Stencil - Hero Arts Petal Burst (HERE at Frantic Stamper)
Other - Copic Markers; upcycled ribbon; Recollections gems;
Vicki Boutin Warm Wishes stickers; Alex Syberia flowers from Marianne

I used a heart coverplate & die cut some chocolate colored patterned paper. Adhered it to a paint print pattern with some subtle gold spotches. Next I stenciled with cocoa ink using a petal stencil over the entire thing & adhered to an A2 card. 

Marianne (Marianne's cards 'n stuff) sent me some stamped/stenciled/die cut floral panels from Alex Syberia's Spring Garden set. Thanks again, Marianne! I'd cut one of them into two pieces & found one part worked perfectly as the flowers. Shaded them a bit with some Copics and a pencil, then added a bow of the upcycled white ribbon

I used a LOVE sticker by Vicki Boutin with a bitty YOU for my sentiment. I stamped, colored and die cut a couple butterflies and added a gem to each, plus 3 yellow gems to the big flower. Done!

Thanks for stopping and we hope to see you in the May Diva gallery by 9p Pacific today!!