Welcome to my blog!

Thanks for visiting my blog. As the title suggests, I love to scrapbook, stamp, and sing! I will share cards and scrapbook pages I create, as well as information about my music - Barbershop harmony.

Tuesday, February 28, 2023

Final Day for Gold at Die Cut Divas!

Hey everyone - today's your last chance to ener our February Die Cut Divas Challenge. I'm providing inspiration with the rest of the end-of-month team with the card below, plus I have a couple bonuses here! We're doing GOLD with our fabulous sponsor, Hero Arts

Supplies: Paper - Park Lane A2 cards (3 shades);
Neenah white for dimension on the ornament
Hot Foil Plate - Hero Arts Ornament Border
Dies - Hero Arts Bulb Ornament Infinity Dies &
Stamps - Hero Arts Holiday Foliage Messages
Other - Spellbinders Gold Foil; Versamark ink;
Ranger Princess Gold ep; retired Hero Arts gem;
Victorian Velvet Distress Ink 


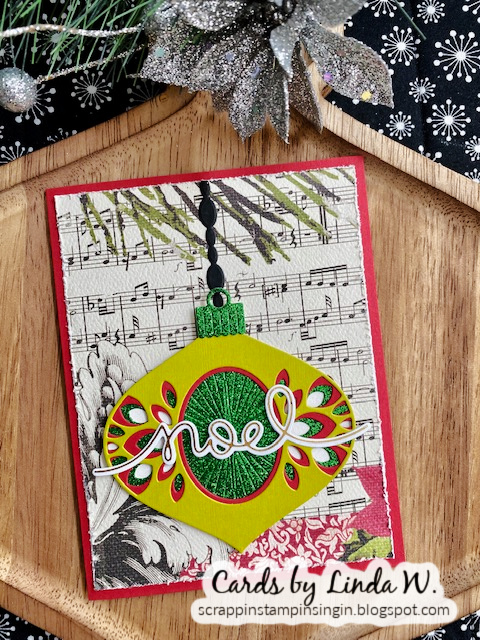
Process: Hot foil the ornament coverplate twice using Spellbinders Glimmer or similar machine. Die cut the ornament out of one panel, plus a few extra ornaments from white to layer for dimension. Shade the edges of the pink ornament with Victorian Velvet, then glue to white layers & add into its spot on the coverplate. Adhere to A2 card. Stamp sentiment in Versamark and emboss with gold. Die cut two bows and layer with a slight offset. Add to ornament with a gem in bow's center. 

Very quick and easy to get a gorgeous effect! I first made cards using the ornament hot foil plate during the Hero Arts Holiday Stamp-Along. You can see more versions here and here. First time trying gold foil with the ornament plate and I love it!! Too bad I've already reached my limit of 3 at the February Christmas Kickstart Challenge since my ornament would meet their theme - oh well. 

Here's a bonus for you - a gold foiled branch card:

Supplies: Paper - Neenah Classic Crest Solar White;
Paper Studio red; DCWV green; Tim Holtz Kraft Metallic gold
Foil & Cut - Hero Arts Holiday Greenery
Stamps - Hero Arts Holiday Borders and Icons & 
Other - Copic Markers R24/R59/G12/G20/G46;
Versamark Ink & Ranger Princess Gold ep;
Hero Arts Pale Tomato ink; foam tape

And here's a closeup of the branch - love it!!!


Process: Foil the branch onto Neenah, then die cut with the included die. Color with Copics. Stamp A2 card with poinsettia bold print stamp tone-on-tone. Stamp and emboss sentiment strip, then mat onto gold. Assemble card - done!

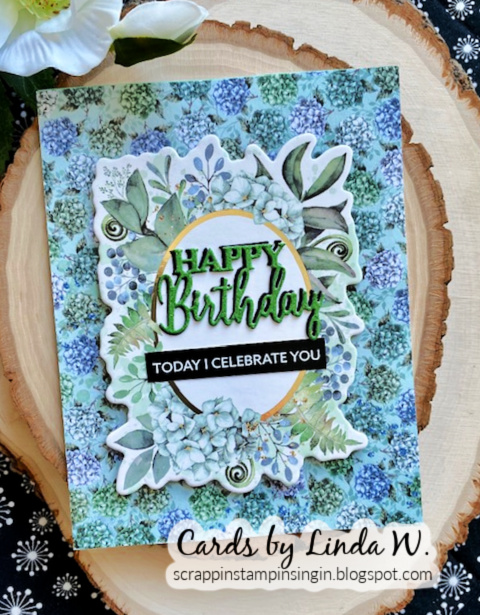
I'm adding the branch card to Darnell's February NBUS Challenge since my new greenery foil set got first play here. And as Darnell would say, how about a Threefer? I took the pink foiled panel left after I'd die cut the ornament out and decided to use it. Had to trim part of the design off since I wasn't careful to get the whole piece of paper on the hot foil plate - it worked though! I embossed the same sentiment directly onto the A2 card and added a gold topper to the ornament.


That's it for today, friends. Be sure to link your golden project using a die cut or embossing folder into the February Diva gallery by 9 pm Pacific Time today. Our winner will be randomly selected from eligible February entries and announced on March 3rd. Hero Arts has generously donated an amazing $50 gift card for our winner - yay! Thanks so much, Hero Arts!!

Thanks for visiting!


Wednesday, February 22, 2023

More Birthday Cards!

Hi there - hope you have good weather in your area. We got snow overnight - about 5" but "THE BIG ONE" starts later today. Stay safe!! 

I thought I'd pop in today with more February birthday cards. Busy month for birthdays! I shared some others on earlier posts but here are the rest. First up - cards for my Diva sisters Arlene (A Bit of This and That) and Cindy (Escape to Stamping) both of whom celebrated yesterday. 

Supplies: Paper - BoBunny Willow & Sage
Paper Studio glitter; Poptone Black Licorice
Die Creative Expressions Stacked Happy Birthday
Other - sentiment strip (brand unknown);
BoBunny Willow & Sage chipboard

I found some chipboard at a Tuesday Morning outlet that I thought matched paper at home - yes!!! Super easy to put together with a die cut sentiment and sub-sentiment strip. Funny story - I went to mail Arlene's card and grouchy postal clerk says "too rigid - that'll be the $5.95 package rate". Well, if it's a package, I'll make it a package, I say. I returned home and filled a padded envelope with the card and some die cuts. I visited a different post office where there were 3 smiling clerks ready to help. The sweet man who calculated my fee charged me $1.95 - the "large package" rate. Say what?! More in the small envelope but way less price - go figure. Anyway, Arlene got her small "large package" in time for her special day.

Supplies: Paper - Strathmore Cold Press Watercolor;
Paper Studio Watercolor Prints A2 card
Stamps with Dies - Hero Arts Wild Columbine Bundle
Sentiment Stamp - Hero Arts Say it All (retired)

For Cindy's card I used another Wild Columbine panel I'd stamped on watercolor paper during the recent Hero Arts Valentine Stamp-Along. I die cut this one with the coordinating die and watercolored with various water reactive inks. The A2 card is from a boxed set of watercolor patterns I got at Hobby Lobby - so gorgeous & in multiple shades. I'll spare you the story of the same grouchy postal clerk who waited on me when I went to mail this beauty! Sorry to Michelle (Just Another Nutter paper crafter), another Diva sister with a February bday - forgot to photograph your card, oh well. I'd stenciled a coffee cup using another find at Tuesday Morning - a Picket Fence stencil for under $3!

Here's a masculine card using 12x12 patterned papers from Echo Park's Transatlantic Travel collection (another TM find). A simple stamped & die cut sentiment (Many More Birthdays by Unity) finished it off. So easy! A retired pilot friend received this one & loved it!


That's it for today, friends. Happy crafting!!

Tuesday, February 21, 2023

Gold and more gold!

Hey everyone - do you love gold? If yes, then our February Die Cut Divas Challenge is for you! 

I'm providing inspiration at Die Cut Divas with the card below, using products by our fabulous sponsor Hero Arts. When I got into card making in 2007, Hero Arts was my go-to brand and still is! Love, love, love this company and their products, including My Monthly Hero kits (I own all but one). Can't forget to mention I'm a proud Hero Hostess from 2011, back when their Flickr group was active.

Supplies: Paper - Hero Arts Black Watercolor Paper
Tim Holtz Kraft Stock Metallic Classics gold & silver cardstock; 
Dies - Hero Arts Lily of the Valley
Stamps - Hero Arts Wild Columbine
Other - Versamark Ink & silver embossing powder; 
Tim Holtz embossing folder (name unk); foam tape


Process: Die cut lilies from silver & stem/leaves from gold metallic cardstock. Die cut and emboss an oval, trim to half. Arrange lilies and "hill" & adhere to black card, popping up a few flowers & the "hill" with foam tape. Stamp thank you in versamark and emboss with silver ep. Very quick and easy, yet so elegant!  

Here's a bonus for you - a golden matchbox!

Additional Supplies: Dies - Hero Arts Matchbox &

I couldn't resist adding the new Hero Arts Matchbox and Box of Chocolates die sets to my January My Monthly Hero kit. Adorable!! At about 4:44 minutes into the Hero Arts January product release video HERE, there's a quick tutorial on putting together the matchbox. So easy and fun to make! It would be great for gifting earrings or other small items. The full bow was cut twice, plus the center area an extra time. On one bow I trimmed the tails off and adhered the loops upside down to the bow for a layered look. Added the extra center with a foam dot then tucked the trimmed tails under the other ones.

And here's a photo of it open. My friends Linda & Lynn each received a matchbox with a little gift inside for their birthdays earlier this month. Not the pin shown; that one snuck in from my jewelry box just for the photo. 😊


I'm adding the matchbox to Darnell's February NBUS Challenge since it got first play here. 

That's it for today, friends. Please enter your golden project using a die cut or embossing folder into the February Diva gallery by 9 pm Pacific Time on the 28th. Our winner will be randomly selected from eligible February entries and announced on March 3rd. Hero Arts has generously donated an amazing $50 gift card for our winner - yay!

Thanks for visiting!


Monday, February 20, 2023

Final Ornament Card for Kickstart

Happy Monday! It snowed like crazy here for a couple hours this morning but it's the light fluffy stuff. The big blizzard supposedly will arrive tomorrow. I just finished my third and final card for the February Christmas Kickstart Challenge to use baubles/ornaments.


Supplies: Paper - Authentique Christmas Essentials 12x12;
DCWV lime green; Paper Studio cream, red and glitter cardstock;
Neenah black and Solar White 
Dies - Birch Press Design Twinkle Ornament Layer Set &
Christmas Ornament Pop Up Easel (base layer & cap);
Lawn Fawn Winter Big Scripty Words
Hero Arts Joy Ornament (retired but HERE at Frantic Stamper)
Hot Foil Plate - Lawn Fawn Winter Big Scripty Words
Other - Spellbinder's gold foil

I used a second piece of my chopped up 12x12 Authentique paper as Dawn (Dawn's World) did in her posts (here and here). Once again, I distressed the patterned paper edges with a Tim Holtz tool - this paper seems so vintage-y to me so I had to distress it! Adhered to A2 card. Die cut all layers of the Birch Press ornament, along with a hanger from the Hero Arts set. Assembled the ornament and glued to the patterned paper. Added a foiled Lawn Fawn sentiment - done! Super simple but so pretty! Here's a look at the piece of 12x12 patterned paper I've been chopping (see card one HERE).


Lawn Fawn sponsored the Divas in January and I placed an order that included the winter words hot foil plate. Yesterday I spent some time foiling various things including that entire set - how fun!! Perfect results and I love this new foil plate which matches the stamp set & coordinating dies.

Thanks again to Jo and her elf Bridget for a fun challenge! I'm adding to my Christmas card stash and that makes me happy!! 

Next I'm sharing a card I made yesterday following an extra LIVE session set up for the Spellbinders & Altenew FLORALS PICK N' PLAY CREATIVE COLLAB CLASS that I took February 9th - 11th. Lydia Evans from Altenew came online and shared two cards, one of which was a shaker with an embossed top using Spellbinders products from the class kit. Here's my take:

Supplies: Paper - Park Lane A2 card; Neenah Solar White;
Paper Studio glitter
Embossing Folder - Spellbinders Four Petal Floral 3D
Dies - Spellbinders Thanks Enclosed Sentiments
Other - Darice and Spellbinders sequins;
Waffle Flower Infinity shaker; Hero Arts gold & reactive inks
Hero Arts White Iridescent Shimmer Mist

I started with a Neenah white panel and ink-blended a variety of Hero Arts reactive inks. Spritzed with a bit of water and then some shimmer mist. Ran it through with the embossing folder once dry. Inked a few spots (as Lydia showed) with some gold ink. Fussy cut out the center for a window to the shaker element. Created the shaker with an A2 infinity pouch. Lydia put her sentiment inside the shaker but I just glued mine to the top of it.

Since my Spellbinders ef is new, I'm adding card two to Darnell's February NBUS Challenge. The Lawn Fawn sentiment set is new too but I'll just link one card.

Thanks for visiting & have a crafty day!! I'll be back tomorrow with some gold items for the February Die Cut Divas Challenge - hope to see you there!!

Happy crafting!!


Sunday, February 19, 2023

Glittery Ornament Trio

Hey everyone - hope you're having a lovely weekend! I finished another card yesterday for the February Christmas Kickstart Challenge to use baubles (aka ornaments in the great US of A). 

Supplies: Paper - Authentique Christmas Essentials 12x12;
Paper Studio green and glitter cardstock;
Neenah black and Solar White (distressed with Antique Linen Distress Ink)
Dies - Memory Box Newbury Ornament Vignette (retired);
Sentiment Stamp - Hero Arts MMH kit 11/19

My apologies - I used a bunch of retired products here! With this card I made the effort to use some of my 12x12 papers as Dawn (Dawn's World) did in her posts (here and here). I have the other 5 panels I chopped from this collage patterned paper by Authentique (a 2015 collection) but just haven't had a chance to use them yet. More to come....

I distressed the patterned paper edges with a Tim Holtz tool. Adhered to A2 card. Die cut 3 of the smallest ornament outlines from the vingette in black, trimmed them and glued to the patterened paper. I had the glittery innards left from a bunch of cards I made last fall like this one where I just used the outline. Inlaid those into the outlines. Added a stamped and fussy cut sentiment - done! Very quick and easy.

Thanks again to Jo and her elf Bridget for a fun challenge! And thanks to you for stopping by!

Happy crafting!!


Tuesday, February 14, 2023

Happy Valentine's Day!

Hey everyone - it's that special day for romance, candy & flowers. Yes, Valentine's Day! It's also my birthday & that of my friend, Lynn. I made her this card to celebrate: 

Supplies: Paper - Park Lane A2 card; Neenah white;
Tim Holtz Kraft Stock Metallic Classics gold cardstock; 
Dies - Hero Arts Heart Flourish Cover Plate &
Stamps - Hero Arts All Occasion Messages (retired)
Other - Hero Arts Hugs and Kisses Hero Transfers

Process: Die cut background from gold cardstock. Trim & mat onto A2 card. Die cut 3 hearts (5th one in the Infinity set) - one in lilac, two in heavy white cardstock. Trim the rub-on to leave off "day" and one heart; apply to lilac heart. Stamp Birthday below the rub-on and apply the trimmed off heart, plus one more (it has an outline square on the sheet but I trimmed that off too).  Adhere to gold heart.

Had to laugh, the rub-ons work so well, I dropped the little trimmed heart onto the diecut heart and it stuck at a wonky angle! Oh well...there it stayed! A tip from years ago: Use the backing paper from the rub-on to help "set" it. Place it over the rub-on you've applied, slippery side down and gently rub over it. Stack the lilac heart onto the white ones for dimension and add to the heart on the cover plate - done! 

Very quick and easy, yet so elegant! We're doing GOLD for our February challenge over at Die Cut Divas (hope to see you there!!) so Lynn had to get something with gold on it - LOL. I'm adding this to Darnell's February NBUS Challenge since my cover plate got first use here. If you're just here for the card, you can skip the rest of this photo-heavy post with birthday stuff.

Our friend Linda (birthday on the 7th), Lynn & I enjoyed a fun lunch at a Red Lobster restaurant on the 10th. Here we are sipping our celebration margaritas:


The sweet server (she took our photo) also has a February bday! She treated us to a jumbo sundae in a margarita glass:


I received many birthday cards, including from card-making friends around the world; here's a quick photo as of the 13th's mail delivery:


Special thanks to Cindy and to Gundi for some extras in the package - oh my, what bounty - thank you!


Thanks everyone for making my birthday special; I loved all the cards and goodies!! If you stop back for my Diva post on the 21st you can see what I gave Linda and Lynn. 😍 I'm off to enjoy lunch with my friend Connie later today and will probably find more cards in the mailbox!

Happy Valentine's Day & Happy Crafting!


Monday, February 13, 2023

Gold on Cream Ornament Vignette

Happy Monday everyone! Extremely happy for me since the Kansas City Chiefs won the Super Bowl last night, despite being predicted to lose! Being from Wisconsin I'm a Packer-backer and living in Minnesota I have to cheer the Vikings (except when playing the Packers). Once both of those teams were out of the running, I had to throw my support somewhere & it went to the Chiefs. They are so fun to watch! The game was in Arizona and the planes flying over the stadium also flew over my sister's house - she loved it but said they were extremely LOUD!

On to a card... today I made a quick one for the February Christmas Kickstart Challenge to use baubles or, as we call them here, ornaments. Thanks to Jo and her elf Bridget for a fun challenge!

Supplies: Paper - BoBunny Winter Wishes 6x6;
Paper Studio cream and glitter cardstock
Dies - Memory Box Newbury Ornament Vignette (retired);
My Favorite Things Torn Paper Edges
Other - Taylored Expressions sentiment strip

I'm so behind on my Christmas card production that I turned to an ornament vignette die I used a few times last year, including on a card that won the final CAS Christmas Challenge last September. I didn't want to duplicate that design but did want to keep just the outline. Decided to put a gold glitter vignette on a cream panel that I trimmed using MFT's torn paper die - love this edger die! Added to a A2 card covered with a piece of BoBunny pine cone paper -such a pretty cream/taupe combo. I distressed the patterned paper with a Tim Holtz tool. A TE sentiment strip popped up with foam tape finished it off. Very quick and easy - I'll probably make a few more!

I was going to try using some of my 12x12 papers as Dawn (Dawn's World) did in some recent posts (here and here) but I remembered the BoBunny paper. Went for that instead this time but I'm still going to search the 12x12 papers & try that technique!

Thanks for visiting and have a wonderful day!!


Sunday, February 12, 2023

Sending Love!

Happy Super Bowl Sunday everyone! After the big Spellbinders/Altenew event the past few days, I spent this morning doing some crafty clean-up so I could do a Hero Arts Make-Along this afternoon. Once a month HA offers a free LIVE (Facebook - watch the replay HERE - or YouTube) session doing a project using the previous month's kit. So after my crafty clean-up, I pulled out the January 2023 My Monthly Hero Kit (still available as of this writing) and separated all the ganged dies to get ready. They offer a pdf of the steps so I knew to get out certain kit stamps, plus my Copic markers. Here's my card:


Simply die cutting, stamping, ink blending, coloring & embossing - done in about an hour. Perfect for an anniversary or Valentines Day! Love the little faux matchbox with the emblem and the coordinating die cut doves! Channin Pelletier created for the LIVE. Had to laugh - she's in AZ and didn't even know which teams are playing in the big Bowl tonight! Must not be a football fan :)

Here's what you get in the kit - such a great value at only $36.99.


Speaking of Hero Arts, they are sponsoring the February Die Cut Divas Challenge! Pop over and check it out - we're using GOLD on those projects so don't confuse today with that - LOL! I'll add my card over at Darnell's February NBUS Challenge since I'm newly using my January 2023 MMH set.

Thanks for visiting and I'm trying to catch up on all I missed on my friends' blogs these past few days! Happy crafting and Go Kansas City!!


Saturday, February 11, 2023

Fun with Florals - a Spellbinders/Altenew Collaboration event

Hey everyone - I've been busy the past few days with an online event co-sponsored by Spellbinders and Altenew. Four classes (2 Thursday and 2 Friday) were done with pre-recorded video so you could take them any time. Then today we met on Zoom for a LIVE with Kim Kesti from Spellbinders and Lydia Evans from Altenew. A detailed handout came with each of the classes but nothing for the LIVE yet. Sadly, there were some access issues with the LIVE today so hope you weren't one of those affected - I wasn't, thankfully.

I thought I'd share my versions of the class cards, plus the card I made using what Lydia Evans taught in the LIVE today; I'll try to make Kim's cards later. Just five cards to share so not too photo heavy, I hope! We used new supplies from both companies - Spellbinders has added them to their store now but Altenew's aren't on their site yet. I added links where available.

Class one with Yana Smakula - Monachrome Florals! Purple - my fave!!

Supplies: Paper - various Spellbinders
Stamps - Altenew Folk Art Flowers (sentiment)
Dies - Spellbinders Four Petal Bloom Reflection
Embossing Folder - Altenew Folk Art Flowers 3D
Other - Versamark ink, gold ep, foam tape

Yana loves dimension so loads of foam tape here! Such a gorgeous die set - it cuts one of the background panels and all the topper flowers - this card features two cuts of everything. The flower centers were cut from a little piece of Spellbinders glitter foam cardstock included in the kit package - so fun & it cuts like butter! 

An A2 purple panel was partially embossed at top then flipped and partially embossed at bottom - a bit tricky since the embossing folder is a big square and I was using a Platinum 6. Then assemble all your die cuts - a bit confusing the first time through but much easier once you know what goes where. The supply kit came with a bitty label which I messed up while embossing. Fixed it by embossing on Lawn Fawn paper and die cutting into a circle which I glued over my boo-boo,

Class two with Lydia Evans - Double Colored Die Cuts!


Same supplies for this one but we also used the coordinating die for the Folk Art Flower. Die cut three of the flower, then embossed each one and adhered them atop an A2 card to create the background. Lydia used white cardstock to die cut all her 4 Petal Bloom Reflection pieces, then inked/shaded them. I did that for some but mostly used Jennifer McGuire's trick of starting with colored cardstock, then shading. I used different colors than she did & also added a golden shadow layer to the green base.

Class three with Jen Rzasa - Regal and Radiant!


Jen had us do the angled embossing on an A2 panel then fussy cut it. Used the coordinating stencil to color before popping onto the card base. I found these stencils confusing at first use - hope to improve! I stamped birthday from the Altenew set and die cut happy with vellum shadow from the new Spellbinders Thanks Enclosed Sentiments. My dots are some extra glitter foam flower centers I die cut - love!!

Class three with Carissa Wiley - Bold and Opulent Colors to Create a Statement!


I photographed this on my Valentine candy box so the delicate peach card would show up better - so gorgeous with the teal panel stamped tone-on-tone with the Altenew Folk Art Flower. I cut my teal on 3 edges with the deckle die from Altenew's Mix and Match Frame Set - Carissa left hers straight. I also changed up my flower colors.

Card I made from today's LIVE with Lydia Evans:


We did a shaker with the base layer embossed, then stenciled. I inked the edges of my top layer to soften the white but mainly to cover a nick of purple from my finger - lol. Shaker bits were included in the supply kit they coordinated. I used a different sentiment from the Spellbinders die set - such a fab new set.

That's it! Whew - a lot; time for a nap! I'll share card one at Darnell's February NBUS Challenge since my Four Petal Bloom Reflection set got first use there.

Thanks for stopping by and happy crafting!!


Thursday, February 2, 2023

January 2023 Card Chain Reveal!

Welcome to the January 2023 Card Chain Challenge reveal - we're celebrating January cards that headed around the world! Twenty-five people participated this time & you can see the full reveal HEREI sent the card below to Patricia (Pineywoods Papercrafter) in Texas USA:

Supplies: Paper - Lawn Fawn All the Dots Petite;
Pink and Main Enchanted Garden 6x6; 
Paper Studio glitter; Poptone Black Licorice
pink card base by unk
Stamps - Hero Arts Fun in the Rain 
& Newspaper Eiffel Tower (both retired)
Dies - My Favorite Things CHEERS
Other - Hero Arts Taffy Reactive ink;
Recollections cocktail sticker; Copic Marker C2

I used the sketch, a couple theme elements & one technique option:

Sketch Option


Theme Options: Cocktails / Elephants / Friendship

Product / Technique Options: Distress Ink/ Oxide / Ombre

I started out with a candy floss pink card base but skipped the other two colors (bubblegum & mulberry) from this month's color option. I masked off all but the upper left diagonal and blended taffy ink in an ombre fashion. Next, I stamped the newsprint using the same ink. Then I stamped the elephant on Lawn Fawn dotted paper, shaded with a C2 Copic & cut out. He's actually raising an umbrella on the stamp but I trimmed that part off and added the cocktail sticker in its place. Cut a strip of Pink & Main paper for the sketch element and to ground Mr. Ellie. Die cut the CHEERS twice and used the black layer as a shadow. Made the sentiment wonky since Mr. E has imbibed a few already - LOL.

I'm still waiting on a fabulous card from the amazing Joanne (Ambrosia & Iron) in the UK; sadly Royal Mail had some issues in January. When I rejoined the Card Chain back in 2020, Joanne was the first person I sent to - Feb 2020. Then she mailed a card to me in March 2020 and I'm looking forward to the day her January 2023 card arrives! **Update - rec'd it on February 13th and well worth the wait - so fun and colorful; thanks Joanne!!**


You have until February 6th to sign up for the February chain - go HERE for all the details.

Thanks for stopping and have a crafty day!!

Wednesday, February 1, 2023

Inspired by the Hero Arts Valentine Stamp-Along

Hey everyone - you might have spotted my Saturday post sharing my cards from the Hero Arts Valentine Stamp-Along. Such fun with many great tips! Along the way, be it during the homework session (held on a Facebook Live last Wednesday) or the event, I stamped, die cut and foiled extra items. Plus there were leftover bits from some class cards. Anyway, I created five more cards on Sunday & yesterday so thought I'd share them.

First up, a card using the negative from Erica A-B's class. We had stenciled the columbines, then die cut the word LOVE out of the stenciled area. I used a full A2 panel so had a lovely negative to use. I die cut it with a stitched rectangle and adhered it to an A2 card. I had foiled an extra red panel with hearts during the class so die cut LOVE from that panel, along with a heart for a future project. Inlaid the LOVE and added a sentiment strip that I'd stamped, white embossed & fussy cut. Left the rest plain.


Next I have three cards using concepts from Laurie Willison's class. In homework she had us stamp 4 colombine panels for the class - I stamped 8 so I'd have extras. I'll probably do another birthday card similar to the 3rd card below with my 4th extra panel. The heart on the thank you card was left over from the class; we had die cut it from one of the panels and stamped within the negative space. I added some inking on the white edge, lined it up with the outline and popped it up with foam tape. The middle card has simple masking and the 3rd card has the flowers die cut and then backed with 2 more die cuts for dimension after the masked inking. Then just pop it back into the outline & add a sentiment - so quick and fun!


And finally, another watercolored columbine inspired by Channin Pelletier's class. I flipped the panel and used more pinks; I felt my watercolor dribbles were more successful this time. After spritzing with water you blow the puddles with a straw to move them around.


You can't buy the columbine set in the Hero Arts store yet; it was first available to Valentine Stamp-Along attendees. I believe it's coming out with the spring release on Feb 20th. The Love You Stamp and Cut XL set was used constantly in the session, along with the Nesting Hearts Infinity Dies and Hearts Hot Foil Plate.

Hero Arts is our fabulous sponsor at Die Cut Divas this month! Check out our February Challenge HERE - we're using gold! I'll be doing my usual Diva post on the 21st but you'll see me back here before then. Meantime, please be inspired by my Diva teamies at the challenge link!

Thanks for stopping and I hope I didn't bore you with more versions from the Stamp-Along! I'm adding card one to the current Stay Crafty with a Blog Named Hero Challenge to do Crazy Love.