Welcome to my blog!

Thanks for visiting my blog. As the title suggests, I love to scrapbook, stamp, and sing! I will share cards and scrapbook pages I create, as well as information about my music - Barbershop harmony.
Showing posts with label Simon Says Stamp. Show all posts

Saturday, October 4, 2025

World Card Making Day Part 2

Hi all - I'm back with a second post today, sharing a card I made while watching the online WCMD Scrapbooks and Cards Today event on YouTube (link is to full playlist). There were six wonderful presenters, each sharing cards and products. My card, though, mostly uses stuff from Simon Says Stamp.


Supplies: Paper - Recollections A2 card;
Lawn Fawn Plaid & Watercolor Wishes;
TH Distress Watercolor; scraps
Stamps with dies - Tim Holtz Festive Watercolor Bundle (sold out)
Dies - Simon Says Stamp Cute Cardinal;
Memory Box Bello Joy;
Other - foam tape; SSS Starshine dots;
white gel pen

The darling cardinal was a SSS Stamptember exclusive & is out of stock. I die cut it from scraps & assembled, adding some white gel pen details. It's been sitting on the craft desk waiting for a home. I was inspired to add it to some foliage from the Tim Holtz event I did on Sunday. 

Die cut some stitched rectangles and inked the edges. Added to an A2 card. Adhered foliage arrangement on the left of the blue rectangle and popped the cardinal onto it with foam tape. Added the die cut sentiment, also with foam tape. Some SSS crystal dots left over from the TH event finished the card.

I'm sharing my card at the Simon Says Stamp World Card Making Day celebration and at Darnell's October NBUS Challenge #79 since my cardinal is newly used. Also, there's a gallery HERE for anything made for the Tim Holtz Festive Workshop event so my card will head there too.

I also participated in the Craft Roulette World Card Making Day 2025 online event. Hosts Mary & Amanda had a new guest every half hour, each making a card with the parameters I shared in my earlier post today. Since I'd already posted a CR card in the wee hours this morning, I could only post a bonus to the members section. It doesn't count toward the weekly participation cards. The bonus still uses the same parameters of "saying hi", crisp colors, sun, & pennants.


Supplies: Paper - Recollections A2 card and blue cardstock;
Neenah Classic Crest Solar White;
Paper Studio orange & yellow; scraps
Spellbinders Under the Sun &
Stitched Taking Notes (DOMST-Apr25)
Other - foam tape

Simple die cutting and assembly, then done! The backdrop is a stitching die but I left it unstitched. If you'd like to see it stitched, I did a card that way HERE.

Thanks for stopping by & have a crafty weekend!!


Friday, March 3, 2017

Tag You're It on Simon Says Stamp

Happy Friday everyone! Both my friends Lin & Virginia inspired me to create a tag for this week's Simon Says Stamp Wednesday challenge.

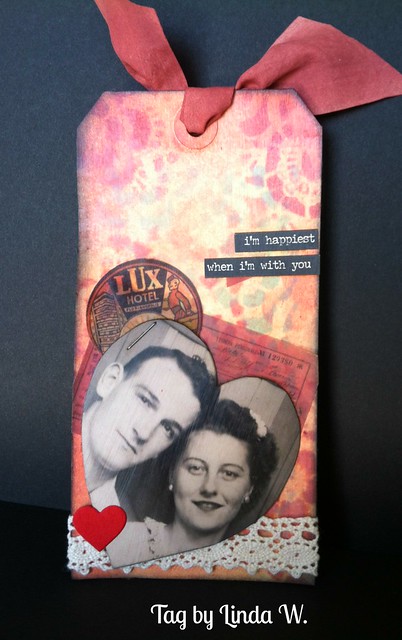
Having taken all three of Tim Holtz's Creative Chemistry classes, I have a lot of Ranger products, many purchased from Simon Says Stamp. My new Distress Oxide inks were purchased locally but I ended up paying more for them - willing to do that to have them already, but I only bought four colors to start. Now that I know I like them, I'll probably order some more through SSS. Here's my tag:

Happiest with you tag
Supplies: Ranger #8 Manila tag;
Dies - Hero Arts DI334 Nesting Hearts Infinity Dies
Tim Holtz Ideology  Expedition Vellum Ephemera; Found Relatives; Small Talk Stickers
Tim Holtz Mini Stencils #6 (the lacy one of the three)
Tim Holtz Distress Oxide Inks - Cracked Pistachio and Fired Brick; Black Soot Distress Ink
Tim Holtz Distress Vintage Collage Medium
Lace and Ribbon by unknown; staple from a regular office stapler

I started with a new-to-me mini stencil set, stenciling it directly over a #8 tag with Cracked Pistachio. Then I rotated the stencil and used Fired Brick in random spots. I misted it to activate the shimmer properties - so pretty in person. Jennifer McGuire said in her post with introductory video on these inks that they are very forgiving and correctable when you have a blob - totally agree!! If you're expecting the same dark red as the regular Distress Ink for the Distress Oxide, it's not - more like a rich salmon color. Decided to add some vellum ephemera & then had fun sifting through the Found Relatives box to find an image for my tag. Ended up cutting it down into a heart shape like my grandma used to do when popping a couple into her photo album. I coated the tag, vellum elements and photo with the vintage collage medium. I added the lace later to retain the bright ivory color. There was a funny spot on Mr's shirt in the photo so I put a heart die cut over it - hidden, yay! Couldn't find my TH inkable ribbon so I used a scrap I got from a friend - brand unknown. Oh my, it didn't want to ink like the TH ribbon but I worked at it and finally got it colored to match.

Still managing to color something each day for Kathy's 30-day Coloring Challenge; today it was a bear to join my duck and pig.... Thanks for stopping by and hope you have a great weekend!

Wednesday, June 29, 2016

Heart Sachets

Hi everyone - Valentines' Day is my favorite holiday and I love heart stuff! When my friend Lin blogged back in April about the new Simon Says Stamp plush heart dies, I was enthralled! I went right over to SSS and ordered two sets. I couldn't decide on just one and why should I?! Thanks for the enabling, Lin!!

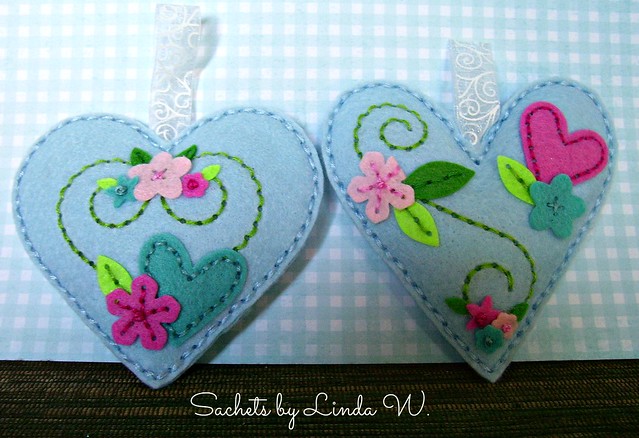
It took me a while before I had time to play with them, but I finally made the effort earlier this month. I was planning a trip with my friend Heather Maria and her family. I wanted to take her something special that I had handmade so that's when I got out the SSS plush dies. I decided a sachet would be fun to make. Here are my first two (and only, so far) attempts:

sachets
Supplies: Dies - Simon Says Stamp Plush Blooming Heart - S376 & Plush Charmed Heart - S377 
Felt, Fusible Interfacing & filling from JoAnn's; DMC embroidery floss; May Arts ribbon; fragrance pouch from Michael's 

I started by making the one on the left but couldn't resist making another so did the one on the right (Heather got that one - more on the trip later...). I bought a bunch of different felt colors, then cut the hearts in powder blue (2 of each) and the embellishments from teal, pink, rose, chartreuse, & green. My Vagabond got a workout that night!! So, I'm making sachets but what do I get for fragrance?? I didn't want to use the dried flower potpourri stuff. I ended up buying some of those envelopes that you normally leave sealed and throw into your dresser drawers. I opened one up and what's inside looks like clay crumbles - very fragrant - as in so strong, I was sneezing a lot! Knew I didn't want to use much of it and I didn't want it to stain my felt!! What could I do??

I ended up buying some fusible interface and I diecut two heart shapes for each sachet from the interface. I put a bit of the scented clay inside of one, popped a second atop, and sealed them with my iron. I trimmed the pouch down, cutting off most of the stitching holes but left a few at top and bottom to anchor it inside the felt hearts. I stitched the ribbon hanger onto the scented pouch and, when I stitched the pouch inside the felt hearts, I used some plush filling to fatten them up. I stitched all the embellishments onto the front hearts before adding the pouch, plush and back, then stitched together. I used a hot glue gun to adhere the bitty flowers. 

The shapes are fun to stitch and you can put together a sachet in an afternoon. The hardest part was putting together the sachet pouch but it was well worth the effort! If I had been more ambitious, I could've make a bunch of these for our chorus fundraiser in May.....oh well! I was lucky to make two - prototype for myself and a second one for Heather. I know she really liked hers - mine is still sitting in a bag from showing it to some friends. Really should get it into the closet!

Thanks for stopping by and I hope you're having a fabulous week!!