Welcome to my blog!

Thanks for visiting my blog. As the title suggests, I love to scrapbook, stamp, and sing! I will share cards and scrapbook pages I create, as well as information about my music - Barbershop harmony.
Showing posts with label Color Layering Stamps. Show all posts

Thursday, September 8, 2022

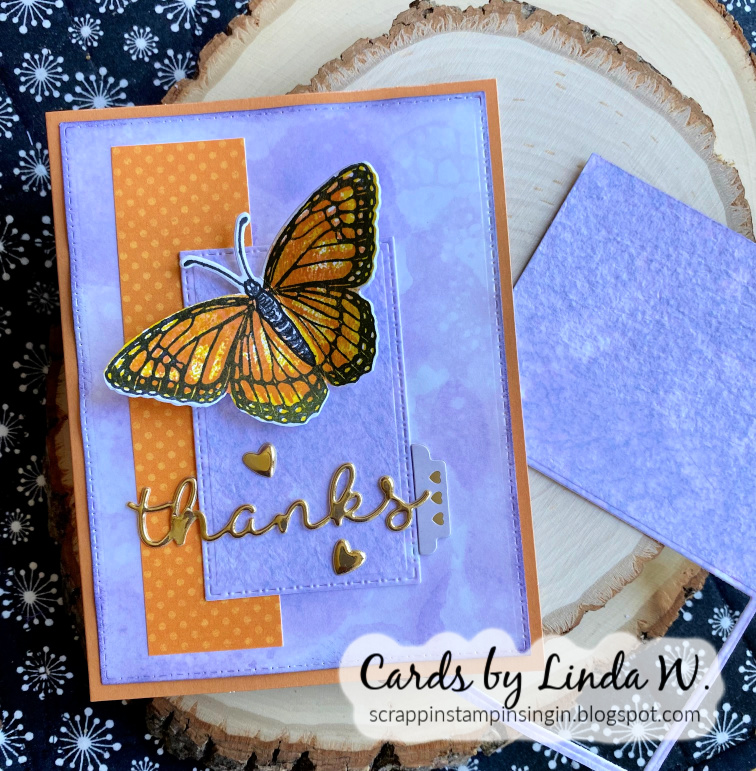
Butterfly with Gesso Dots

Hey everyone - I hope you're having a great week! After the holiday weekend, I'm struggling to remember what day it is - does that happen to you? Anyway, I'm glad it's only Thursday!

The talented Hilary (Fiddling About) hosts this month at CAS Mix Up and asks for stencils & gesso. Since I know Hilary through the Card Chain Challenge, I thought I'd make the effort to play along! If I ever had any gesso, I can't find it in the stash so I went out and bought some. I got it in the art area at JoAnn's and it's very thin - oh well, live & learn....

Supplies: Paper - Park Lane A2 card; Neenah white;
Poptone Black Licorice
Stencil - Hero Arts Chevron Stencil Pair
Stamp with die - Hero Arts Color Layering Monarch Butterfly
Die - A Jillian Vance Design Stitched Dot Rectangle Backdrop Set
Other - Artsmith Gesso, Tim Holtz Mustard Seed Distress Ink

I've had this Hero Arts stencil set for ages and decided to give it some love. I had a thought to do a border for another butterfly I had sitting here. I applied the gesso through the stencil onto a white stitched rectangle and left to dry. Came back later and blended Distress Ink slightly off to further off the dots - sorta hard to see in the photo. Matted it in black and glued to an A2 card. Cut a TE sentiment strip into 4 bits and added going down the border. Curled the wings up on a monarch and popped up with some foam tape - done!

Thanks to Hilary and the CAS Mix Up Team for a fun challenge! Since it was out on the craft table, I also used some gesso with a new stencil for an upcoming Die Cut Divas project. Please watch for it on the 21st and if you have an Anything Goes project, be sure to upload it to our September gallery.

Thanks for stopping!


Friday, September 2, 2022

August 2022 Card Chain Reveal

Hey crafty friends - another month has flown by and it's time to reveal cards that zipped (or sometimes crawled) around the world via snail mail. Twenty-nine people participated in the August Card Chain Challenge - you can see the full reveal HERE. My card found its way across the pond to dear Jo (Jo's Blogs) who, like me, had Covid 19 this summer. Thankfully we both recovered quickly!

Supplies: Paper - Parklane A2 card, Neenah white:
My Mind's Eye The Sweetest Thing; Michael's green
Stamps - Sunny Studio Captivating Camellias;
Dies - Sunny Studio Frilly Frames Eyelet Lace &
Other - enamel heart from a Hero Arts kit; various inks


Colour Palette Option
Sketch Option
Big surprise - NOT - I went with the colors, sketch, and theme of friendship. I even popped some flowers on there (one of the other themes) but no fruit. I was eager to use - finally - the Sunny Studio Captivating Camellias color layering stamp set I bought when it was released January 2021. Not bad, a year and a half to use something....sorry, Mendi!

As usual, I die cut a bunch of white flowers and leaves and popped them into the negatives to stamp with my MISTI - makes a great assembly line for each layer. I stamped my flowers in various shades of purple for the color grape - one was even named Grape Juice. That color was pretty dark so I stamped the final layer in silver to get a softer look in those spots. I used three shades of green for the leaves, including Lime Green. Really liked how these turned out and, like many examples I saw at Sunny Studio, I skipped stamping the yellow flower center layer - just left it white.

The sketch seemed to include a mat layer so, to make it extra feminine, I used a fave Sunny Studio Frilly Frames Eyelet Lace. I found the perfect kumquat card base & floral patterned paper to echo my camellias and used a scrap of lime green for my sentiment label.

I received this darling card from Joanne in California. Aren't those little fishes the cutest?! Such a fun, decorated envelope too - thanks, Joanne!!


That's it for today. If you haven't already signed up for the September Card Chain, you can still link up by September 6th.

Thanks for stopping by and have a crafty day!!


Tuesday, August 30, 2022

Monarch Butterfly Trio

 Hey everyone - I'm popping in with a trio of cards featuring the Hero Arts Color Layering Monarch Butterfly stamp set! Here's card one:

Supplies: Paper - Park Lane A2 card; Poptone black;
Neenah white; scrap of orange; My Mind's Eye Rosy pattern
Stamps - Hero Arts Color Layering Monarch Butterfly (with die)
Dies - A Jillian Vance Design Stitched Dot Rectangle Backdrop Set;
Inks - Memento Tuxedo Black; Tim Holtz Mustard Seed Distress Ink;
Hero Arts orange from some MMH kit

When this Hero Arts set came out in 2019, I passed on it since I already had oodles of butterfly stamps. On Friday, though, I found myself wandering around a Hobby Lobby & spotted this set on clearance. Practically free, as I like to say - less than $4!! HL doesn't carry the dies so I figured I'd find them online. Hero Arts was sold out as were other places I normally shop online. Hmmmm - then I remembered a clearance bin of frame cut sets for various brands that my favorite paper warehouse Anchor Paper has. Decided to check there and found the die set, again, practically free - in this case $2. I ended up buying two sets so I could cut multiples. I also bought the sentiment at Anchor Paper - in the regular sale area but at a lovely price. Frantic Stamper carries it too so I linked there.

I didn't like my first attempts at color layering the butterfly. I usually die cut a bunch and use the negative to pop the die cuts into for stamping. For my earliest ones I stamped the outline layer first. For the later ones (I cut a total of 9), I started with the orange layer and found I could line them up better. I used the acetate packaging with the outline to help line up my negative around the orange layer. Worked very well! I stacked the sentiment and put an orange shadow - had a hard time photographing it in focus, oh well - it's ok in real life.

Since this was my first card using of the butterfly set, I'm linking to Darnell's August NBUS Challenge.

Here are two other cards using butterflies from my assembly line stamping:

Additional supplies: Penny Black Eloquence sentiment

Additional supplies: Ephemera from Spellbinders May 2022 card kit

For card three I made a bubble background - my friend Betty shared her card with this technique HERE, linking to a fabulous Christine Stokes video which I enjoyed thoroughly. Just had to give it a go! I tried two different types of card. The largest rectangle was a lightweight cheap white card stock from Michaels. The small rectangle was cut from a superior Hero Arts Handmade Watercolor Paper. Such different effects from the bubbles and both beautiful. The lightweight card warped heavily but I managed to flatten it for the most part...I'd use a heavier weight card next time. You can see to the  right where I die cut the smaller rectangle from the larger watercolor. I found a fun way to get max coverage on my paper and that was to hold it over the water vessel (in my case a plastic drinking cup) and blow bubbles into the cup until they reached the paper. My cup was very full of liquid so it didn't take much blowing with a straw to get a lovely foam. Then I just assessed and moved the paper into more bubbles. Anyway, thanks to Betty for sharing the link - this was fun!!

Thanks for stopping and have a crafty day! Be sure to check back tomorrow as I'll have a last-of-the-month Diva post for you :)


Thursday, July 22, 2021

Two birdie cards!

Hey crafty friends - I finally got a chance to work on cards for Darnell's Twofer Challenge 40 - Birds. Here's my twofer:


After thinking of all the bird stuff in my stash, I decided on a gorgeous color layering bird stamp. Originally I planned to color layer one bird & stamp just the outline on the other bird, coloring it with Copics. Well, on the second birdie I just Copic blended the wing then color layered the rest. With the white card stock I used, I ended up filling in some of the white patches with Copic coloring atop the layering stamps on both birds. I loved the very different looks from the two color schemes. Stamping & some die cutting - easy peasy!! Here's a closer look:

Supplies: Paper - DCWV A2 card; Paper Studio green;
Neenah Classic Crest Solar White 110 lb
Stamps - Hero Arts Color Layering Dimensional Bird & 
Dies - Hero Arts Branches Infinity Dies &
coordinating dies to stamps
Other - Copic Markers; various Hero Arts inks;

Supplies: Paper - DCWV A2 card; Paper Studio brown;
Neenah Classic Crest Solar White 110 lb;
Momenta Watercolor print
Stamps - Hero Arts Color Layering Dimensional Bird, Friends, & 
Let the Angels Sing (musical note) - all retired;
Taylored Expressions Hand Lettered Sentiments
Dies - coordinating dies to stamps;
A Jillian Vance Design Stitched Dot Rectangle Backdrop
Other - Copic Markers; various Hero Arts inks

Because my branch frame got its first play on card one, I'm also adding it to Darnell's July NBUS Challenge. Card one fits for Dawn's All Occasion Challenge at Watercooler Wednesday.

Thanks for stopping by and have a crafty day!!


Sunday, March 14, 2021

Twofer - your choice!!

Happy Sunday!! I've been missing in action this past week but just had to make time for the Twofer Challenge. For Challenge 36 Darnell & team offer the theme of "your choice"!! Here's my Twofer with my choice of dragonflies:

I'd been thinking of making a slimline card with the Hero Arts Color Layering Dragonfly so I started with that idea. When I put it together, I added the bitty dragonflies and I decided they would be my common element, rather than the bigger dragonfly. The slimline became a birthday card with the sentiment dividing the card in two. I die cut a Tulisa Collage from Poppystamps (sadly retired) into each half of the stitched panel, then backed it with a piece of printed watercolor patterned paper. Stitched panel came from an LDRS creative die set; my friend Lin (Sending Hugs) enabled me to purchase this set - a great value with 14 dies!! Here's a closer look with supply list:

Supplies: Paper - Hero Arts (retired);
Momenta Watercolor; Neenah white
Stamps - Hero Arts Color Layering Dragonfly
Dies - Memory Box Little Dragonflies;
Poppystamps Tulisa Collage (retired);
Spellbinders Glimmer plate - Everyday Sentiments II
Other - Crystal Stickles; silver foil

So, you need a different occasion for the second Twofer card, even though I had birthdays on my mind. Hmmm, had to think a minute. Then realized my brother and his wife plan to retire soon - I'll need a card for each!! Thought the bitty dragonflies would be pretty with a Spellbinders floral swag on an A2 card for my sister-in-law. Here's a photo of that one alone:

Supplies: Paper - DCWV A2 card;
Momenta Watercolor
Dies - Memory Box Little Dragonflies;
Spellbinders Floral Oval (retired);
Avery Elle Quilted Frame
Other - Michael's gems; Crystal Stickles;

I'm also entering the retirement card at Watercooler Wednesday All Things Feminine.

That's it for today. Thanks for visiting and I hope to visit your blogs soon too!


Thursday, November 19, 2020

Wreath with Ornaments

Another busy day but I'm back for Day 9 of Kathy's (The Daily Marker) Coloring Challenge with a Christmas wreath.


Supplies: Paper - Paper Studio A2 card & kraft;
Neenah Classic Crest Solar White
Dies - Hero Arts Branch Wreath (retired)
Stamps - My Favorite Things Winter Wreath;
Hero Arts Christmas List Stamp & Cut (retired) and
Other - Copic Markers; pencils;
Various inks

I was die cutting some wreaths for a friend and one cut kinda wonky. I cleaned it up with a bit of fussy cutting and decided to color it today. Normally there's a stamped line connecting the right side but that was part of the wonkiness I cut off. Decided to add a Hero Arts branch wreath. Then I thought a few pines would be nice. The pine stamp set had an ornament stamp so I added a trio of ornaments. Sentiment and done!

Also adding to Darnell's November NBUS Challenge since my wreath stamp & die are getting first play today and to Merry Little Christmas Anything Christmas Goes (third entry there). Thanks for all the fun challenges!!

Thanks for visiting and for your kind comments!!


Sunday, August 2, 2020

July Card Chain Challenge Reveal

Hey there - it's time to reveal the July chain for The Card Chain Challenge! Twenty-seven people participated with each sending a card to the person above her on the chain. Cards flew over the world - see the entire chain here! My July card went a bit closer to home to Arlene (A Bit of This and That) in California:

Supplies: Paper - Hero Arts A2 card (retired); Anchor Paper smoke:
Neenah Classic Crest Solar White
Stamps - Sunny Studio Everything's Rosy (with dies)
Hero Arts Friend Definition & Leafy Vines (both retired) 
and CL155 Playful Animals (sentiment, also retired)
Other - Various Hero Arts & Memento inks; May Arts string twine; 
Michael's gems; white ep; foam tape

As usual, I threw the kitchen sink at this card, starting with the colors - amethyst being my birthstone!  Just had to do the colors!! And I  liked the sketch too, the theme of friendship, and twine since the sketch looked like it included twine. Whew - that's plenty but Arlene deserves every bit of it!!


I moved my circle element to the left as I tend to go left to right. My sentiment is a smaller one so there'd be room for my floral embellishments. You may have spotted a purple roses card by me back in June, luckily my friend likes purple aka amethyst so I stamped enough for her card when I started doing this one! And yes, Arlene got some roses in her favorite red colors. 😊 I went a shade darker on the leaves for this rose since it matched better with my card base. I didn't want a plain circle or a plain card base so I stamped them with some fave Hero Arts cling stamps. Both tone-on-tone, the circle has the friend definition text & the card has leafy vines. Thank goodness for the search feature in Flickr as I found a card I'd made with what I thought was named flourish something or other (I lost the packaging). Didn't work searching on flourish so I searched on cling and found it under its name "Leafy Vines" (new back in 2012, now retired).

I've known Arlene for 11 years - wow! I joined the Hero Arts Flickr Group (still in existence but little used anymore) back in August of 2009. I uploaded my first pitiful card on August 2nd and Arlene was right there to comment with kind words and encouragement. Thanks for that, Arlene - always friends!!

I received this lovely card from Suze (Crafty Suze) in New Zealand and I thank her for sharing her photo!! I love the background stencil, done on a linen card with beautiful texture. And isn't that a fab sentiment?! Of course I love the trio of amethyst gems as a finishing touch. Suze included some cute diecuts for me to use on future projects - many thanks, Suze!!


The Card Chain Challenge is a lot of fun if you ever want to join us; you can get in on the August chain if you sign up by the 6th here
Badge Grab

If you're still with me, here's a very quick card sorta using the sketch. 


I was "Misty-proofing" for my brother's cat Misty to visit me in July. One of my projects was to sort through a bunch of orphaned diecuts and stamped items. I started making use of some of them, including everything here except the sentiment (from Altenew's Floral Sprig) and Leafy Vines that I stamped. Even the card base was tossed into the box of diecuts, along with some other stuff like gems that shouldn't have been there - I give up!! Sorry I don't know the source of the leafy branch - pretty sure I cut it on the Silhouette. I sent this card to a chorus friend.

Thanks for stopping and thanks to Deborah, Jo & Gail for the Card Chain Challenge!!

Wednesday, June 24, 2020

Blue Rose Gift Bag

Hey crafty friends! I'm off to have lunch with my friend JoAnn tomorrow - a nice break from cleaning up my crafty messes (what I call Misty-proofing) so my brother's cat won't get into them! Misty arrives next week so I don't have much longer to get ready!! Anyway, I was sorting through all sorts of diecut and stamped goodies from my friend Heather and from others, plus stuff I had cut or stamped. It's a large pile - so I decided I'd better start making things with them. I made a card I'll post in future and then a fun gift bag, which I'm sharing today, to take to JoAnn with some mini chocolate squares:

Supplies: Paper - Momenta Watercolor 8x8;
Neenah Classic Crest Solar White 110lb;
check pattern by unknown
Stamps - Sunny Studio Everything's Rosy (with dies)
Dies - Lawn Fawn Goodie Bag
Spellbinder's tag (retired)
Other - ribbon by unknown;
Doodlebug string

I found this fun Lawn Fawn mini bag diecut from Heather in my box; loved it so much that I bought the die, not that I've used it yet ... I made up the bag and found a fun ribbon in the scrap bin. My friend Connie gets all kinds of ribbon given to her by her employer, a dentist. They know I like them for crafting and this beauty was perfect. Now how to decorate it?

I had the Sunny Studio rosy set out to stamp some roses to send to Arlene with the July Card chain challenge card (you can still sign up HERE until July 6th). Don't worry, she knows about it as I was checking with her to see if her favorite color is still red. It is! Since the set was out and the ribbon had roses on it, light bulb - add a rose. So my final rose in each of the five steps was to use a blue ink. I had 5 reds and 5 blues all ready, plue 3 greens for leaves. Once you get set up, it's easy and fun to do multiples!!

That's it for today, friends! Thanks again to Heather for all the fun bits over the years and I'll get to it all - eventually.... Thanks for stopping & happy crafting!!

Sunday, June 21, 2020

More Twofer Bubbles

Hey everyone - hope you're having a wonderful weekend! I had a great Father's Day with my family except for one sister who's in AZ. We played our favorite card game (Phase 10) and Dad won, coming from way behind to wipe the floor with the rest of us!

I was excited to get out into the world to have lunch with a friend last weekend - take out food eaten at a park, but hey - new normal... JoAnn's has a store near the park so I made a shopping run - hadn't been to JoAnn's in ages and I'm not one to use their online store. Anyway, since I last visited, JoAnn's expanded their Hero Arts stock - yay!! In the Hero Arts store I'd been looking at the new HA/Sweet Petunia MISTI in black (so classy, though why would I need another MISTI, you ask). JoAnn's had one - score! Plus I got the matching mouse pad so I didn't have to laminate another SSS grid - it's the little things, right? Anyway, I also spotted a 6x6 cling stamp with, you guessed it, bubbles! So I had to make another pair of bubble cards for the current Twofer Challenge. Here's my Twofer:


Jennifer McGuire had a fun video June 11th on faux monoprint (see her full post here). I decided to give it a whirl with my new bubble background. After clear embossing the image I laid down a lot of ink on it, then spritzed with water and ran it through my diecut machine with another paper atop. See the results below, far inferior to Jennifer's but I probably should've picked a different ink for my lighter shade - Tumbled Glass came out too light on the monoprint side. I thought I had enough water but maybe that was part of it.


No matter - I cut the light part off (you can see the pattern, oh so subtly) and used it for sentiments. I used the darker part (still quite light compared to the ink-to-paper side) and die cut some circles. Wasn't sure what I'd do with the circles at that point but I moved them around a card base several times. The original embossed piece was die cut with a stitched rectangle for my fish. Here's a closer look with supply list:

Supplies: Paper - Neenah Black and Classic Crest Solar White 110 lb; 
Paper Studio Turquoise A2 card;
Momenta watercolor print 8x8 (for seaweed)
Dies - My Favorite Things Blueprints (retired) and 
Leafy Greenery (retired but they sell similar greenery);
Memory Box Seaweed Stalks (retired)
Inks - Memento Dandelion, Cantaloupe, & Tangelo; Versamark
Distress Inks - Tumbled Glass, Mermaid Lagoon, Pumice Stone
Other - Ranger clear ep; Copic black pen; Hero Arts lacquer, foam tape

When I made my previous entry (see it here if you missed it), I mentioned having stamped a couple of extra fish. I intended to use a similar background to the one I used previously but now I had a fun bubble background to try. It's busy, but I didn't care a whit!! Die cut some seaweed and a couple mat layers, & stamped a sentiment. Put it all together - done! Sent this one to Darnell and her hubby who have received it - yay!!

On to my Peace card (sympathy for a chorus friend whose mom passed). I had a plain card with the circles arranged but didn't like it. Noticed an Altenew flower stem left over from another sympathy card, laid it on the circles and viola - it tied it together. Gave the stem a quick color with Copics to coordinate with my card colors. Decided I needed a pale background paper and chose a winter paper but it works! Diecut a circle from the light monoprint for the sentiment, put it together, and done! Here's a closer look with supply list:

Supplies: Paper - Paper Studio Turquoise A2 card; 
Neenah Classic Crest Solar White110 lb
Lawn Fawn Let's Bokeh in the Snow 6x6
Dies - My Favorite Things Blueprints (retired) and 
Stamps - Hero Arts Bubbles Bold Prints
Stampendous Encouraging Words
Altenew Floral Sprig (with matching die)
Inks - Hero Arts Intense Black
Distress Inks - Tumbled Glass & Mermaid Lagoon
Other - Copic markers; Michael's gems, foam tape

That's it for today! Will also enter Darnell's NBUS challenge since my bubbles are newly used. Thanks for two fun challenges, Darnell and crew. As always, thanks to you for stopping!!


Thursday, June 18, 2020

Purple roses and a pair of bells

Hey all - good to "see" you! Today I'm sharing a card for my old - oops, should say "former", lead singer from my retired quartet. Her birthday comes at the end of the month and we're getting together for a "deck chat" (outdoors with physical distancing) on Friday. Thought I'd save postage and take the card to her then!

Supplies: Paper - DCWV Ms Sparkle A2 card & teal wood grain; 
American Craft A2 card cut for the music panel;
Neenah Classic Crest Solar White; Momenta watercolor 8x8;
purple/teal patterned - Prima Royal Menagerie 
Dies - My Favorite Things Blueprints (retired);
Spellbinders Petite Labels One (retired)
Stamps - Sunny Studio Everything's Rosy (with matching dies);
Hero Arts It's Your Day (retired);
Clearly Besotted A Little Sentimental
Other - foam tape; Hero Arts inks

Heidi loves purple, as do I! I may have mentioned before that, whenever the quartet rec'd a gift with four different colored items (such as vases, Christmas bells, etc), she & I had to bargain over any purple item - LOL. I hadn't tried the Sunny Studio roses in shades of purple yet and had a great time with them! I'm getting better at aligning, even if there was an oops now & then (I made two sets). When I went to stamp the fifth layer in a deep purple, it didn't show up well. So I went ahead and used black - worked great, I thought! I found one lonely piece of beautiful patterned paper in purple and teal to go atop my card base. I couldn't find the 6x6 pad anywhere but I know I bought it at Hobby Lobby some time ago. Wish I had more!! ** Update - found a card I made four years ago using a piece of it; updated the supply list - it was Prima, thought so!** I used a variation of the sketch by Julee Tilman as seen on the Hero Arts blog here.

Thinking of Christmas bells, I made the fourth and final bell card with the remaining two bells I had left (of the 9 I cut on Monday). Don't know what possessed me to use gold mirror cardstock for the card base so please excuse the phone shadow on the card (artfully? disguised by my name). I first cut a stitched rectangle and dry embossed it with an old Cuttlebug folder, matted in black, to cover most of the mirror card. A glittery oval frame grounded my two bells and I used another AJVD jingle sentiment. I had stamped a sheet of several for Betty and did one for myself before I put the set away. I've already entered the limit of three at the current CAS Christmas so I'm just sharing for fun...

Supplies: Paper - Mirror card from a Hero Arts MMH kit; Tim Holtz Metallic Jewels 
Neenah Classic Crest Solar White; Paper Studio Glitter
Dies - AJVD Jingle Bells Die Set and
My Favorite Things retired Blueprints 
Stamps - AJVD  Jingle All the Way
Embossing folder - Cuttlebug Kitchen Weave
Other - foam tape, Hero Arts Intense Black ink

And in the continuing saga of the washing machine, a different new one was delivered yesterday (one from Tuesday leaked & went back to the store). All seems well so far - no leakage or other problems noted during the test cycle - whew! So I went ahead and started the oodles of laundry I've been saving for my new washer. Very nice - I'm so happy to have another item checked off my to-do list! Now to Misty-proofing. My brother's cat Misty will take a vacation with me in a few weeks and I'm trying to clean up all the crafty messes around here that she might get into. Problem is, the more I put away, the more I take out - when will it end?!

Thanks for listening to my craziness stories and for checking out my cards! Hope your having a great week!!

Friday, June 5, 2020

Blue Roses

Hi all - if you spotted my previous post with the raspberry/rose/cream roses, I said I'd share some cards I made with blue roses. I love the Everything's Rosy stamp set from Sunny Studio and made several cards this spring with it, along with the matching dies. First up, a card for my friend Heather who had a birthday in early May. Given the mail issues due to covid19 she didn't get it on time but it arrived before the end of May - yay!!

Supplies: Paper - Hero Arts Sunshine A2 card (retired);
Neenah Classic Crest Solar White; Stampin' Up green;
BoBunny Boulevard & Cottontail 6x6
Stamps - Sunny Studio Everything's Rosy (with matching dies);
Hero Arts CL139 Birthday Messages (retired)
Dies - My Favorite Things Blueprints 20 (retired);
Spellbinders Elegant Ovals S4-425; Avery Elle Quilted Frame
Other - Michael's gems; Inks - various Hero Arts & Memento

Heather loves blue and I had some beautiful BoBunny paper with some blue roses in it. I thought blue stamped roses would be perfect with it. What do you think? Heather loved them! Since I had the set out with the MISTI, I stamped a bunch of these roses. More ended up on my parents' anniversary card - they celebrate the day after Heather's birthday. I used some of the same papers, just in a bit different way. When I cut the quilted mat for Heather's card, I had a perfect frame left over. Decided to use it on the parents' card.

Supplies: see above plus - 
Sentiment - Hero Arts CL272 All Occasion Messages (retired);
Taylored Expressions Simple Strips Die

Many companies have narrow sentiment stamps that fit the TE strips. It's so easy to retain the negative and pop a strip into its slot for stamping. I have a stack of them ready to stamp! Well, that's it for today. I came home Wednesday to a dying water heater and spent yesterday with the plumber in residence installing a new one. He did the water softener and some valves at the same time - everything looks so nice. I'll have him back next week for some other piddly replacements that need doing. Now I can work on some Christmas cards for different challenges.

Thanks for stopping and have a great weekend!!

Wednesday, May 20, 2020

More Christmas Wreaths

Hey all - I've got a twofer for the current Christmas Kickstart Challenge to be Wreathed in Christmas Smiles (use a wreath). When I made my first card for this challenge (and for CAS Christmas), I happened to stamp two additional wreaths  & various add-ons. Mixed and matched then decided to go ahead make a couple cards with the finished wreaths. Would love to hear which is your fave of the three.

I'm calling this card 2 (card 1 being on the other post):

Supplies: Paper - DCWV A2 card; Neenah Classic Crest Solar White;
Taylored Expressions Playful Patterns Holiday
Stamps with coordinating dies - Hero Arts CL907 Color Layering Wreath (retired)
Inks - Memento Rhubarb Stalk, New Sprout and Bamboo; Twisted Citron Distress Oxide
Other - Michaels clear gem; Paper Studio red gems; foam tape; 
Copic Markers for shading; red washi from Target

And this next one will be card 3 if you're voting :)

Supplies: Paper - Paper Studio Holiday; Neenah Classic Crest Solar White';
Doodlebug Swiss Dots; Taylored Expressions Playful Patterns Holiday
Stamps with coordinating dies - Hero Arts CL907 Color Layering Wreath (retired)
Dies - various My Favorite Things Blueprints  (retired) 
Inks - Memento Rhubarb Stalk, New Sprout and Bamboo; Twisted Citron Distress Oxide
Other - Paper Studio red gem; foam tape; Copic Markers for shading

While the card base and mat looks a bit brownish in the photo, they're actually a dark burgundy which matches the lattice paper exactly - go figure, different brand entirely!! And I used the darker red gems from the same set as the previous card.

Thanks to Jo and her elf Robyn for a fun challenge!! Thanks to you for visiting and for voting if you choose to do so!! Happy crafting!!


Saturday, March 28, 2020

Stay Crafty with Hero - Challenge 2

Hey everyone - I'm back with a card for the new Hero Arts Stay Crafty Challenge. This one fits me to a tee - Never Seen Ink or as Darnell (djkardkreations) would say NBUS (never before used schtuff). I have plenty of that, despite loving Hero Arts as I do. I'd buy a big pile and then become enamored with one set, leaving the rest to collect dust. Soooo, I pulled out a hibiscus set I'd never used. Here's my card:

Supplies: Paper - DCWV A2 card; Lawn Fawn plaid;
Neenah Classic Crest Solar White
Stamps - Hero Arts Color Layering Hibiscus (retired) & 
Inks - various Distress Oxide, Hero Arts & Memento
Other - Copic Markers, Joy ultra thin foam tape, Michael's gems

I just love these color layering sets and the hibiscus is no exception! Such a pretty look, although I did embellish them. The sentiment comes from a water lily set I've used often but never this sentiment - comes in two words which I combined.

Here's a shot of two flowers, one just stamped and the other stamped then embellished with some shading. In my own inept way, I'm trying to follow Kathy's (The Daily Marker) tips; they really make a difference! I went on to embellish the second flower before applying to my card.


That's it for today friends! We're under a Safer at Home order in MN, giving me plenty of time to make cards. Still need to work on Easter cards but I have a while to get those done. Thanks for stopping and stay safe!!

Tuesday, August 6, 2019

More Ireland and a birthday card

Back with more Ireland and a card. On my second day there (7/20/19), Heather and I worked on crafts in the morning. Heather had ordered a color layering stamp set from Sunny Studios so we played around with that for a bit. There are actually five steps to the rose but I only did four as I ran out of colors I wanted to combine. Still liked how they came out. I brought my stamped flowers and leaves home where I made the card recently. I got the idea to use the black/white patterned paper from a card Heather made me with some of the roses she stamped. I'm hoping she'll blog that one in future.

Supplies: Paper - DCWV A2 green card; Momenta Watercolor;
 Neenah Classic Crest Solar White; Basic Grey Kneehighs
Stamps - Sunny Studios Everything's Rosy (with matching dies); 
Our Daily Bread Mini Tag Sentiments
Dies - label and banner from My Favorite Things retired Blueprints
Inks - Distress Inks - Mustard Seed, Worn Lipstick, Spiced Marmalade, Pine Needles; 
Hero Arts Red Tomato, a minty green from Heather's stash and a green Pro-marker

In the afternoon we visited the lovely Johnstowne Garden Centre with a fabulous cafe attached (I had a yummy latte). We posed by our favorite flowers - mine were the purple hydrangeas.


Then we took the Blessington Lakes Drive and walked on the shore of different parts of the lake. Most of my photos were taken on the camcorder but I did have this one of Heather walking by the lake. It was a cloudy day but you can see some sunnier photos on their website here. There were two young men fishing from the shore and a mother & daughter with their dog playing a bit further down.  On the other side of the lake we spotted some men pulling a boat ashore; no motorized boats allowed so it was very quiet and peaceful.


We did a bit of grocery shopping on the way back, ate a late dinner, then it was another early night for me as I continued acclimating to the time zone difference. That's it for day two in Ireland - I'm not one to blog in real time so I'm enjoying refreshing my memories!

Thanks for stopping and I'll try to blog more of my trip later....