Welcome to my blog!

Thanks for visiting my blog. As the title suggests, I love to scrapbook, stamp, and sing! I will share cards and scrapbook pages I create, as well as information about my music - Barbershop harmony.
Showing posts with label Hello cards. Show all posts

Saturday, August 1, 2026

Hello Robot!

Hey there - happy Saturday! I watched Craft Roulette Episode #330 last night and made a card during the show:


Supplies: Paper - Paper Studio A2 card & cardstock;
Lawn Fawn & MFT patterns
Dies - Concord & 9th Holiday Cheer Tag Dies (retired);
Frantic Stamper Robot (retired)
Other - Recollections puffy stickers & gems;
foam tape; Park Lane tassel (from the old JoAnn)

Host Mary Gunn had Amanda Stevens (‪@PearBlossomPress‬), owner of Pear Blossom Press, as her guest. Pear Blossom is famous for the light up mechanisms to make fabulous light up cards. Amanda will be at Craft Roulette Live in Kansas City later this summer.

The wheel was spun 4 times, as usual, for our parameters - not too bad, though I couldn't find at least three items I wanted to use! At least I happened upon something!!

  • Project - Tag with Pocket: I put a pocket with tag onto an A2 card. 
  • Colors - Trick Or Treat: I used Orange/Black/Purple/Lime green. 
  • Element - Robot(S) Or "Bo-Bot": I used a robot die. 
  • Random - 3 Strips of Paper: I added 3 paper strips behind my pocket. 

I pulled out a purple ombré portrait A2 card and added three strips of patterned paper. Die cut the pocket and tag and assembled. Added a tassel to the tag.

Next I die cut the robot and added to the pocket with foam tape, then added the pocket to the card. Put a puffy sticker and some gems on the robot and colored a few spots with a metallic pen. If desired, you can see a previous card with that cute robot die HERE. Sadly, yesterday was Frantic Stamper's last day in business as Fran wanted to retire. I'll miss them!!

That's it for today. I hope you have a crafty weekend!!

Friday, April 17, 2026

Hello Friend!

TGIFF friends - Happy Funn Friday with Craft Roulette Episode #315!


Supplies: Paper - Spellbinders A2 card;
Neenah Classic Crest Solar White; Authentique;
Violet Studio patterned; Paper Studio cardstock
Stamps - Hero Arts Adorable Baby (retired)
Dies - Spellbinders How Does Your Garden Grow (DOML-Jul20);
Other - foam tape; Pink and Main gem;
Recollections puffy sticker

Mary Gunn Funn had Donna Mack (‪@purplepinkypromises202mainA‬) as her guest. Donna owns a store in the Kansas City area & many Paperganza attendees found their way there last year. I didn't get to go but maybe this year?! The wheel was kind and I quickly made a card within an hour.


  • Project - Hello: I made an A2 card with a Hello Friend sentiment. 
  • Colors - Strawberry Fields: I used red/green/white for strawberries and blue for sky. 
  • Element - Hop(S)/Hopping: I added a bunny to my O. 
  • Random - Big Letter(S): My HELLO is die cut from the biggest letters in my stash.

I die cut the letters, flower & butterfly and 3 stitched rectangles. Stamped, colored and fussy cut the bunny. Assembled and added a gem to the flower center. Quick and easy!

That's it for tonight! This weekend I'm doing the Pink and Main birthday card event. Hopefully I'll have something to share from that, although I haven't done the homework...

Thanks for stopping by and have a crafty weekend!! 

Wednesday, January 28, 2026

Thanks and Hello with Spellbinders 2025 Advent Calendar

Hey there, friends! Crazy, I know - I'm back for a fourth consecutive day with items from the 2025 Spellbinders Advent calendar. I've been having a lot of fun with the items behind the calendar windows! Here's a thanks card using two of the stamps in the Day 2 mini stamp set:


Supplies: Paper - Neenah Classic Crest Solar White;
Paper Studio A2 card; scraps
Stamps - Spellbinders 2025 Advent Calendar (Day 2)
Dies - Poppystamps Flower and Leaf Sprinkles;
Other - Copic Markers; Sharpie fineliner;
Hero Arts inks

I'm very accustomed to stamping with a MISTI and these Advent calendar stamps don't do well with it. I tried stamping later using a stamping block and the impression was much better. On this one, after I colored the image with Copics, I did a lot of outlining with a fineliner. The bitty stamped flowers didn't fare so well with that so I covered them up with various bitty die cut flowers. I ink blended the ground and sky then die cut the panel with a stitched rectangle. Added it to an A2 card - done! You can see Crafty Al's short video on this set HERE.

I'll send this card to Darnell's January NBUS Challenge #82 since the stamps were newly used.

Next, I made a hello card with the strip embossing folder from Day 6 (Crafty Al's video HERE).


Supplies: Paper - Paper Studio ombre card;
Spellbinders Terracotta card stock; scraps
Embossing strip - Spellbinders 2025 Advent Calendar (Day 6)
Dies - Spellbinders Faux Stitched Sentiments & Floss (DOM-Apr24 retired)
Other - SSS printed sentiment strip & Starshine dots

I embossed a scrap of orange cardstock. Added to an A2 ombre card along with some scrap patterned strips. I had a HELLO die cut sitting on the table so die cut a white shadow and layered them for dimension. Added to the card along with a printed subsentiment strip and some Starshine dots.

That's it for today, my friends. Thanks for continuing to stop by & for commenting when you can! Have a crafty day!!


Saturday, February 15, 2025

Frogs for Craft Roulette

Hi all - hope you're having a wonderful weekend! We got hit with a bunch of snow last night, so you can guess what I'll be doing today!

I watched Craft Roulette #254 live last night. Fun Valentine episode with a faithful CR member Jay Thomas (@Craft by Jay) as our "date" - LOL! Here's my card:


Supplies: Paper - My Favorite Things purple & plaid;
Sunny Studio Flirty Flowers; Neenah white; scraps
Dies - Waffleflower Open Book, Small Frog &
Hero Arts retired alphabet
Stencils - Waffleflower Open Book Coloring Stencil
Inks - Tumbled Glass & Salty Ocean DI; Hero Arts purple
Other - Copic Markers (for pussy willows);
Recollections metallic stickers

Here's what the wheel spun for host Mary Gunn FUNN, Jay, and all players:


  • Project - Book Binding Card: I did the standard format, as demonstrated by Mary.
  • Colors - Candy: I did jelly bean colors plus blues a la M&Ms.
  • Element - Rhymes with "Ogg": I used frog die cuts
  • Random - Letter(s)(ing): Sentiment was made from individual letter die cuts.

Re: book binding, I made my left side score a bit smaller than usual since I wanted my book die cut to fit. The typical space to the right is 4.25 square but I made it a bit longer. Card overall is still A2 size. To emphasize the left side, I added some metallic embellishments. 

I wanted to use some new Waffleflower stuff I bought locally. The clerk said she thought this would be their new craze like the postage collage was. I bought just a few of this line, then I bought a couple frog sets too. The bigger frog is actually the "small" frog set. The bitty frog came from the lily pond set. Since this is all new, I'll add my card to Darnell's February NBUS Challenge #71.

Thanks for stopping & have a crafty weekend!!


Tuesday, February 11, 2025

With Love event Class Four Cards

Hi everyone - Final day of cards I made in the fourth class of the online With Love event offered by Scrapbook & Cards Today (SCT) last Saturday. You can see a group photo of the batch of cards, what the session kit contained, plus the class one cards with Meghann Andrew HERE. You can see class two cards with Cathy Zielske HERE and class three cards with Dana Joy HERE. 

Anyone who knows Jennifer McGuire (the crafting GOAT) has heard of her "Share Handmade Kindness" mantra. SCT thought that would be a great collaboration for this event. Jennifer described how it all began & shared some stories of cards she's donated - very inspiring!

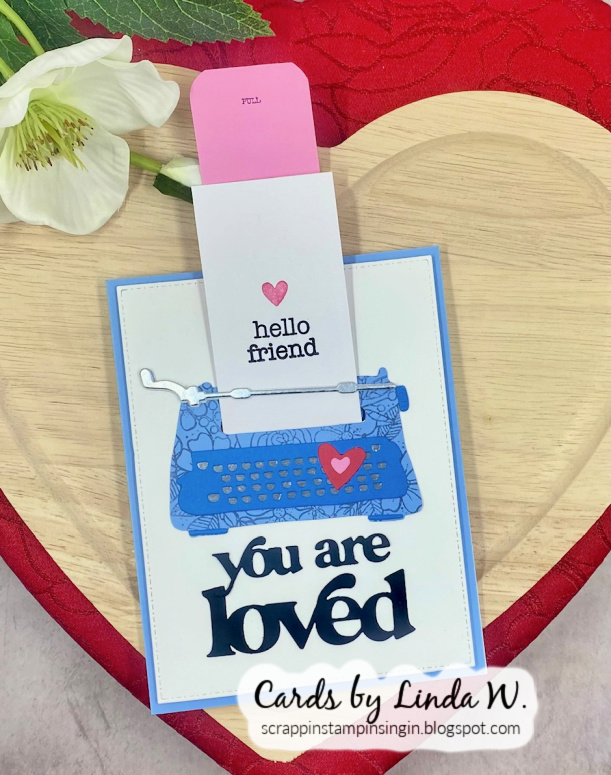
Card one is an interactive card - the white page pulls up from inside the typewriter to reveal the hidden message. Amazingly easy to put together - we did a lot of homework on this one! Jennifer mentioned she loves to inlay so would probably inlay all the typewriter keys - yikes!! For the class we just backed the keyboard die cut with silver.


Jennifer had us trim "so very" off the die cut sentiment for a different look. The typewriter is stamped with the bouquet stamp for some interest; you could also cut it in a patterned paper. I didn't photograph the card with the pull-out tucked in. Oh, Jennifer also trimmed her card to shorter than A2 so it would fit into an A2 envelope. Not me - I'll just pop it into a larger envelope!

Card two is a window card, different that Meghann's in that it's interactive. Putting it together gave me many problems. I'm still trying to decide if it's useable. 


Jennifer wanted the shutters to close over the window so when you take the card out of the envelope (with shutters closed), the shutters pop open. When assembled there was a gap in the center so they didn't look closed. Jennifer used solid color cardstock & cut a second set of shutters, trimmed off the tabs (that go behind the window assembly) & "cheated" in a bit when gluing atop the existing shutters. That way, they closed perfectly.

I had die cut my shutters with white backed cardstock. I didn't like the white on the inside so I cut a third set of shutters to glue over the white. Made a very thick stack and I don't like the look from the side, oh well. You can see in the photo how I tried to cover the white edge with a grey Copic.

The other element Jennifer did that I skipped was to have the window peek into the card's inside. She glued the bouquet panel to the inside where you'd write your message. Her inside message was a strip hidden by the Hello Friend on the front.

When I cut the hole for the window into the card front, my opening seemed too large. I ended up gluing the bouquet-stamped panel directly behind the window. Of course, detail loving Jennifer would've sandwiched acetate in the window but she left that step out in the instructions. I was just glad to finish this during class!

Jennifer did a bonus session called "Mix It Up". She turned the window box greenery and flowers into a wreath & the window curtains became a bow - so clever!! I don't have her engineer brain but I know I'll get a lot of use from this kit!!

To wrap up, SCT announced two more of these one-day events coming up in 2025. One will take place in July (holiday cards) and one in September (Halloween cards). Registrations will open to the general public on Feb. 14th; With Love participants could register now so I did! Products and instruction are first class - well worth your time and money!

Thanks for checking out my class cards & happy crafting!!

Monday, February 10, 2025

With Love event Class Two Cards

Hi all - I'm back to share cards I made in the second class of the online With Love event offered by Scrapbook & Cards Today (SCT). The day included four classes taught by Meghann Andrew, Cathy Zielske, Dana Joy & Jennifer McGuire, plus Jennifer did a little bonus session. You can see a photo of the batch of cards, what the session kit contained, plus the class one cards with Meghann HERE. 

The cards below were made in the class with Cathy Zielske, the Art Director at SCT, YouTuber & blogger (CZ Design) & she has a line of products at Simon Says Stamp HERE. I love how she "boops" when she places her gems & calls objects "little friends".

Card one used the floral bouquet and ball jar images with coordinating dies and stencils. The sentiment is mixed with die cuts and stamping. So simple, yet effective.


Card two (or this little friend, as Cathy would say) used the envelope die in the class kit to create a shaped card that opens at the bottom! We just placed the fold inside the cut line so the bottom edge stayed folded when we die cut the rest. Some masking & stamping gave us a liner look behind the sweet note. I left my note loose so it can be pulled out from the card base. Again, I used enamel dots instead of the bitty flower centers that you could die cut.


Card three used a cute batch of dies to create an old fashioned typewriter. Cathy did a white background with the cover plate that adds a heart pattern to it (hard to see in the photo). She suggested a neutral would also be fun so I tried this pale grey. A mixed die cut & stamped sentiment finished the card.


At the end of her session Cathy also showed two bonus cards; no instructions, but they looked super simple to create. I'm sure to try them sometime. Yesterday Cathy offered a free download to create some design templates - check that out HERE.

That's it for today; thanks for checking in & I'll be back tomorrow with class three cards. Have a fabulous day!!

Monday, February 3, 2025

Atrium with Nordic Bird

Hi all - I'm playing with a January Spellbinders Club set today (no link yet). Here's what I created:


Supplies: Paper - Park Lane A2 card;
Lawn Fawn All the Dots (retired); scraps
Dies - Spellbinders Botanical Atrium (DOML-Jan25)
& Outlined Sentiments (retired);
The Greetery Nordic Birds
Other - Copic Markers G40, Y19; Park Lane gems

First I die cut a stitched rectangle and added to an A2 card. Next, I die cut the atrium, background, flowers and leaves from scraps. Assembled the flowers & arranged them with leaves on the background. Added one of the Nordic birds that Lin (Sending Hugs) sent me. Thanks again, Lin! I shaded it with Copics before assembling. Added the black atrium. A die cut sentiment & some gems finished the card.

I'll add my card to Darnell's February NBUS Challenge #71 since this was my first play using this fun set. I was proud of myself for using something from the January Club box so quickly! 

Thanks for stopping by & have a wonderful day!


Saturday, October 26, 2024

hi Hello!

Hi & hello, everyone!! Watched Craft Roulette Episode #238 last night & made a card during the show. Since I'd already posted yesterday, I waited to share my card until today:


Supplies: Paper - Olive by unk;
Neenah Classic Crest Solar White; scraps
Stamps - Hero Arts Old Letter &
Watch Gears (both retired); Sunny Studio Berry Bliss
Spellbinders Faux Stitched Sentiments & Floss (DOM-Apr24);
Taylored Expressions Easy Strips - 1/8" 
Stencil - My Favorite Things Smart Mask - Diagonal High/Low Strip
Inks - Taylored Expressions, SSS, Altenew, TH Distress

Host Mary Gunn FUNN had Meghann Andrew (her YouTube) as a 1st time guest. Meghann has done both scrapbooking and cardmaking & will be teaching at the Concord & 9th Winter Retreat 2025. She works for Scrapbooks and Cards Today magazine; see the fall issue online HERE. 

The wheel spun some nice & easy parameters; Meghann was lucky to have her pick come up for the Random item:


  • Project - Collage: I created a collage with stamping.
  • Colors - Italian Restaurant: Found a palette on Pinterest HERE - Lime/Olive/Salmon/Rust.
  • Element - Short: I stamped hi, short for hello.
  • Random - Diagonal Lines: I used the same stencil as on a recent Diva card; it leaves a diagonal area blank. I framed it with diagonal strips.
I started by stenciling an A2 panel of Neenah white using the MFT high/low strip stencil and Limeade ink. Leaving the stencil in place, I masked off the lower part and stamped the text/postage on the upper part using Crushed Olive Distress ink. Next I stamped the watch gears with Pumpkin ink & also in Blush ink, then in Limeade (with a little blush left on the stamp so it went a bit brown - oops). Probably should've added some text on the lower part, oh well...

I die cut the panel with a stitched rectangle and added 1/8" strips to frame the diagonal opening. Adhered it to an A2 olive green card base formed from cardstock. The 8.5x11 piece was in a mixed package, unlabeled so I think it was part of some card kit - maybe SSS??

Die cut HELLO twice and layered. Stamped hi directly in the diagonal window and adhered HELLO. The hi is actually "hi sweetie" but I did a little surgery to get the hi alone. I left it at that, adding no gems, etc. Nice & flat!

Since I used a stencil, I'll add my card to Just Us Girls #750 where it's stencil week. I'll also link up to Darnell's October NBUS Challenge #67 since my hi and HELLO are newly used here.

That's all for today; thanks for stopping by!!


Friday, September 27, 2024

Mouse with a Flower

Hey everyone - TGIF! Once again I watched Craft Roulette live (see the replay of Episode #234 HERE) from the satellite studio & made my card during the show. This was my 25th submission which is a milestone in the CR world.

Supplies: Paper - Core'dinations & My Mind's Eye;
Neenah white; silver glitter (colored indigo)
Stamps - Hero Arts CL125 a thank you gift to subscribers
Dies - Poppystamps Floral Vase Pop Up Easel Set (flower)
(retired at Poppy but HERE at Frantic Stamper)
Other - Copic Markers; foam tape;
Hero Arts gems; Celebrate It ribbon;
Distress Oxides Wilted Violet & Villianous Potion;
Memento Tuxedo Black and Paris Dusk

Mary Gunn FUNN had Tiffany Solorio (@Tiffany.Solorio) as her guest. Tiffany mainly does mixed media on her cards & loves to get inky! Here's what the wheel spun for us:


  • Project - 6x6 Card: I used 1/2 a sheet of 12x12 paper to form a card.
  • Colors - Rainbow: Every color in the rainbow is here somewhere.
  • Element - Single Flower: Mouse image is holding a flower; I used a die cut blossom.
  • Random - Cloth: I used velvet ribbon.
Formed a 6x6 card. Stamped, colored and fussy cut the mouse, trimming off the dandelion from the image. Added a colorful panel to the card onto which I stamped the sentiment. Added the ribbon across the card with double sided tape, then popped the mouse on with foam tape. Added a few gems & the die cut flower to finish it off. I inked silver glitter cardstock with purple and dark blue to get the indigo color of the rainbow.

That's it for tonight! Hope you're enjoying the weekend and thanks for stopping!!

Thursday, January 4, 2024

Spring Bunnies

Hello friends - something different today than the Christmas cards I've been sharing - a Spring card! 

I had the opportunity to do some crafty shopping at my fave Twin Cities stamping store Anchor Paper. They have participated in the Hero Arts ShopBox program in the past but missed the final one of 2023 to my disappointment. But they're back into it for Hero Arts ShopBox Spring 2024, giving me early access to new Hero Arts not yet available online. Here's my first card with new Spring goodies*:


Supplies: Paper - Neenah white; Paper Studio A2 card;
Lawn Fawn Petite Watercolor Wishes
Stamps with dies - Hero Arts Spring Bunny Bundle*
Stamps - Hero Arts Rain Texture Bold Prints*
Dies - Hero Arts Butterfly Foliage*;
Other - Copic Markers; foam tape

Aren't those bunnies just the cutest?!! If I remember, I will add links to the Spring products once they're available on the Hero Arts site (February 14th). Hero Arts also mentioned that Simon Says Stamp (among other places) will offer the new release online starting January 25th.

Process:
  • Stamped the rain texture onto a piece of blue LF Watercolor Wishes, then die cut with a stitched rectangle (in this case, an old well loved one from AJVD). 
  • Die cut a piece of lime green with the foliage die, then with the rectangle
  • Adhered the two pieces. 
  • Added some Copic detail to the grass & leaves. 
  • Die cut the butterflies from some scraps.
  • Die cut bunnies and sentiment, saving the negative.
  • Use negative for stamping the images in the MISTI.
  • Color images with Copics
  • Assemble card using liquid glue & some foam tape 
As usual, I had die cut all bundle elements creating a template. Then I use the negative and pop the die cuts in for stamping. For the first time ever, after buying hundreds of stamp/die sets, the dies cut the mirror image, rather than the stamped image! I made use of the items I'd die cut, though, by flipping them and my template to stamp on the underside. Not as smooth as normal but, hey - it worked & I was able to finish my card. I reported the issue to Hero Arts who will send me new dies when available.

I'm entering my card at the January Stay Crafty with a Blog Named Hero Challenge to combine old (stitched rectangle, Copics & paper) and new (Spring ShopBox items). Also linking up to Darnell's January NBUS Challenge since using my Spring items for the first time.

One more note - the photo of my card was taken with my new Shot Box, picked up at Michael's during their post Christmas sale. It definitely diminished shadows since it was fully dark when I took the photo but I expected a better result. Oh well, I'll keep trying!

Have a crafty day & thanks for stopping by!!


Friday, June 23, 2023

Enjoy Today!

TGIF everyone - hope you're looking at a fabulous weekend! I'm starting mine with a card using materials from the Spellbinders June Quick and Easy Card Kit. 

Supplies: Paper - Spellbinders kit; Park Lane black
Dies - Spellbinders Fancy Edged Ovals (retired)
My Favorite Things Blueprints 2 (retired)
Other - Tim Holtz sentiment sticker;
Spellbinders kit ephemera; Kaisercraft gems

I came home from the dentist on Monday to find a big box on the steps - yay - Spellbinders club! It's a lot to process and usually I set the box aside but I dug in and pulled out the card kit. I'm making weekly cards for my Blue Stars adopt-a-member AJ and found just what I needed in this month's kit! Card base, envelope, patterned & layering papers, fun frames and butterfly stickers. I knew my stash of Spellbinders dies would have a perfect matching oval frame - bingo, a pretty pierced scalloped one.

Next, a quick share of a card I mailed to AJ today. I upcycled the top of a manufactured card I received from a friend - can't remember what brand but I love the sparkly rays. I cut it down with a stitched rectangle and added to a dotted mat layer, then to an A2 card. A couple gems over the printed eyes and a sentiment sticker from the same Tim Holtz pack - done!


That's it for today, friends. I'll be off to a chorus rehearsal tonight & tomorrow with a special coach coming in from Canada. Hope to have time on the way to do some crafty shopping!

Thanks for stopping & enjoy your weekend!!

P.S.Have you checked out the Die Cut Divas June Critter Challenge? Hope to see you in the gallery - only 7 days left to play! 

Sunday, May 21, 2023

Diva Tic-Tac-Toe, Anyone?

Hello everyone - I hope you're enjoying May! It's my day to post at Die Cut Divas for some inspiration. We Divas are having loads of fun with a Tic-Tac-Toe Challenge. We're using products available at Frantic Stamper, our May sponsor, but you can use any supplies. Just remember to include a die cut or embossing folder & use a row from the board in your design. Hope to see your card in our gallery!


 Supplies: Paper - Neenah White; Paper Studio Brights;
BoBunny patterned; Tim Holtz metallic; MFT vellum
Stamps - Hero Arts Abstract Butterfly Wing Background
(available HERE at Frantic Stamper)
Stamps with Dies - Hero Arts Beautiful Butterflies Bundle
  (HERE at Frantic Stamper) & 
Dies - Hero Arts Nesting Circle Infinity Dies &
Other - Darice sequin; Hero Arts & Memento inks



I chose the bottom horizonal row from the board because I wanted to use bling and butterflies! Frantic Stamper carries a wonderful selection of butterfly items, including all the latest from Hero Arts as well as some hard-to-find oldies. I went with stamps from Hero's February release - a background cling stamp that I hadn't used until now, plus a butterfly clear set with coordinating dies. I stamped the butterflies on patterned paper, a popular technique for many years (see an example from 2010 before I began blogging HERE). Most of the time when I use a butterfly image, it gets bling of some sort - usually gems - but this time I popped a sequin on it.

I stamped the background in black ink and blended orange and yellow inks over it. Die cut it with a stitched rectangle and glued to an A2 card. Stamped the butterfly on patterned paper and the sentiment on white paper, then die cut. Die cut a circle from metallic card and a bigger one from vellum. Assembled and added a sequin to the butterfly. Done!

And here's a bonus using a Frantic Stamper brand flower die and the top horizontal tic-tac-toe row. I interpreted "chocolate" to be a brown color and stenciled with it. 


Supplies: Paper - Neenah white; scrap of brown;
Paper Studio pastel A2 card; Bazzill green
Stamps - Frantic Stamper Spring Bold Sentiments
(coordinating dies HERE)
Hero Arts From the Vault Cute Animals
(Here at Frantic Stamper; coordinating dies HERE)
Dies - Frantic Stamper Botanical Daffodils;
Hero Arts Thorn Tree and Grasses (Here at Frantic Stamper)
Stencils - Hero Arts Stripe (Here at Frantic Stamper)
Inks - Hero Arts Tangerine and Memento Rich Cocoa & Tuxedo Black
Other - Copic Markers; Hero Arts Sparkle Lacquer; foam tape

I took a pastel blue A2 card and stenciled some stripes in brown on the left edge, shifted the angle & did a few more, then a third angle lightly with orange. I die cut two of the FS daffodils (love these so much!) and colored with Copics. Stamped a bee from Cute Animals, colored with Copics & die cut. Added sparkle lacquer to the wings. Stamped and die cut the sentiment, plus two layers of white for dimension and a brown shadow layer. The Hero Arts Thorn Tree and Grasses die set is another oldie but goodie that's still available at Frantic Stamper - love this set! I cut two layers of grass and put one set of daffodils behind each & layered. Some flowers were popped up with foam tape. Assembled & done!

I will add the butterfly card to Darnell's May NBUS Challenge since the abstract background is new.

Thanks for stopping and have a crafty day!


Friday, April 21, 2023

Watercoloring with Altenew

Hey everyone - welcome! I'm providing inspiration over at Die Cut Divas today for our Water Color Challenge with the amazing Altenew as our sponsor. I took their collaboration class with Spellbinders back in February, adding new techniques and products from both brands. One of my new purchases was Altenew's beautiful Golden Days Stamp Die Stencil Hot Foil Bundle.

Supplies: Paper - Bazzill A2 card; Tim Holtz Jewel kraft metallic;
Strathmore watercolor paper
Hot Foil Plate - Altenew Golden Days
Dies - Altenew Mix and Match Frames
Stamps - Altenew Floral Sprig
Other - Spellbinders Hot Foil Roll - Pewter; 
various Hero Arts Reactive and Tim Holtz Distress Inks; 
water spritzer & Hero Arts Iridescent shimmer spray


Process: Hot foil the Golden Days flower onto the smoother side of a 6x8" piece of watercolor paper using pewter foil and a hot foiling system (I used Spellbinders Glimmer).

Stencil the flower using the coordinating stencil set & water reactive inks. Move the ink with water & brushes. Spritz lightly with shimmer spray through the base flower stencil. Let dry thoroughly.

Die cut into two pieces using the Mix and Match Frames deckle die (save one piece for bonus project). Layer onto metallic panel die cut with the dotted frame die. Add to A2 card.

Stamp the thank you sentiment from the Floral Sprig set. Add a few dots from the die cut frame.

Now for a bonus using the other half of the flower panel. Hard to see but I added a clear enamel water droplet in the lower right of the flower. The sentiment is from the same Floral Sprig set. I sent this card to dear Lin (Sending Hugs) for her birthday.


Ready for a threefer?


My first attempt at foiling the Golden Days flower (used gold foil) ended up with loads of over-foiling because I used an unnecessary shim. I set the panel aside and tried a new panel which I used on cards one and two. Then I went back to my first panel - could I save it? I simply trimmed the flower smaller so I didn't have much over-foil to erase. Next I watercolored it freely & let dry, then I used the fourth stencil to add more dark red (in this case Lumberjack Plaid DI) & moved it a bit with water. Finally, spritzed heavily with Iridescent spray. Oh, and I took a damp cloth and went over the center foil that had kinda muted with the watercoloring. Die cut gold metallic cardstock using the 3rd die in the Mixed Frame set, leaving all the bits in (they were anchored well into this heavy cardstock). Added to an A2 card along with the flower popped up with foam tape. Had a tiny white flaw on the card base so covered it up with a gold gel pen & continued dotting! Finally adhered some stamped/embossed/die cut leaves (also from the Golden Days bundle) that I'd watercolored. Could've used more, I think, but I was lazy.... Done!

I'll add card three to Darnell's April NBUS Challenge since the Golden Days plate technically got first play there.

Thanks for stopping and I hope you check out the April Diva Challenge! Happy crafting!


Sunday, April 16, 2023

Hero Arts Spring Stamp Along 2023 - Day Two

Hey everyone - It's Day 2 of the online Hero Arts Spring Stamp Along 2023! We did 5 classes yesterday & 5 more today. Here are my versions of the class cards:


Class six - Dreamy Floral with Bees with Channin Pelletier (Crafts by Channin)! Stenciled on an A2 panel, then trimmed a bit off right & glued to A2 card. I added sparkle to the wings and a vellum shadow to the sentiment (stacked for dimension with extra white layers).


Supplies: Paper - Neenah White; vellum 
Stamps with Dies - Hero Arts Friendly Messages Bundle
Stencils - Hero Arts Color Layering Bee Florals 
Other - various HA and Distress inks; Hero Arts Sparkle Lacquer;
Copic Marker 100; white gel pen

Class seven - Wisteria Thank You with Jessica Frost-Ballas (All the Sparkle). Jessica's card had a few more wisteria layers on top of the vellum but I put most of mine behind - oops. Really liked how it turned out, though! I added a butterfly to draw the eye down to the wisteria behind. I used the sympathy sentiment because I suddenly needed a card for a friend whose sister passed away yesterday.


Supplies: Paper - Neenah Classic Crest Solar White; MFT vellum
Stamps (with dies) - Hero Arts Wisteria Heroscape Bundle &
Other - various HA and Distress inks; Copics on butterfly

Class eight - Neon Bee Florals with Kelly Taylor (You and Your Big Dreams). Time ran a bit short so I didn't add as much shading and dimension with my watercolors. Will probably go back in and do some later.


Supplies: Paper - Hero Arts Arctic; Tim Holtz DI Watercolor;
Neenah Black
Stamps with Dies - Hero Arts Friendly Messages Bundle
Dies - Hero Arts Bee Florals Window;
Other - Hero Arts Liquid Watercolors Neon Brights Chartreuse, 
Yellow & Pink 
Versamark ink;  white ep; Copic BG11 & 100

Class nine - Hello Bee and Florals with Maria Willis (Card Bomb). Mixed media w/a watercolor background stamped randomly with "taco" stamping using a folded cling stamp. Did much better with it than I did yesterday! Rest of the elements are transfers (aka rub-ons) including the sentiment - so fun! My vellum is so thick I couldn't tear it by hand so used a torn paper die. :)


Supplies: Paper - Hero Arts Arctic; MFT vellum
Tim Holtz DI Watercolor
Stamps - Hero Arts Burlap Bold Prints
Dies - My Favorite Things Torn Paper Edges
Other - Hero Arts Liquid Watercolors Neon Brights Chartreuse, 
Versamark ink with gold ep

Class ten - Delicate Butterflies with Jennifer McGuire (Jennifer McGuire Ink). One of my favorite card making gurus who I was fortunate to meet years ago at a ScrapFest at Mall of America - Jennifer offered a 2hr session despite being under the weather. Card at right is a fun fold so I included a top view photo.


Supplies: Paper - Neenah Classic Crest Solar White
Stamps - Hero Arts Wisteria Heroscape (sentiments) & Burlap Bold Prints
Other - Hero Arts Ultra Pink, Paradise & Dusty Blue inks; 
Memento Daffodil & Tuxedo Black

Such a fun event - I enjoyed it thoroughly! Hilary asked on yesterday's post if I watch and do the cards later - NO! I faithfully do the homework (getting card bases and supplies ready, some minimal diecutting and the like). The rest I do right along with the instructors! Sometimes I have to rush which makes for an imperfect product but - hey - it's handmade! Then there's a :30 minute break til the next session (hour for lunchtime). I take a photo of my class card, edit it and upload to the event's Facebook group and also to a post in progress. I try to publish the post shortly after the event ends. I also try to clean up between classes. I know it's a lot but if one does fall behind, the replay can always be watched later. These events have a low cost and one can go ahead and use supplies on hand; you don't have to purchase the product package. I usually have most of stuff being used or I pick up anything I'm missing.

Thanks for visiting & happy crafting!! 

P.S. I'll be back with a post for Die Cut Divas on the 21st. Please check out our April Watercoloring Challenge - just be sure to include a diecut or embossing folder in your design. Card 8 from the Stamp Along would work perfectly!!