Welcome to my blog!

Thanks for visiting my blog. As the title suggests, I love to scrapbook, stamp, and sing! I will share cards and scrapbook pages I create, as well as information about my music - Barbershop harmony.
Showing posts with label Pick N' Play. Show all posts

Monday, February 20, 2023

Final Ornament Card for Kickstart

Happy Monday! It snowed like crazy here for a couple hours this morning but it's the light fluffy stuff. The big blizzard supposedly will arrive tomorrow. I just finished my third and final card for the February Christmas Kickstart Challenge to use baubles/ornaments.
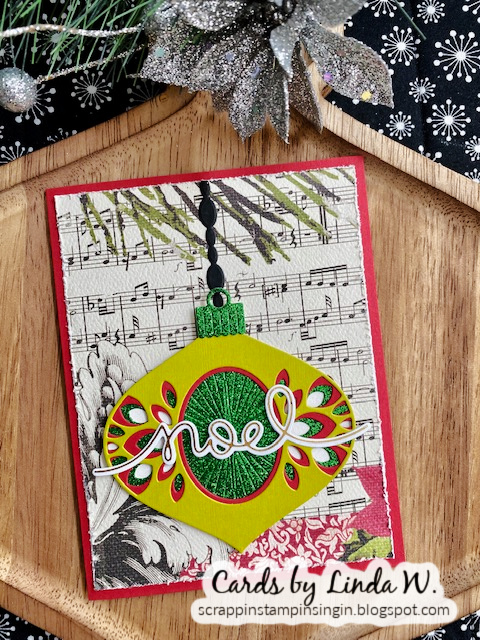

Supplies: Paper - Authentique Christmas Essentials 12x12;
DCWV lime green; Paper Studio cream, red and glitter cardstock;
Neenah black and Solar White 
Dies - Birch Press Design Twinkle Ornament Layer Set &
Christmas Ornament Pop Up Easel (base layer & cap);
Lawn Fawn Winter Big Scripty Words; 
Hero Arts Joy Ornament (retired but HERE at Frantic Stamper)
Hot Foil Plate - Lawn Fawn Winter Big Scripty Words
Other - Spellbinder's gold foil

I used a second piece of my chopped up 12x12 Authentique paper as Dawn (Dawn's World) did in her posts (here and here). Once again, I distressed the patterned paper edges with a Tim Holtz tool - this paper seems so vintage-y to me so I had to distress it! Adhered to A2 card. Die cut all layers of the Birch Press ornament, along with a hanger from the Hero Arts set. Assembled the ornament and glued to the patterned paper. Added a foiled Lawn Fawn sentiment - done! Super simple but so pretty! Here's a look at the piece of 12x12 patterned paper I've been chopping (see card one HERE).


Lawn Fawn sponsored the Divas in January and I placed an order that included the winter words hot foil plate. Yesterday I spent some time foiling various things including that entire set - how fun!! Perfect results and I love this new foil plate which matches the stamp set & coordinating dies.

Thanks again to Jo and her elf Bridget for a fun challenge! I'm adding to my Christmas card stash and that makes me happy!! 

Next I'm sharing a card I made yesterday following an extra LIVE session set up for the Spellbinders & Altenew FLORALS PICK N' PLAY CREATIVE COLLAB CLASS that I took February 9th - 11th. Lydia Evans from Altenew came online and shared two cards, one of which was a shaker with an embossed top using Spellbinders products from the class kit. Here's my take:

Supplies: Paper - Park Lane A2 card; Neenah Solar White;
Paper Studio glitter
Embossing Folder - Spellbinders Four Petal Floral 3D
Dies - Spellbinders Thanks Enclosed Sentiments
Other - Darice and Spellbinders sequins;
Waffle Flower Infinity shaker; Hero Arts gold & reactive inks
Hero Arts White Iridescent Shimmer Mist

I started with a Neenah white panel and ink-blended a variety of Hero Arts reactive inks. Spritzed with a bit of water and then some shimmer mist. Ran it through with the embossing folder once dry. Inked a few spots (as Lydia showed) with some gold ink. Fussy cut out the center for a window to the shaker element. Created the shaker with an A2 infinity pouch. Lydia put her sentiment inside the shaker but I just glued mine to the top of it.

Since my Spellbinders ef is new, I'm adding card two to Darnell's February NBUS Challenge. The Lawn Fawn sentiment set is new too but I'll just link one card.

Thanks for visiting & have a crafty day!! I'll be back tomorrow with some gold items for the February Die Cut Divas Challenge - hope to see you there!!

Happy crafting!!


Saturday, February 11, 2023

Fun with Florals - a Spellbinders/Altenew Collaboration event

Hey everyone - I've been busy the past few days with an online event co-sponsored by Spellbinders and Altenew. Four classes (2 Thursday and 2 Friday) were done with pre-recorded video so you could take them any time. Then today we met on Zoom for a LIVE with Kim Kesti from Spellbinders and Lydia Evans from Altenew. A detailed handout came with each of the classes but nothing for the LIVE yet. Sadly, there were some access issues with the LIVE today so hope you weren't one of those affected - I wasn't, thankfully.

I thought I'd share my versions of the class cards, plus the card I made using what Lydia Evans taught in the LIVE today; I'll try to make Kim's cards later. Just five cards to share so not too photo heavy, I hope! We used new supplies from both companies - Spellbinders has added them to their store now but Altenew's aren't on their site yet. I added links where available.

Class one with Yana Smakula - Monachrome Florals! Purple - my fave!!

Supplies: Paper - various Spellbinders
Stamps - Altenew Folk Art Flowers (sentiment)
Dies - Spellbinders Four Petal Bloom Reflection
Embossing Folder - Altenew Folk Art Flowers 3D
Other - Versamark ink, gold ep, foam tape

Yana loves dimension so loads of foam tape here! Such a gorgeous die set - it cuts one of the background panels and all the topper flowers - this card features two cuts of everything. The flower centers were cut from a little piece of Spellbinders glitter foam cardstock included in the kit package - so fun & it cuts like butter! 

An A2 purple panel was partially embossed at top then flipped and partially embossed at bottom - a bit tricky since the embossing folder is a big square and I was using a Platinum 6. Then assemble all your die cuts - a bit confusing the first time through but much easier once you know what goes where. The supply kit came with a bitty label which I messed up while embossing. Fixed it by embossing on Lawn Fawn paper and die cutting into a circle which I glued over my boo-boo,

Class two with Lydia Evans - Double Colored Die Cuts!


Same supplies for this one but we also used the coordinating die for the Folk Art Flower. Die cut three of the flower, then embossed each one and adhered them atop an A2 card to create the background. Lydia used white cardstock to die cut all her 4 Petal Bloom Reflection pieces, then inked/shaded them. I did that for some but mostly used Jennifer McGuire's trick of starting with colored cardstock, then shading. I used different colors than she did & also added a golden shadow layer to the green base.

Class three with Jen Rzasa - Regal and Radiant!


Jen had us do the angled embossing on an A2 panel then fussy cut it. Used the coordinating stencil to color before popping onto the card base. I found these stencils confusing at first use - hope to improve! I stamped birthday from the Altenew set and die cut happy with vellum shadow from the new Spellbinders Thanks Enclosed Sentiments. My dots are some extra glitter foam flower centers I die cut - love!!

Class three with Carissa Wiley - Bold and Opulent Colors to Create a Statement!


I photographed this on my Valentine candy box so the delicate peach card would show up better - so gorgeous with the teal panel stamped tone-on-tone with the Altenew Folk Art Flower. I cut my teal on 3 edges with the deckle die from Altenew's Mix and Match Frame Set - Carissa left hers straight. I also changed up my flower colors.

Card I made from today's LIVE with Lydia Evans:


We did a shaker with the base layer embossed, then stenciled. I inked the edges of my top layer to soften the white but mainly to cover a nick of purple from my finger - lol. Shaker bits were included in the supply kit they coordinated. I used a different sentiment from the Spellbinders die set - such a fab new set.

That's it! Whew - a lot; time for a nap! I'll share card one at Darnell's February NBUS Challenge since my Four Petal Bloom Reflection set got first use there.

Thanks for stopping by and happy crafting!!