Welcome to my blog!

Thanks for visiting my blog. As the title suggests, I love to scrapbook, stamp, and sing! I will share cards and scrapbook pages I create, as well as information about my music - Barbershop harmony.
Showing posts with label Thanksgiving cards. Show all posts

Thursday, November 27, 2025

Happy Thanksgiving!

Happy Thanksgiving to all in the USA! I'll be dining with friends that are like family to me later in the day. Here's a pair of pilgrims to start the Thanksgiving fun:


Supplies: Paper - Neenah Classic Crest Solar White;
Paper Studio Assorted Cardstock; 
Stamps with dies - Hero Arts September Card Kit (pumpkins),
Autumn Bounty Stamp & Cut (retired), 
& Color Layering Grateful Leaves (retired)
Stamps - Hero Arts Thankful (retired)
Dies - Spellbinders Country Wheelbarrow (retired)
My Favorite Things Stitched Scallop Basic Edges
Other - Copic Markers; white gel pen; foam tape


Additional supplies: 
Stamps - Taylored Expressions Mini Strips Harvest
Dies - Taylored Expressions Heart Fence & Hill (retired),
Other - Hero Arts enamel dots

Simple stamping, coloring, die cutting and assembling. I also made more versions of a previous card, just without the turkey and varying the papers. Finally, I made a pumpkin stack card using new Waffleflower; I'll take this one to dinner with me today.


Supplies: Paper - Paper Studio ombre A2 card
& orange cardstock;
Neenah Classic Crest Solar White
Stamps w/dies - Honey Bee Forever Grateful (dies)
Dies - Waffle Flower Pumpkin Time Texture Die
Stencils - Waffle Flower Pumpkin Time Coloring Stencil
Other - Hero Arts enamel dots; white gel pen

I started with an ombre A2 card. Die cut the pumpkin cover plate from orange card stock. Just used the stencil for the leaves/stems. Trimmed the pumpkin clusters apart and stacked them. Stamped and die cut the sentiment. Added everything to the card with some enamel dots & finished with some white gel pen details.

I'll add this card to Darnell's November NBUS Challenge #80 since my pumpkin die and stencils are newly used.

Thanks for stopping by! Hope you have a wonderful day filled with great food and family!


Monday, November 10, 2025

Turkey Among the Pumpkins

Hey everyone - the November Stay Crafty with a Blog Named Hero Challenge - Bits and Pieces suits me to a tee! The Challenge? Use your scraps and stuff from the UFO (UnFinished Objects) box (or in my case, many boxes & even large bins!!). Here's my card:


Supplies: Paper - Neenah Classic Crest Solar White;
Recollections A2 card; patterned scraps
Stamps with dies - Hero Arts September Card Kit (pumpkins),
Autumn Bounty Stamp & Cut, 
& Color Layering Grateful Leaves (both retired)
Dies - Kat Scrappiness A2 Stitched Strips
Other - Copic Markers; foam tape; 
turkey upcycled from a previous card;
Hero Arts enamel dots (from card kit); 
enamel heart from Pink & Main

I often stamp multiples when working with a new stamp set. I sometimes store them in a cellophane bag with the set but more often they end up in the UFO box. Or, they're still on the craft counter for weeks on end, as is the case with the pumpkins. I stamped oodles of pumpkins when I received the Hero Arts September Card Kit. I'd sit coloring them during Craft Roulette member Zoom calls (we craft and chat). I figured I'd be able to work them in to Thanksgiving cards so that's where I started today. Here's a photo of part of my craft counter:


I liked Michelle Lupton's inspiration card with the scrap strips so I made some of my own! I have paper scraps in a 3-drawed plastic cart with neutrals in the top drawer, solid colors in the middle drawer & patterns in the bottom. There were some fall-ish ones towards the top so I pulled those. I die cut them with a set of stitched strip dies. Here's a photo of the bin:


Pulling 5 patterned snippets barely made a dent! Since I used snippets, I'll share at Snippets Playground #519. And since my pumpkins are newly used, I'll add my card to Darnell's NBUS Challenge #80. The turkey was pried off the Thanksgiving card I sent to my aunt last year. She saves my cards and then gives them back when she gets a bunch. I upcycle what I can...

Bonus: Thought I might as well share another card using the September kit since I hadn't blogged it yet. A chorus member & her husband celebrated 60 years of marriage in October so I made a squirrel card! I used two squirrels, some leaves, and a fall tree from the kit, along with a big diamond (the symbol for a 60th anniversary) & a Betterpressed banner (using a hot foil plate). 


Supplies: Paper - Neenah Classic Crest Solar White;
freebie leaf print from Lawn Fawn; 
Paper Studio brown & black cardstock;
scrap of Graphic 45 green print;
Recollections A2 card
Stamps with dies - Hero Arts September Card Kit;
Art-C Stamp & Die set (diamond)
Dies - Hero Arts September Card Kit (tree & carvings);
MFT numbers (NIB)
Hot Foil Plate with die - Spellbinders set name unk (retired)
Other - Copic Markers; Stickles; foam tape; white gel pen

Simple stamping and die cutting here - very fun to put together. I love how this turned out & the couple loved it too!! 

Thanks for stopping and have a crafty day!!


Thursday, November 28, 2024

Happy Thanksgiving USA 2024

Hi all - if you're from the USA you're celebrating Thanksgiving! Wishing you a wonderful day!!

Thought I'd share the rest of the Thanksgiving cards I sent this year....


Supplies: Paper - Recollections A2 card;
Neenah white; Sunny Studio Critter Country
Stamps - Hero Arts Bold Pumpkin
Other - Paper Studio sticker; Copic Markers; white gel pen;

I lead with the card I sent my baby sister. She often calls people "pumpkin" as a term of endearment so I thought she'd get a kick out of the sentiment sticker (she did!). I downloaded a sheet of icons from Scrapbook & Cards today and fussy cut them, using the piece of pie here. I stamped, colored and fussy cut the HA woodblock pumpkin & arranged the elements on an A2 card with a couple strips of Sunny Studio paper - done!

I mentioned in a previous post that I put together a bunch of turkeys using a retired Impression Obsession die set earlier this month. Here's how I finished off the rest of them using various patterned papers (mostly Sunny Studio Critter Country), Paper Studio stickers, another HA pumpkin and some Taylored Expressions Mini Strips - Harvest:


I made a similar version of the card above (just different sentiments) which I'm not posting. Finally, I made a card using some retired Hero Arts rub-ons that I bought a couple years ago (see previous card with them HERE and HERE, if interested). I'm taking this one to my neffy-poo (son of good friends, not a real nephew) who's hosting Thanksgiving dinner later today.


That's it for today. Hope you have a lovely day, whether or not you're celebrating Thanksgiving! Thanks for stopping by!!

Monday, November 18, 2024

A Thanksgiving Z-fold for Craft Roulette #241

Hey all - Happy Monday! I finally got a chance to watch Craft Roulette #241 which aired Friday night while I went to a party. Here's my creation:

Supplies: Paper - Recollections yellow 65lb cardstock;
Sunny Studio Critter Country; scraps
Dies - Impression Obsession Patchwork Turkey (retired);
Simon Says Stamp Holiday Baking Essentials
Other - Paper Studio Thanksgiving ephemera and stickers;
foam tape; Taylored Expressions Sweet Corn, Latte, & Hot Fudge inks

Host Mary Gunn FUNN had Jessica Vasher (Jessica Vasher Designs) as her guest. Jessica has been cardmaking for 10 years and posts process videos whenever she can. The wheel gave us another set of interesting parameters to use on our cards:


  • Project - Z-fold card: I formed a double Z-fold from cardstock.
  • Colors - Scarecrow: Yellow & brown, plus orange and blue commonly for clothes.
  • Element - Bake: Baked pie, plus there's a rolling pin on another section of the Z.
  • Random - Crinkle Inkle: This is what Mary Gunn calls inking with something crinkled, be it plastic wrap or paper. On the front Z panel I crinkle inkled the whole thing with some plastic packaging & 3 different TE inks.
I watched a YouTube video on creating a triple Z-fold. Decided I only wanted two layers. The instructor didn't give the dimensions of her 2nd and 3rd layers but you could really use however deep you want them. Length always starts at 11 inches to fold to an A2 size. I tried some TE Sweet Corn cardstock but it was too heavy. Found a lighter weight yellow in a Michael's pack. Back layer is 4.25x11" long scored at 2.75 and 5.5". Top layer I cut to about 3x11"; scored at 4.25 and 7". Here are a few other views:


I had just started my Thanksgiving cards by assembling a bunch of IO's Patchwork Turkey, sadly retired. They have another turkey die set but I think Mr. Patchwork is cuter. I decided I could make a turkey work for my Craft Roulette project, thereby getting a Thanksgiving card finished! I only make 6 so it should go quickly but I'll keep the rest to normal A2s.

That's it for today, friends - thanks for visiting!!

Tuesday, November 21, 2023

Cards for a couple of holidays

Hi all - it's my turn to post at Die Cut Divas today! This month we're celebrating holidays - that would be ANY holiday! For full challenge details, go HERE.

Of course, I'm still trying to get this year's Christmas cards done so here's one featuring new-to-me dies by our wonderful November sponsor Kat Scrappiness (KS). They have donated a fabulous prize package to be awarded to our random winner from eligible (US address only - sorry) November entries.


Supplies: Paper - Pink & Main Jolly;
Paper Studio Holiday; vellum;
Tim Holtz Kraft Metallic
Other - Hero Arts Sparkle Lacquer; BG70 Copic


I covered an A2 card with a tree patterned paper from Pink & Main's Jolly 6x6 pad. Added a reverse scallop frame, then the layered tree, star and sentiment. Colored the snow edges with a Copic and added sparkle lacquer - done! Kat Scrappiness dies cut like butter and are a joy to work with! I'll probably make a few more of this design since it came together so quickly. The tree die set also contains a bunch of little bauble dies but I chose to leave them off this time.

For my bonus, I made my final Thanksgiving card for this year. I used a long time fave KS mini slim diamond wire frame. 


Supplies: Paper - Tim Holtz Classic Cardstock
Doodlebug Designs Swiss Dot Rainbow Petite Prints;
Neenah Classic Crest Solar White
Stamps - Hero Arts Thankful (c2010 retired) &
Thankful for You (c2012 retired)
Other - Copic Markers

I created a mini slim top fold card from TH cardstock, then added a die cut diamond wire frame (cut from another shade of TH cardstock) that I'd backed with dotted paper. Stamped four of the Thankful images on Neenah white, colored with Copics and fussy cut. Stamped the sentiment on a scrap of orange & fussy cut. Arranged the elements on the card and adhered with glue and foam tape - done!

That's it for today. Thanks for visiting and I hope to see you in the November Diva gallery by 9p PST on 11/30/23; just remember to use a die cut or embossing folder in your design - use of Kat Scrappiness isn't required.


Monday, November 13, 2023

Thanksgiving swag

Hi everyone - hope you had a great weekend! I started my Monday with some card making - still working on Thanksgiving cards! Thought I'd fit another one in at Just Us Girls Challenge #705 where they're doing a word prompt of Thanks or Thanksgiving. 

Supplies: Paper - Paper Studio A2 card;
foiled kraft paper from Target years ago; Neenah white
various scraps of green, orange, red & brown
Dies - Poppy Stamps Fanciful Fall Leaves;
Stamps with Dies - Hero Arts Holiday Season Messages Bundle
and Thankful (c2010 retired)
Other - foam tape; Copic Markers

I had die cut a bunch of leaves for yesterday's card and had a leftover oval from cutting a brown frame for dimension. Decided to use the oval atop a stitched rectangle of foiled leaves and create a swag below the sentiment, this time using a pumpkin.

And here's a twofer - a portrait orientation of yesterday's card:

Supplies: Paper - Neenah White; Tim Holtz cardstock;
Paper Studio A2 card
various scraps of green, orange, red & brown
Dies - Poppy Stamps Harvest Oval Frame &
Stamps with Dies - Hero Arts Autumn Bounty Stamp & Cut
(retired but I saw one left HERE at Frantic Stamper)
Other - Altenew enamel dots; foam tape; Copic Markers;
Hero Arts sprays - orange & red

This one was a bit simplier since I started with a darker cardstock and just used two sprays. I also gave the frame no dimension; yesterday's card was stacked with 3 diecuts. Left this nice and flat for mailing.

Thanks for stopping by & have a crafty day!

Sunday, November 12, 2023

Leafy Thanksgiving

Happy Sunday - hope you're enjoying the weekend! I'm way behind on making Thanksgiving cards (hadn't started yet). Then Just Us Girls announced Challenge #705 yesterday with a word prompt of Thanks or Thanksgiving. Yay - inspiration to get started & I came up with a card using a new-to-me Poppystamps frame. It's a fall 2022 release that I recently ordered at a deep discount from Poppystamps along with some new Christmas items. Here's my card:


Supplies: Paper - Hero Arts Antique Ivory;
various scraps of green, orange, red & brown
Dies - Poppy Stamps Harvest Oval Frame &
Stamps with Dies - Hero Arts Autumn Bounty Stamp & Cut
(retired but I saw one left HERE at Frantic Stamper)
Other - Park Lane gems; foam tape; Copic Markers;
Hero Arts sprays - orange, red & yellow

I die cut the frame in ivory then spritzed it with 3 different sprays. After drying it with a heat tool, I sponged Gathered Twigs DOI around the edges & around the center oval (which cuts with the frame) & the card base. Die cut leaves and acorns from scraps; stamped, die cut & colored corn. Stamped Thanksgiving on the oval and added a die cut happy. Arranged everything and adhered with glue or foam tape. A few gold gems - done!

I'll also add this card to Darnell's November NBUS Challenge since my frame (and leaves) got first play today.

Thanks for visiting & have a crafty day.


Thursday, November 24, 2022

Thanksgiving Wishes

It's Thanksgiving Day in the USA - hope you enjoy it if you're celebrating today! I'm so grateful for all my family and friends; special thanks to my blogging buddies whose kind comments make my day!

Supplies: Paper - Paper Studio brown and ivory; 
scrap of patterned by unk
Stamps - Hero Arts My Monthly Hero kit 0922 (background print);
Whimsy Stamps Autumn Blessings (retired - sentiment on left)
Dies - A Jillian Vance Design Stitched Dot Rectangle Backdrop Set 
Rub ons - Hero Arts Autumn Arrangement
Other - Creative Expressions sentiment strip (bday);
Versamark, Taylored Expressions and Hero Arts inks 

I previously shared cards using the bouquet stamp set (see them here & here if desired). Today's cards use rub-ons and oh, how I love them! A sheet of them came with the Sept 22 My Monthly Hero kit but they were so popular that HA offers them for separate purchase. Of course my last 3 orders I have forgotten to add them to the cart - oops. They make such gorgeous fall cards that I'd like to have some on hand. 

I sent the bday card to my friend Dixie - her bday sometimes falls on Thanksgiving but not this year. She'll celebrate on Sunday. I'm taking the card on the left to Thanksgiving dinner with friends Connie & Doug. Here's the thanks card I have ready to mail to them after the event:

Supplies: Paper - A Cut Above A2 card; BoBunny Farmer's Market 6x6
Paper Studio Brights, Brown & Glitter
Dies - Birch Press Design Big Thanks Sugar Script;
Embossing Folder - Darice Fall Leaves Swirl

I'm adding the thanks card to Darnell's November NBUS Challenge since my embossing folder is newly used. LOL - It's a 2013 copyright and, if I remember correctly, I bought it in 2016. Just opened the package to make the card on Tuesday - so yay for getting it off Mount NBUS!!

Maybe you'll have crafty time once all the football games and food/clean up have ended. If so, check out our November Die Cut Divas Challenge where Birch Press Design is our sponsor. I have my favorite BPD thanks die out in their honor today. No need to use their products to play along - any die or embossing folder will do!

Thanks for stopping by!


Friday, October 14, 2022

A Poinsettia Quad Window!

Welcome - I'm back with another poinsettia card for the October Christmas Kickstart Challenge.

Supplies: Paper - Park Lane A2 card; 
BoBunny Winter Getaway; Poptone Black;
Paper Studio Holiday & Glitter cardstock; 
My Favorite Things Very Merry
Dies - Sunny Studio Window Quad Circles 
A Jillian Vance Design Stitched Dot Rectangle Backdrop Set;
Sizzix Joy (from a retired stamp/die set)
Other - foam tape

In my earlier post for the Kickstart challenge, I mentioned it not being Christmas card-making season without my Hero Arts Paper Layering Poinsettia set. Well, same goes for my Sunny Studio's Window Quad Circles set! I just love this set and pair it with a little freebie flower that you can find in with Sunny's Basic Mini Shapes 4 set. It makes a fabulous layered flower! Today I'm using the window part for only the second time. You can see the non-Christmas card I made with it back in 2020 HERE. If interested, you can search my blog using "quad" to find more Christmas versions using the flower.

First I die cut pieces for four flowers using red cardstock & green and gold glitter cardstock, then assembled. Next I trimmed a 3 3/4" square panel of BoBunny striped paper & die cut the Quad Circles into it. I also die cut a red circle with part of the quad and a layering circle with my Hero Arts set. Next I die cut several layers of black Joys and a topper Joy of green glitter; I assembled leaving a bit of black as a shadow. I die cut the MFT Christmas text paper with an AJVD stitched dot rectangle & adhered to an A2 card. Adhered the quad window square with foam tape & added three flowers and sentiment. 

What to do with the bottom part?? Hmmmm.... I tried a couple gold glitter strips alone - ugh. Tried with a black strip between the gold - better. With the sentiment taking up one of my circle windows, I had the 4th flower left. Added it to my black strip - finally liked the arrangement. Done!

That's entry two of a possible three for Kickstart and I already am planning card three. Just received my October Spellbinders package and found loads of poinsettia stuff inside!! Don't laugh - I haven't even opened September's box yet.... 

And here's another version of a card using the Hero Arts September 2022 My Monthly Hero kit (you can find my other two HERE). On this one, I stamped the urn bouquet in black which I like better than the brown we used in the Make-Along last weekend. We cut off the urn bottom to make a pumpkin vase during the Make-Along; I left it intact here. I stamped the background with Versamark, rather than Forest Green ink, and used a few darker Copics than last time. Another Thanksgiving card done - only two more to go! The kit contains some gorgeous rub-on urn bouquets and I plan to use them - saves some coloring time - LOL.


Thanks for stopping and happy crafting!


Thursday, November 25, 2021

Happy Thanksgiving USA!

Hi all - I'm popping in with a quick post to wish all my US friends a Happy Thanksgiving!! I've been offline a lot and sorry I haven't been able to visit your blogs as often as I'd like (more on that another time). For now - I'll just share a Thanksgiving card and say how thankful I am for all of you, celebrating today or not!! Hope all is well and that you have a wonderful day!!

Supplies: Hero Arts Autumn Leaves Fancy Dies
Taylored Expressions All Tucked In Harvest

I just received a Hero Arts order with some new dies and had fun using the autumn leaves set. I'll add this to Darnell's November NBUS Challenge since the leaves are getting first play. Sorry for the poor photo; I just made this card last night and the light was bad. I had fun with the staging though - the fuzzy pumpkins came from Target, along with the tray & wheat. The leafy orange paper came from Target a few years ago when they still had paper pads in their Hot Spot (luckily I bought several)

Thanks for the visit!!

Saturday, November 21, 2020

Thanksgiving Flip Card

Hey everyone - hope you're enjoying this fall day! I've got a post up at Die Cut Divas today with November's challenge theme of Thanks or Thanksgiving. Our wonderful sponsor this month is Frantic Stamper and I'm sharing this Thanksgiving card:


Supplies: Paper - Anchor Paper brown & ivory;
BoBunny patterned
Dies - Sizzix Circle Flip-its #2 (available at Frantic Stamper here)
Stamps - Art Impressions Thanksgiving Circlet;
Taylored Expressions Many Minis - Holiday (retired)

I absolutely love this flip card die set and have used it before but it's been a few years (see other examples here). If it's already sold out at Frantic Stamper by the time this post runs, you can find oodles of other flip cards!!

Frantic Stamper Inc.

Here's a view of the card open with the center circle flipped:


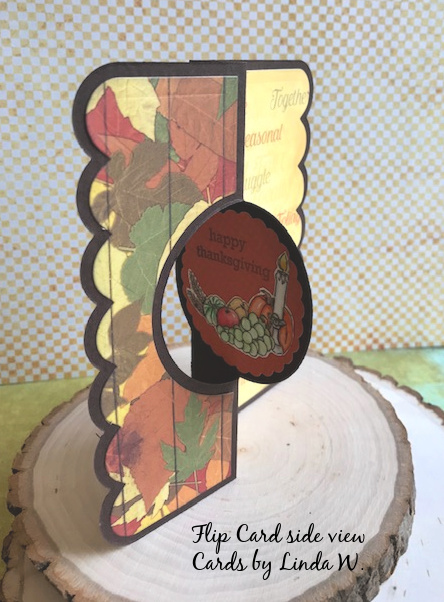
And a side view of the card standing up; I plan to put my message on the back.


I hope to see your Thanks or Thanksgiving themed card in our Diva gallery! You have until the 30th at 9pm Pacific time to play along (max of 4 entries). Thanks for visiting!


Tuesday, September 22, 2020

Scramble - using Multiple Stamp Sets

Hi friends - We have a private Facebook group for Hero Arts Scramble Lovers and I have a card I shared there yesterday, created in about 60 minutes. The final steps took me another 15 minutes so I was still within the allotted time. Char is the host and chose the theme of multiple stamp sets. Here's my card:

Supplies: Paper - Ms Sparkle A2 card & Woodgrain Neutral;
Paper Studio brown, kraft and ivory
Stamps - Hero Arts CL987 Color Layering Grateful Leaves &
CL882 Autumn (both retired)
My Favorite Things various Blueprints (retired)

I started by stamping an array of leaves (just the solid parts; some have a separate vein stamp) on a piece of woodgrain patterned paper. Next I die cut the leafy panel with a stitched rectangle and added a brown mat, then glued to my card base. Next I cut three of the labels from Concord & 9th, stacked for dimension & glued to the leafty panel. Die cut the banner letters from brown and 5 solid banners from the orange & layered. Arranged on the label with foam tape then added the string. Stamped THANKSGIVING on a strip of ivory and hand cut flag ends. Popped onto the label - done!! I think the creation of the background paper with stamping took the longest, even with a MISTI.

I'm adding this to Virginia's September Show and Share (sorry - no rainbow colors but that was optional...). Thanks to Char for hosting a fun Scramble, to Virginia for her challenge and to you for stopping by! Hope you have a crafty day!!


Monday, September 21, 2020

I'm A Diva!!

Hey friends - you're probably thinking, "yeah right - she's a diva in her own mind"! But it's true - I'm now an official Diva, joining the Design Team over at Die Cut Divas. I've known most of the team for over 10 years and will quickly get to know the other members. Thanks to all the Divas for inviting me to join them! Here's my inspiration card for the September Challenge All Kinds of Holidays Time.

Supplies: Paper - Cinnamon cardstock from an old Hero Arts kit;
BoBunny Enchanted Harvest and Bold & Bright Double Dot (both retired);
Bazill brown; scrap of kraft
Studio Calico Here + There; Basic Grey True Love
Dies - Impression Obsession Patchwork Turkey
Stamps - Divinity Designs Mini Tag Sentiments;
Hero Arts CM110 Holiday Planner Icons (retired)
Other - Hero Arts orange metallic decor (retired;
Frayed Burlap Distress ink; Darice 4mm googly eyes

Cheapo Dies sponsors our challenge this month and offers a $15 gift certificate to the challenge winner (to be announced on 10/3 on the Die Cut Diva's blog). Have you heard of Cheapo Dies? I learned about them from the Divas and subscribed to their newsletter. Since I had to make my first post card quickly, I used at least one die from my stash that's sold at Cheapo Dies (available when I made my card, anyway...). They carry a TON of brands, including my fave Hero Arts, Altenew, Memory Box, Poppystamps, etc. and all at a great value. I could say more but let me talk about the card!

I started out diecutting the turkey from various papers and adding extra layers, such as two bodies with the legs sandwiched between for stability. I added googly eyes and some metallic dots for accents on one layer of tail feathers. Isn't he just the cutest??!! The brown dotted paper is from BoBunny's Enchanted Harvest pad and I used the text background paper and striped paper from the same one. The label was diecut from a piece of Basic Grey valentine paper (can you see the bitty hearts?); I didn't care - it was the color of woodgrain I wanted!! Behind the woodgrain paper I stacked several more of the die cut labels for some dimension.

Let me tell you  about my stamp set box I call "Celebrate Everyday", borrowing the name of a Hero Arts stamp set (CL498) I own which contains loads of different holidays in one set. In this box I put all the stamps from holidays, other than Christmas (which has multiple boxes of its own!!). I grouped each holiday together for ease of finding them. Then at the front I have sets that have multiple holiday sentiments, plus some Hero Arts planner sets that have loads of words & icons for various holidays. When I didn't find a single Thanksgiving sentiment to fit my project, I combined stamps from two sets of the multiple and planner variety. The trio of happys came from Divinity Designs (love this set!!) and  the Thanksgiving from Hero Arts.

That's it from me for today. I hope you can find time to make a card this month using at least one diecut or embossing folder for any holiday (maximum of four entries). You'll find all the details and more inspiration at the challenge post  from the first of this month.

Thanks for stopping and thanks again to the Divas!!

Current Design Team

Thursday, September 10, 2020

Fall trees

Hey crafty friends - there's a new challenge up at the Twofer Challenge to use trees. I really wanted to do something other than a Christmas tree since I'd recently made a Christmas tree card (see it here, if you missed it). I was inspired by Darnell's (djkardkreations) card and by Marcia's (Marcia's Stampin' Pad) card using branchy trees with dots. I pulled out an older Hero Arts fall set called Color Layering Fall Trees that has both of those. Here's my Twofer:


I thought the bare tree would be fun as a spooky tree for Halloween and then as a fall tree with all the dotted layers for Thanksgiving. Here's a closer look at each with supplies:

Supplies: Paper - Poptone Black; 
Neenah Classic Crest Solar White
CL628 Ghostly Greetings (retired);
Simon Says Stamp Creepy Cute (retired)
Dies - My Favorite Things Blueprints (retired)
Other - Copic Markers; Distress Inks;
Hero Arts Intense Black Ink & Crystal Clear Lacquer Pen

I used a fun Haunted House from a 2017 SSS set, stamping it onto a white stitched diecut rectangle just for placement, then stamping the middle tree on the left and the far right tree to go off paper. Next I stamped the ghost & boo. Then I colored in the sky and ground with various Distress and pigment inks. My scene looked pretty bare so I added three more trees & some shadows. I had intended to stamp and color the house separately & pop onto the card but I really liked how the trees overlapped onto the house. So, I colored the house I'd already stamped. I thought the multiple Halloween colors would add a nice pop. Stamped the sentiment & put lacquer on the windows - done! Next, the Thanksgiving tree:

Supplies: Paper - Paper Studio ivory & glitter;
Authentique Thankful; BoBunny Enchanted Harvest
Stamps - Hero Arts CL886 Color Layering Fall Trees &
Taylored Expressions All Tucked in Harvest
Dies - My Favorite Things Blueprints (retired);
Other - Copic & Distress Markers;
Memento Rich Cocoa & various Hero Arts inks

I stamped the bare tree onto ivory cardstock and then all the leafy layers in autumn colored inks from various My Monthly Hero kits. Note to self - label the colors when the kit arrives!! Next I die cut the panel into an oval and colored in a little ground with Copics, then popped it onto a glittery oval in the next size up. Die cut a stitched rectangle, added a strip of a different pattern and adhered all to an ivory card. Next I die cut a set of ivory sentiment strips and used the one best fitting my sentiment. Stamped the sentiment and adhered with foam tape - done!!

I'm also adding my Halloween card to the current Watercolor Wednesday Challenge All Occasions and my Thanksgiving card to the current Sweet Stampin Challenge Anything but a Birthday Card. Thanks to all for the fun challenges! Thanks to you for visiting and for any kind comments!! Hope you have a crafty day!