Welcome to my blog!

Thanks for visiting my blog. As the title suggests, I love to scrapbook, stamp, and sing! I will share cards and scrapbook pages I create, as well as information about my music - Barbershop harmony.

Wednesday, July 31, 2024

Final Day for July 2024 Die Cut Diva Challenge!!

Welcome everyone - I'm posting card one below with the end-of-month team at Die Cut Divas today, then a bonus follows only here. You have until 9pm Pacific Time to link a project to our July Diva Challenge where we're Adding Glitter!! 


Supplies: Paper - Authentique Patterned;
Paper Studio A2 card and glitter paper; scraps
Stamps with dies - Scrappy Tails Flower Shop (Dies HERE)
Dies - Scrappy Tails Stitched Daisy Blooms;
Other - Hero Art enamel dots; Copic Markers; foam tape

Our wonderful sponsor this month is Scrappy Tails which I'm just getting to know. As I mentioned in my earlier July Diva post, I had placed an order for a flower die bundle and a glimmer plate - all products were fab! Scrappy Tails has generously donated a $25 gift card to their store which we'll award to our random winner on 8/3/24.


Teamie Arlene (A Bit of This and That) had stamped & die cut the Flower Shop bits for me (Thanks Arlene!!). I colored them with Copics. Next I die cut a rectangle to represent a little house; added it to an A2 card with a strip of silver for the sidewalk. Added a little roof to the "house" and then popped the window (backed with some vellum and yellow paper for a light effect) on with foam tape. Added the bicyclist and a flower that reminded me of a sun. Gave the bike wheels some enamel dots. Done!

Now for a bonus:


Supplies: Paper - Paper Studio A2 card & glitter cardstock; 
Hero Arts black; Lawn Fawn patterned (freebie with order)
Dies - Scrappy Tails Bloom Trio Bundle;
A Jillian Vance Design Stitched Dot Rectangle Backdrop Set
Other - white gel pen

Each set from the Bloom Trio Bundle (Retro Birthday Blooms, Stitched Daisy Blooms, and I Love You Mom Blooms) includes a butterfly die so I cut one from each. I stacked a couple of the Thanks (included in the daisy set) for dimension & added some white dot details - quick and easy!

Thanks for stopping by and we hope to see you in our July Diva gallery using some die cuts (or embossing folders) and glitter!! Remember: link up by 9pm Pacific Time today.


Monday, July 29, 2024

Stenciled English Garden Birthday Card

Happy Monday everyone! I'm playing along with Darnell's IDEAS program where S is for Stencil this week (see her gorgeous inspiration HERE at djkardkreations). 


Supplies: Paper - Park Lane A2 card;
Neenah white; Betterpress Porcelain
Stamps w/Die & Stencils - Pinkfresh Studio English Garden
 (retired but found at Frantic Stamper - stamps, die (limited availability; no stencils)
Hot Foil Plate with Die - Spellbinders All You Need Sentiments
Other - embossed panel from a friend;
Hero Arts & Memento inks; Hero Arts enamel dots;
Spellbinders Betterpress Black ink

When I visited my fave local craft store earlier this month, I found all their in stock stencils 20% off. This prompted me to invest in a Pinkfresh Studio set that I've admired for a long while. Sadly, it's retired at Pinkfresh but my local store had all the coordinating products. I was enabled by Lisa (My Paper Tales) who sent me some English Garden washi cuts last year - see the card I made with them HERE.

Simply stamped, stenciled & die cut the pieces. The embossed background came from my friend Greta (GG Creations) along with a Card Chain card back in May. Thanks again, Greta! Arranged everything on the card with foam tape & added a sentiment - quick and easy! The sentiment is another hot foil plate that I Betterpressed - so fun to be able to use those plates more than one way (although I have yet to hot foil it...).

Here's a process photo including the inks I used; the sixth step of the stencils is still over the paper. I found my large MISTI perfect for both stamping and stenciling this large stamp. The single die cuts out all the individual pieces which is such a time saver.


I'll send my card to Darnell's July NBUS Challenge #64 since my English Garden stuff is newly used. I'm also playing at Just Us Girls #737 Stencil Week and at Tic Tac Toe Challenge #252 (third of 3 max) where my friend Betty has set the board. Once again I've used the center vertical column - Die Cuts/Free/Any Sentiment.

Thanks for stopping by & have a crafty day!!


Saturday, July 27, 2024

A Pair of Pet Christmas Cards!

Hey there friends - I spent yesterday evening watching Craft Roulette Episode #225 & crafting along. I managed to make two cards during the LIVE - first is the episode contribution and the second card they call a bonus contribution. Last week over 500 people contributed - amazing!!


Supplies: Paper - Authentique Colorful Christmas
Paper Studio pastel A2 card; scraps
Stamps w/dies - Hero Arts Fluffy Stockings Stamp & Cut (retired)
Colorado Craft Company Meowy Christmas (dies HERE)
Dies - A Jillian Vance Design Stitched Dot Rectangle Backdrop Set;
Other - Copic Markers; foam tape; Hero Arts enamel dots

Host Mary Gunn FUNN had Vicki Ruta from the UK (The Craftacular Creator) as her guest and the wheel was very kind to us this week:


  • Project - A2 card: I used a preformed A2 card from a pastel boxed set.
  • Colors - Tea Party: Found a "high tea" color palette online using mints and pinks.
  • Element - House Pet(s): I used a kitty image.
  • Random - Stripe(s): I used a striped patterned paper.
Some simple die cutting and stamping/coloring and I had a card in no time!! Was done so quickly, including editing and uploading at CR, that I made a second card. Used a doggy from the same main stamp set (including one of the sentiments); the first card's sentiment was from a Colorado Craft Company kitty set. Also used the same papers and Copics for coloring. I cut my striped paper too short so I turned it into a banner. The oval ended up higher because of it but I was fine with it.


Two more cards for the Christmas stash & that's it for today. Thanks for stopping & have a crafty weekend!

Friday, July 26, 2024

Stitched Bow Christmas Card

Hello & TGIF everyone! I wanted to do another Christmas card for the current Color Hues Challenge #91 featuring Red & Green. My stash of cards is getting bigger but I still can use more! Here's my card:


Supplies: Paper - Stampin Up Cherry Cobbler;
Paper Studio A2 card; Spellbinders Betterpress Porcelain
Dies - Spellbinders Stitched All Wrapped Up (DOMST-Jul24)
Letterpress w/die - Spellbinders Betterpress Merry & Bright Sentiment Strips
Other - DMC floss #347 
Spellbinders Betterpress Leaf ink

I die cut all the bow pieces, most twice and some three times. The stitching dies are separate from the outlines so you could use the bow without stitching. I used them on the appropriate pieces, stitched with DMC floss (3 strands), then backed with an outline piece. Not sure if Spellbinders gives this as a tip but I find it protects the stitching. It also gives a smooth backing to adhere to the card. The extra bow loops and tail pieces were added for dimension - here's a view of this:


I think the dimension adds a lot. This view better shows the bow's deep red than the overhead photo. The green looks more minty here but it is a deeper green in real life. I debated stamping some text on the card base but decided to leave it plain; the bow is the star here! Stitching while watching television is very relaxing; I did the bow last night watching reality tv. Assembled the bow on the card this morning and added a Betterpressed sentiment from the stash. Done!

I was excited to get to this stitching die set so soon after the July Spellbinders box arrived; usually I'm much slower!! I'll add my card to Darnell's July NBUS Challenge since the dies got first play today.

Thanks for stopping by & have a crafty day!


Wednesday, July 24, 2024

Winter Park Scene

Happy Wednesday everyone! 

I'm back with more Hero Arts 2024 Holiday Shopbox products that I picked up at my favorite local store on Monday (will be available at Hero Arts online on 8/22). I shared a card using a new peeking die set yesterday; today I have a park scene:


Supplies: Paper - Hero Arts Bermuda; many scraps;
Paper Studio glitter; Lawn Fawn All the Dots;
Spellbinders Betterpress Porcelain
Dies - Hero Arts Snowy Street Lamp;
Memory Box Pine Tree Grove;
Press Plate with die - Spellbinders Betterpress Merry & Bright Sentiment Strips
Other - Copic Markers; Betterpress Black ink

Die cut the lamp 3 times from black & stacked for dimension. Next, I die cut the candle twice - from scraps of gold and yellow; trimmed off the yellow flame & added to the gold candle. Die cut the wreath, bow (twice) and snowy details. Added to the lamp.

Die cut a LF patterned paper with a stitched rectangle & added to an A2 card. Die cut a glittery LF stitched hill & then the snowy banks from the HA set. Die cut them with the stitched rectangle so the edges matched & added to the card. Die cut the pine grove from Bermuda and glitter card stocks & assembled. Die cut the bench from a shimmery silver scrap & the birds from a red scrap. Added shading & details with Copics. Arranged the scene atop the cards and adhered. Added a pressed sentiment from the bits box - done!

I have other street lamp sets from other brands. I especially liked this new Hero Arts set for the extra scene elements it included. I could've left the trio of pines out and still had a nice scene just using this set.

Since my street lamp set got first play today, I'll send my card to Darnell's July NBUS Challenge #64. Will also add to Merry Little Christmas Challenge #57 where Anything Goes and to Tic Tac Toe Challenge #252 where my friend Betty has set the board. Once again I've used the center vertical column - Die Cuts/Free/Any Sentiment.

Thanks for stopping by & have a crafty day!!


Tuesday, July 23, 2024

Peeking Winter Bear

Hello & welcome! I wanted to play along with Darnell & her IDEAS program (see her beautiful inspiration HERE). This week A=Anything Goes and I wanted to do a Christmas card to build the stash. But what products to use??

Hero Arts just announced their 2024 Holiday Shopbox and I saw that my favorite local store participated this year! I popped over yesterday and picked up some new products not available yet, except at a Shopbox store. I knew right away that I'd use Peeking Winter Bear first - so cute!!


Supplies: Paper - Spellbinders A2 card;
Neenah Classic Crest Solar white;
Sunny Studio Holiday Cheer; scraps
Dies - Hero Arts Peeking Winter Bear;
Waffle Flower Christmas Banners
Other - Copic Markers

Die cut the bear 3 times from white & stacked for dimension. Next, I die cut the face bits from scraps of grey and black; trimmed & added to the bear. Did some shading with Copics. Die cut the accessories from a scrap of red & added to the bear. Adhered patterned papers to an A2 card, then added the bear. Die cut the sentiment from a scrap of black & adhered to the card. It looked a bit bare so I found some snowflakes in the bits box, plus die cut some more. Added them around the card and one to the bear's hat - done!

Since my bear got first play today, I'll send my card to Darnell's July NBUS Challenge #64. Will also add to Merry Little Christmas Challenge #57 where Anything Goes.

Thanks for stopping by & have a crafty day!!


Monday, July 22, 2024

Flamingo Anniversary

Happy Monday everyone! Gloomy day yesterday so I stayed inside and worked on a card for a couple of challenges. Here's my card:


Supplies: Paper - Park Lane gold A2 card; Poptone kraft; 
many scraps; Paper Studio pastel; BoBunny Double Dotted
Dies - Spellbinders Grand Tropical Flamingos (DOML-May24);
Hero Arts Beach Frame
Press Plates w/dies - Spellbinders You Are Everything Sentiments
Other - Copic Markers for shading

I die cut the flamingo from many scraps (including dark pink) & a pale pink card stock. Assembled the two birds. Next I die cut the Hero Arts beach frame w/oval using kraft cardstock, then again in green. Trimmed off the kraft palm leaves and replaced with green behind. backed the scene with a blue oval. Die cut a gold oval along with a second smaller oval to create a gold frame; added to the scene. 

Die cut a stitched rectangle and added to a gold A2 card, then adhered the oval scene. Die cut foliage from two colors of green scraps and added to the corners. Found an anniversary sentiment in the bits box and added it to the card. This will go to my brother and his wife for their early September anniversary.

I was inspired to pull out this flamingo set for the first time by the beautiful mood board for Just Us Girls Challenge #736. I'm also playing at Tic Tac Toe Challenge #252. My friend Betty designed the board so I made a special effort to get there - used the center vertical row of Die Cut/Free/Any Sentiment. And since my flamingo dies got first play, I'll send my card to Darnell's July NBUS Challenge #64.

Thanks for visiting! Enjoy your day!! 


Sunday, July 21, 2024

Friend Flower

Hey everyone - I'm posting card one below at Die Cut Divas today, then a bonus follows only here. For our July Diva Challenge, we're all about Adding Glitter!! Most people love some glitter; I know I do!!


Supplies: Paper - Spellbinders Betterpress Pebble;
Paper Studio A2 card and glitter paper; scraps
Stamps with dies - Scrappy Tails Flower Shop (Dies HERE)
Hot Foil Plate with dies - Scrappy Tails A2 Butterfly Frame (Dies HERE
Dies - Scrappy Tails Retro Birthday Blooms &
Other - Park Lane gems; Betterpress Leaf ink; foam tape

Our wonderful sponsor this month is Scrappy Tails, a company new to me. I placed an order for a flower die bundle and a glimmer plate & was very happy with the items. Scrappy Tails has generously donated a $25 gift card to their store which we'll award to our random winner in early August.


You might ask - Linda, don't you have enough flower die sets? Well, I made room for a few more - lol. On this card I die cut flower pieces (some glitter paper) from one set and the leaves (glitter paper) from another. Teamie Arlene (A Bit of This and That) had stamped off some flower sentiments for me so I made use of one here. Thanks Arlene!!

Rather than foiling the deco frame, I letterpressed it using Leaf ink. It's a thick plate so I had to remove all the shims before it would go through the Betterpress! Then I used the coordinating die to cut it out. Backed it with some LF speckled paper before adding to an A2 card. Added the blossom, leaves and sentiment - very quick and easy!

Ready for a bonus? I did another deco frame using Strawberry ink. This one I stacked with more die cuts for dimension and the look of a painting:


Supplies: Paper - Hero Arts Glitter Paper Basics;
Paper Studio A2 card; Spellbinders Betterpress Porcelain;
Sunny Studio Holiday Cheer
Stamps with dies - Scrappy Tails German Winter Village (Dies HERE)
Hot Foil Plate with diesA2 Butterfly Frame (Dies HERE
Dies - Lawn Fawn Stitched Hillside Borders


Thanks again to Arlene who stamped off some German village elements for me - aren't they the cutest?! Sadly, they're sold out of this set at Scrappy Tails.... I colored them with Copics & assembled atop a snowflake paper with sparkly hills. Added the stacked frame and then adhered to an A2 card. Added sparkle lacquer to to the snow on the buildings. Popped a sentiment up with foam tape. Such a fun card to put together!

I'll add card one to Darnell's July NBUS Challenge #64 since the flower, leaves and frame are newly used. I'll add card two to the current Christmas Kickstart Challenge #88 featuring Festive Frames (my 3rd of 3 max entries)

Thanks for stopping by and I hope to see you in our July Diva gallery using some die cuts (or embossing folders) and glitter!! You have until 9pm Pacific Time on July 31, 2024 to enter. Good luck!!


Friday, July 19, 2024

Sweet Bunny on a Perfect Day

Hi all - another Friday night and I'm watching Craft Roulette Episode 224 live. Here's the card I managed to finish during the LIVE.


Supplies: Paper - Paper Studio A2 card cut to 3x3";
Sunny Studio Holiday Cheer; scrap of black;
Core'dinations plaid; Neenah white; Betterpress Porcelain
Stamps with dies - Hero Arts Spring Bunny Bundle & old MMH kits
Hot Foil Plate with dies - Spellbinders Tropical Bloom (GOM-May24)
Other - Copic Markers; foam tape

Host Mary Gunn FUNN had Maymay from Maymay Made It Crafts as her guest. The wheel spun for following parameters for us to use:


  • Project - Mini Card: I made a 3x3" card.
  • Colors - Perfect Day: To me, a perfect day has green grass, blue sky, yellow sun & white clouds.
  • Element - Scents &/or Noses: My bunny has a sweet little nose, among fragrant flowers.
  • Random - Packaging: I used some of that thin foam packaging as the mat layer between my card and the scene panel.

While watching the LIVE, I started pulling apart a packing box hoping to use some corrugated bits. Decided they smelled bad, especially after I sprayed them with shimmer spray - ugh!! Then I settled on a bit of that thin foam packaging. Tried spraying it too but it just wiped clean - I used it plain. 

Cut a 2.75" square piece of blue dotted paper and added a scrap of green plaid for the ground. The bunny, sun and cloud were stamped & die cut in my bits box; just had to color them with Copics. The sentiment was laying on the table - left over from a previous card where I Betterpressed some hot foil plates. Assembled and done!

That's it for tonight. I'm exhausted from trying to water my new landscaping. They had to level a large chunk of ground, then seeded it & covered with a straw blanket. Very tough to water without stepping on it and getting muddy - I hate mud!!

Have a great weekend and I'll be back with a Diva post on Sunday!

Thursday, July 18, 2024

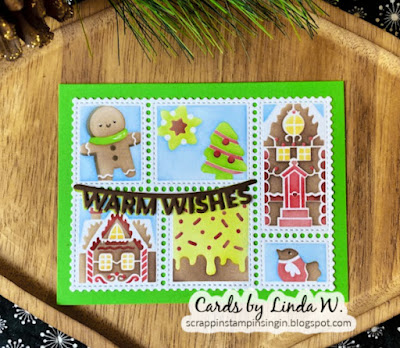
Gingerbread Stamps

Welcome! As promised I'm back with a card using the new Waffle Flower Postage Collage Gingerbread Stencil. The four piece set just arrived in Saturday's mail along with a bundle.

I've been having fun using these stencils! This will be my third and final card for the current Day of the Month Card Club Challenge #65 where they're celebrating postage stamps. 


Supplies: Paper - Neenah Solar White;
Paper Studio A2 card; scraps of brown & lime green
Dies - Waffle Flower Postage Collage &
Stencils - Waffle Flower Postage Collage Gingerbread
Other - Hero Arts inks

I stenciled the 4-step design onto Neenah using various Hero Arts inks, masking as necessary. Next I die cut the stenciled panel with the collage die.  Then I die cut the banner from a brown & a green scrap.; layered them for a shadow effect. Adhered everything to an A2 card base. Did a small bit of detailing with a black & a white gel pen - done! Another quick and easy one!

Good for me - I used new stuff quickly!! I'll add my card to Darnell's July NBUS Challenge since the gingerbread stencil set got first play today.

Thanks for stopping by & have a crafty day!


Wednesday, July 17, 2024

Snowman Stamps

Hey there, friends! I'm back with a second card for the current Day of the Month Card Club Challenge #65 where they're celebrating postage stamps. I'm also playing along with Darnell who's doing Embossing for her IDEAS plan (3rd week of the month). You can see her gorgeous inspiration cards HERE.


Supplies: Paper - Neenah Solar White;
Paper Studio A2 card; scrap of black
Stamps - Waffle Flower Postage Collage North Pole
Dies - Waffle Flower Postage Collage &
Stencils - Waffle Flower Postage Collage Snowman
Embossing Folder - Spellbinders Hexi Snowflake (EOM-Jul24)
Other - Hero Arts inks; foam tape

I stenciled the 2-step design onto Neenah using two shades of blue ink, plus black and orange for details. Next I die cut the stenciled panel with the collage die. I trimmed off two of the stamps and kept 4 in a block. Stamped a couple of snowflakes with the darker blue ink.

Die cut the banner from a black scrap. Embossed the A2 card with snowflakes., then ran the darker blue ink pad over the raised bits. Adhered the block of 4 stamps to the embossed card base, then added a fifth stamp popped up with foam. Adhered the sentiment - done! Again, I could have done some shading and detailing on the snowman but I went for quick and easy.

Another case of using new stuff quickly (just got new Waffleflower in the mail on Saturday & the Spellbinders on Monday), so I'm very proud of myself!! I'll add my card to Darnell's July NBUS Challenge since the snowman stencil set & the embossing folder got first play today.

Thanks for stopping by & have a wonderful day!! I'll probably be back tomorrow using the final new postage collage stencil in the WF bundle...


Tuesday, July 16, 2024

Poinsettia Collage

Hello & welcome! I'm popping in with a quick post for a couple of challenges. The current Color Hues Challenge #91 features Red & Green - perfect for Christmas cards which I desperately need. For the current Day of the Month Card Club #65, they're celebrating postage stamps. Here's my card:


Supplies: Paper - Neenah Solar White;
Paper Studio A2 card; scraps of red & black
Dies - Waffle Flower Postage Collage &
Stencils - Waffle Flower Postage Collage Poinsettia
Other - Hero Arts red and green inks;
Park Lane gems

I stenciled the 4-step design onto Neenah. My Fiesta Red ink reads pinkish in the photo but it is red! I applied it lightly for the contrast with the medium red (unk name - from an old MMH kit). I used Red Royal for the flower centers but then covered most of it up with gems! Greens were Key Lime, another no-name one from an MMH kit, and Green Hills. Next I die cut the stenciled panel with the collage die (b4 adding the gems!). Adhered to A2 card. Die cut the banner from red and black scraps and layered for a shadow effect. Added to the card - done! 

You often see the collage in landscape but I chose to orient it as a portrait so my sentiment banner would stretch across the card. I could have/should have added some detail to the poinsettias but for this quick and easy card, I kept it simple. Oops - also meant to stamp some of the cancellation marks from the new WF Postage Collage North Pole Stamp Set - oh well.... 

I had placed a pre-order with Waffle Flower and just got the new Christmas bundle in the mail on Saturday - proud to use new stuff so quickly!! I'll add my card to Darnell's July NBUS Challenge since the poinsettia stencil set & banner die got first play today.

Thanks for stopping by & happy crafting!!


Sunday, July 14, 2024

Warm Wishes House for Craft Roulette

Hi everyone - sorry I've been missing for a few days! I went to my high school reunion and had a wonderful weekend of activities! Back home now & had to catch up on Craft Roulette, watching Episode #223 on replay. Here's my card:


Supplies: Paper - Sunny Studio Polka Dot Parade;
Paper Studio Red A2 cards (both cut down);
Neenah Solar White
Stamps - Hero Arts Wishes Come True (retired)
Dies - Hero Arts Square Infinity Dies
Other - Copic Markers; Hero Arts sparkle lacquer 

Mary Gunn FUNN had Tracy Fear (@Not Afraid of Color) as her guest. Tracy enjoys mixed media and has been making cards for a while (has about 66 CR cards in her gallery). The wheel spun some interesting parameters for this week:


Project: Smaller/Larger - I thought it would be fun to do a square card that had a smaller square card on the front. I cut one A2 card to 4.25x4.25" & one to 3x3".
Colors: Planets - I googled and found this YouTube video describing the colors of our solar system's plantets. I'm sure you could find other solar systems with an even larger color range! I went with grey for Mercury, red for Mars, blue & green for Earth, yellow from among Jupiter's colors.
Element: House(s) - I pulled out an old Hero Arts stamp set from 2010 which contains a little house, among other images.
Random: White Border - I put a white border around the patterned paper atop the larger square card and echoed it on the smaller card.

Stamped the house image and colored with Copics; cut into a square and layered with blue and then the white border & onto a 3x3" card. Cut a second A2 card to 4.25x4.25" and added a white border to the patterned square. Assembled and added sparkle to the snow. Done, except to stamp the insides of both cards...

I had to laugh - while watching the replay, I just went to the parameters & paused it while I made my card. When I watched the rest, I saw that Mary had the same idea - a small card atop a larger one. Funny how great minds think alike!

That's it for today, friends! I hope to get around to commenting on everyone's projects from this past weekend. Thanks for stopping and happy crafting!!