Welcome to my blog!

Thanks for visiting my blog. As the title suggests, I love to scrapbook, stamp, and sing! I will share cards and scrapbook pages I create, as well as information about my music - Barbershop harmony.

Tuesday, September 27, 2016

Another Pink/Silver card for Merry Monday

I couldn't resist doing another pink and silver card for this week's Merry Monday challenge. Over the weekend I bought a Penny Black Nativity die and decided to try it with silver backed in pink. A bit unusual but I had fun with it.

peace nativity
Supplies: Paper - Neenah Solar White, the Paper Studio glitter and Old World Winter (music)
Penny Black Manger 51-254, My Favorite Things Blueprints 20
Ink - Tim Holtz Distress Spun Sugar, Hickory Smoke (on the music paper); Other - 3M Foam Tape

Hope you're making progress on your Christmas cards - I'm nearly done with what I need for my list!
Have a great day!!

Monday, September 26, 2016

Pinks with grey or silver

Photo source

Kristie returns to Merry Monday this week for a Guest Challenge to use light and dark pinks with grey or silver. I just love the fun patterns in the inspiration photo and Kristie's card captured them perfectly!! I found some fun pink patterns of my own and went with a silver snowflake and grey stamped sentiment to finish the card.

Merry Christmas pink and silver
Supplies: Paper - Neenah Solar White (card base), Basic Grey Juniper Berry,  
Penny Black Holiday Trimmings, the Paper Studio glitter paper
Die - Hero Arts DI196 Paper Layering Snowflakes w/Frames; Stamp - Hero Arts CL469 Swirl Christmas (sentiment)
Ink - Ranger Archival Watering Can (Wendy Vecchi); Other - Washi Tape (Target brand), Darice gem

It was a bit gloomy when I took my photo so the top pattern (Penny Black) looks a bit purplish but it's a nice pale pink. I just love the deeper pink from Basic Grey and the washi I bought at Target. The foil dots in the washi tape look a bit red in the light but they look dark pink to me in real life. I die cut the paper layering snowflake (one of a set of three) along with its frame using glitter paper and popped up the layered elements for a 3d look.

Thanks to Kristie for the fun challenge and thanks to you for stopping by! I hope you have a crafty day!!

Monday, September 19, 2016

Keep Warm!

Photo source

Happy Monday everyone - I hope you're enjoying your day! I blew out a tire on the weekend so spent the morning getting a new one. Still had time to check out the latest Merry Monday challenge for this week - Kathy wants us to "Keep Warm" - fun!! I recently received two different mitten sets I ordered from Hero Arts and knew they'd be perfect for this challenge! I set to work right after I got home. Here's my card:

Cozy Mitten Christmas
Supplies: Paper - Hero Arts Latte, Paper Studio Old World Winter, Authentique Glistening, Theresa Collins Santa's List
Ink - Ranger Archival Watering Can (Wendy Vecchi); Other - Copic markers, 3M foam tape
Stamps - Hero Arts CL999 Holiday Mittens (sentiment) & DC193 Kelly's Mitten Stamp & Cut (pair of mittens)
Dies - My Favorite Things Blueprints 13 & 20, Spellbinders Classic Ovals, Hero Arts DC195 Christmas Trimmings (bow)

I stamped and die cut the mittens but was a bit off in my cut so trimmed them out, then colored with Copics. I had a bunch of colors of bows die cut for other possible cards but, of course, hadn't yet cut the red I wanted. Quickly did that along with the ovals, a stitched rectangle and a washi sentiment label. The card came together easily. Another Christmas card done - yay!

Thanks for stopping by and have a crafty week!!

Monday, September 12, 2016

Inspiration Photo Challenge at Merry Monday


Photo Source


Hi all - it's a gorgeous day in Minnesota and time to check for another Merry Monday challenge. This week, Debbie challenges us with a beautiful inspiration photo. If you go to the photo source link, you can find oodles of other decorating ideas for Christmas. I usually don't go this fancy for my holiday dining but I certainly enjoy how gorgeous this dining room looks!! I just love all the red and white but can you imagine trying to keep those chairs clean?!

Great colors for a card though - here's what I created:


Peace snowflake
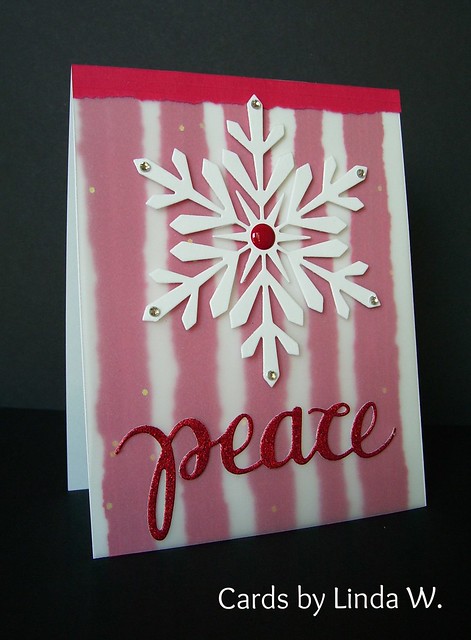
Supplies: Paper - Neenah Solar White card stock and red vellum, Hero Arts glittered vellum, DCWV glitter
Other - Michael's Reflection gems, Doodlebug enamel dot; Darice striped embossing folder, foam tape

I started out embossing a piece of red vellum with a striped folder. The vellum came in a package of several colors which I bought at Walmart. The vellum tore along some of the embossed stripes so I decided to go with it and tore it into more strips. I used them to make a background on my card. To soften it and make my sentiment pop, I added the glitter speckled vellum. To hide the glue at the top, I added another bit of the torn vellum - looks a bit pinky in the photo but it's a true red. After die cutting the snowflake I popped it with foam tape and added the embellishments. I started with a Merry I had previously die cut in the red glitter paper but it was too delicate, ripping as I tried to adhere it. I then used Peel 'N Stick on a white card behind the red glitter paper and die cut the Peace. The die was out from a previous project so I went with it, rather than looking for my Merry die. 

Hopefully this doesn't look too much like a circus tent - LOL! Thanks for stopping and have a crafty day!!

Tuesday, September 6, 2016

Harvest thank you

Hi all - over the Labor Day weekend I had dinner with friends - yummy hamburgers on the grill with all the fixings! I had a thank you card ready but I decided make a different one. I just got a new Lawn Fawn clear set last week and it called to me! Here's my card:

Thanks a bushel
Supplies: Paper - Hero Arts punch layering paper, Pink Paisley "Hello Sunshine" paper, Target's $ bin paper; 
Stamps - Lawn Fawn Thanks a Bushel; Other - Copic Markers, May Arts string twine; foam tape
Dies - My Favorite Things Die-namics Double Stitched Rectangles; Simon Says Stamp Bundle of Stitched Shapes 
Ink - Ranger Archival - Watering Can (Wendy Vecchi)

How cute is that basket of apples?! I couldn't resist it when I spotted the new Lawn Fawn release. And the set comes with a bunch of little faces, including two that reminded me of my friends. The coppery paper for the sentiment frame came from the Target bin (kraft and foil papers), as did the leafy paper and green behind the basket. These 6x6 paper pads were $3 and have no listed manufacturer but they're very nice! I bought 3 different pads the other day and will use them often this fall.

Thanks for stopping and I hope you're having a crafty week!!

Monday, September 5, 2016

Merry Monday is back!


Happy Labor Day in the USA! Merry Monday returns today from the summer off - yay! Deanne challenges us to use only gold/black/white on your Christmas card - what an elegant combination. I love her inspiration photo!

As usual I immediately had one idea, only to go in a different direction once I started digging through my stash. I was looking for an ornament die cut when I ran into a sentiment die by Sizzix that I got on sale at Hobby Lobby. Then I found an errant embossing folder in the die cut drawer - a lovely woodgrain by Darice that I thought would give nice texture behind the sentiment.

Here's my card:
Merry Christmas & Happy New Year
Supplies: Paper - Neenah Solar White, DCWV foil, Anchor Paper black
Dies - Sizzix 660662; My Favorite Things Die-Namics Blueprints 20 (stitched rectangle)
Embossing Folder - Darice Woodgrain; Other - foam tape

How appropriate that I'd use Blueprints 20 on a Deanne challenge - she inspired me to buy that set with her beautiful cards using it. I now own a bunch of Blueprints but I seem to go to 20 quite often. I die cut the stitched rectangle after I embossed the woodgrain which really softened the texture. Perfect for popping my sentiment panel on top.

The summer passed too quickly for my taste but I love fall with all the beautiful colors we'll get on the trees in Minnesota. If you're in the US, hope you're enjoying the holiday! Happy crafting and thanks for stopping!!

Sunday, September 4, 2016

Set for a Scramble

Yesterday, over on the Hero Arts Flickr Group, Kim hosted a fun and challenging Scramble (timed event) to create a matching card, tag & envelope set. It was perfect timing as I had just come from my mailbox to find a box of new Hero Arts goodies, including the Infinity Tags set. I also received some new Christmas stamps I was eager to try. Here's my set:

Cardinal set

Supplies: Paper - Hero Arts Kraft card and envelope; Paper Studio Old World Winter; Penny Black Holiday Trimmings
Dies - Hero Arts DI197 Tag Infinity dies; Simon Says Stamp Bundle of Stitched Shapes (for the plaid stitched rectangle), My Favorite Things Blueprints 20 (for the dotted stitched rectangle)
Stamps - Hero Arts CM102 Vintage Christmas Post & CL983 Holiday Messages and Tags
Inks - Distress Inks: Pine Needles & Gathered Twigs
Other - Copic Markers; May Arts ribbon and twine; Doodlebug enamel dots; Michael's gems

Since the Scramble is only 90 minutes from start to finish, including photography and uploading, I hastily colored the cardinals. I noticed after the Scramble that the card's cardinal needed some more blending - yikes! The other funny thing - I was sure I had ordered the matching dies to the cardinal stamp set (I did!) but I couldn't find them until after I had fussy cut them both - duh! All due to "Misty proofing" - putting away my craft stuff so my brother's cat wouldn't get into it. Misty is here for her fall vacation - loves it at "Auntie" Linda's house!! Luckily Misty was napping during the Scramble when quite a few crafty items found their way back onto the kitchen table and counters!

I don't decorate my envelopes often enough, much less make gift tags, so this was a fun challenge! I'm looking forward to making more cards and tags with new Hero Arts goodies!! Thanks for stopping by!

Saturday, September 3, 2016

Grateful leaves

Hero Arts recently released their new fall/holiday line and I ordered a bunch of fun goodies. Today I had a chance to play with the color layering leaves clear stamp set with matching dies. I was inspired by my friend Virginia's post and video about creating a background. She started with a stamped flower which she later covered with a die cut - I decided to try it. Here's my card:

grateful for you
Supplies: Paper - Hero Arts mocha folded card and daffodil layering paper, Bazzill orange, vellum
Ink - Tim Holtz Distress Inks: Mustard Seed, Dried Marigold, Twisted Citron, Tea Dye, Frayed Burlap, Gathered Twigs
Other - Hero Arts Earth Mixed Accents and Copper embossing powder, May Arts string twine, foam tape

I started out stamping a leaf where I intended to put my die cut and worked outward from there in rings around it, just like Virginia's video showed. The extra yellow leaves at top left were just to fill in the space  but I liked how it ended up. On the die cut, I used colored card stock and just stamped the vein layer - I thought it added lovely dimension. I couldn't find my vellum adhesive so I just hid a glue dot behind the gems for my sentiment strip. Yay, now I have card ready to thank a friend for a dinner I'm attending later in the weekend.

Hope you're having a wonderful Saturday! Thanks for stopping!!

Friday, September 2, 2016

Recap of Heather's Challenges to me

Hi all - I thought it would be fun to recap this summer's Christmas card challenges from my friend, Heather. Here are her challenges to me (the hyperlinks are to her posts, when she was able to do one):
  1. Christmas Quilt 
  2. CAS (clean and simple)
  3. Non-Christmas Image
  4. Critter Christmas (use an animal)
  5. Blog Title
  6. Christmas Shaker
  7. Inked Embossing Folder
  8. Needles
  9. Hearts
Here's a photo of all the initial cards I made for Heather's nine challenges:

Summer challenges from Heather

I put them in challenge order starting at top left and continuing in 2nd row starting at left. To see each card individually with supply lists, here are the hyperlinks to my posts:
  1. Christmas Quilt 
  2. CAS
  3. Non-Christmas Image
  4. Critter Christmas
  5. Blog Title
  6. Christmas Shaker
  7. Inked Embossing Folder
  8. Needles
  9. Hearts
Sometimes, I was able to do more than one card. Here's a quick photo of the extra cards:

More challenge cards

Links to posts for these card: Wreath, Ellie and chairs, Critters

Wow - I made a total of 16 cards for Heather's challenges!! Thanks to Heather for challenging me to keep the Christmas card production going!! I also made 9 cards to challenge her resulting in a total of 27 Christmas cards during the nine weeks of challenges. Heather hasn't finished my challenges yet so I'll save that recap for the future... :)

How's your Christmas card production going? I'm up to 59 cards at this point so I should be done well in time this year - yay!! I'd love to hear your totals so far - remember, only 16 weeks until Christmas and this time will fly! If you need inspiration to get going, head over to Merry Monday where new challenges start next week.

Thanks for stopping by and thanks for the lovely comments!!