Welcome to my blog!

Thanks for visiting my blog. As the title suggests, I love to scrapbook, stamp, and sing! I will share cards and scrapbook pages I create, as well as information about my music - Barbershop harmony.

Sunday, December 31, 2023

Last day for Flowers at Die Cut Divas!!

Happy New Year's Eve!! Today is the last day for our Die Cut Diva December Challenge to use Flowers. You only have until 9pm PST today and remember to include a die cut &/or embossing folder in your design!

I'm part of the last-of-the-month team posting inspiration at the Divas HERE with this first card. I used a new Altenew Press Plate!

Supplies: Paper - Spellbinders Pebble Betterpress A2 Cotton
Paper Studio Navy A2 card
Press Plate - Altenew Hummingbird Nectar
A Jillian Vance Design Stitched Dot Rectangle Backdrop Set
Inks - Spellbinders Betterpress Black and Cosmic Sky
from the Regal Tones pack 
Other - Sakura gelly roll pen


Altenew has donated a generous $50 gift certificate to our December winner
(awarded by random draw from eligible December entries).

From mid November to Cyber Monday I enjoyed ample time to place online orders from various companies having sales. I took advantage of one at Spellbinders to pick up a Betterpress but hadn't had a chance to use it until yesterday. Then I went to Arizona for the Christmas holiday and while there, placed an Altenew order for a press plate bundle. I found it waiting for me when I arrived home on the 28th & whipped up the card using the hummingbird plate and my new Betterpress. Here's a shot of the card with the set up.


This card couldn't have been simpler & look at the results! My first attempt at Betterpress and it turned out perfectly! Literally as easy as popping the plates down onto the Chase (a magnetic platform), inking them up, applying the paper which is taped to the Platen (cover to put over the Chase) & running it all through Spellbinders Platinum 6. I die cut the panel with a stitched rectangle, glued it to an A2 card and added some gold glitter pen to the bird's beak & the flower centers - done! Best thing - the set up remained firmly in place and could be reinked for more cards! Trust me, I made multiples!

Bonus!! I made another simple card using one of Altenew's darling mini stamp sets:

Supplies: Paper - Park Lane gold A2 card; Neenah white;
Lawn Fawn Petite Spiffier Speckles
Stamps with Dies - Altenew Mini Dogwood;
Poppystamps Say It Big
Other - Copic Markers

I'd barely opened my accumulated mail Thursday night when I decided that Friday needed a trip to my favorite local craft store Anchor Paper. Sure enough, they had post Christmas sales with 20% off all holiday & Spellbinders. Picked up some of both, then I popped a sweet Altenew mini set into my cart. These sets are such a great value! As promised, I used my new Altenew Stampwheel - picked it up during one of their November sales but hadn't tried it yet. Here's a photo of my mini Dogwood on the wheel stamping the 4th flower. 


This was the second batch of flowers I stamped. To stamp the ones on the card, I'd laid the stamp out more on a curve, hoping to create a wreath. Didn't space it quite right so I ended up die cutting the three clusters with the coordinating die. Not sure if I'll die cut this batch or try to add in smaller stamps for a background. Both cards feature newly used stuff but I'll just add card one to Darnell's December NBUS Challenge.

That's it, friends! Before you head off to your New Year's Eve party, I'd love to see your flower project in our December Diva gallery! I'll be dining early with some friends trying to beat the crowds - lol.

Thanks for stopping by & many thanks to Altenew for being a fabulous sponsor!!


Monday, December 25, 2023

Merry Christmas!

Merriest Christmas wishes to you and yours! 

I'm happy to celebrate Christmas with part of my family & hope you're having a wonderful day with yours! Today I'm just sharing a few holiday decorations, starting with my living room tree trio:


Next, a close-up of the middle tree showing the darling star ornament Gundi (paperielle) sent me. You can also see a jeweled tree & part of an Irish girl from my friend Heather (stamping and stitching).


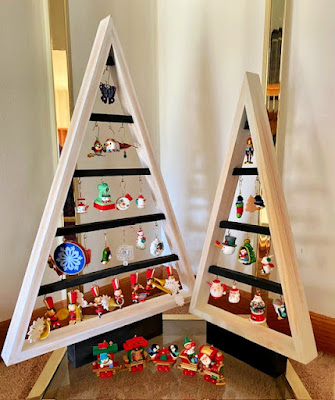
Next, my triangle trees filled with Hallmark minis:


My guest room tree got a new topper/skirt by Hallmark to match my Peanuts mini ornaments!

I also finished my wreath and designer mini trees featuring mini ornaments & my 12 Days of Christmas porcelain ornaments on a gold wire tree. The mini tree in my bedroom got an angel topper but no ornaments - just ran out of time!

Hope you enjoy your holidays and I'll be back next week with more flowers for our December Die Cut Diva Challenge. Would love to see you there!

Thursday, December 21, 2023

Flowers at the Divas!

Hey everyone - ready for Christmas?? I think I am...

I'm posting inspiration over at Die Cut Divas today - we're doing flowers for our December Challenge. I first made a card using the amazing Layered Ornate Frame set by our sponsor, Altenew.


Supplies: Paper - Park Lane A2 card; Tim Holtz gold metallic;
Lawn Fawn Spiffier Speckles and Petite Watercolor Wishes;
Neenah Classic Crest Solar White 110 lb; scraps of green
Dies - Altenew Layered Ornate Frame
Stamps with Dies - Poppystamps Say It Big
Other - Park Lane rainbow gems; Hero Arts ink


Altenew has donated a generous $50 gift certificate for our December winner

(awarded by random draw from eligible December entries).

The frame set made it so quick and easy to create a card. I simple die cut the frame twice and layered for dimension and stability. Next I die cut the flowers and leaves and assembled. Stamped and die cut the sentiment - I wanted a jumbo one to fill the frame opening and Poppystamps came through for me. This one went to my cousin who landed in the hospital - no fun this close to the holidays but she's on the mend, thankfully!!

Next, I have a couple of bonus cards using the Build-a-Garden: Dear Dahlias bundle. Altenew generously sent me this bundle along with one of my orders - thanks so much!! Here's the first card I made with it:


I stamped and stenciled the image then die cut with the coordinating die. Added it to another Spiffier Speckles rectangle and glued to an A2 card. A printed sentiment strip from my bits box finished the card. My stenciling went a bit wonky in spots but I saved it by outlining the image with a grey Copic before die-cutting it. After layering it onto the peachy background, I really liked how this card turned out! Here's another, more successful stenciled Dear Dahlia along with a Hero Arts sentiment:


I'll add my first card to Darnell's December NBUS Challenge since the frame got first use here....

I recently bought one of the Altenew Stampwheels and hope to use it for my end-of-month Diva project... Until then, I'd love to see your flower project in our December Diva gallery

Thanks for stopping by!!


Monday, December 18, 2023

Poinsettia thanks

Hello & welcome! Busy holiday times but I'm squeaking in a quick post for the current We Love Stamping Challenge. They're doing winter flowers so I used a poinsettia spray stamp to create a holiday thank you card.


Supplies: Paper - Park Lane gold A2 card;
Paper Studio Holiday (red) & Gifts of Gold (foiled stripes); 
Neenah Classic Crest Solar White
Stamps with Dies - Spellbinders Wonderful Christmas (dies retired);
Dies - A Jillian Vance Design Stitched Dot Rectangle Backdrop Set
Other - Copic Markers; foam tape

Simply stamped, colored & die cut the spray which came in my October 2022 Spellbinders box. Finally using it for the first time so I'll add my card to Darnell's December NBUS Challenge too! I cut an extra outline for dimension & added the spray to a foiled striped rectangle matted in red. Adhered to A2 card. Stamped and die cut the sentiment and added a red shadow. Done!

Hope your holiday prep is going well! Thanks for stopping by!!


Wednesday, December 13, 2023

A Nordic Snowman in Snow Globe

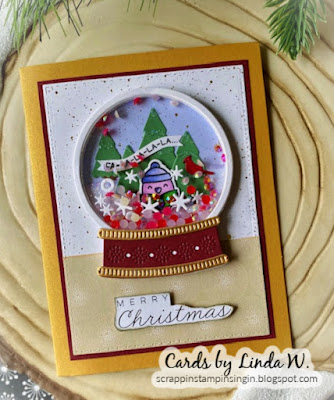
Hey there - since I'm  guest designing for the December Day of the Month Card Club Challenge #58, I thought I'd share another snow globe card. I'll add it to the DotMCC gallery just for inspiration & hope this inspires you to join in!!.


Supplies: Paper - Spellbinders A2 card; Hero Arts Bermuda 
& Glitter Paper Basics; Neenah Classic Crest Solar White; 
Sunny Studio Holiday Cheer & All is Bright;
scrap of metallic from an old Target 6x6 pad
Dies - Poppystamps Sweet Nordic Snowman;
Hero Arts Snow Globe; Memory Box Pine Tree Grove;
A Jillian Vance Design Stitched Dot Rectangle Backdrop Set
Hot Foil Plate - Lawn Fawn Winter Big Scripty Words
Other - Copic Markers; snowflakes & presents from the bits box

When Poppystamps' Christmas release came out, I couldn't resist ordering some of the Nordic items. Hadn't used any of them yet, then I got a darling Christmas card from Lisa (My Paper Tales) using the Nordic Bear. She inspired me to break out one of the Nordic dies this week and I chose the snowman. Lisa put her bear in a snow globe so I thought I'd do the same for my snowman. Maybe she'll blog her card and link up at DotMCC!

I die cut the snowman and all the pieces in white, then colored with Copics. To match the BG Copics I used, I chose Bermuda cardstock to cut my pine grove. I cut the snowy tree pieces from white glitter paper. I die cut the snow globe from Neenah, the sky from Lawn Fawn, the snow from glitter & the base from metallic. The background papers were from Sunny Studio. I had a sentiment already foiled from back in February; I added a shadow die cut from Bermuda. Snowflakes (maybe Lawn Fawn) & presents (maybe MFT) from the bits box completed the scene.

Since my little snowman is newly used, I'm adding this card to Darnell's December NBUS Challenge. I'm also linking up to the December Poppy Challenge Cool Yule and to the Hero Arts December Stay Crafty with a Blog Named Hero where they're doing "Shiny". My snow globe base and snow definitely fit that theme!

Thanks for stopping and happy crafting!!


Tuesday, December 12, 2023

Glittery Nativity

Hi everyone - I'm back with another quick post - the "panic making mode" has ended and yesterday I mailed out the last of this year's Christmas cards (unless I forgot someone - it's possible). Last I posted, I mentioned discovering I needed 25 more cards - I'd made 9 snowflake cards, so what next? I decided on a simple design using a Taylored Expressions Nativity cutting plate. Here's a pair of the cards I made:


Supplies: Paper - Hero Arts Dove A2 card
linen aqua by unk; BoBunny Altitude (bokeh)
Dies - Taylored Expressions Arched Nativity Cutting Plate,
Other - Taylored Expressions printed sentiment strip; white gel pen

Such a simple one - I die cut the Nativity plate, backed it with paper & adhered to A2 card. Added a die cut sentiment strip & a star - done! I made 10 of these in all - very quick and easy.

I'm linking up to the December Christmas Kickstart Challenge (If It's Christmassy - Link it Up!) and Darnell's December NBUS Challenge since my Nativity plate is newly used.

I've been catching up on blog commenting so hope I visited you! Thanks for stopping by & happy crafting!! I'm off to do more Christmas decorating - I have oodles of ornaments ready to add to my trees....


Friday, December 8, 2023

Celeste Snowflake bonanza

Hi all - I'm here with a quick post since, as one friend (who shall remain nameless) put it - I'm in "panic making mode". I started addressing and mailing out my stash of Christmas cards made this year, beginning with those going the furthest distances. Got the overseas ones out before Thanksgiving; I was so proud. As I continued addressing, the pile dwindled alarmingly so I counted. Discovered I needed 25 more cards - yikes!! That started the panic mode so on Wednesday I made 7 cards of a similar design, starting with this one:

Supplies: Paper - Hero Arts Dove A2 card;
Park Lane pink; Recollections silver glitter; Neenah White
Dies - Taylored Expressions Sweater Weather coverplate (retired);
Memory Box Celeste Snowflake (retired, 
but still available HERE at Frantic Stamper)
Other - Taylored Expressions sentiment strip; foam tape

I took advantage of some Black Friday sales both online and locally. My Birch Press Design order arrived earlier this week and Dave popped in some retired MB products, including the snowflake, as a gift. Christmas came early -yay - and, of course, I had to use the die right away! I cut the outline from white and the snowflake from glitter paper. Layered & added it to a cover plate diecut sitting on the table, then adhered to an A2 card. Popped a sentiment strip in the center with foam tape. Very quick and easy! The coverplate is a fiddly one with all the bits to poke out but this had been done weeks ago so I just grabbed and used.

Next I cut a variety of stitched rectangles & snowflakes, then used various sentiments from my stash or die cut to match (as in JOY from Kat Scrappiness & some sweet sentiments from Colorado Craft Company). Most of the patterned papers were from Sunny Studio or Authentique.


I'm linking up to the December Christmas Kickstart Challenge (If It's Christmassy - Link it Up!) and Darnell's December NBUS Challenge since my Celeste Snowflake is newly used.

Sorry if I haven't visited your blog lately - I'll have to play catch up soon! Thanks for stopping by & hope you have a crafty day! I'm off to make more Christmas cards - see you when I come up for air!!


Wednesday, December 6, 2023

Guest Designing at Day of the Month Card Club!

Hi all - I'm excited to be the Guest Designer for the December Day of the Month Card Club Challenge #58 where the team is celebrating Day of the Snow Globe! My fairy card was declared winner for Challenge #56 affording me the guest slot this month - yay!!


Here's my card:


Supplies: Paper - Park Lane A2 card; Paper Studio Holiday;
Neenah Classic Crest Solar White; Tim Holtz kraft metallic;
Lawn Fawn Petite Spiffier Speckles; Hero Arts white glitter cardstock
Moda Scrap Forever Green; acetate
Dies - Lawn Fawn Build-a-Snow Globe;
Stamps with dies - Lawn Fawn Seasons Tweetings (Stamptember 2020)
Other - sentiment from an old Simon Says Stamp kit;
shaker mix from an old Hero Arts kit; Copic Markers

First I made the snow globe shaker:
  • Die cut the back layer once from white & once from acetate
  • Die cut the top layer 8 times from white
  • Die cut the globe portion of the top once from lavender Spiffier Speckles & twice from white glitter cardstock; use the interior portion that otherwise would be scrap
  • Die cut the base portion of the top once from dark red; trim to fit & die cut snowflake detail into it
  • Die cut the base trim from gold metallic
  • Die cut shaker elements from white
  • Using the snowbank die, trim the white glitter pieces to form hills
  • Adhere one front piece to one back piece, then inlay the sky and hills into the globe portion
  • Die cut trees (large and small) & trucks twice and cardinal once; Assemble & add to scene.
  • Stamp, cut and color the caroling birdie & add to scene
  • Stamp and fussy cut fa-la-la banner and glue to trees
  • Adhere acetate base piece behind one top piece, then adhere a second top piece behind it to make an acetate sandwich
  • Glue the other top pieces into a stack and adhere to the white base piece that already has a top piece with the scene inlaid
  • Add shaker mix to the open globe section & adhere the acetate sandwich on top
  • Glue the dark red base piece & the gold trim onto the base
Next I die cut a stitched rectangle from white Spiffier Speckles paper & covered the bottom with a piece cut from the Moda Scrap paper. Glued this to the A2 card and added the snow globe and a fussy cut sentiment - done! My card is very similar to cards you can find, along with Kelly Marie's great video tutorial, on the Lawn Fawn product page linked above.

Due to the thickness of the snow globe, this card would be better hand-delivered or on a package. The shaker gems I used have some dimension - I would've been smart to add another top piece to my shaker stack. You can see some gems stuck sideways in there; couldn't get them unstuck for the life of me - oh well...

Many thanks to Rosi, Gundi & Izzy for inviting me to guest design this month!! Despite having many snow globe stamp and die sets, I bought the Lawn Fawn Build-A-Snow Globe set just for the occasion (as if I needed an excuse).

Thanks for stopping and I hope you'll check out the December Day of the Month Card Club Challenge #58!! We'd love to see your snow globe projects!!


Saturday, December 2, 2023

November 2023 Card Chain Reveal

Hello everyone! Are you ready for December holidays?? I'm not - too busy with our chorus winter show today (3pm at the Masonic Heritage Center in Bloomington if you're in the Twin Cities USA)!

But first, it's time to reveal cards that went 'round the world for the November Card Chain Challenge! Thirty-two people participated and you can see the full reveal HERE. My card went to dear Michaela (Bastelmichaela's Kreative Unikate) in Austria.


Supplies: Paper - Hero Arts Pitch Black;
Spellbinders A2 card; Lawn Fawn Petite Perfectly Plaid;
Recollections Purple Passion 4.5x7" 
Stamps - Divinity Designs Mini Tag Sentiments
Dies - A Jillian Vance Design Stitched Dot Rectangle Backdrop;
Kat Scrappiness A2 Stitched Strips;
My Favorite Things Blueprints 21 (retired)
Other - Hero Arts Grape Juice Ink & Sparkle lacquer;
Black Soot Distress ink; Recollections gems; foam tape

We had the following options for creating our cards:

Color Palette Option


Sketch Option


Theme Options: Winter / Indian / Friendship

Product / Technique Options: Scraps / Quilling


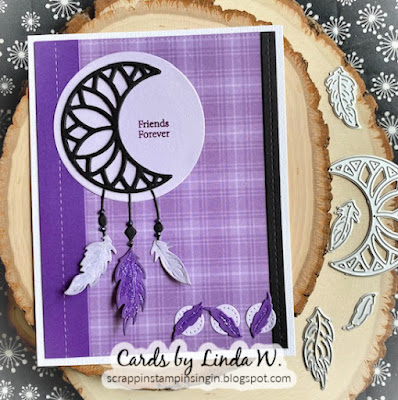
I used the colors, sketch, & themes of Indian & friendship. It wasn't specified what kind of Indian so I went with Native American Indian, using a new dreamcatcher die set. I had loads of black scraps so was able to use that technique option too. If you haven't tried Hero Arts premium pitch black cardstock, it's yummy!!

Just die cut all the elements, stamped a mini sentiment and assembled. The dream catcher feathers have foam tape behind and all feathers have some sparkle lacquer. I added some gems to the bead area of the dangles. Done!

I received this card from Dagmara [(P)otworki] in Poland. I sent to her in October and was delighted to have her reciprocate with this beauty! I just love the image and her gorgeous coloring of it!!


Interested in joining the Card Chain? So simple to make and send one card, then you receive one card - so fun!! Go HERE for details & to sign up for the December Card Chain by 12/6/23.

Thanks for stopping & happy crafting!!