Welcome to my blog!

Thanks for visiting my blog. As the title suggests, I love to scrapbook, stamp, and sing! I will share cards and scrapbook pages I create, as well as information about my music - Barbershop harmony.

Wednesday, August 31, 2022

Last Day for a Shaped Card at Die Cut Divas!

Hey everyone - It's the end of the month and time for a last day post at Die Cut Divas! We've been doing shaped cards all month long with our sponsor Poppystamps. Please go HERE by 9pm Pacific Time today to upload your shaped card, being sure to use a die cut or embossing folder in your design. Remember - no square or rectangular cards allowed this month! 

Here's my last day inspiration:

Supplies: Paper - Paper Studio silver
Sunny Studio Holiday Cheer
Neenah White; various scraps
Dies - Poppystamps Simple Lantern Oval
Memory Box Newbury Ornament Vignette 
(retired but HERE at Frantic Stamper)
Spellbinders Labels Thirty-Six 
(retired but HERE at Frantic Stamper)
Stamps - Poppystamps Tidings of Joy 
(retired but HERE at 123Stitch)
Other - Michael's gems; Glossy Accents

Thanks to Diva Arlene (A Bit of This and That) who sent me a few cuts from the darling oval lantern die. As of this writing, it was available at Poppystamps for a very reduced price - as I like to say, practically free! I couldn't resist picking one up along with a few other items...the Poppystamps Sale section is amazing!!

I went through a bunch of label and oval dies before settling on a Spellbinders set that I thought would make a lovely backdrop for the oval lantern. I simply cut two silver labels and scored the back one for my card base. I cut a third one in white for the card interior which I stamped and adhered before gluing front to back. Next I die cut a patterned label to go behind my lantern. Glued a backing of yellow to the lantern first and added glossy accents to simulate glass. 

Next I added some holly leaves from a Memory Box set and die cut the snowflakes from the same set. 
I layered the snowflakes and added them to a JOY sentiment I'd stamped, die cut and colored. I stamped a sub-sentiment on a scrap of yellow and fussy cut it. The holly berries are clear gems I colored with a red Copic. Done!

Ready for a bonus? I wanted to try something different and I found a fun Poppystamps ice cream cone die at my LSS earlier this month. My mini card turned out just how I envisioned! The ice cream cone is one die but cuts two pieces - the cone and the scoop. I cut two of each and scored the back of the second scoop. Assembled then added a interior piece die cut from a retired Hero Arts cone stamp/die set. I stamped the interior with a sentiment & a cherry. Stamped and die cut a second cherry for the top of my cone. I tried different sentiments for the cone and decided to let a longer banner stick out from both sides - kinda fun! My handwritten bday message went on the back of the card.

Supplies: Paper - Hero Arts latte (retired);
Neenah white; Michael's green
Dies - Poppystamps Grand Whittle Ice Cream Cone
Taylored Expressions Simple Strips
Stamps with Dies - Hero Arts Color Layering Ice Cream (retired)
Stamps - Taylored Expressions Simple Strips Birthday

Inside sentiment from Divinity Designs Mini Tag Sentiments

I'll add my cone card to Darnell's August NBUS Challenge since that die is new. And I'll add my lantern card to the August Christmas Kickstart Challenge where we're to use things that aren't in a Nativity. Streetlights - definitely not! This will be my third and final card there.

That's it, Diva friends - thanks for stopping and hope to see you in the August Diva Gallery! Poppystamps is offering a $20 gift card to our random winner (to be announced September 3rd).


Tuesday, August 30, 2022

Monarch Butterfly Trio

 Hey everyone - I'm popping in with a trio of cards featuring the Hero Arts Color Layering Monarch Butterfly stamp set! Here's card one:

Supplies: Paper - Park Lane A2 card; Poptone black;
Neenah white; scrap of orange; My Mind's Eye Rosy pattern
Stamps - Hero Arts Color Layering Monarch Butterfly (with die)
Dies - A Jillian Vance Design Stitched Dot Rectangle Backdrop Set;
Inks - Memento Tuxedo Black; Tim Holtz Mustard Seed Distress Ink;
Hero Arts orange from some MMH kit

When this Hero Arts set came out in 2019, I passed on it since I already had oodles of butterfly stamps. On Friday, though, I found myself wandering around a Hobby Lobby & spotted this set on clearance. Practically free, as I like to say - less than $4!! HL doesn't carry the dies so I figured I'd find them online. Hero Arts was sold out as were other places I normally shop online. Hmmmm - then I remembered a clearance bin of frame cut sets for various brands that my favorite paper warehouse Anchor Paper has. Decided to check there and found the die set, again, practically free - in this case $2. I ended up buying two sets so I could cut multiples. I also bought the sentiment at Anchor Paper - in the regular sale area but at a lovely price. Frantic Stamper carries it too so I linked there.

I didn't like my first attempts at color layering the butterfly. I usually die cut a bunch and use the negative to pop the die cuts into for stamping. For my earliest ones I stamped the outline layer first. For the later ones (I cut a total of 9), I started with the orange layer and found I could line them up better. I used the acetate packaging with the outline to help line up my negative around the orange layer. Worked very well! I stacked the sentiment and put an orange shadow - had a hard time photographing it in focus, oh well - it's ok in real life.

Since this was my first card using of the butterfly set, I'm linking to Darnell's August NBUS Challenge.

Here are two other cards using butterflies from my assembly line stamping:

Additional supplies: Penny Black Eloquence sentiment

Additional supplies: Ephemera from Spellbinders May 2022 card kit

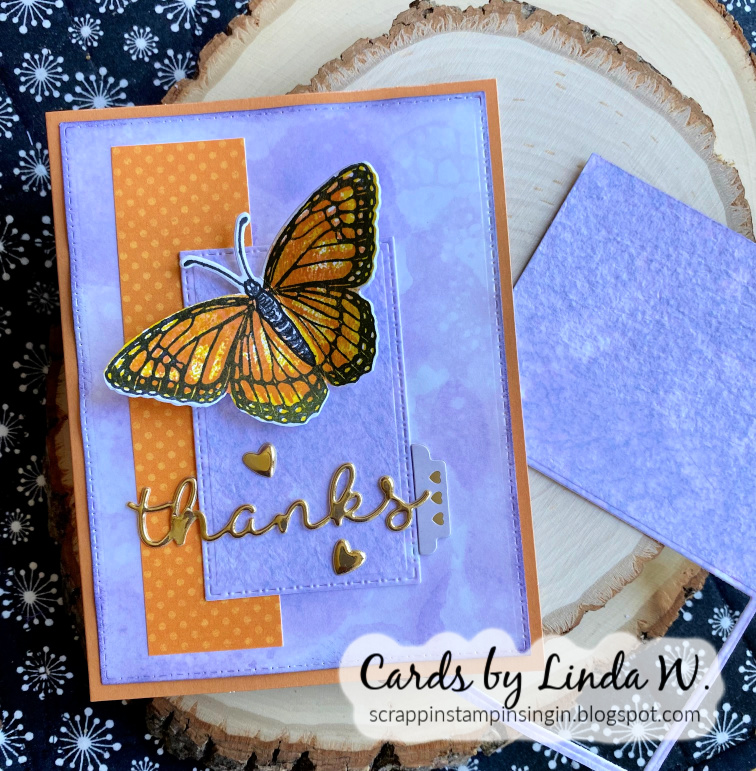
For card three I made a bubble background - my friend Betty shared her card with this technique HERE, linking to a fabulous Christine Stokes video which I enjoyed thoroughly. Just had to give it a go! I tried two different types of card. The largest rectangle was a lightweight cheap white card stock from Michaels. The small rectangle was cut from a superior Hero Arts Handmade Watercolor Paper. Such different effects from the bubbles and both beautiful. The lightweight card warped heavily but I managed to flatten it for the most part...I'd use a heavier weight card next time. You can see to the  right where I die cut the smaller rectangle from the larger watercolor. I found a fun way to get max coverage on my paper and that was to hold it over the water vessel (in my case a plastic drinking cup) and blow bubbles into the cup until they reached the paper. My cup was very full of liquid so it didn't take much blowing with a straw to get a lovely foam. Then I just assessed and moved the paper into more bubbles. Anyway, thanks to Betty for sharing the link - this was fun!!

Thanks for stopping and have a crafty day! Be sure to check back tomorrow as I'll have a last-of-the-month Diva post for you :)


Sunday, August 28, 2022

Birthday Cake Pop Up!

Hey crafty friends - it's my sister Tami's birthday today so I'm serving up birthday cake!

Supplies: Paper - Neenah white;
Momenta watercolor print
Dies - Poppystamps Floral Cake Pop Up Easel
Stamps - Poppystamps Say It Big

I sent Diva Arlene (A Bit of This and That) some cuts of the Poppystamps Floral Cake Pop Up Easel set and she's been busily making cake cards. She wondered if I might like to join her for a Diva post today using the cake die set and I said yes. I needed a birthday card for Tami and thought she'd enjoy some cake!

You can see a different version I made using the cake die HERE. This time I used the flowers and leafy sprigs from the set, plus there are little petals that look like piped frosting to me. I also used a couple of them stacked as my stopper for the pop-up. Here are a couple other views:


I hope we've inspired you to add a shaped card to our August Diva gallery! You have until 9pm Pacific Time on 8/31 to upload. You don't need to use Poppystamps products to play along but be sure to use a die cut &/or embossing folder, plus have a shaped card - no rectangles or squares this month! If you decide to use an embossing folder, check out the August Let's Squash It! Challenge where Gail & Jo are also doing shaped cards!

Since I was at it, I decided to do another Poppystamps cake with some embossed layers to add to the LSI Challenge! So here's a bonus cake made for my brother and his wife, soon to be celebrating 27 years of marriage.

Embossing folder - Sizzix plaid (retired)
Sentiment - Unity I Did. I Do. I Will. (with matching die)

Thanks for stopping and have a wonderful day!


Wednesday, August 24, 2022

Squeeking in with a CAS pine

Hey there - I'm supposed to be doing other things but I had a card idea. So, of course, I had to drop everything else! Here's my card:

Supplies: Paper - Neenah White; 
Paper Studio glitter cardstock
Dies - Hero Arts Fir Trees Infinity Dies
Embossing folder - Sizzix (name unk)
Other - SSS sentiment strip; Paper Studio star gem

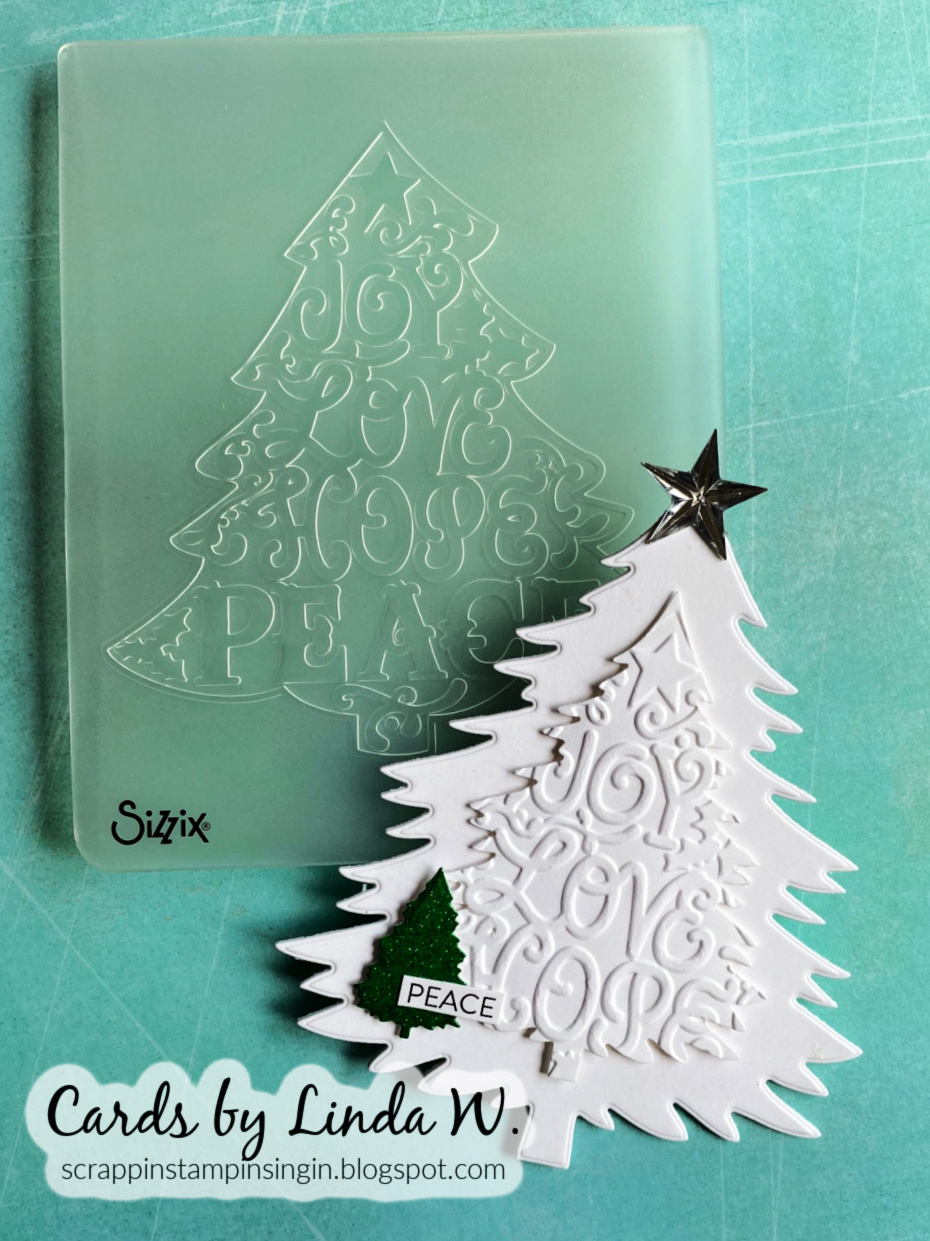
When I made a previous card for the August CAS Christmas Challenge (Pines), I had also pulled out my Hero Arts fir tree set. Decided to make a shaped tree card so it would fit both CAS Christmas and the August Let's Squash It! Challenge to use a shaped card with an embossing folder. It's the last hours for CAS Christmas but I made it!

I used a top fold A2 card and hung the die off the top a bit so I'd retain the crease when I die cut. I covered the fold with the tip of the star gem. Next I cut a smaller tree in white and embossed it. The tree embossing folder came with one of those older thick dies - it's around here somewhere... I made it work for the second layer of the HA tree set but the bottom word "Peace" didn't fit. I snipped a "Peace" off a longer sentiment strip and stuck it to my little glittery tree, also from the HA set. Done!

Thanks to these challenges, I'm gradually building my Christmas card stash - still woefully behind but oh well... Thanks for stopping!!


Monday, August 22, 2022

Stained Glass Candle

Happy Monday - I hope you enjoyed a great weekend! I managed to make a card for Let's Squash It! where Challenge 23 requires us to have something dry embossed and also to use a shaped card. Some of those shaped cards are finding their way to the August Die Cut Divas Challenge where we're doing shaped cards this month too - yay!! I made mine a Christmas card with non-Nativity elements so it would work at Christmas Kickstart 65 too!

Supplies: Paper - Paper Studio Navy A2 card;
Neenah White
Embossing folder - Taylored Expressions Brick
Stamps - Taylored Expressions O Holy Night (retired)
Dies - Taylored Expressions Label Stacklets 5 (retired)
Other - Copic Markers; Hero Arts clear Lacquer; Stickles

I stamped and colored the TE stained glass candle image then fussy cut it. I die cut a thin navy background for it using a scrap of A2 card & one of the stacklet dies. I used a Navy card to cut the label shape, placing the left edge just outside the fold. I added some gloss to the berries and stickles to the candle flame. I die cut a white label layer and dry embossed it with a brick ef. I was inspired in my layering by the beautiful citrus card Joanne (Ambrosia & Iron) made for the LSI challenge. I left off a front sentiment since I didn't want to cover up the window.

Too bad the gorgeous stained glass window image & matching die stack are already retired at TE!! I'm just getting around to using them - oh well.... Darnell's August NBUS Challenge will see this card too, since I'm using the stained glass image & dies for the first time.

Thanks for stopping and happy crafting!


Sunday, August 21, 2022

Shaped card for Die Cut Divas

Hey crafty friends - I've posted the card below at Die Cut Divas today for our August Shape Your Cards Challenge! We have the amazing Poppystamps as our August sponsor and I can attest to their high quality products and great customer service. And no, I don't receive any compensation for those statements - this is just another fabulous company I love!

Supplies: Paper - Bazzill ivory; various scraps;
Paper Studio brown
Stamps - Poppystamps Say it Big
My Favorite Things Mini Cupcake Maker (retired) &
The Scrapping Cottage Cottage Cutz Hot Cocoa Cafe (retired)


I ordered the Floral Cake Pop up Easel set via Frantic Stamper - can't remember if it was already out of stock at Poppystamps or I was trying to round out an order at FS (I do that often...). Anyway, the set came and I'm counting the dies repeatedly and coming up short by one. In no time, Fran from FS and Dave from Poppystamps got me my missing die! Amazing service from both places!

After all that, I didn't use the die (a flower and foliage sprig combo) on my cake. Instead I was replicating a cake spotted on the cover of my town's local magazine - February 2022 editon of Woodbury Magazine. It features frosting drips so of course I had to buy the coordinating Layer Cake Drip Icing die too!! Hard to see in the online magazine photo but the frosting drips had bitty hearts! I included those, of course, albeit from a different brand's die set. I used the Poppystamps Say it Big sentiment stamp set (with coordinating dies) which I've done oodles  of times since I bought it in May - just love the jumbo script!! I stamped it on the lower tier of the cake's inside so it's revealed when popped-up. I used a stack of oval shadows for the stopper.


I considered many different stamps & dies for the creamy poofs on top of the cake. I ended up using the cupcake frosting from an MFT die set for the 3 front ones and the tip of a Cottage Cutz cocoa foam die for the back 2 (since they face the other way). I didn't dare try to put sprinkles on my poofs - afraid I'd mess them up! You can see a card with the full cocoa poof HERE, if desired. My dear friend Connie, more like a sister, received this card for her early August birthday - she loved it!

Still with me for a bonus? Keep reading :)

My friend and sister Diva Arlene (A Bit of This and That) gifted me the Poppystamps Stained Glass Snowflake die. Thanks again, Arlene!! I loved it so much I promptly purchased the matching shadow Stained Glass Snowflake Background & coverplate Stained Glass Snowflake Window dies. For my bonus I made a quick & easy mini snowflake card using the gifted die and its shadow.

Supplies: Paper - Neenah Classic Crest Solar White;
Paper Studio Glitter cardstock
Dies - Poppystamps Stained Glass Snowflake
Other - Michael's gems

To make the card I just cut two outlines and put a little score line near the top to hinge it. Next I cut the snowflake from glitter paper and glued to the top. I stamped the sentiment on the inside of the back piece before I glued the scored part to the bottom, forming the card. Here's a view of the inside:

Stamps on inside from Hero Arts 
Jingle All the Way Stamp & Cut (retired) &
Gingerbread House Stamp & Cut - snowflake at bottom
(as of this writing still available HERE at Frantic Stamper)

Still with me? You could also make this into a gift tag or adhere it to a circle to make it bigger & still make it into a tag. I didn't actually glue it down, but here's how it'd look that way:

Any circle would do, this one's from Hero Arts Nesting Circle Infinity Dies set.

That's it for today. I hope I've inspired you to join the Diva August Shape Your Cards Challenge - you have until 9pm Pacific Time on 8/31/22 to link up! 

Thanks for stopping by!!


Wednesday, August 10, 2022

Peace in Pines

Hey everyone - quick post today. I'm playing along with the August CAS Christmas Challenge where Trina is hosting the theme of Pines. Hopefully this branch frame resembles pines, at least it does to me!!

Supplies: Paper - Spellbinders A2 card;
Poptone black; Tim Holtz Kraft Metallic;
Paper Studio glitter
Dies - Hero Arts Branches Infinity Dies &
Peace Stamp & Cut (retired but here at Frantic Stamper)
Other - Hero Arts Spring Enamel Accents (from a MMH kit)

Very quick and easy card - I simply die cut the frame from glitter paper and adhered to an A2 card. Die cut a silver Peace and a black shadow; adhered to card. Added some clear enamel dots - done!

Be sure to check out all the inspiration at CAS Christmas and have a crafty day!

Thanks for stopping by!