Welcome to my blog!

Thanks for visiting my blog. As the title suggests, I love to scrapbook, stamp, and sing! I will share cards and scrapbook pages I create, as well as information about my music - Barbershop harmony.

Saturday, November 30, 2024

Last Day for Die Cut Divas November 2024 Challenge!

Hi everyone - if you're in the USA, you're probably still recovering from Thanksgiving and Black Friday! Over at Die Cut Divas, we're celebrating the end of November & our fun Any Holiday Challenge, sponsored by Birch Press Design. You can see inspiration from the end-of-month team HERE. Here's the card I'm sharing on that post:


Supplies: Paper - Spellbinders; Lawn Fawn pastel glitter;
Neenah white; Hero Arts Glitter white;
& Graphic 45 Twas the Night Before Christmas
Other - Recollections gems

Some simple die-cutting results in an elegant layered card! I formed an A2 card from pine cardstock, then added the 3 herbarium layers (LF green glitter, Neenah white, Graphic 45). When I got to the top layer I decided to try a texty paper & was delighted with the result! A sentiment with shadow layer (perfect size & font, I thought) plus some gems for berries finished the card.

For my bonus, I didn't make a holiday card at all - sorry about that. I needed a thank you card for a party I attended a couple weeks ago so I got out my fave BPD Sugar Script Thanks die set.


Supplies: Paper - Hero Arts Bermuda; Neenah white;
Carta Bella It's a Celebration (patterned)
Other - various enamel dots

Simply added a stitched rectangle to an A2 card, then the layered sentiment & some enamel stickers. Very quick and easy. I just love the sugar script font and would've used the Christmas one on my first card if it had been a bit smaller.

That's it for today! Would love to see you in the November gallery if you haven't already maxed out (limit of 4). Your holiday card using a die &/or embossing folder needs to be linked by 9pm Pacific time today.

Thanks for visiting & happy crafting!!


Friday, November 29, 2024

Upcycled for Christmas!

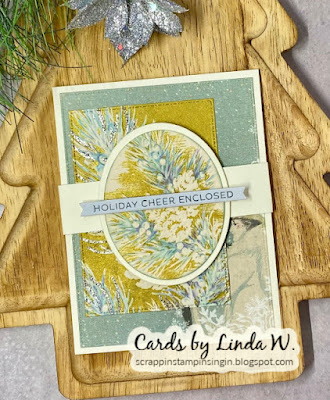
Hi everyone - did you do a lot of crafty shopping today (US Black Friday)? I refrained since I popped over on Wednesday to take advantage of early sales at my local store. Tonight I had Craft Roulette #243 running live in the background while talking to a friend who phoned, then I ran with the parameters. I'll have to watch the replay to see what was created! Here's my take:


Supplies: Paper - Recollections ivory cardstock;
Authentique Glistening; Spellbinders Betterpress Pebble;
upcycled vintage Christmas card
Hero Arts Nesting Oval Infinity Dies (retired)
Press Plate with Dies - Spellbinders Merry & Bright Sentiment Strips

Mary Gunn FUNN had Michelle Lupton (Handmade by Michelle) as her guest. Michelle is on the global team at Hero Arts and helps with their Stay Crafty challenges. Right now she's doing a series of CASE-ing other card makers who then CASE her. The amazing Trina (Phamtastic Design) participated in this CASE series on November 22nd - see her beautiful card HERE. The wheel had some interesting parameters for us:


  • Project - Card with Belly Band: I formed an A2 ivory card from cardstock and used a 1" wide strip of another piece for the belly band.
  • Colors - Cottage: I googled and used the combo of a minty grey, ivory, mossy green & pale grey found at Home Depot.
  • Element - Coat(s): I used a patterned paper with a woman wearing a faux fur coat.
  • Random - Upcycled: I used parts of a 1950s Christmas card; I have several boxes left by my grandma.
Here's a view of the card with the belly band off:


That's it, friends. I'll be back tomorrow early with an end-of-month post for Die Cut Divas. We're doing Any Holiday and you have until 9pm Pacific time on November 30th to enter a card.

Thanks for stopping!!

Thursday, November 28, 2024

Happy Thanksgiving USA 2024

Hi all - if you're from the USA you're celebrating Thanksgiving! Wishing you a wonderful day!!

Thought I'd share the rest of the Thanksgiving cards I sent this year....


Supplies: Paper - Recollections A2 card;
Neenah white; Sunny Studio Critter Country
Stamps - Hero Arts Bold Pumpkin
Other - Paper Studio sticker; Copic Markers; white gel pen;

I lead with the card I sent my baby sister. She often calls people "pumpkin" as a term of endearment so I thought she'd get a kick out of the sentiment sticker (she did!). I downloaded a sheet of icons from Scrapbook & Cards today and fussy cut them, using the piece of pie here. I stamped, colored and fussy cut the HA woodblock pumpkin & arranged the elements on an A2 card with a couple strips of Sunny Studio paper - done!

I mentioned in a previous post that I put together a bunch of turkeys using a retired Impression Obsession die set earlier this month. Here's how I finished off the rest of them using various patterned papers (mostly Sunny Studio Critter Country), Paper Studio stickers, another HA pumpkin and some Taylored Expressions Mini Strips - Harvest:


I made a similar version of the card above (just different sentiments) which I'm not posting. Finally, I made a card using some retired Hero Arts rub-ons that I bought a couple years ago (see previous card with them HERE and HERE, if interested). I'm taking this one to my neffy-poo (son of good friends, not a real nephew) who's hosting Thanksgiving dinner later today.


That's it for today. Hope you have a lovely day, whether or not you're celebrating Thanksgiving! Thanks for stopping by!!

Saturday, November 23, 2024

More Christmas cards!

Happy Saturday everyone! I have a couple of Christmas cards today. First up a vintage Santa for Inkspirational #329 where the word is SANTA.


Supplies: Paper - Hero Arts red; Neenah white
Stampendous Jolly Santa (retired)
Stamps w/dies - Taylored Expressions Season's Sweetings (dies HERE)
Other - foam tape; white gel pen; Copic Markers; 
Glossy Accents; Hero Arts Sparkle Lacquer

I wanted to feature Santa so I went to a cling stamp set I haven't used in 5 years (see previous HERE). Thanks again to Jean (Right as Rain) for gifting me this sweetie!! Stamped and colored him with Copics, then die cut with a stitched rectangle. Blended some blue ink at the top and stamped the banner across his beard. Adhered the panel to a red A2 card and popped up a TE sentiment with foam tape. Added Glossy Accents to the berries and sparkle lacquer to the holly leaves. Done!
 
Next up, a gatefold I did for Craft Roulette #249 which I watched LIVE last night. 


Supplies: Paper - Neenah white; Paper Studio glitter;
cardstock from Hero Arts, Lawn Fawn & Spellbinders;
vellum & TH kraft metallic
Dies - Birch Press Design Ornament Basics &
fence from Hero Arts MMH kit Mar17
Other - Recollections gems

Mary Gunn FUNN had Alicia (Call Me Crafty Al) as her guest. Alicia is known for her free printables with Sheetloads of Cards. In December Alicia plans to do daily videos from the 1st to the 24th using crafty advent calendars (like Spellbinders) so check her out! The wheel spun some fun parameters, perfect for a holiday card I thought:


  • Project - Gatefold Card: I formed an A2 gatefold card by scoring 8.5x11 paper at 2 1/8" from both edges to fold in.
  • Colors - Produce Aisle: Used greens, reds and white for lettuc, peppers & onions.
  • Element - Fence: Used a die cut fence cut in half for the two sides of the gatefold.
  • Random - Crumple Paper: I crumpled some lightweight vellum, then die cut into an ornament.

After forming my gatefold card, I cut the three layers of the BPD for the gate panels using sparkle green, white and pine green. Next I cut an ornament from red & the accents from glitter red and the hanger from a scrap of silver. I crumpled some vellum and smoothed it out then die cut with the ornament die & layered onto the red one. Added the accent pieces, the hanger & some gems, then glued just to the left side of the gate. Popped on a sentiment from the stash using foam tape. Die cut the fence, cut in half and glued to each half of the gate. Here's a view of the card standing:


That's it for today, friends. Thanks for visiting &, just a reminder, we're doing Any Holiday with BPD as our sponsor over at Die Cut Divas - gallery HERE for you to link up. Just remember to use a die cut &/or embossing folder.

Happy crafting!!


Thursday, November 21, 2024

Any Holiday at Die Cut Divas

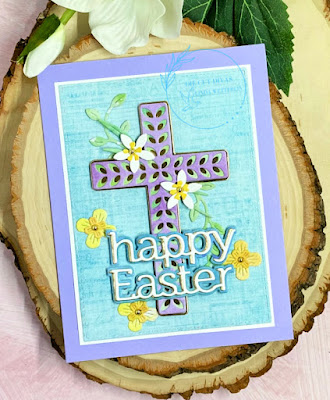
Hey there - I'm sharing the card below at Die Cut Divas today, inspiration for our November Challenge: Any Holiday in the Year. We're delighted to have Birch Press Design as our fabulous sponsor this month!! Here's my card:


Supplies: Paper - Paper Studio A2 card;
Neenah white; Tim Holtz kraft metallic;
Momenta watercolor print
DiesBirch Press Design Floral Cross Layer Set
Poppystamps Fresh Happy Easter
Other - foam tape; Paper studio gold pearls

I know we're all busily making Christmas cards at this time of year but I picked up a beautiful cross at BPD recently. Just had to make an Easter card for today's inspiration; our challenge is ANY holiday, after all...

Besides the 3 layers of the cross, the set comes with foliage and flowers - such a great value!! First I die cut the cross layers from gold metallic, variegated purple & green. Next I die cut the foliage in green and the flowers in white & yellow. Die cut a rectangle and added to an A2 card. Assembled the cross and added to the card with foam tape. Die cut and assembled the sentiment, then added to the cross & arranged foliage & flowers around it.

Ready for a bonus? OK, I just had to add another Christmas card to the stash :)


Supplies: Paper - Anchor Paper grey linen;
Neenah white; Tim Holtz kraft metallic;
scraps of red, teal and glitter
Dies - Birch Press Design Meridian Ornament Layer Set 
Stamps with dies - Poppystamps Holiday Banners
Other - foam tape; Park Lane gems

Another quick and easy card, thanks to BPD dies! Instead of the ornament that comes with the pop-up, I used another BPD layered ornament (I have a fair few!). Assembled everything and added a stamped/die cut Poppystamps sentiment & some gems. Here are a couple other views; when flat, the card fits in an A2 envelope.


I think this was my first use of this lovely Meridian ornament which is on deep discount right now at BPD! But I know my cross is newly used so I'll add that card to Darnell's November NBUS Challenge #68. Don't know what I'd do without that challenge - really makes me use my new stuff!! I'll add my ornament card to Merry Little Christmas Challenge #59 (6th of 8 possible).

Hope to see you in the November Diva gallery by 9pm Pacific time on the 30th! Thanks for visiting & I appreciate your kind comments in this busy season!!


Tuesday, November 19, 2024

Baking Spirits Bright

Hi all - I'm back with my second card for National Gingerbread Cookie Day over at Day of the Month Card Club Challenge #69. I'm using new Simon Says Stamp dies with a newly used sentiment stamp I bought last season.


Supplies: Paper - Recollections A2 card;
Sunny Studio Critter Country; TH silver kraft metallic;
scraps of kraft and white
Dies - Simon Says Stamp Holiday Baking Essentials 
Stamps w/dies - Taylored Expressions Season's Sweetings (dies HERE)
Other - foam tape; white gel pen; Copic RV16 & E50

I die cut a rectangle from a Sunny Studio buffalo plaid paper & added to an A2 card top fold card from Michael's. I die cut the baking elements from various scraps. Stamped and die cut a sentiment. Added everything to the card after detailing with a gel pen and a Copic. Done! I thought it was fun to combine the rolled & cut out dough on the left with the baked cookies on the right.

I'll also add my card to Merry Little Christmas Challenge #59 where Anything Goes Christmas (5th entry of 8 max if I'm counting correctly) & to Darnell's November NBUS Challenge #68 since the sentiment and some of the baking elements were newly used.

That's all for now. Thanks for stopping by & have a crafty day!!


Monday, November 18, 2024

A Thanksgiving Z-fold for Craft Roulette #241

Hey all - Happy Monday! I finally got a chance to watch Craft Roulette #241 which aired Friday night while I went to a party. Here's my creation:


Supplies: Paper - Recollections yellow 65lb cardstock;
Sunny Studio Critter Country; scraps
Dies - Impression Obsession Patchwork Turkey (retired);
Simon Says Stamp Holiday Baking Essentials
Other - Paper Studio Thanksgiving ephemera and stickers;
foam tape; Taylored Expressions Sweet Corn, Latte, & Hot Fudge inks

Host Mary Gunn FUNN had Jessica Vasher (Jessica Vasher Designs) as her guest. Jessica has been cardmaking for 10 years and posts process videos whenever she can. The wheel gave us another set of interesting parameters to use on our cards:


  • Project - Z-fold card: I formed a double Z-fold from cardstock.
  • Colors - Scarecrow: Yellow & brown, plus orange and blue commonly for clothes.
  • Element - Bake: Baked pie, plus there's a rolling pin on another section of the Z.
  • Random - Crinkle Inkle: This is what Mary Gunn calls inking with something crinkled, be it plastic wrap or paper. On the front Z panel I crinkle inkled the whole thing with some plastic packaging & 3 different TE inks.
I watched a YouTube video on creating a triple Z-fold. Decided I only wanted two layers. The instructor didn't give the dimensions of her 2nd and 3rd layers but you could really use however deep you want them. Length always starts at 11 inches to fold to an A2 size. I tried some TE Sweet Corn cardstock but it was too heavy. Found a lighter weight yellow in a Michael's pack. Back layer is 4.25x11" long scored at 2.75 and 5.5". Top layer I cut to about 3x11"; scored at 4.25 and 7". Here are a few other views:


I had just started my Thanksgiving cards by assembling a bunch of IO's Patchwork Turkey, sadly retired. They have another turkey die set but I think Mr. Patchwork is cuter. I decided I could make a turkey work for my Craft Roulette project, thereby getting a Thanksgiving card finished! I only make 6 so it should go quickly but I'll keep the rest to normal A2s.

That's it for today, friends - thanks for visiting!!

Sunday, November 17, 2024

Pink Ornament on Aqua

Happy Sunday, everyone - I spotted Color Hues Challenge #99 yesterday and just had to play along! Marcia is hosting and chose Pink/Aqua as her color combo - so yummy!! Here's my card:


Supplies: Paper - Recollection top fold A2 card; 
scraps; striped by unk; Betterpress Porcelain;
Dies - Simon Says Stamp Reeded Ornament;
My Favorite Things Blueprints 26 (bow);
Impression Obsession Pine Branch (retired at IO 
but a couple left at Frantic Stamper HERE);
Press Plate w/die - Spellbinders Seasons Greetings Evergreens
Other - foam tape; Hero Arts enamel dots

I just received an order from Simon Says Stamp last week. I couldn't resist their Reeded Ornament set from the new Festive Fun collection. It's getting first play on this card. I used a tried & true sketch of an ornament hanging from pine boughs. 

I die cut some aqua striped paper (it was a rogue piece, not with a pad so brand unk) using a stitched rectangle. Added to an A2 card. Next I cut two pine boughs from some aqua scraps (paper brand unk - might be MFT) & then the ornament from pink scraps (again, maybe MFT). The ornament hanger was cut from scraps of a neutral silver Tim Holtz kraft metallic. Assembled and added to the card. The Betterpressed sentiment came from the Christmas bits box. Die cut a bitty bow from a fave MFT Blueprints set & added it to the ornament along with a gem - done! 

I'll also play at the Tic Tac Toe Challenge #260 using the bottom horizontal row - Die Cut, Metallic Element & Festive Sentiment. And also at Darnell's November NBUS Challenge #68 since my ornament is newly used.

That's it for today, friends. I'm very behind on Craft Roulette - went to a party Friday night so missed the LIVE. Haven't watched the replay yet but hope to get to it later today...

Thanks for stopping by & have a crafty day!! 


Thursday, November 14, 2024

Joy for a Christmas Card!

Hello & welcome! It's Thursday so I checked out the new Just Us Girls challenge after I caught up on the Young & the Restless (US television soap opera). Sue is hosting Challenge #753 where she chose the word JOY for Word Week. I love using the word joy whether stamped or die cut - here's my card:


Supplies: Paper - Hero Arts Bermuda;
Sunny Studio Critter Country;
My Mind's Eye Lost & Found Christmas;
Neenah Classic Crest Solar White
Stamps - Hero Arts K5852 Joy Burst
Dies - Hero Arts Tag Frame Infinity Dies (retired)
Other - Copic Markers; 3M foam tape

I immediately thought about a woodblock JOY stamp I've had for over 10 years & haven't used in quite a while. Took some searching through the stamp boxes but I found it!! Stamped & colored the image, then die cut with a tag frame. Die cut a buffalo plaid panel and added it to an A2 card with a strip of gold striped paper that matched the coloring. Popped the JOY label atop with foam tap. Quick and easy!!

I'll also add my card (third and final) to the November We Love Stamping Challenge where they're doing Christmas & to Merry Little Christmas Challenge #59 where Anything Christmas Goes.

Thanks for stopping & enjoy your day!!


Wednesday, November 13, 2024

A Bunch of Christmas Cards!

Hey there - I'm back with a bunch of Christmas cards, definitely needed for the stash! First up a card using a darling snowmen stamp I picked up in Kansas City a couple weeks ago:


Supplies: Paper - Hero Arts Bermuda;
Neenah Classic Crest Solar White
Stamps - Woodware Craft Collection Snow Balls;
Hero Arts Christmas Holidays Stamp Cut,
North Pole Express, & Cozy Penguin (all retired);
Sunny Studio Snowman Kisses
Other - Copic Markers; Memento Tuxedo Black ink;
Hero Arts Creamsicle, Dusty Blue, Emerald Green, & Red Royal inks;
Glossy Accents; Hero Arts Sparkle Lacquer

When I was in KC for the Sweet Adelines International convention (more on that in future), I had a free morning. Of course, I sought out a craft store! Found the charming LS Scrapbook Boutique in Lee's Summit, not too far from downtown KC. I had a lovely chat with owner Stacie &, though they focus on scrapbooking, found some card-making goodies, including the snowmen stamp.

I stamped the image onto a piece of Neenah white that was already die cut into a stitched rectangle. Colored it with Copic Markers. I stamped a sentiment  & snowflake from the same set, then added snowflakes from 4 other sets to get different sizes. I used ink colors to match my coloring. Finally, I added sparkle lacquer to the star and Glossy Accents to the heart. I did a second version of this card that I'm not sharing. I used some stamped/die cut snowflakes and found I liked the ones stamped directly on the panel better.

I'm adding this card to the November We Love Stamping Challenge where the theme is Christmas or Anything Goes. I'll also send my card to Darnell's November NBUS Challenge #68 since my snowmen stamp is getting first play here. 

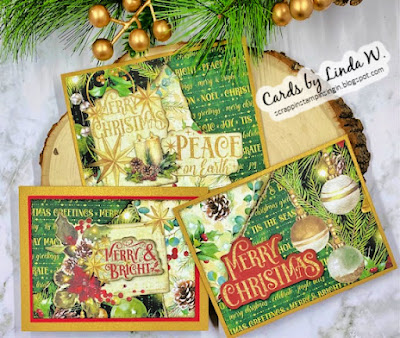
Next, I have a set of cards using some gorgeous Graphic 45 papers I also bought on my trip. For the first two I die cut panels from the patterned paper using my fave dot stitched rectangle, then added ephemera. I added items to a gold Park Lane A2 card. The Graphic 45 collection is called Merry & Bright (12x12 paper pack/ephemera pack).


Then I made three cards using the "Stack and Whack" technique shared by Natasha Foote (video 1099). My friend Dawn (Dawn's World) shared her cards with this technique yesterday and I had to try it! I put them all in one photo:


Basically you stack 3 pieces of paper and tear the stack into three pieces randomly, then put them back together mixed up. I glued my piece to a A2 piece of typing paper & die cut the results into various stitched rectangles. I topped them with Graphic 45 ephemera; quick & easy!

That's it for today, my friends! So glad you took time to visit & I hope you have a wonderful day!!


Tuesday, November 12, 2024

Gingerbread Couple

Hi everyone - it's been a while since I joined Darnell and her IDEAS program (see her beautiful cards HERE) so I thought I'd jump into D is for Dies this week. And the designers are celebrating National Gingerbread Cookie Day over at Day of the Month Card Club Challenge #69 so I got out a die set to play along. Thought it was past time to use a darling Spellbinders set I bought last year but hadn't even opened yet. 

Here's my gingerbread couple:


Supplies: Paper - Taylored Expressions Hot Fudge & Latte;
BoBunny Snowfall Collection 6x6"; vellum;
scraps of blue and glitter paper, plus pink for the cheeks; 
Spellbinders Betterpress Pebble
Dies - Spellbinders Dancin Gingerbread;
My Favorite Things Stitched Oval Scallop Frames (retired)
Press Plate w/die - Spellbinders Merry & Bright Sentiment Strips
Other - Spellbinders Betterpress Thunder ink

I die cut a rectangle from a BoBunny patterned paper pad & added to an A2 card formed from Latte cardstock. I die cut the gingerpeople from the same Latte. Their frosting and clothes were die cut from scraps. I adhered scraps of Hot Fudge cardstock behind the faces and inlaid the peachy cheeks, die cut from scraps. Assembled the gingerpeople.

Next I die cut a piece of vellum using a scalloped oval frame. What's left is a zig-zag edged oval which I used as my cookie platter. Added this to the card then popped the gingerpeople atop it. A Betterpressed sentiment finished the card.

I'll also add my card to Merry Little Christmas Challenge #59 where Anything Goes & to Darnell's November NBUS Challenge #68 since my gingerbread set is newly used.

That's all for now. Thanks for stopping by & have a crafty day!!