Welcome to my blog!

Thanks for visiting my blog. As the title suggests, I love to scrapbook, stamp, and sing! I will share cards and scrapbook pages I create, as well as information about my music - Barbershop harmony.

Wednesday, June 11, 2025

Watercolored Morning Glories

Hi all - I've been doing some crafty clean-up and, of course, started playing with things I found! Isn't that why we never truly finish our clean-ups??!

Here's a card I made this morning using Darnell's IDEAS program - this week D is for Dies. You can see her gorgeous inspiration HERE. I also designed my card around my friend Betty's (created by bjk) Tic-Tac-Toe board for TTTC272.


Supplies: Paper - Spellbinders A2 card;
Tim Holtz Distress Watercolor Paper;
My Favorite Things Colorful Canvas (on
notify at MFT but HERE at Frantic Stamper)
Dies - Hero Arts Morning Glory Fancy Die &
Trellis Window (sold out);
Simon Says Stamp Whirl Bay Leaves;
Other - Altenew 24 Pan Watercolors; foam tape


I used the bottom horizontal row - Ink Blending, Floral/Foliage, & Enamel Dots/Sequins - as well as the bottom left to upper right diagonal row - Ink Blending, Free, Die Cuts.

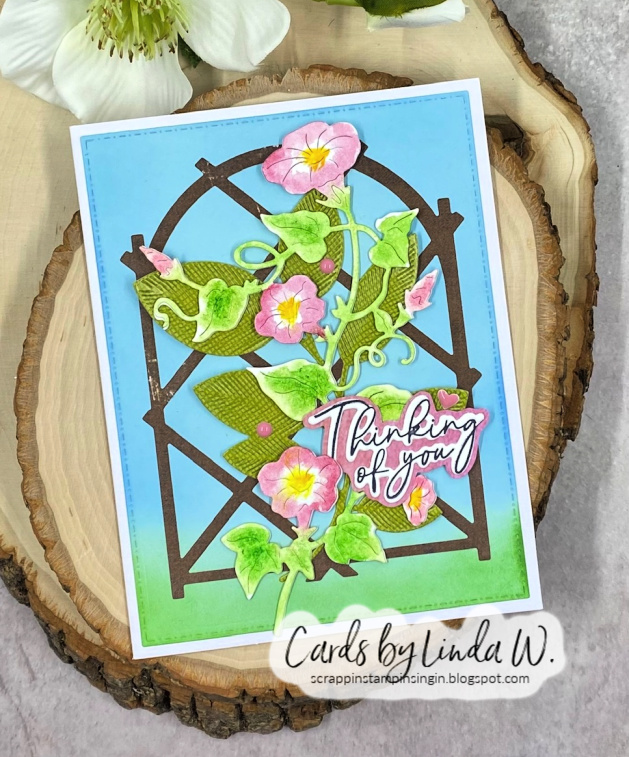
First I die cut a soft blue rectangle & ink blended the bottom with green and the upper portion with blue. Added this to a white A2 card. Next I die cut the trellis and the green leaves. Then I die cut the morning glories and watercolored them with Altenew's 24 pan watercolors, then spritzed with shimmer spray. Dried with a heat tool and stacked with a plain white die cut for stability. Assembled on the card, popping up some flowers with foam tape.

I took a sentiment out of the bits box; I think it's from a Hero Studio kit but can't be sure. Since I'm doing some crafty clean-up, all my Hero Arts kits went to the satellite studio at my Dad's house to give me some breathing room. I tried tucking the sentiment among the flowers but it got a bit lost. Since I didn't have the die here to cut a shadow, I simply glued the die cut sentiment to a scrap piece of pink and fussy cut it. Shows up much better that way!

Some Altenew enamel dots finished the card. This one is going to a chorus friend who's battling breast cancer - too much of that happening within the chorus! The morning glory die, the trellis and the whirl leaves are all getting first play here so I'll also add my card to Darnell's June NBUS Challenge #75.

That's all for today, friends! Thanks for stopping by and have a crafty day!!


Sunday, June 8, 2025

Flower Cart Mouse

Hi all - I'm back with a quick card for the June We Love Stamping challenge where they're doing Nature, as well as Anything Goes. Thought I'd do a sweet mouse with a flower cart. Besides flowers, the image has butterflies so I'm well covered with the nature theme!


Supplies: Paper - Art Impressions Birthday Journal;
Neenah Solar White; scraps; Paper Studio A2 card
Stamps with Dies - Pink & Main Mice Spring (dies)
Dies - Birch Press Design Happy Birthday Vintage Sentiment;
My Favorite Things Blueprints 26 (out of stock 
at MFT but one left HERE at Frantic Stamper)
Stencil - Lawn Fawn Cloudy
Other - Copic Markers, Hero Arts &
Memento inks; sentiment strip (SSS maybe);
white gel pen; foam tape

I'm using an adorable spring stamp set from Pink & Main. Libby from P&M presented a segment at the recent BellaCon I attended & I ordered a few things. This is the first outing for the mouse with flower cart. I stamped, colored with Copics & die cut the image. Added a few white gel details.

Next I cut a stitched rectangle from Neenah and ink the bottom edge green for grass, then stenciled the clouds. Die cut a large stitched rectangle from plaid and added to an A2 card. Matted the smaller rectangle and popped onto the plaid with foam tape. Die cut a small banner. The sentiment and sub-sentiment strip were from my bits box. Assembled and done!

I'll also add my card to Darnell's June NBUS Challenge #75 since my mouse is newly used. I colored the mouse while I was at a Craft Roulette after show party on Zoom Friday night. Gave me something to work on since my CR card was already done!! I finished the card yesterday afternoon before I headed to the western suburbs for a chorus party. That little mouse really makes me smile!

That's it for today. Thanks for stopping by and have a crafty day!


Saturday, June 7, 2025

Yippee!

Happy weekend everyone! We've been experiencing Internet issues in the neighborhood so I get online when I can. Tough for me to blog, etc. from a phone so I don't! Anyway, I managed to watch Craft Roulette #270 last night (mostly on my phone) and made my card during the show. 


Supplies: Paper - Michael's Recollections;
Momenta Watercolor Print; scraps
Stamps - Hero Arts Yay! (retired)
Dies - Hero Arts Arches Infinity Dies
(sold out at HA but HERE at Frantic Stamper);
My Favorite Things Die Cuts & Shapes (retired)
Ink - Hero Arts Blue Hawaii Reactive
Other - Foam tape

Host Mary Gunn Funn had Sue Small-Kreider (‪@SSKUllyCatDesigns‬) as her guest. Sue is a Design Team member at Karen Burniston, plus a Craft Roulette member. Sue routinely does process videos of her CR cards along with her KB projects on her YouTube channel.

As usual, the roulette wheel was spun four times to see what parameters we had to use for our card:


  • Project - A7: I formed a 5x7" card from pink cardstock.
  • Color - 1980s: I googled & found a palette on Color Hex.
  • Element - Interjection: I used yippee, an interjection per a Part of Speech website.
  • Random - Include an Arch: I layered several die cut arches.

When I saw Arch on the wheel, I immediately thought of the Hero Arts arches infinity set. I've mentioned before that I do better at creating quickly when I can use dies. Not that you have to create quickly for Craft Roulette - you can actually take until Sunday to submit a card (longer if a member). I just like to play like we did for the old HA Scrambles! 

The '80s color palette I found had 5 colors so I decided to make one the card base and then cut layers of arches for the rest. I used a mat layer of a watercolor print paper to tie all the colors together.

For the interjection, I found an old HA stamp set with yippee. Decided to loosely use the sketch I used on my bonus card from Sunday's post & stamped three horizontal sentiments. Then I added three MFT die cut stars using arch colors. Popped the arches and the stars with foam tape. I'm sending this card to the person we honored with our Sweet Adeline Region's Shining Star award this year, probably with the addition of some glitter lacquer on the stars.

I'm adding my card to Just Us Girls Challenge #778 where it's die week with layers!

That's it for today, friends! I'm running one last donation to the Book 'Em book drive in Bloomington MN (home of Mall of America & a suburb of Minneapolis). I gathered 20 Banker's boxes full of books to donate this year! I had so many books around the house that I needed to purge some - making room for more craft supplies, right?! I still haven't finished my Spellbinders Weekender cards but I'll get there...

Thanks for stopping by & happy crafting!!


Monday, June 2, 2025

May 2025 Card Chain Reveal

Hello everyone - I'm sharing the card I sent for the May 2025 Card Chain. Twenty-one people played along for May and you can see the full reveal HEREMy card traveled across the Pond to the super talented Brenda (Floral Fantasies) in the UK:


Supplies: Paper - American Crafts;
BoBunny Cottontail Collection;
Neenah Classic Crest Solar White
Stamps w/dies - Art Impressions Hen House Cubbies 
Other - Copic Markers; Recollections stickers

We had the following options for creating our cards:

Color Palette Option

Sketch Option


Theme Options: Chickens / Smiles and Laughter / Friendship

Product / Technique Options: Ribbon or Lace / Lacé

This time I went with the sketch option, plus themes of chickens and friendship. I bought the adorable Hen House set by Art Impressions last November & had stamped/die cut a bunch of the elements. They had been sitting in the set's package ever since! When I saw the theme of chickens, I just had to get them out!! Colored them with Copics and arranged the hen & chicks on the cubby.

On the craft table was an egg (thanks again, Gundi, for this set!) that I'd die cut for an Easter card (not finished yet). I thought the egg shape would be perfect for the focal point in the sketch & the chicken theme. I cut a different colored egg, though, to better contrast with my hen house colors. I chose an ombre peach A2 card from a boxed set and cut the egg from it. Added the hen house to the egg. It seemed too large to fit with all the sketch elements on an A2 card so I formed an A7 from Neenah white.

Luckily, I had the perfect peach plaid in a 12x12" size, purchased with a bunch of other papers at a JoAnn going-out-of-business visit. I still had a BoBunny 6x6" Easter paper pad on the table & found three coordinating pieces to go behind the egg. I used a paper trimmer to cut thin strips of white for that element of the sketch. Two puffy sentiment stickers completed the sketch. I really loved how this turned out and was glad Brenda enjoyed it!

I received this amazing card from Dagmara in Poland. She likes doing flat slimline cards & they are so special. She loves Mary Poppins and so do I - isn't this a great scene?! She also sent some fun images for me to color - thanks, Dagmara!! 


Want to join us? Please go HERE for details & to sign up for the June chain by June 6th.

I'll add my card to Darnell's June NBUS Challenge #75 since my chickens are new.

That's it for today. Thanks for stopping & have a crafty day!!


Sunday, June 1, 2025

Birthday Balloons and a bonus!

Hey friends - hope you're enjoying your day! Crazy week last week so, other than yesterday's prescheduled post, I've been missing. More on that later... I watched Craft Roulette Episode #269 on replay this morning and quickly created a simple card for my 60th contribution:


Supplies:
 Paper - 
Neenah Classic Crest Solar White;
Paper Studio A2 card (trimmed down);
various scraps
Stamp/Die - Hero Arts May 2025 Card Kit
Dies - Poppystamps Brilliant Birthday Balloons
Stencil - Lawn Fawn Cloudy
Other - White gel pen, black heavyweight thread;
Memento & Hero Arts inks; foam tape

Host Mary Gunn FUNN had Amanda Stevens (‪@PearBlossomPress‬), an owner of Pear Blossom Press (known for light-up elements) and her daughter Kelly as guests. As usual, the craft wheel was spun four times for the things we had to use:


I remembered to download my contribution banner which includes the parameters - so much easier than trying to grab a screen shot!
  • Project - Square Card: Trimmed an A2 card down to a 4.25" square.
  • Color - Butterfly(ies): Found on Gardens with Wings website.
  • Element - Cloud(s)/Cloudy: Stenciled clouds for the background.
  • Random -Tied: Tied strings on the balloons & tied together.
I started with an A2 card and cut the 5.5" side to 4.25" to create a square card. This way I can use an A2 envelope! Next, I stenciled a mat layer of white using LF clouds. I die cut some balloons and tied them with a heavyweight thread. Added white gel pen to each balloon. Stamped and die cut a sentiment from the May '25 Hero Arts kit. Assembled and done!

I'll add my card to Seize the Birthday #306 using the Anything Goes option.

For my bonus card, I added to my Christmas card stash! Remember me telling about Bellacon? I recently attended their online event & shared one card from it HERE. I created this card based on a sketch class taught by Meg Daves. 


Supplies: Paper - Paper Studio A2 card;
scraps of white and glitter;
Dies - Memory Box Bello Joy;
Simon Says Stamp EZ Strips Rectangles

The sketch is basically three horizontal elements. I used two EZ strips sentiments and a die cut JOY. The penguin is a bit of ephemera from the cutsie paper pack where I got the snowflake paper. Very quick and easy! I'll add my card to Merry Little Christmas #62 where Anything Goes (contribution #5).

So, Friday I went to a chorus friend's dance show and had to miss both Craft Roulette and the Spellbinders Weekender online sessions that night. Came home and watched one Weekender class and actually made that card (will share later with the others). Yesterday was spent with the Weekender classes. Loooong day and I was so tired (and hadn't done all the homework) that I didn't create the cards for the last two. Hopefully I can catch up and share those soon. Oh, and I signed up for the latest Online Card Class offering and didn't even start that yet - oops!

That's it for today! Thanks for stopping by!


Saturday, May 31, 2025

Last Day for Diva Watercoloring!

Hi everyone! I'm posting with the end-of-the-month team at Die Cut Divas today as inspiration for the last day of our May Watercolor ChallengeI couldn't resist doing the old watercolor print-making technique to create a background & embellishments for a Christmas card.


Supplies: Paper - Strathmore 300 Cold Press Watercolor;
Core'dinations A2 kraft card
Stamps - Art Impressions Woodland Critters Set
Dies - Art Impressions Large Snowflake Dies;
Other - Altenew 24 Pan set; 
Hero Arts Iridescent Shimmer Spray


Using a piece of watercolor paper as a work surface, I watercolored snowflakes that I'd die cut from watercolor paper. I did four snowflakes, moving the smaller ones around to add that color more places. I moved the snowflakes to a paper towel to add more color and to spray them with shimmer spray. Once dry, I die cut the work surface panel with a stitched rectangle & added it to an A2 kraft card. Stamped a sentiment from the Woodland Critters set & glued three snowflakes around it - done! I saved the fourth snowflake for future but you can see it off to the side in the photo.

For my bonus, I wanted to do a couple more pages for my mini watercolor journal started HERE. I already had two blank pages ready to go from that previous post; just not added to the journal yet.


Supplies: Paper - Strathmore 300 Cold Press Watercolor;
scrap of kraft
Stamps - Art Impressions With a Friend Window &
Dies - Art Impressions Mini Journal Template,
Other - Liquid watercolors & Altenew 24 Pan set

First I stamped the With a Friend Window image - one of AI's fabulous Windows to the World collection - onto watercolor paper. I watercolored it with leftover inks in my palette (mostly Altenew 24 pan), plus water.  Once dry, I die cut it with the back panel to the window frame die from the journal set. Then I cut the window frame from a scrap of kraft cardstock & layered it atop the watercolored panel. Added this to a journal page. I love how the window panes open to show more of the scene!

Next I stamped the mailbox from the Mini Journal stamp set & watercolored it, doodling some grass & flowers. Die cut it with the frame die that cuts an interior rectangle. Then I die cut a kraft frame to go around it. Glued this to the opposite page and added the pages to the journal. Here's a photo of how they fit:


There's room to add more artwork on the back sides of the pages I've completed, plus the insides of the covers and back. Kinda fun to work with the small scale.

Thanks for stopping by and I hope to see your watercolored project in the May Diva gallery by 9pm Pacific Time today!! Happy coloring!

Sunday, May 25, 2025

Kitty on a Quilt

Hello and welcome! Did you watch the Indy 500? Quite a race and a tradition for this holiday weekend.

I'm back with another stenciled card for Just Us Girls Anything Goes Stencil Week #776. I'm using new Waffle Flower I picked up last week on my Anchor Paper shopping spree.


Supplies: Paper - Paper Studio A2 card; 
Neenah Solar White; scraps
Dies - Waffle Flower Tiny Square Texture Die;
Stencil Waffle Flower Tiny Square
Die/Stencil Combo - Waffle Flower Fabric Lover
Other - various Hero Arts & Distress Inks;
printed sentiment strip (maybe SSS?);
Hero Arts iridescent shimmer spray

I started with a leftover pink A2 sized panel and die cut the tiny square texture. Stenciled the die cut with the coordinating three layers - 2 shades of pink and one grape. On the darker pink layer I also used shimmer spray over the stencil. Trimmed and layered onto an A2 card.

Next I die cut the kitty on fabric and stenciled with the coordinating stencils. I had a spare BPD birthday sentiment and a sub-sentiment strip in the bits box. Added them to the card.

I'll also add my card to Darnell's May NBUS Challenge #74 since my kitty and tiny square quilt supplies are newly used here.

That's it for today - back to my Sunday chores! Thanks for stopping by!!