Welcome to my blog!

Thanks for visiting my blog. As the title suggests, I love to scrapbook, stamp, and sing! I will share cards and scrapbook pages I create, as well as information about my music - Barbershop harmony.

Monday, July 21, 2025

Big Birthday Balloon!

Hello friends - I've posted at Die Cut Divas today with the first card below. You can only find all details and a bonus here!!


Supplies: Paper - Spellbinders A2 card; 
MFT Petite Gingham; Poptone Blu Raspberry; scraps
Dies - MFT Blueprints 26

We were to be sponsored by My Favorite Things this month & they had requested birthdays since it's their birthday month. Sadly, they have closed but don't worry, we'll still be offering a prize!


I fell in love with My Favorite Things starting with their Blueprints die sets. So, I thought it would be fitting to use one of my first Blueprints - the fabulous #26 which works perfectly for birthdays! I simply die cut the elements and assembled on an A2 card with a bottom border strip. Very quick & easy!! I linked to Frantic Stamper who still has this set but Simon Says Stamp also has some in stock (just slightly more expensive).

For my bonus, I went with another fave Blueprints set that I've used several times over the years. This one isn't available either at FS or SSS however.


Supplies: Paper - Spellbinders A2 card; 
MFT Petite Gingham, Orange Sherbet, 
& Watercolor Wash; scraps
Dies - MFT Blueprints 20 (retired)
Stamps - MFT Something for Everything (retired)
Ink - Hero Arts Amethyst

Another quick and easy card with die cutting, plus a stamped sentiment. I stacked the label with three white ones behind the purple one for dimension. The gingham looks rather blue in the photo but it's a lavender that coordinates well with the other papers...

That's it for today, friends. We'd love to see your birthday projects using dies &/or embossing folders in the July Diva Gallery!

Thanks for stopping & happy crafting!!

Saturday, July 19, 2025

An Easel Card for Craft Roulette

Hey crafty friends - hope you're having a great weekend! I watched Craft Roulette #276 last night &, while I crafted along, I just missed getting my card submitted during the LIVE.

Supplies: Paper - Hero Arts
many scraps
Dies - Poppystamps Winter Porch Pop up Easel Set;
Spellbinders Open House Door Base
Other - rope; scrap of ribbon;
Tim Holtz Christmas Paper Dolls

Host Mary had Charlet Mallett (‪@charletmallett6605‬) as a first time guest. Charlet is a graphic designer who does a lot of TikTok videos. I linked to her YouTube, though it seems she hasn't posted there for a few years... They spun the roulette wheel for our four parameters; a couple curveballs:


  • Project - Easel Card: I formed a pop up easel using a Poppystamps die set.
  • Colors - Rainbow: I used every color, except indigo (blue Copic along the icicles).
  • Element - Western: I made a rope wreath for the door. 
  • Random - A B&W image: I used a Tim Holtz paper doll. Might be called sepia, but I stretched it...

Here's a side view of this pop-up easel, plus a modified from view. 


This morning I removed the rope wreath which would be tough to mail and added some Tim Holtz ephemera. Do you do that too? Modify your cards after they're made, I mean. I think I like it this way better. What do you think of the modifications? Comment, if desired. 

I will link my modified card to Merry Little Christmas #63 where Anything Goes Christmas.

Still with me? I can't resist showing a photo (no face showing so ok) of my cousin's granddaughter A (short for a much longer name I won't share) and me crafting:


They came over today and A (nearly age 4) was very enthralled with the card I posted yesterday. She wanted to take it but was ok with me saying that it is for Christmas. I said I'd send it to her in December. Then she asked to make a card! Her brother's bday is coming up so that's what we're making. She stamped 4 cute animals from Hero Arts on the card and colored them with pencils and Copics. Her fave color is purple too so she picked that color card base out of the box. Then we toured the new landscaping my cousin hadn't seen yet and A had fun walking along the low retaining wall. Fun morning!

That's it for today - I have a chorus event tomorrow so you'll see me back Monday with my normal Diva post. Thanks for stopping & happy crafting!!


Friday, July 18, 2025

More round baubles

Hey there - I'm back with more baubles for Christmas Kickstart #100 where Jo and elf Gail are celebrating round things. I used leftover circular baubles from the Spellbinders stitching set I used for my previous CKC #100 card along with a magazine freebie.


Supplies: Paper - Paper Studio A2 card; scraps;
TH Kraft Metallic Colors; Spellbinders Christmas 6x6"
 Stitching Dies - Spellbinders I'll Be Home for Christmas 
(DOMST-Oct23);
Magazine freebie - can't find the name
Other - foam tape

First I die cut the Merry Christmas sentiment tree from metallic cardstock and the outline from a scrap of green. Next I die cut a striped paper with a stitched rectangle. Added the striped rectangle to an A2 card. Layered the sentiment tree to the outline & added to the card with foam tape. Next I added the leftover round baubles so they'd be peeking from behind the tree. Quick and easy - so much so, I die cut two extra trees for future cards.

I'll also link my card to Merry Little Christmas #63 where Anything Goes Christmas. I'm playing with Darnell's IDEAS where this week she's doing D for Dies & at NBUS #76 since my sentiment tree is getting first play here.

Still with me? I haven't shared many photos of my yard but here is the view of the right front of the house and a close up of the bigger hydrangea bush:


That's it for today. Thanks for stopping by and happy crafting!!


Saturday, July 12, 2025

ATC on a Christmas Card!

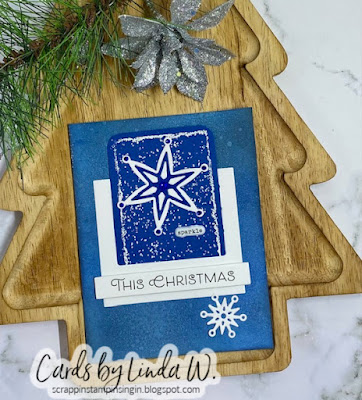
Hi all - I watched Craft Roulette Episode 275 live last night, despite my long hours of Tim Holtz crafting yesterday. If you missed those projects, go HERE. Here's my CR card, created during the show:


Supplies: Paper - Paper Studio A2 card; 
Neenah Solar White; scrap of blue
Dies - Spellbinders Holiday Greetings (retired
but HERE at Frantic Stamper, called Snowflake Bliss);
Simon Says Stamp slot die (in TH class kit)
Other - Versamark ink and Seafoam white embossing powder;
Distress Inks - Chipped Sapphire, Black Soot, Blueprint Sketch;
Spellbinders gems & puffy sticker; SSS printed sentiment

Mary & 1st time guest Hannah C. (‪@MostlyPaperCrafts‬) had fun with the parameters:


  • Project - Include an ATC: I made an A2 card and included an ATC.
  • Colors - Starry Night: I used dark blues, black & white. 
  • Element - Down: My ATC slides down into a slotted panel. 
  • Random - White Dots: I stamped and white embossed using an ATC stamp.

So, I still had my Tim Holtz class stuff all over the place. Grabbed the slot die we used and made a panel to slide my ATC into. I ink blended black and blues on an A2 card & spritzed with water. Stamped an ATC base, which included white dots, onto a blue card & white embossed it. Looked for my ATC die set - found it after I'd already trimmed it with a paper trimmer! Oh well. Rounded the corners with a corner punch. 

Grabbed an old Spellbinders snowflake die set and cut two white and one blue. Added some blue gems to the ATC's snowflake. Used a Spellbinders puffy sticker sentiment on the ATC and a Simon printed sentiment to cover the bottom slot. Here's a photo of the ATC out of its slot:


I will send this card to a new challenge for me - Cut it Up where for Challenge #334 they're doing Christmas in July (must use a die cut). My friend Darnell (djkardkreations) is guest designing! I will also play at Darnell's IDEAS for this week where I is for inks. My ink blended background qualifies!!

That's it for today, friends. Thanks for stopping by & I hope you have a crafty weekend!!


Friday, July 11, 2025

Tim Holtz Holiday Collage Christmas in July!

Hi all - earlier today I enjoyed Tim Holtz's live holiday class joint with Simon Says Stamp Holiday Collage Christmas in July (free on YouTube)! I purchased the class kit but anyone can watch the video & learn from Tim. Heidi from SSS created her projects right alongside Tim which was very fun. We made four projects in about 3 hours, including intro & chit chat, all making our own choices.


Supplies: Tim Holtz Christmas Ideology
Other - green twill ribbon from stash

While the kit is sold out, Simon Says Stamp carries stand-along products at the link above. The candles, I believe Tim said, are Halloween but they work fine for Christmas too! The glittery mix we used will be coming out for purchase later this year in a bigger jar than we received in the kit. Here's some individual photos:

The first project was a card using ephemera, layers and a paper doll. We made a shaker out of a frame of our choice, filled with the snowflake glitter:


Next we made a couple tags. The one at right is doubled up with the top tag layer die cut with slots. We filled the slots with stuff, including a gift card on hand. The tag at left has a collaged background:


Heidi's fave project was the decor piece; we had some choices here but I did my wreath as Tim showed (took two artificial pine sprigs & twist together then formed a circle):


All in all, a very fun way to spend three hours! Plus I have loads more product to use. Here's a quick photo of my organization of the different packages of stuff (mainly shoeboxes). Tim wanted us to be able to flip through the stuff when choosing what to use:


That's it for today - I'm off to watch the latest Craft Roulette - have a great evening. Thanks for stopping!!

Wednesday, July 9, 2025

Minnie and Friend

Hi all - I'm back from my little trip to my hometown for the holiday weekend. I was able to watch Craft Roulette Episode #274 live on my phone Friday night but didn't have time to finish a card until yesterday.


Supplies: Paper - Archiver's A7 card; scraps;
Tim Holtz Classic Kraft
Stamps - Sunny Studio Words of Gratitude
Hero Arts Peeking Bunny 
Other - Park Lane gems; Versamark ink; 
Ranger Sea Foam White ep; white gel pen

Host Mary Gunn FUNN had Tina Wan Kenobi (50 Shades of Crafting) as her guest. Tina was making her first appearance as a guest but she's been playing at CR for over a year. As usual, the wheel was spun four times for mandatory parameters. Not too bad:


  • Project - Thank You Card: I created an A7 card with Thanks a Bunch as the sentiment.
  • Colors - Decorations: I used a combo of Christmas & Easter colors w/neutrals black/white. 
  • Element - Hand(S): Cartoon mice have hands.
  • Random - Tone-On-Tone: Multiple examples - red on red/blue on blue/yellow on yellow.
I came home to a package from Spellbinders - couldn't resist ordering some Mickey Mouse sets - so cute!! Did a bunch of die cutting for this one - mainly with the mouse set, plus a few extras. I made a complete Minnie then took Mickey and turned him into a girl. I trimmed his body and cut Minnie's skirt a few times for a layered look. I trimmed down the shoes so they looked more like Mary Janes and added a gem to each. The hat came from a Hero Arts set.  I created a little bouquet using some Poppystamps dies. The eyelash die is just to put behind head by the smaller eye. I trimmed extra ones and glued above the eyes.

The alpha for the THANKS is another Mickey Mouse release. The sub-sentiment strip came from the bits box but I know it was made with a Sunny Studio stamp set so I linked it. This card will go to the aunt whose hospitality I enjoyed over the holiday weekend.

Since the Mickey Mouse dies are new, I'll link to Darnell's July NBUS Challenge #76. I'll also link up to Ally's Angels #95 where Anything Goes.

Thanks for visiting and have a crafty day!


Tuesday, July 8, 2025

Merry Go Round Baubles

Hey there - thought I'd play at Christmas Kickstart #100 where Jo and elf Gail are celebrating round things. I went with circular baubles using a Spellbinders stitching set I used once before HERE. Let me know, if desired, which card you preferred - this one or the earlier one.


Supplies: Paper - Paper Studio A2 cards (green, pink, red); 
Park Lane white A2 card; Hero Arts Bermuda
 Stitching Dies - Spellbinders I'll Be Home for Christmas 
(DOMST-Oct23)
Other - DMC floss 817, 943, & 3326

Please don't judge me - I still had left over bits from the previous card strewn around my "mesk". I had cut those sets from 3 colors so I could mix and match but only got one card done last year! I didn't stitch a tree previously so started by stitching a green one. Didn't have a nice mix of colors for the baubles so I left two spots open and backed them with an embossed snowflake panel. Not sure of the embossing brand - it was a gifted panel in with a Card Chain card - sorry can't remember who sent it...

Adhered the backed panel to an A2 card. Stitched the ones needing stitching and added them to the card along with the tree & a die cut sentiment from the set. This time I left off the bauble hangers to emphasize the roundness of the baubles. Hard to see in the photo but the etched sentiment says "Merry Christmas".

I'll also link my card to Merry Little Christmas #63 where Anything Goes Christmas.

Thanks for stopping by and happy crafting!!


Thursday, July 3, 2025

Mr. Walrus Says Happy Birthday

Hi all - today I'm sharing a birthday card headed to a former coworker &, for a while, my boss! We have kept in touch for years, even after he moved to a new office & later retired.


Supplies: Paper - Park Lane A7 card; Neenah Solar White;
My Favorite Things Sand, Surf & Sky; scraps
Dies - Spellbinders Shipmates (DOM-Jun25);
Stitching Dies - Spellbinders Ahoy Matey (DOMST-Jun25)
Stamps - Hero Arts Kiss for the Sun (retired)
Other - foam tape; white gel pen; Copic Markers

We all know I'm not that timely when getting to new stuff. However, when I saw the Spellbinders June Small Die of the Month, I knew I wanted to make Steve's birthday card with the walrus. I die cut the pieces and assembled, adding googly eyes. I had a navy/white sentiment in the bits box & decided these elements needed the space of an A7 card. 

Added a background of patterned paper, matted with white. I fussy cut along lines in the wave paper to make two pieces with a spot to tuck in Mr. Walrus. Seemed like something was missing so I die cut an anchor from another June set, tied some heavy string on it, & added it. I was off to photograph when I noticed a smudge upper right - ugh! Tried to erase, no luck - so I stamped, colored and fussy cut a sun to pop onto the scene. 

I really like how this turned out & I know Steve will enjoy it as he always loves my cards. He's the guy with a talented chef wife who loads him with food but he never gains an ounce!! Hard to hate him when he's soooo nice! I'll add my card to Darnell's July NBUS #76 since my June small die set is getting first play here.

Thanks for stopping and have a wonderful weekend (holiday for the USA)! I'll be busy with family but will catch up with you later. Happy crafting!!


Wednesday, July 2, 2025

June 2025 Card Chain Challenge Reveal

Hey there - once again it's time to reveal cards that went around the world for the Card Chain Challenge. Twenty people participated & you can see the entire June Chain reveal HERE. My card went to the talented Dagmara in Poland; she sent me a beautiful card in May so I was happy to reciprocate!


Supplies: Paper - Neenah Solar White;
My Favorite Things Petite Gingham;
BoBunny Early Bird; Momenta Watercolor print;
Recollections blue cardstock
Dies - Memory Box Bella Bouquet (retired);
Hero Arts Tag Frame Infinity Dies (retired)
Other - printed sentiment from stash

We had the following possible parameters for our card:

Color Palette Option:

Sketch Option:


Theme Options: Gingham / Something beginning with 'Tu' / Friendship

Product / Technique Options:  Wood  / Rip It Up 

The sketch reminded me of that technique Stack and Whack as shown by Natasha Foote (video 1099); I used it HERE last year. Fits perfectly with the Rip It Up technique option! I skipped the colors, wanting something more summery. And, of course, I used the theme of Friendship & managed to squeeze in some gingham paper.

I received the card below from Greta (GGCreations) in Oregon. Greta's an almost birthday twin and I've known her from the old Hero Arts group for over 15 years! So fun to get this beauty from her! And it was the second card she mailed - the first one never arrived - darn it. Must've taken the scenic route!! Anyway, thanks for sending another card, Greta, & if the first one ever shows up, I'll let you know!


That's it for today. If you'd like to join the July chain (only need to make and mail one card), go HERE for details by July 6th. Thanks for stopping & have a crafty day!!


Tuesday, July 1, 2025

Amazing Things Floral Spray

Hi all - thought I'd play along at Just Us Girls #781 where it's Stencil Week. It's also S is for Stencil at Darnell's IDEAS program - 5th Monday of June yesterday. I pulled out a Pinkfresh Studio press plate with coordinating stencils:


Supplies: Paper - Recollections cardstock;
Spellbinders Betterpress Porcelain; scrap of grey
Press Plate w/Stencils & Dies - Pinkfresh Studio 
Amazing Things (Stencils HERE/Dies HERE)
Additional stencil - Frantic Stamper Old Brick Wall
Inks - Taylored Expressions; Hero Arts; MFT; 
Altenew; Betterpress Thunder
Other - gems by unk; foam tape

I pressed the floral spray and sentiment, then stenciled and die cut. Formed an A2 card from cardstock and stenciled a partial brick wall to the left side. Added the spray with some foam tape and adhered the sentiment backed with a shadow. Some gems finished the card.

I'll also play at the Pinkfresh Studio July Challenge which has a mood board for inspiration but is always Anything Goes with PFS as the focal point.

That's it for today, friends! Yes, it's 1:30 am here - vampire hours as friend Cat (Cat Loves Paper) calls them. I came home from chorus practice and was too energized to sleep so decided to make a card!

Thanks for stopping by & have a crafty day!!